
CXF-JAX-WS开发(二)spring整合CXF-JAX-WS
一、服务端
1、目录结构
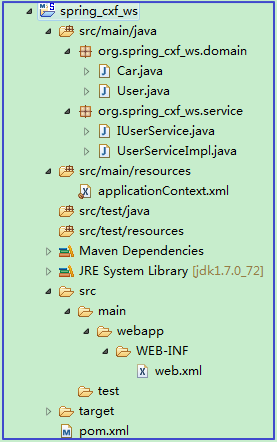
2、创建maven工程[Packaging:war]

3、引入依赖
 <dependencies>

     <!-- CXF(这里不需要引入cxf-rt-transports-http-jetty,使用tomcat启动) -->

     <dependency>

         <groupId>org.apache.cxf</groupId>

       <artifactId>cxf-rt-frontend-jaxws</artifactId>

       <version>3.0.1</version>

     </dependency>

     <!-- 日志 -->

     <dependency>

         <groupId>org.slf4j</groupId>

         <artifactId>slf4j-log4j12</artifactId>

         <version>1.7.12</version>

     </dependency>

     <!-- Spring开发 -->

     <dependency>

         <groupId>org.springframework</groupId>

       <artifactId>spring-context</artifactId>

       <version>4.1.7.RELEASE</version>

     </dependency>

     <dependency>

         <groupId>org.springframework</groupId>

         <artifactId>spring-web</artifactId>

         <version>4.1.7.RELEASE</version>

     </dependency>

     <!-- 基于spring测试开发 -->

     <!-- Spring与Junit整合 -->

     <dependency>

         <groupId>org.springframework</groupId>

       <artifactId>spring-test</artifactId>

       <version>4.1.7.RELEASE</version>

     </dependency>

     <dependency>

         <groupId>junit</groupId>

       <artifactId>junit</artifactId>

       <version>4.11</version>

     </dependency>

 </dependencies>
4、配置web.xml
 <?xml version="1.0" encoding="UTF-8"?>

 <web-app xmlns:xsi="http://www.w3.org/2001/XMLSchema-instance"

     xmlns="http://java.sun.com/xml/ns/javaee"

     xsi:schemaLocation="http://java.sun.com/xml/ns/javaee http://java.sun.com/xml/ns/javaee/web-app_2_5.xsd"

     id="WebApp_ID" version="2.5">

     <welcome-file-list>

         <welcome-file>index.html</welcome-file>

     </welcome-file-list>

     <!-- 引入spring配置文件 -->

     <context-param>

         <param-name>contextConfigLocation</param-name>

         <param-value>classpath:applicationContext.xml</param-value>

     </context-param>

     <!-- spring核心监听器 -->

     <listener>

         <listener-class>org.springframework.web.context.ContextLoaderListener</listener-class>

     </listener>

     <!-- 配置cxf基于web访问 -->

     <servlet>

         <servlet-name>CXFService</servlet-name>

         <servlet-class>org.apache.cxf.transport.servlet.CXFServlet</servlet-class>

         <load-on-startup>1</load-on-startup>

     </servlet>

     <servlet-mapping>

         <servlet-name>CXFService</servlet-name>

         <url-pattern>/services/*</url-pattern>

     </servlet-mapping>

 </web-app>
5、搭建服务
5.1、导入javaBean

5.1.1、domain
参考CXF-JAX-WS开发(一)入门案例,2.4.1、导入实体bean目录下的实体类Car.java和User.java
5.1.2、service
参考CXF-JAX-WS开发(一)入门案例,2.4.2、构建服务bean目录下的类IUserService.java和UserServiceImpl.java
5.2、创建spring配置文件applicationContext.xml
5.2.1、目录

5.2.2、配置
 <?xml version="1.0" encoding="UTF-8"?>

 <beans xmlns="http://www.springframework.org/schema/beans"

     xmlns:xsi="http://www.w3.org/2001/XMLSchema-instance" xmlns:jaxws="http://cxf.apache.org/jaxws"

     xsi:schemaLocation="

     http://www.springframework.org/schema/beans http://www.springframework.org/schema/beans/spring-beans.xsd

     http://cxf.apache.org/jaxws http://cxf.apache.org/schemas/jaxws.xsd">

     <jaxws:server id="userService" address="/userService"

         serviceClass="org.spring_cxf_ws.service.IUserService"><!-- serviceClass指定一个接口 -->

         <jaxws:serviceBean>

             <bean class="org.spring_cxf_ws.service.UserServiceImpl" />

         </jaxws:serviceBean>

         <!-- 日志配置start -->

         <!-- 输入消息拦截器 -->

         <jaxws:inInterceptors>

             <bean class="org.apache.cxf.interceptor.LoggingInInterceptor" />

         </jaxws:inInterceptors>

         <!-- 输出消息拦截器 -->

         <jaxws:outInterceptors>

             <bean class="org.apache.cxf.interceptor.LoggingOutInterceptor" />

         </jaxws:outInterceptors>

         <!-- 日志配置end -->

     </jaxws:server>

 </beans>
5.3、在pom.xml中配置tomcat插件
 <build>

     <plugins>

         <!-- 配置tomcat端口号为: 9800 -->

     <plugin>

         <groupId>org.codehaus.mojo</groupId>

         <artifactId>tomcat-maven-plugin</artifactId>

         <version>1.1</version>

         <configuration>

             <port>9800</port>

         </configuration>

     </plugin>

     </plugins>

 </build>
5.4、配置jre环境1.5以上[使注解@WebService和@WebMethod生效]
参考CXF-JAX-WS开发(一)入门案例,2.4.3、配置jre环境1.5以上[使注解@WebService和@WebMethod生效]
5.5、测试服务发布是否成功
启动spring_cxf_ws,执行tomcat:run。访问:http://localhost:9800/spring_cxf_ws/services/userService?wsdl
| 名称 | 含义 |
|
|
端口号 |
| spring_cxf_ws | 项目名称 |
|
services |
web.xml中配置的servlet的url |
|
userService |
applicationContext.xml中配置的address |

二、搭建客户端
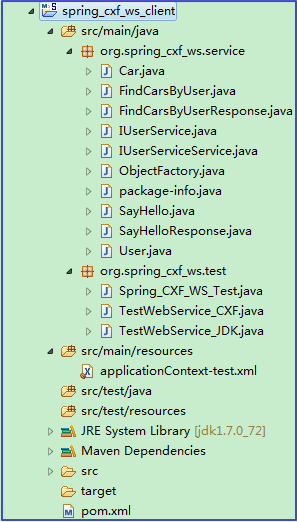
1、客户端目录结构
2、JDK的wsimport命令生成本地调用WebService服务的代码
wsimport -s . http://localhost:9800/spring_cxf_ws/services/userService?wsdl

3、创建客户端maven project[Packaing:jar]

4、引入依赖
5、复制调用WebService服务的代码到客户端工程

三、测试
1、目录结构

2、测试方案
2.1、方式一、jdk
 package org.spring_cxf_ws.service;

 import java.util.List;

 /**

  * 基于JDK提供的wsimport命令解析WSDL文档生成本地代码 使用本地代码生成一个代理对象,通过代理对象可以发送HTTP请求

  * 请求webservice服务

  *

  */

 public class TestWebService_JDK {

     public static void main(String[] args) {

         // 方式一、jdk

         IUserServiceService userService = new IUserServiceService();

         IUserService proxy = userService.getIUserServicePort();

         System.out.println(proxy.sayHello("张无忌"));

         User user = new User();

         user.setUsername("xiaoming");

         List<Car> list = proxy.findCarsByUser(user);

         for (Car car : list) {

             System.out.println(car.getId() + ":" + car.getCarName() + ":" + car.getPrice());

         }

     }

 }
2.2、方式二、cxf
 package org.spring_cxf_ws.test;

 import java.util.List;

 import org.apache.cxf.jaxws.JaxWsProxyFactoryBean;

 import org.spring_cxf_ws.service.Car;

 import org.spring_cxf_ws.service.IUserService;

 import org.spring_cxf_ws.service.User;

 /**

  * 基于JDK提供的wsimport命令解析WSDL文档生成本地代码 使用本地代码生成一个代理对象,通过代理对象可以发送HTTP请求

  * 请求webservice服务

  *

  */

 public class TestWebService_CXF {

     public static void main(String[] args) {

         // 方式二、cxf

         JaxWsProxyFactoryBean jaxWsProxyFactoryBean = new JaxWsProxyFactoryBean();

         jaxWsProxyFactoryBean.setServiceClass(IUserService.class);

         jaxWsProxyFactoryBean.setAddress("http://localhost:9800/spring_cxf_ws/services/userService?wsdl");

         // 创建调用远程服务的代理对象

         IUserService proxy = (IUserService) jaxWsProxyFactoryBean.create();

         // 调用远程服务上的sayHello方法

         System.out.println(proxy.sayHello("张无忌"));

         // 调用远程服务上的findCarsByUser方法

         User user = new User();

         user.setUsername("xiaoming");

         List<Car> list = proxy.findCarsByUser(user);

         for (Car car : list) {

             System.out.println(car.getId() + ":" + car.getCarName() + ":" + car.getPrice());

         }

     }

 }
2.3、方式三、spring+cxf
2.3.1、配置applicationContext-test.xml
①所在目录

②配置
 <?xml version="1.0" encoding="UTF-8"?>

 <beans xmlns="http://www.springframework.org/schema/beans"

     xmlns:xsi="http://www.w3.org/2001/XMLSchema-instance" xmlns:jaxws="http://cxf.apache.org/jaxws"

     xsi:schemaLocation="

     http://www.springframework.org/schema/beans http://www.springframework.org/schema/beans/spring-beans.xsd

     http://cxf.apache.org/jaxws http://cxf.apache.org/schemas/jaxws.xsd">

     <!--

         id:唯一标识

         serviceClass:服务接口的路径

         address:服务地址

      -->

     <jaxws:client id="userServiceClient" serviceClass="org.spring_cxf_ws.service.IUserService"

         address="http://localhost:9800/spring_cxf_ws/services/userService?wsdl" >

     </jaxws:client>

 </beans>
2.3.2、测试类
 package org.spring_cxf_ws.test;

 import org.junit.Test;

 import org.junit.runner.RunWith;

 import org.spring_cxf_ws.service.IUserService;

 import org.spring_cxf_ws.service.User;

 import org.springframework.beans.factory.annotation.Autowired;

 import org.springframework.beans.factory.annotation.Qualifier;

 import org.springframework.test.context.ContextConfiguration;

 import org.springframework.test.context.junit4.SpringJUnit4ClassRunner;

 @RunWith(SpringJUnit4ClassRunner.class)

 @ContextConfiguration(locations = "classpath:applicationContext-test.xml")

 public class Spring_CXF_WS_Test {

     @Autowired

     @Qualifier("userServiceClient")

     private IUserService userService;

     @Test

     public void testService() {

         // 方式三、spring+cxf

         System.out.println(userService.sayHello("张无忌"));

         User user = new User();

         user.setUsername("xiaoming");

         System.out.println(userService.findCarsByUser(user));

     }

 }
CXF-JAX-WS开发(二)spring整合CXF-JAX-WS的更多相关文章
- Spring整合CXF,发布RSETful 风格WebService(转)
Spring整合CXF,发布RSETful 风格WebService 这篇文章是承接之前CXF整合Spring的这个项目示例的延伸,所以有很大一部分都是一样的.关于发布CXF WebServer和Sp ...
- Spring整合CXF,发布RSETful 风格WebService
原文地址:http://www.cnblogs.com/hoojo/archive/2012/07/23/2605219.html 这篇文章是承接之前CXF整合Spring的这个项目示例的延伸,所以有 ...
- Spring整合CXF步骤,Spring实现webService,spring整合WebService
Spring整合CXF步骤 Spring实现webService, spring整合WebService >>>>>>>>>>>> ...
- Java WebService 教程系列之 Spring 整合 CXF
Java WebService 教程系列之 Spring 整合 CXF 一.引入 jar 包 <dependency> <groupId>org.apache.cxf</ ...
- Spring整合CXF之发布WebService服务
今天我们来讲下如何用Spring来整合CXF,来发布WebService服务: 给下官方文档地址:http://cxf.apache.org/docs/writing-a-service-with-s ...
- Spring整合CXF webservice restful 实例
webservice restful接口跟soap协议的接口实现大同小异,只是在提供服务的类/接口的注解上存在差异,具体看下面的代码,然后自己对比下就可以了. 用到的基础类 User.java @Xm ...
- 8、Web Service-IDEA-jaxws规范下的 spring整合CXF
前提:开发和之前eclipse的开发有很大的不同! 1.服务端的实现 1.新建项目 此时创建的是web项目 2.此时创建的项目是不完整的需要开发人员手动补充完整 3.对文件夹的设置(满满的软件使用方法 ...
- Spring的AOP开发入门,Spring整合Junit单元测试(基于ASpectJ的XML方式)
参考自 https://www.cnblogs.com/ltfxy/p/9882430.html 创建web项目,引入jar包 除了基本的6个Spring开发的jar包外,还要引入aop开发相关的四个 ...
- So easy Webservice 8.spring整合CXF 发布WS
1.添加jar包(cxf的jar包中包含了spring的jar包),添加spring配置文件 2.web.xml中配置CXFServlet,过滤WS服务的地址 <!-- 配置CXFServlet ...
- Spring整合CXF发布及调用WebService
这几天终于把webService搞定,下面给大家分享一下发布webService和调用webService的方法 添加jar包 (官方下载地址:http://cxf.apache.org/downlo ...
随机推荐
- 『REM』手机屏幕适配
function adapt(designWidth, rem2px){ var d = window.document.createElement('div'); d.style.width = ' ...
- LMDB installation
Official Website: http://lmdb.readthedocs.io/en/release/ Install commands for Ubuntu: $ sudo apt-get ...
- 【Developer Log】ProGuard扰码可执行JAR包
在项目上线之前需要通过ProGuard来对java的class进行混淆,以避免反编译方式,来保护自己的代码.ProGuard网上有很多资料,可以参考:http://blog.csdn.net/zhan ...
- [bzoj3450]Tyvj1952 Easy[概率dp]
和之前一样考虑这个音符时x还是o,如果是x,是否是新的连续一段,对答案的贡献是多少$(a^2-{(a-1)}^2)$,然后递推就可以了. #include <bits/stdc++.h> ...
- SRPING MVC基本配置
作下记录,WEB.XML的配置及DispatcherServlet-context.xml的配置. 而后者的配置,有不同的形式,不要被迷惑. WEB.XML <servlet> <s ...
- POJ 3304 segments 线段和直线相交
Segments Time Limit: 1000MS Memory Limit: 65536K Total Submissions: 14178 Accepted: 4521 Descrip ...
- Monitor和Lock以及区别
1.Monitor.Enter(object)方法是获取锁,Monitor.Exit(object)方法是释放锁,这就是Monitor最常用的两个方法,当然在使用过程中为了避免获取锁之后因为异常,致锁 ...
- 【LeetCode】Longest Substring Without Repeating Characters 解题报告
[题意] Given a string, find the length of the longest substring without repeating characters. For exam ...
- 【JavaSE】day03_Date、SimpleDateFormat、Calendar、Collection
[JavaSE]day03_Date.SimpleDateFormat.Calendar.Collection 1.Date及其经常使用API 1)JAVA 中的时间 Java中的时间使用标准类库的D ...
- js获取单独一个checkbox是否被选中
<script language=javascript> function check(){ var xz=document.getElementById("xz"); ...