pytorch学习笔记(7)--线性层
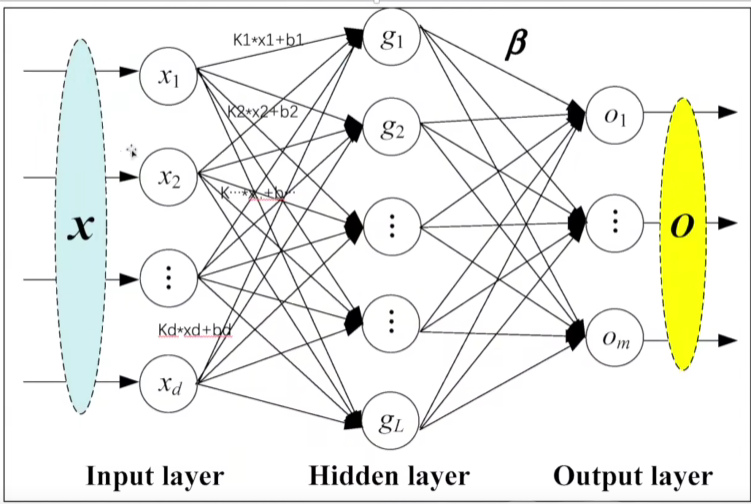
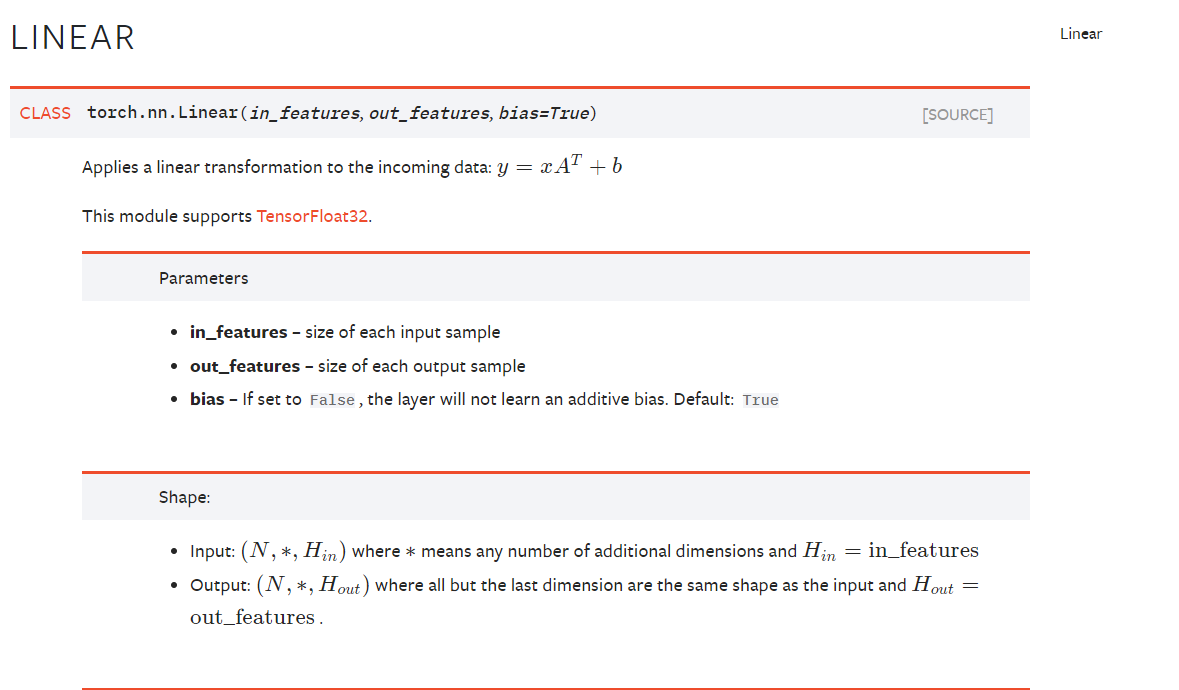
(一)Liner Layers线性层
b 是偏移量bias
代码输入:
import torch

import torchvision

from torch import nn

from torch.nn import Linear

from torch.utils.data import DataLoader

dataset = torchvision.datasets.CIFAR10("../dataset", train=False, transform=torchvision.transforms.ToTensor(), download=False)

dataloader = DataLoader(dataset, batch_size=64)

class Tudui(nn.Module):

    def __init__(self):

        super(Tudui, self).__init__()

        self.linear1 = Linear(196608, 10)

    def forward(self, input):

        output = self.linear1(input)

        return output

tudui = Tudui()

for data in dataloader:

    imgs, target = data

    print(imgs.shape)

    output = torch.reshape(imgs, (1, 1, 1, -1))

    print(output.shape)

    output = tudui(output)

    print(output.shape)
输出:
torch.Size([64, 3, 32, 32])

torch.Size([1, 1, 1, 196608])

torch.Size([1, 1, 1, 10])
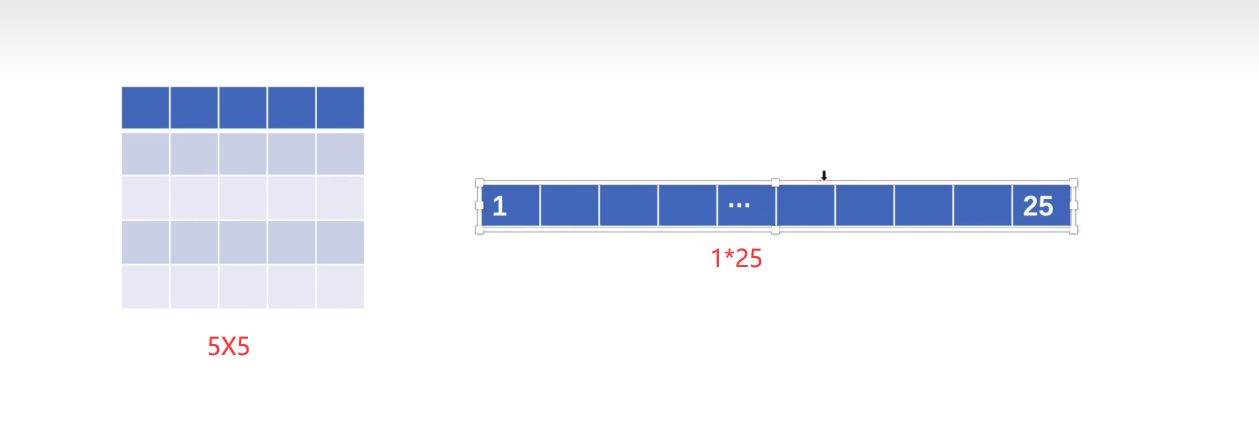
改为 flatten 类似“平铺”:
import torch

import torchvision

from torch import nn

from torch.nn import Linear

from torch.utils.data import DataLoader

dataset = torchvision.datasets.CIFAR10("../dataset", train=False, transform=torchvision.transforms.ToTensor(), download=False)

dataloader = DataLoader(dataset, batch_size=64)

class Tudui(nn.Module):

    def __init__(self):

        super(Tudui, self).__init__()

        self.linear1 = Linear(196608, 10)

    def forward(self, input):

        output = self.linear1(input)

        return output

tudui = Tudui()

for data in dataloader:

    imgs, target = data

    print(imgs.shape)

    # flatten

    output = torch.flatten(imgs)

    print(output.shape)
输出:
torch.Size([64, 3, 32, 32])

torch.Size([196608])
图形图像方面Module:

pytorch学习笔记(7)--线性层的更多相关文章
- [PyTorch 学习笔记] 3.3 池化层、线性层和激活函数层
本章代码:https://github.com/zhangxiann/PyTorch_Practice/blob/master/lesson3/nn_layers_others.py 这篇文章主要介绍 ...
- [PyTorch 学习笔记] 3.2 卷积层
本章代码:https://github.com/zhangxiann/PyTorch_Practice/blob/master/lesson3/nn_layers_convolution.py 这篇文 ...
- 【pytorch】pytorch学习笔记(一)
原文地址:https://pytorch.org/tutorials/beginner/deep_learning_60min_blitz.html 什么是pytorch? pytorch是一个基于p ...
- [PyTorch 学习笔记] 4.1 权值初始化
本章代码:https://github.com/zhangxiann/PyTorch_Practice/blob/master/lesson4/grad_vanish_explod.py 在搭建好网络 ...
- PyTorch学习笔记6--案例2:PyTorch神经网络(MNIST CNN)
上一节中,我们使用autograd的包来定义模型并求导.本节中,我们将使用torch.nn包来构建神经网络. 一个nn.Module包含各个层和一个forward(input)方法,该方法返回outp ...
- 【深度学习】Pytorch 学习笔记
目录 Pytorch Leture 05: Linear Rregression in the Pytorch Way Logistic Regression 逻辑回归 - 二分类 Lecture07 ...
- TensorFlow 深度学习笔记 从线性分类器到深度神经网络
转载请注明作者:梦里风林 Github工程地址:https://github.com/ahangchen/GDLnotes 欢迎star,有问题可以到Issue区讨论 官方教程地址 视频/字幕下载 L ...
- Pytorch学习笔记(二)---- 神经网络搭建
记录如何用Pytorch搭建LeNet-5,大体步骤包括:网络的搭建->前向传播->定义Loss和Optimizer->训练 # -*- coding: utf-8 -*- # Al ...
- Pytorch学习笔记(一)---- 基础语法
书上内容太多太杂,看完容易忘记,特此记录方便日后查看,所有基础语法以代码形式呈现,代码和注释均来源与书本和案例的整理. # -*- coding: utf-8 -*- # All codes and ...
- 学习笔记TF014:卷积层、激活函数、池化层、归一化层、高级层
CNN神经网络架构至少包含一个卷积层 (tf.nn.conv2d).单层CNN检测边缘.图像识别分类,使用不同层类型支持卷积层,减少过拟合,加速训练过程,降低内存占用率. TensorFlow加速所有 ...
随机推荐
- JAVA诞生历史【转载】
一.计算机语言的发展史 1.第一代语言(只有机器能读懂,人根本读不懂) 纯机器语言 2.第二代语言(机器能读懂,人可以读懂,但是很难懂) 汇编语言(符号语言) 3.第三代语言(机器能读懂,也非常便于人 ...
- ubuntu18.04 安装cython_bbox
方式一: pip install cython_bbox 方式二:下载地址 https://github.com/samson-wang/cython_bbox 解压后并cd cython_bbox- ...
- JavaScript 数字与字符串的加减乘除运算
点击跳转 Tips: 除开字符串 + 数字的运算,会产生级联,其他情况下会将 String 转为 number 再进行数字运算. js 运算是从左到右的,所以一步一步来,不要跳步进行运算.
- linux mint 中文支持
sudo apt-get install localessudo dpkg-reconfigure locales 设置zh_CN.UTF-8
- VS2010配置WTL
1.首先去下载WTL 地址:http://wtl.svn.sourceforge.net/viewvc/wtl/?view=tar 2.安装App Wizard 找到"VS安装目录\VC\V ...
- Markdowm的下载方法
1打开百度搜索,输入TYPORA打开下载页面,根据自己的系统(我的是WINDOWS64位)点"DOWN"进行下载安装. 2安装好后回到桌面新建一个文件夹(Markdown学习),然 ...
- ZIAO日报 202302
2023.2 2023年2月14日 10:23 2023.2.14 继续读<Multi-View Transformer for 3D Visual Grounding>,读到了relat ...
- a[i]之和小于N的含义
例题 小白月赛 困难卷积 题目 要求一个暴力算是 \(O(n^2)\) 的东西 同时题目保证 \(\sum a[i] \leq 10^7\) 题解 \(\sum a[i] \leq 10^7\) 的含 ...
- django连接ubuntu22下的mysql8
1.安装mysql(这里就不过多赘述了) sudo apt-get install mysql-server 2.登录mysql (1) 在 根目录/etc/mysql/debian.cnf ,使 ...
- J V M(二)双亲委派机制及native
package java.lang;public class String {// 双亲委派机制: 安全// 应用程序加载器-扩展程序加载器-根加载器// 自底向上检查类是否被加载,自顶向下加载类// ...