使用 NIO 搭建一个聊天室
使用 NIO 搭建一个聊天室
前面刚讲了使用 Socket 搭建了一个 Http Server,在最后我们使用了 NIO 对 Server 进行了优化,然后有小伙伴问到怎么使用 Socket 搭建聊天室,这节仍然使用 NIO 为基础进行搭建。
一、NIO 聊天室入门案例
该案例只有三个类:NioServer 聊天室服务端、NioClient 聊天室客户端、ClientThread 客户端线程。
服务端代码:
package com.fengsir.network.chatroom;

import java.io.IOException;

import java.net.InetSocketAddress;

import java.nio.ByteBuffer;

import java.nio.CharBuffer;

import java.nio.channels.SelectionKey;

import java.nio.channels.Selector;

import java.nio.channels.ServerSocketChannel;

import java.nio.channels.SocketChannel;

import java.nio.charset.CharsetDecoder;

import java.nio.charset.CharsetEncoder;

import java.nio.charset.StandardCharsets;

import java.util.Iterator;

import java.util.Map;

import java.util.Set;

import java.util.concurrent.ConcurrentHashMap;

/**

 * @Author FengZeng

 * @Date 2022-01-24 17:01

 * @Description Nio聊天室服务端

 */

public class NioServer {

  /**

   * 聊天室成员列表:

   */

  Map<String, SocketChannel> memberChannels;

  /**

   * 端口

   */

  private static final int PORT = 8000;

  /**

   * 选择器

   */

  private Selector selector;

  /**

   * 管道

   */

  private ServerSocketChannel server;

  /**

   * 缓冲

   */

  private ByteBuffer buffer;

  public NioServer() throws IOException {

    // 初始化 Selector 选择器

    this.selector = Selector.open();

    // 初始化 Channel 通道

    this.server = getServerChannel(selector);

    // 初始化 Buffer 缓冲:1k

    this.buffer = ByteBuffer.allocate(1024);

    // 初始化聊天室成员列表

    memberChannels = new ConcurrentHashMap<>();

  }

  /**

   * 初始化Channel通道

   *

   * @param selector 选择器

   * @return ServerSocketChannel

   * @throws IOException

   */

  private ServerSocketChannel getServerChannel(Selector selector) throws IOException {

    // 开辟一个 Channel 通道

    ServerSocketChannel serverSocketChannel = ServerSocketChannel.open();

    // 通道设置为非阻塞模式

    serverSocketChannel.configureBlocking(false);

    // 通道注册绑定 Selector 选择器,通道中数据的事件类型为OP_ACCEPT

    serverSocketChannel.register(selector, SelectionKey.OP_ACCEPT);

    // 通道绑定端口

    serverSocketChannel.socket().bind(new InetSocketAddress(PORT));

    return serverSocketChannel;

  }

  /**

   * 事件监听

   */

  public void listen() throws IOException {

    System.out.println("服务端启动......");

    try {

      // 据说用 while(true) 会多一个判断,用这种方式更好哈哈哈

      for (;;){

        // 作用:至少需要有一个事件发生,否则(如果count == 0)就继续阻塞循环

        int count = selector.select();

        if (count == 0) {

          continue;

        }

        // 获取 SelectorKey 的集合

        Set<SelectionKey> keySet = selector.selectedKeys();

        Iterator<SelectionKey> iterator = keySet.iterator();

        while (iterator.hasNext()) {

          // 当前事件对应的 SelectorKey

          SelectionKey key = iterator.next();

          // 删除当前事件:表示当前事件已经被消费了

          iterator.remove();

          // 接收事件已就绪:

          if (key.isAcceptable()) {

            // 通过key获取ServerSocketChannel

            ServerSocketChannel server = (ServerSocketChannel) key.channel();

            // 通过 ServerSocketChannel 获取SocketChannel

            SocketChannel channel = server.accept();

            // channel 设置为非阻塞模式

            channel.configureBlocking(false);

            // channel 绑定选择器,当前事件切换为 读就绪

            channel.register(selector, SelectionKey.OP_READ);

            // 从channel中获取Host、端口等信息

            System.out.println("客户端连接:"

                + channel.socket().getInetAddress().getHostName() + ":"

                + channel.socket().getPort());

            // Read就绪事件

          } else if (key.isReadable()) {

            SocketChannel channel = (SocketChannel) key.channel();

            // 用于解密消息内容

            CharsetDecoder decoder = StandardCharsets.UTF_8.newDecoder();

            // 将消息数据从通道 channel 读取到缓冲buffer

            buffer.clear();

            channel.read(buffer);

            buffer.flip();

            // 获取解密后的消息内容:

            String msg = decoder.decode(buffer).toString();

            if (!"".equals(msg)) {

              System.out.println("收到:" + msg);

              if (msg.startsWith("username:")) {

                String username = msg.replaceAll("username:", "");

                memberChannels.put(username, channel);

                System.out.println("用户总数:" + memberChannels.size());

              } else {

                // 转发消息给客户端

                String[] arr = msg.split(":");

                if (arr.length == 3) {

                  // 发送者

                  String from = arr[0];

                  // 接收者

                  String to = arr[1];

                  // 发送内容

                  String content = arr[2];

                  System.out.println(from + " 发送给 " + to + " 的消息:" + content);

                  if (memberChannels.containsKey(to)) {

                    // 解密

                    CharsetEncoder encoder = StandardCharsets.UTF_8.newEncoder();

                    // 给接收者发送消息

                    memberChannels.get(to).write(encoder.encode(CharBuffer.wrap(from + ":" + content)));

                  }

                }

              }

            }

          }

        }

      }

    }catch (Exception e){

      System.out.println("服务端启动失败......");

      e.printStackTrace();

    }finally {

      try {

        // 先关闭选择器,在关闭通道

        // 调用 close() 方法将会关闭Selector,同时也会将关联的SelectionKey失效,但不会关闭Channel。

        selector.close();

        server.close();

      } catch (IOException e) {

        e.printStackTrace();

      }

    }

  }

  public static void main(String[] args) throws IOException {

    // 服务端启动:

    new NioServer().listen();

  }

}
客户端线程类:
package com.fengsir.network.chatroom;

import java.io.IOException;

import java.net.InetSocketAddress;

import java.nio.ByteBuffer;

import java.nio.CharBuffer;

import java.nio.channels.SelectionKey;

import java.nio.channels.Selector;

import java.nio.channels.SocketChannel;

import java.nio.charset.Charset;

import java.nio.charset.CharsetDecoder;

import java.nio.charset.CharsetEncoder;

import java.nio.charset.StandardCharsets;

import java.util.Iterator;

/**

 * @Author FengZeng

 * @Date 2022-01-24 17:16

 * @Description Nio聊天室客户端线程

 */

public class ClientThread extends Thread {

  /**

   * 解密

   */

  private CharsetDecoder decoder = StandardCharsets.UTF_8.newDecoder();

  /**

   * 加密

   */

  private CharsetEncoder encoder = StandardCharsets.UTF_8.newEncoder();

  /**

   * 选择器

   */

  private Selector selector = null;

  /**

   * 通道

   */

  private SocketChannel socket = null;

  /**

   * 通道key

   */

  private SelectionKey clientKey = null;

  /**

   * 用户名

   */

  private String username;

  public ClientThread(String username) {

    try {

      // 创建一个Selector

      selector = Selector.open();

      // 创建Socket并注册

      socket = SocketChannel.open();

      socket.configureBlocking(false);

      clientKey = socket.register(selector, SelectionKey.OP_CONNECT);

      // 连接到远程地址

      InetSocketAddress ip = new InetSocketAddress("localhost", 8000);

      socket.connect(ip);

      this.username = username;

    } catch (IOException e) {

      e.printStackTrace();

    }

  }

  /**

   * 开辟读取事件的线程

   */

  @Override

  public void run() {

    try {

      // 监听事件(无限循环)

      for (; ; ) {

        // 监听事件

        int count = selector.select();

        if (count == 0) {

          continue;

        }

        // 事件来源列表

        Iterator<SelectionKey> it = selector.selectedKeys().iterator();

        while (it.hasNext()) {

          SelectionKey key = it.next();

          // 删除当前事件

          it.remove();

          // 判断事件类型

          if (key.isConnectable()) {

            // 连接事件

            SocketChannel channel = (SocketChannel) key.channel();

            if (channel.isConnectionPending()) {

              channel.finishConnect();

            }

            channel.register(selector, SelectionKey.OP_READ);

            System.out.println("连接服务器端成功!");

            // 发送用户名

            send("username:" + this.username);

          } else if (key.isReadable()) {

            // 读取数据事件

            SocketChannel channel = (SocketChannel) key.channel();

            // 读取数据

            ByteBuffer buffer = ByteBuffer.allocate(50);

            channel.read(buffer);

            buffer.flip();

            String msg = decoder.decode(buffer).toString();

            System.out.println("收到: " + msg);

          }

        }

      }

    } catch (IOException e) {

      e.printStackTrace();

    } finally {

      // 关闭

      try {

        selector.close();

        socket.close();

      } catch (IOException ignored) {

      }

    }

  }

  /**

   * 发送消息

   *

   * @param msg message

   */

  public void send(String msg) {

    try {

      SocketChannel client = (SocketChannel) clientKey.channel();

      client.write(encoder.encode(CharBuffer.wrap(msg)));

    } catch (Exception e) {

      e.printStackTrace();

    }

  }

  /**

   * 关闭客户端

   */

  public void close() {

    try {

      selector.close();

      socket.close();

    } catch (IOException ignored) {

    }

  }

}
客户端类:
package com.fengsir.network.chatroom;

import java.io.BufferedReader;

import java.io.IOException;

import java.io.InputStreamReader;

/**

 * @Author FengZeng

 * @Date 2022-01-24 17:20

 * @Description TODO

 */

public class NioClient {

  public static void main(String[] args) {

    // 当前客户端的用户名

    String username = "fengzeng";

    // 为当前客户端开辟一个线程

    ClientThread client = new ClientThread(username);

    client.start();

    // 输入输出流

    BufferedReader bfReader = new BufferedReader(new InputStreamReader(System.in));

    try {

      // 循环读取键盘输入

      String readline;

      while ((readline = bfReader.readLine()) != null) {

        if ("bye".equals(readline)) {

          client.close();

          System.exit(0);

        }

        // 发送消息

        client.send(username + ":" + readline);

      }

    } catch (IOException e) {

      e.printStackTrace();

    }

  }

}
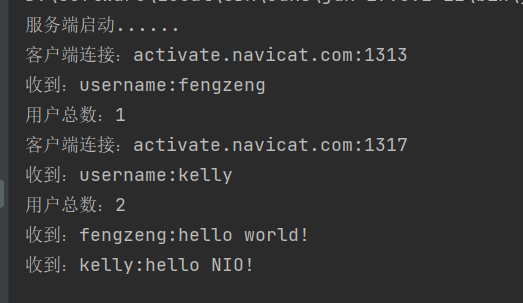
运行效果图就是这样子,代码结合注释看,应该都能理解。
使用 NIO 搭建一个聊天室的更多相关文章
- netty实现消息中心(二)基于netty搭建一个聊天室
前言 上篇博文(netty实现消息中心(一)思路整理 )大概说了下netty websocket消息中心的设计思路,这篇文章主要说说简化版的netty聊天室代码实现,支持群聊和点对点聊天. 此demo ...
- Jaguar_websocket结合Flutter搭建简单聊天室
1.定义消息 在开始建立webSocket之前,我们需要定义消息,如:发送人,发送时间,发送人id等.. import 'dart:convert'; class ChatMessageData { ...
- SpringBoot 搭建简单聊天室
SpringBoot 搭建简单聊天室(queue 点对点) 1.引用 SpringBoot 搭建 WebSocket 链接 https://www.cnblogs.com/yi1036943655/p ...
- IO、NIO实现简单聊天室,附带问题解析
本篇文章主要使用IO和NIO的形式来实现一个简单的聊天室,并且说明IO方法存在的问题,而NIO又是如何解决的. 大概的框架为,先提供思路和大概框架图--代码--问题及解决方式,这样会容易看一点 ...
- 基于react+react-router+redux+socket.io+koa开发一个聊天室
最近练手开发了一个项目,是一个聊天室应用.项目虽不大,但是使用到了react, react-router, redux, socket.io,后端开发使用了koa,算是一个比较综合性的案例,很多概念和 ...
- SilverLight搭建WCF聊天室详细过程[转]
http://www.silverlightchina.net/html/zhuantixilie/getstart/2011/0424/7148.html 默认节点 SilverLight搭建WCF ...
- 使用.NET Core和Vue搭建WebSocket聊天室
博客地址是:https://qinyuanpei.github.io. WebSocket是HTML5标准中的一部分,从Socket这个字眼我们就可以知道,这是一种网络通信协议.WebSocket是 ...
- 使用原生node写一个聊天室
在学习node的时候都会练习做一个聊天室的项目,主要使用socket.io模块和http模块.这里我们使用更加原始的方式去写一个在命令行聊天的聊天室. http模块,socket.io都是高度封装之后 ...
- 利用socket.io构建一个聊天室
利用socket.io来构建一个聊天室,输入自己的id和消息,所有的访问用户都可以看到,类似于群聊. socket.io 这里只用来做一个简单的聊天室,官网也有例子,很容易就做出来了.其实主要用的东西 ...
随机推荐
- 理解 Events Loop 宏任务微任务
在 JavaScript 中,任务被分为两种,一种宏任务(MacroTask),一种叫微任务(MicroTask). MacroTask(宏任务) script全部代码.setTimeout.setI ...
- rsyn实现服务器源码同步
近期技术总监提出,要建立预生产环境,代码实现灰度发布.需要多台服务器源码保持一致. 实施步骤 1.安装rsyn服务端并添加环境变量. 2.安装客户端并配置环境变量. 3.更改配置文件并开放防火墙端口. ...
- LGP3449题解
其实每个串都不是回文串也能做的说... 题意:给定 \(n\) 个互不相同的串,两两拼接一共能够拼出 \(n^2\) 个串,问这 \(n^2\) 个串中有几个回文串. 首先假设拼接出来的串是 \(AB ...
- Div+CSS 定位 Position
position 属性规定应用于元素的定位方法的类型(static.relative.fixed.absolute 或 sticky). position: static;HTML 元素默认情况下的定 ...
- 旅游清单一步搭建,Angular助力你的踏春计划
春天的脚步愈发临近,相信很多小伙伴已经开始规划自己的踏春计划了,无论是欣赏名胜古迹,还是走访风土人文,你都需要提前准备一份旅游清单!有了这款Angular旅游计划应用,从地点到预算,它都能帮助你创建自 ...
- 如何在MySQL中增加一列
如果想在一个已经建好的表中添加一列,可以使用诸如: alter table TABLE_NAME add column NEW_COLUMN_NAME varchar(255) not null; 这 ...
- CF1452E Two Editorials (思维题,暴力+差分)
题目描述: 给你m个位于[1,n]的区间p,现在有长度为K的区间b和c.设对于区间$p[i]$,定义$a[i]$为$p[i]$分别与b,c相交长度的较大值,现在问区间b和c位于何处时,$\sum p_ ...
- SP接口的全双工首发接口整合
unsigned char bits = 8; unsigned int speed = 50000; unsigned short delay; static void spi_transfer_d ...
- IDEA 配置Tomcat乱码解决方法
问题:页面没有乱码,但是通过http请求的js文件会乱码,原因是由于 CharacterEncodingFilter 只会处理Servlet请求,不会处理静态文件的响应编码,所以这里需要进一步的配置. ...
- 手撕代码:leetcode 309最佳买卖股票时机含冷冻期
转载于:https://segmentfault.com/a/1190000014746613 给定一个整数数组,其中第i个元素代表了第i天的股票价格. 设计一个算法计算出最大利润.在满足以下约束条件 ...