FreeMarker与Spring MVC 4集合的HelloWorld示例
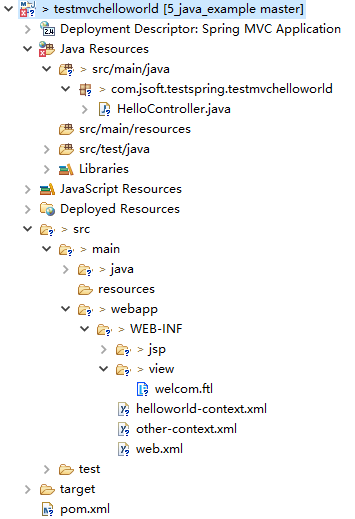
0、整体的项目结构
1、引入POM
<project xmlns="http://maven.apache.org/POM/4.0.0" xmlns:xsi="http://www.w3.org/2001/XMLSchema-instance"

    xsi:schemaLocation="http://maven.apache.org/POM/4.0.0 http://maven.apache.org/maven-v4_0_0.xsd">

    <modelVersion>4.0.0</modelVersion>

    <groupId>com.jsoft.testspring</groupId>

    <artifactId>testmvchelloworld</artifactId>

    <packaging>war</packaging>

    <version>0.0.1-SNAPSHOT</version>

    <name>testmvchelloworld Maven Webapp</name>

    <url>http://maven.apache.org</url>

    <dependencies>

        <dependency>

            <groupId>junit</groupId>

            <artifactId>junit</artifactId>

            <version>3.8.1</version>

            <scope>test</scope>

        </dependency>

        <!-- Servlet Library -->

        <!-- http://mvnrepository.com/artifact/javax.servlet/javax.servlet-api -->

        <dependency>

            <groupId>javax.servlet</groupId>

            <artifactId>javax.servlet-api</artifactId>

            <version>3.1.0</version>

            <scope>provided</scope>

        </dependency>

        <!-- Spring Core -->

        <!-- http://mvnrepository.com/artifact/org.springframework/spring-core -->

        <dependency>

            <groupId>org.springframework</groupId>

            <artifactId>spring-core</artifactId>

            <version>4.1.4.RELEASE</version>

        </dependency>

        <!-- Spring Web -->

        <!-- http://mvnrepository.com/artifact/org.springframework/spring-web -->

        <dependency>

            <groupId>org.springframework</groupId>

            <artifactId>spring-web</artifactId>

            <version>4.1.4.RELEASE</version>

        </dependency>

        <!-- Spring Web MVC -->

        <!-- http://mvnrepository.com/artifact/org.springframework/spring-webmvc -->

        <dependency>

            <groupId>org.springframework</groupId>

            <artifactId>spring-webmvc</artifactId>

            <version>4.1.4.RELEASE</version>

        </dependency>

        <!-- spring-context-support -->

        <!-- https://mvnrepository.com/artifact/org.springframework/spring-context-support -->

        <dependency>

            <groupId>org.springframework</groupId>

            <artifactId>spring-context-support</artifactId>

            <version>4.1.4.RELEASE</version>

        </dependency>

        <!-- https://mvnrepository.com/artifact/org.freemarker/freemarker -->

        <dependency>

            <groupId>org.freemarker</groupId>

            <artifactId>freemarker</artifactId>

            <version>2.3.26-incubating</version>

        </dependency>

    </dependencies>

    <build>

        <finalName>testmvchelloworld</finalName>

        <plugins>

            <!-- Config: Maven Tomcat Plugin -->

            <!-- http://mvnrepository.com/artifact/org.apache.tomcat.maven/tomcat7-maven-plugin -->

            <!-- http://tomcat.apache.org/maven-plugin-2.0/tomcat7-maven-plugin/plugin-info.html -->

            <plugin>

                <groupId>org.apache.tomcat.maven</groupId>

                <artifactId>tomcat7-maven-plugin</artifactId>

                <version>2.2</version>

                <!-- Config: contextPath and Port (Default:8080) -->

                <!--

                <configuration>

                    <path>/</path>

                    <port>8899</port>

                </configuration>

                 -->

            </plugin>

            <!-- Config: Maven Jetty Plugin -->

            <!-- http://mvnrepository.com/artifact/org.mortbay.jetty/jetty-maven-plugin -->

            <!-- http://www.eclipse.org/jetty/documentation/current/jetty-maven-plugin.html -->

            <plugin>

                <groupId>org.eclipse.jetty</groupId>

                <artifactId>jetty-maven-plugin</artifactId>

                <version>9.4.3.v20170317</version>

                <!-- Config: contextPath and Port (Default:8080) -->

                <!--

                <configuration>

                    <httpConnector>

                        <port>8899</port>

                    </httpConnector>

                    <webAppConfig>

                        <contextPath>/</contextPath>

                    </webAppConfig>

                </configuration>

                 -->

            </plugin>

        </plugins>

    </build>

</project>
注意:引入时参考上面不同颜色的引入,尤其是spring-context-support这个JAR包,里面包含了处理FreeMarker的UI组件。
2、配置web.xml
<web-app id="WebApp_ID" version="3.0"

         xmlns="http://java.sun.com/xml/ns/javaee"

         xmlns:xsi="http://www.w3.org/2001/XMLSchema-instance"

            xsi:schemaLocation="http://java.sun.com/xml/ns/javaee

                                 http://java.sun.com/xml/ns/javaee/web-app_3_0.xsd">

   <display-name>Spring MVC Application</display-name>

   <servlet>

       <servlet-name>spring-mvc</servlet-name>

       <servlet-class>org.springframework.web.servlet.DispatcherServlet</servlet-class>

       <!-- 默认:[servlet-name]-servlet.xml -->

       <!-- 通过初始化参数,指定xml文件的位置 -->

       <init-param>

           <param-name>contextConfigLocation</param-name>

           <param-value>/WEB-INF/helloworld-context.xml</param-value>

       </init-param>

       <load-on-startup>1</load-on-startup>

   </servlet>

   <servlet-mapping>

       <servlet-name>spring-mvc</servlet-name>

       <url-pattern>/</url-pattern>

   </servlet-mapping>

   <!-- 添加其它xml配置 -->

   <context-param>

       <param-name>contextConfigLocation</param-name>

       <param-value>/WEB-INF/other-context.xml</param-value>

   </context-param>

   <listener>

       <listener-class>org.springframework.web.context.ContextLoaderListener</listener-class>

   </listener>

</web-app>
3、配置helloworld-context.xml
<?xml version="1.0" encoding="UTF-8"?>

<beans xmlns="http://www.springframework.org/schema/beans"

    xmlns:xsi="http://www.w3.org/2001/XMLSchema-instance"

    xmlns:p="http://www.springframework.org/schema/p"

    xmlns:context="http://www.springframework.org/schema/context"

    xmlns:mvc="http://www.springframework.org/schema/mvc"

    xsi:schemaLocation="http://www.springframework.org/schema/beans

                        http://www.springframework.org/schema/beans/spring-beans.xsd

                        http://www.springframework.org/schema/context

                        http://www.springframework.org/schema/context/spring-context.xsd

                        http://www.springframework.org/schema/mvc

                        http://www.springframework.org/schema/mvc/spring-mvc.xsd">

    <context:component-scan base-package="com.jsoft.testspring" />

    <context:annotation-config />

    <!-- 配置FreeMarker -->

    <!--以下三种视图配置根据需要任选一种即可 -->

    <!-- 一般的视图配置 -->

    <!-- <bean class="org.springframework.web.servlet.view.InternalResourceViewResolver">

        <property name="prefix">

            <value>/WEB-INF/jsp/</value>

        </property>

        <property name="suffix">

            <value>.jsp</value>

        </property>

    </bean> -->

    <!-- 针对FreeMarker的视图配置 -->

    <bean id="viewResolver" class="org.springframework.web.servlet.view.freemarker.FreeMarkerViewResolver">

        <property name="cache" value="true" />

        <property name="prefix" value="" />

        <property name="suffix" value=".ftl" />

        <property name="contentType" value="text/html;charset=UTF-8"/>

        <property name="requestContextAttribute" value="request" />

        <property name="exposeSpringMacroHelpers" value="true" />

        <property name="exposeRequestAttributes" value="true" />

        <property name="exposeSessionAttributes" value="true" />

    </bean>

    <bean id="freemarkerConfig" class="org.springframework.web.servlet.view.freemarker.FreeMarkerConfigurer">

        <property name="templateLoaderPath" value="/WEB-INF/view" />

        <property name="freemarkerSettings">

            <props>

                <prop key="template_update_delay">0</prop>

                <prop key="default_encoding">UTF-8</prop>

                <prop key="number_format">0.##########</prop>

                <prop key="datetime_format">yyyy-MM-dd HH:mm:ss</prop>

                <prop key="classic_compatible">true</prop>

                <prop key="template_exception_handler">ignore</prop>

            </props>

        </property>

    </bean>

    <!-- 查看解析器也可以使用ResourceBundles或XML文件进行配置。如果您需要基于区域设置的不同视图解析,则必须使用资源束解析器。 -->

    <!-- 这个是针对返回视图还是json值的视图配置 来分别处理同步和异步请求 -->

    <!-- <bean class="org.springframework.web.servlet.view.ContentNegotiatingViewResolver">

        <property name="mediaTypes">

            <map>

                <entry key="html" value="text/html" />

                <entry key="json" value="application/json" />

            </map>

        </property>

        <property name="favorParameter" value="true" />

        <property name="viewResolvers">

            <list>

                <bean class="org.springframework.web.servlet.view.BeanNameViewResolver" />

                <bean id="viewResolver" class="org.springframework.web.servlet.view.freemarker.FreeMarkerViewResolver">

                    <property name="cache" value="true" />

                    <property name="prefix" value="" />

                    <property name="suffix" value=".ftl" />

                    <property name="contentType" value="text/html;charset=UTF-8"/>

                    <property name="requestContextAttribute" value="request" />

                    <property name="exposeSpringMacroHelpers" value="true" />

                    <property name="exposeRequestAttributes" value="true" />

                    <property name="exposeSessionAttributes" value="true" />

                </bean>

            </list>

        </property>

        <property name="defaultContentType" value="text/html" />

    </bean> -->

</beans>
说明:other-context.xml这个文件其实没有什么内容,当然,也可以将上述一些配置引入到这个文件上,效果是一致的。
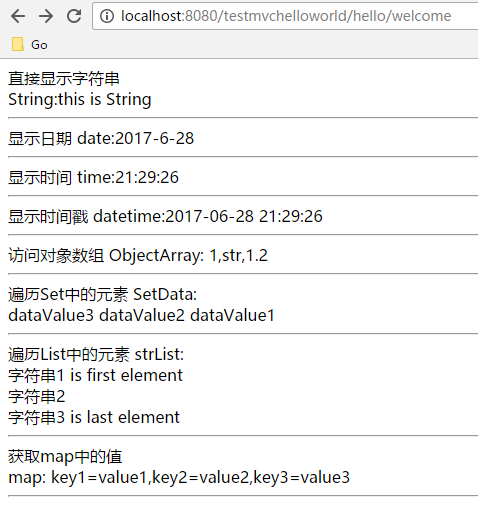
4、新建模板页面welcom.ftl
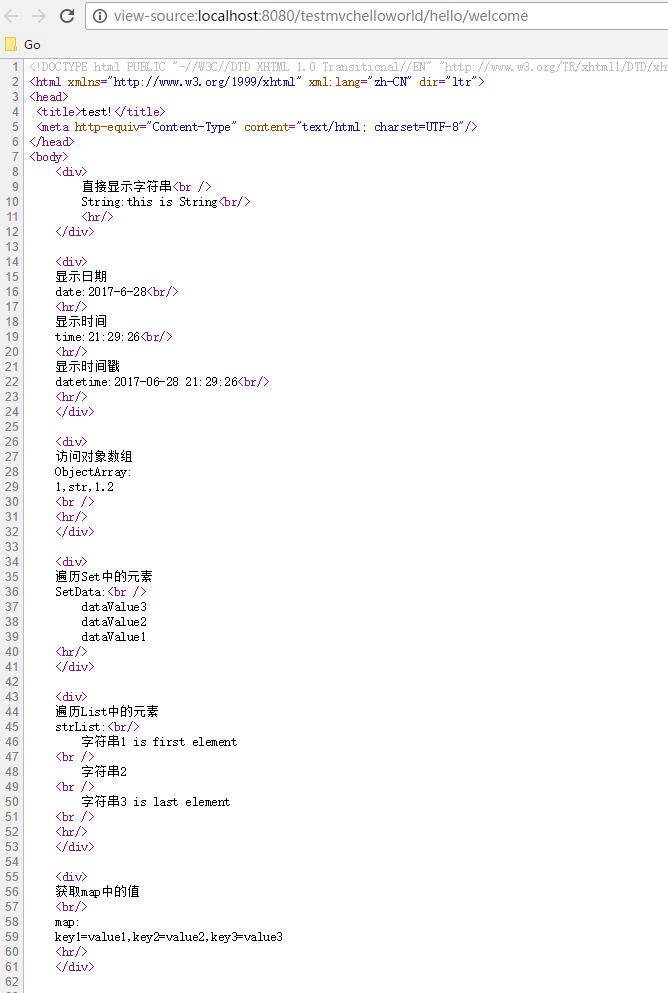
<!DOCTYPE html PUBLIC "-//W3C//DTD XHTML 1.0 Transitional//EN" "http://www.w3.org/TR/xhtml1/DTD/xhtml1-transitional.dtd">

<html xmlns="http://www.w3.org/1999/xhtml" xml:lang="zh-CN" dir="ltr">

<head>

 <title>test!</title>

 <meta http-equiv="Content-Type" content="text/html; charset=UTF-8"/>

</head>

<body>

    <div>

        直接显示字符串<br />

        String:${strValue}<br/>

        <hr/>

    </div>

    <div>

    显示日期

    date:${myDate?date}<br/>

    <hr/>

    显示时间

    time:${myDate?time}<br/>

    <hr/>

    显示时间戳

    datetime:${myDate?datetime}<br/>

    <hr/>

    </div>

    <div>

    访问对象数组

    ObjectArray:

    ${objectArray[0]},${objectArray[1]},${objectArray[2]}

    <br />

    <hr/>

    </div>

    <div>

    遍历Set中的元素

    SetData:<br />

    <#list setData as value>

        ${value}

    </#list>

    <hr/>

    </div>

    <div>

    遍历List中的元素

    strList:<br/>

    <#list strList as strValue >

    <#if strValue_index == >

        ${strValue} is first element

    <#elseif !strValue_has_next>

        ${strValue} is last element

    <#else>

        ${strValue}

    </#if>

    <br />

    </#list>

    <hr/>

    </div>

    <div>

    获取map中的值

    <br/>

    map:

    key1=${map.key1},key2=${map.key2},key3=${map.key3}

    <hr/>

    </div>

</body>

</html>
5、编写HelloController.java
package com.jsoft.testspring.testmvchelloworld;

import java.util.ArrayList;

import java.util.Date;

import java.util.HashMap;

import java.util.HashSet;

import java.util.List;

import java.util.Map;

import java.util.Set;

import javax.servlet.http.HttpServletRequest;

import org.springframework.stereotype.Controller;

import org.springframework.ui.ModelMap;

import org.springframework.web.bind.annotation.RequestMapping;

import org.springframework.web.bind.annotation.RequestMethod;

import org.springframework.web.servlet.ModelAndView;

@Controller

@RequestMapping("/hello")

public class HelloController {

    @RequestMapping(method=RequestMethod.GET)

    public String printHello(ModelMap model){

        model.addAttribute("message","Hello Spring MVC Framework!");

        return "hello";

    }

    @RequestMapping(value = "/welcome", method = { RequestMethod.GET })

    public ModelAndView getFirstPage(HttpServletRequest request) {

        String strValue = "this is String";

        Date myDate = new Date();

        Object[] objectArray = new Object[] { 1, "str", 1.2 };

        Set<Object> setData = new HashSet<Object>();

        setData.add("dataValue1");

        setData.add("dataValue2");

        setData.add("dataValue3");

        List<String> strList = new ArrayList<String>();

        strList.add("字符串1");

        strList.add("字符串2");

        strList.add("字符串3");

        Map<String, Object> map = new HashMap<String, Object>();

        map.put("key1", "value1");

        map.put("key2", "value2");

        map.put("key3", "value3");

        //welcom就是视图的名称(welcom.ftl)

        ModelAndView mv = new ModelAndView("welcom");

        mv.addObject("strValue", strValue);

        mv.addObject("objectArray", objectArray);

        mv.addObject("strList", strList);

        mv.addObject("map", map);

        mv.addObject("myDate", myDate);

        mv.addObject("setData", setData);

        return mv;

    }

}
6、测试效果
通过命令运行:mvn tomcat7:run
测试工程:https://github.com/easonjim/5_java_example/tree/master/freemarker/test4
参考:
http://www.iteye.com/topic/1121801
FreeMarker与Spring MVC 4集合的HelloWorld示例的更多相关文章
- Spring MVC 学习笔记一 HelloWorld
Spring MVC 学习笔记一 HelloWorld Spring MVC 的使用可以按照以下步骤进行(使用Eclipse): 加入JAR包 在web.xml中配置DispatcherServlet ...
- FreeMarker与Spring MVC的结合应用
Freemarker是一种基于java的模板引擎.SpringMVC对FreeMarker进行一些配置的支持,能够利用Freemarker只关注表现层以及Spring MVC的三层分离的特点,向前端输 ...
- Spring mvc接受集合类型参数的方法
public String xxxxx(String xxxx, String xxxxx, @RequestParam("parameterList[]") List<St ...
- 【FreeMarker】Spring MVC与FreeMarker整合(二)
前一篇介绍了FreeMarker的基本使用,本例介绍Spring MVC与FreeMarker整合 不熟悉项目搭建,可参考 [FreeMarker]FreeMarker快速入门(一) 整合 1.新建S ...
- FreeMarker与Spring MVC 4结合错误:Caused by: java.lang.NoClassDefFoundError: org/springframework/ui/freemarker/FreeMarkerConfiguration
添加spring-context-support的依赖到POM: <!-- spring-context-support --> <!-- https://mvnrepository ...
- Spring MVC 文件上传简单示例(form、ajax方式 )
1.Form Upload SpringMVC 中,文件的上传是通过 MultipartResolver 实现的,所以要实现上传,只要注册相应的 MultipartResolver 即可. Multi ...
- Spring MVC使用@RestController生成JSON示例
继上一章的生成JSON示例http://www.cnblogs.com/EasonJim/p/7500405.html,现在还有另一种选择,就是使用@RestController,下面将参照上一节例子 ...
- Spring MVC拦截器完整代码示例
拦截器的作用: 编写一个自定义的类,实现相关拦截器接口: preHandler不放行,直接return false:直接跳转到错误页面error.jsp postHandler后置处理器,也就是C ...
- Spring MVC教程——检视阅读
Spring MVC教程--检视阅读 参考 Spring MVC教程--一点--蓝本 Spring MVC教程--c语言中午网--3.0版本太老了 Spring MVC教程--易百--4.0版本不是通 ...
随机推荐
- 2017杭电多校第六场1011Classes
传送门 Classes Time Limit: 2000/1000 MS (Java/Others) Memory Limit: 65536/65536 K (Java/Others) Tota ...
- 同余模定理 HDOJ 5373 The shortest problem
题目传送门 /* 题意:题目讲的很清楚:When n=123 and t=3 then we can get 123->1236->123612->12361215.要求t次操作后, ...
- NLog简单配置与使用
对项目添加NLog 安装完成后,在项目里面会自动引入该引入的dll,并且会添加如下两个文件 NLog的配置主要是在这个config文件里.当然也可以将这个文件里面的nlog节点复制到项目配置文件App ...
- 9i 和 11 g 区别
9i 和 11 g 区别 9i 不支持 2/4/8G,只支持 2000/4000/8000 M的
- [转]oracle 同义词 synonym
本文转自:http://blog.csdn.net/generalfu/article/details/7906561 同义词定义 当一个用户想访问另外一个用户的表时, 需要在表前加用户名,总加表名不 ...
- 使用Micrisoft.net设计方案 第三章Web表示模式 Web模式集群详细介绍 Observer(观察器)
在面向对象的编程中,对象同时包含数据和行为,这两者一起表示业务域的特定方面.使用对象生成应用程序的优点之一是可以将所有数据操作封装在对象内.这样, 就使对象成为独立的单位,并增加了在其他应用程序中重用 ...
- input checkbox 选择内容输出多少个
<input type="checkbox" name="qId" onclick="doit();"/><input t ...
- 高效程序员的45个习惯·敏捷开发修炼之道(Practices of an Agile Developer)读书笔记
首先,这本书值得再看一遍——这次的阅读,有很多东西都是知其“形”,不知其“神”的,这导致了我对其中某些建议持怀疑态度,接受了的建议也有待商榷. 总之,先记录本书的一些信息: Practices of ...
- 2014中秋节,用java为QQ游戏美女找茬写辅助
引子 今年中秋闲在家,总要找点事做. 前几天开始学python,很早之前就有计划拿下这门语言了,可惜一直拖到现在……不可否认,我也是个拖沓症患者.在学习python的过程中 ...
- PSP辅助软件开发计划
PSP辅助软件开发计划 作者: 日期:2013年11月14号 1开发目的 鉴于软件开发过程中,程序员往往无法在规定时间内完成任务,而且无法给出拖延的时间从而造成项目进度计划不准确.开发此软件帮助程序员 ...