Modern OpenGL用Shader拾取VBO内单一图元的思路和实现(3)
Modern OpenGL用Shader拾取VBO内单一图元的思路和实现(3)
到上一篇为止,拾取一个VBO里的单个图元的问题已经彻底解决了。那么来看下一个问题:一个场景里可能会有多个VBO,此时每个VBO的gl_VertexID都是从0开始的,那么如何区分不同VBO里的图元呢?
指定起始编号

其实办法很简单。举个例子,士兵站成一排进行报数,那么每个士兵所报的数值都不同;这时又来了一排士兵,需要两排都进行报数,且每个士兵所报的数值都不同,怎么办?让第二排士兵从第一排所报的最后一个数值后面接着报就行了。
所以,在用gl_VertexID计算给顶点颜色时,需要加上当前已经计算过的顶点总数,记作pickingBaseID,也就是当前VBO的Shader计算顶点颜色时的基础地址。这样一来,各个VBO的顶点对应的颜色也就全不相同了。
更新Shader

根据这个思路,只需给Vertex Shader增加一个uniform变量。
 #version  core

 in vec3 in_Position;

 in vec3 in_Color;

 flat out vec4 pass_Color; // glShadeMode(GL_FLAT); in legacy opengl.

 uniform mat4 projectionMatrix;

 uniform mat4 viewMatrix;

 uniform mat4 modelMatrix;

 uniform int pickingBaseID; // how many vertices have been coded so far?

 void main(void) {

     gl_Position = projectionMatrix * viewMatrix * modelMatrix * vec4(in_Position, 1.0);

     int objectID = pickingBaseID + gl_VertexID;

     pass_Color = vec4(

         float(objectID & 0xFF) / 255.0,

         float((objectID >> ) & 0xFF) / 255.0,

         float((objectID >> ) & 0xFF) / 255.0,

         float((objectID >> ) & 0xFF) / 255.0);

 }
Fragment Shader则保持不变。
阶段状态信息

为了保存渲染各个VBO的中间过程里的pickingBaseID,我们先给出如下一个存储阶段性计算状态的类型。
     /// <summary>

     /// This type's instance is used in <see cref="MyScene.Draw(RenderMode.HitTest)"/>

     /// by <see cref="IColorCodedPicking"/> so that sceneElements can get their updated PickingBaseID.

     /// </summary>

     public class SharedStageInfo

     {

         /// <summary>

         /// Gets or sets how many vertices have been rendered during hit test.

         /// </summary>

         public virtual int RenderedVertexCount { get; set; }

         /// <summary>

         /// Reset this instance's fields' values to initial state so that it can be used again during rendering.

         /// </summary>

         public virtual void Reset()

         {

             RenderedVertexCount = ;

         }

         public override string ToString()

         {

             return string.Format("rendered {0} vertexes during hit test(picking).", RenderedVertexCount);

             //return base.ToString();

         }

     }
稍后,我们将在每次渲染完一个VBO时就更新此类型的实例的状态,并在每次渲染下一个VBO前为其指定PickingBaseID。
可拾取的场景元素

为了实现拾取功能,我们首先做的就是用这几篇文章介绍的方法渲染场景。当然,渲染出来的效果并不展示到屏幕上,只在OpenGL内部缓存中存在。其实想展示出来也很容易,在SharpGL中只需用如下几行代码:
     //    Blit our offscreen bitmap.

     IntPtr handleDeviceContext = e.Graphics.GetHdc();

     OpenGL.Blit(handleDeviceContext);

     e.Graphics.ReleaseHdc(handleDeviceContext);
其大意就是把OpenGL缓存中的图形贴到屏幕上。
我们设计一个接口IColorCodedPicking,只有实现了此接口的场景元素类型,才能参与拾取过程。
     /// <summary>

     /// Scene element that implemented this interface will take part in color-coded picking when using <see cref="MyScene.Draw(RenderMode.HitTest);"/>.

     /// </summary>

     public interface IColorCodedPicking

     {

         /// <summary>

         /// Gets or internal sets how many primitived have been rendered till now during hit test.

         /// <para>This will be set up by <see cref="MyScene.Draw(RenderMode.HitTest)"/>, so just use the get method.</para>

         /// </summary>

         int PickingBaseID { get; set; }

         /// <summary>

         /// Gets Primitive's count of this element.

         /// </summary>

         int VertexCount { get; }

         /// <summary>

         /// Get the primitive according to vertex's id.

         /// <para>Note: the <paramref name="stageVertexID"/> refers to the last vertex that constructs the primitive.</para>

         /// </summary>

         /// <param name="stageVertexID"></param>

         /// <returns></returns>

         IPickedPrimitive Pick(int stageVertexID);

     }
渲染场景

接下来就是实施渲染了。注意在为了拾取而渲染时,我们让gl.ClearColor(1, 1, 1, 1);,这样一来,如果鼠标所在位置没有任何图元,其"颜色编号"就是4294967295。这是color-coded picking在理论上能分辨的图元数量的上限,所以可以用来判定是否拾取到了图元。
         /// <summary>

         /// Draw the scene.

         /// </summary>

         /// <param name="renderMode">Use Render for normal rendering and HitTest for picking.</param>

         /// <param name="camera">Keep this to null if <see cref="CurrentCamera"/> is already set up.</param>

         public void Draw(RenderMode renderMode = RenderMode.Render)

         {

             var gl = OpenGL;

             if (gl == null) { return; }

             if (renderMode == RenderMode.HitTest)

             {

                 // When picking on a position that no model exists,

                 // the picked color would be

                 // =255

                 // +255 << 8

                 // +255 << 16

                 // +255 << 24

                 // =255

                 // +65280

                 // +16711680

                 // +4278190080

                 // =4294967295

                 // This makes it easier to determin whether we picked something or not.

                 gl.ClearColor(, , , );

             }

             else

             {

                 //    Set the clear color.

                 float[] clear = (SharpGL.SceneGraph.GLColor)ClearColor;

                 gl.ClearColor(clear[], clear[], clear[], clear[]);

             }

             //  Reproject.

             if (camera != null)

                 camera.Project(gl);

             //    Clear.

             gl.Clear(OpenGL.GL_COLOR_BUFFER_BIT | OpenGL.GL_DEPTH_BUFFER_BIT |

                 OpenGL.GL_STENCIL_BUFFER_BIT);

             SharedStageInfo info = this.StageInfo;

             info.Reset();

             //  Render the root element, this will then render the whole

             //  of the scene tree.

             MyRenderElement(SceneContainer, gl, renderMode, info);

             gl.Flush();

         }

         /// <summary>

         /// Renders the element.

         /// </summary>

         /// <param name="gl">The gl.</param>

         /// <param name="renderMode">The render mode.</param>

         public void MyRenderElement(SceneElement sceneElement, OpenGL gl, RenderMode renderMode, SharedStageInfo info)

         {

             // ...

             if (renderMode == RenderMode.HitTest) // Do color coded picking if we are in HitTest mode.

             {

                 IColorCodedPicking picking = sceneElement as IColorCodedPicking;

                 if (picking != null)// This element should take part in color coded picking.

                 {

                     picking.PickingBaseID = info.RenderedVertexCount;// set up picking base id to transform to shader.

                     //  If the element can be rendered, render it.

                     IRenderable renderable = sceneElement as IRenderable;

                     if (renderable != null) renderable.Render(gl, renderMode);

                     info.RenderedVertexCount += picking.VertexCount;// update stage info for next element's picking process.

                 }

             }

             else // Normally render the scene.

             {

                 //  If the element can be rendered, render it.

                 IRenderable renderable = sceneElement as IRenderable;

                 if (renderable != null) renderable.Render(gl, renderMode);

             }

             //  Recurse through the children.

             foreach (var childElement in sceneElement.Children)

                 MyRenderElement(childElement, gl, renderMode, info);

             // ...

         }
获取顶点编号

场景渲染完毕,那么就可以获取鼠标所在位置的颜色,进而获取顶点编号了。
         private IPickedPrimitive Pick(int x, int y)

         {

             // render the scene for color-coded picking.

             this.Scene.Draw(RenderMode.HitTest);

             // get coded color.

             byte[] codedColor = new byte[];

             this.OpenGL.ReadPixels(x, this.Height - y - , , ,

                 OpenGL.GL_RGBA, OpenGL.GL_UNSIGNED_BYTE, codedColor);

             // get vertexID from coded color.

             // the vertexID is the last vertex that constructs the primitive.

             // see http://www.cnblogs.com/bitzhuwei/p/modern-opengl-picking-primitive-in-VBO-2.html

             var shiftedR = (uint)codedColor[];

             var shiftedG = (uint)codedColor[] << ;

             var shiftedB = (uint)codedColor[] << ;

             var shiftedA = (uint)codedColor[] << ;

             var stageVertexID = shiftedR + shiftedG + shiftedB + shiftedA;

             // get picked primitive.

             IPickedPrimitive picked = null;

             picked = this.Scene.Pick((int)stageVertexID);

             return picked;

         }
获取图元

这个顶点编号是在所有VBO中的唯一编号,所以需要遍历所有实现了IColorCodedPicking接口的场景元素来找到此编号对应的图元。
         /// <summary>

         /// Get picked primitive by <paramref name="stageVertexID"/> as the last vertex that constructs the primitive.

         /// </summary>

         /// <param name="stageVertexID">The last vertex that constructs the primitive.</param>

         /// <returns></returns>

         public IPickedPrimitive Pick(int stageVertexID)

         {

             if (stageVertexID < ) { return null; }

             IPickedPrimitive picked = null;

             SceneElement element = this.SceneContainer;

             picked = Pick(element, stageVertexID);

             return picked;

         }

         private IPickedPrimitive Pick(SceneElement element, int stageVertexID)

         {

             IPickedPrimitive result = null;

             IColorCodedPicking picking = element as IColorCodedPicking;

             if (picking != null)

             {

                 result = picking.Pick(stageVertexID);

                 if (result != null)

                 {

                     result.Element = picking;

                     result.StageVertexID = stageVertexID;

                 }

             }

             if (result == null)

             {

                 foreach (var item in element.Children)

                 {

                     result = Pick(item, stageVertexID);

                     if (result != null)

                     { break; }

                 }

             }

             return result;

         }
至于每个场景元素是如何实现IColorCodedPicking的Pick方法的,就比较自由了,下面是一种可参考的方式:
         IPickedPrimitive IColorCodedPicking.Pick(int stageVertexID)

         {

             ScientificModel model = this.Model;

             if (model == null) { return null; }

             IColorCodedPicking picking = this;

             int lastVertexID = picking.GetLastVertexIDOfPickedPrimitive(stageVertexID);

             if (lastVertexID < ) { return null; }

             PickedPrimitive primitive = new PickedPrimitive();

             primitive.Type = BeginModeHelper.ToPrimitiveType(model.Mode);

             int vertexCount = PrimitiveTypeHelper.GetVertexCount(primitive.Type);

             if (vertexCount == -) { vertexCount = model.VertexCount; }

             float[] positions = new float[vertexCount * ];

             float[] colors = new float[vertexCount * ];

21             // copy primitive's position and color to result.

             {

                 float[] modelPositions = model.Positions;

                 float[] modelColors = model.Colors;

                 for (int i = lastVertexID *  + , j = positions.Length - ; j >= ; i--, j--)

                 {

                     if (i < )

                     { i += modelPositions.Length; }

                     positions[j] = modelPositions[i];

                     colors[j] = modelColors[i];

                 }

             }

             primitive.positions = positions;

             primitive.colors = colors;

             return primitive;

         }

         /// <summary>

         /// Get last vertex's id of picked Primitive if it belongs to this <paramref name="picking"/> instance.

         /// <para>Returns -1 if <paramref name="stageVertexID"/> is an illigal number or the <paramref name="stageVertexID"/> is in some other element.</para>

         /// </summary>

         /// <param name="picking"></param>

         /// <param name="stageVertexID"></param>

         /// <returns></returns>

         public static int GetLastVertexIDOfPickedPrimitive(this IColorCodedPicking picking, int stageVertexID)

         {

             int lastVertexID = -;

             if (picking == null) { return lastVertexID; }

             if (stageVertexID < ) // Illigal ID.

             { return lastVertexID; }

             if (stageVertexID < picking.PickingBaseID) // ID is in some previous element.

             { return lastVertexID; }

             if (picking.PickingBaseID + picking.VertexCount <= stageVertexID) // ID is in some subsequent element.

             { return lastVertexID; }

             lastVertexID = stageVertexID - picking.PickingBaseID;

             return lastVertexID;

         }
至此,终于找到了要拾取的图元。
有图有真相

折腾了3篇,现在终于算解决所有的问题了。
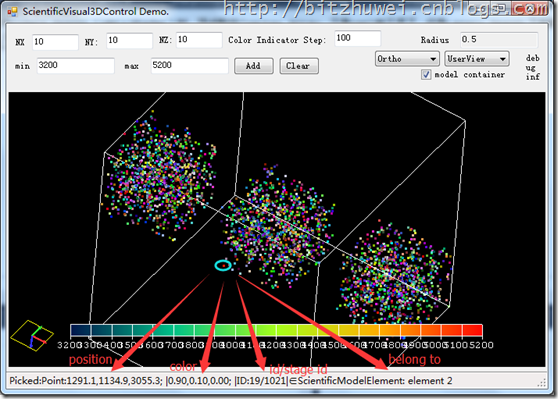
这里以GL_POINTS为例,如图所示,有3个VBO,每个VBO各有1000个顶点。我们可以分别拾取各个顶点,并得知其位置、颜色、ID号、从属哪个VBO这些信息。可以说能得到所拾取的图元的所有信息。
综上所述

总结起来,Modern OpenGL可以利用GLSL内置变量gl_VertexID的存在,借助一点小技巧,实现拾取多个VBO内的任一图元的功能。不过这个方法显然只能拾取一个图元,就是Z缓冲中离屏幕最近的那个图元,不像射线一样能穿透过去拾取多个。
本系列到此结束,今后如果需要拾取鼠标所在位置下的所有图元,再续后话吧。
2016-04-24
最近在整理CSharpGL时发现了一个问题:我只解决了用glDrawArrays();渲染时的拾取问题。如果是用glDrawElements();进行渲染,就会得到错误的图元。
( CSharpGL(18)分别处理glDrawArrays()和glDrawElements()两种方式下的拾取(ColorCodedPicking))就彻底解决这个拾取的问题。
Modern OpenGL用Shader拾取VBO内单一图元的思路和实现(3)的更多相关文章
- Modern OpenGL用Shader拾取VBO内单一图元的思路和实现
Modern OpenGL用Shader拾取VBO内单一图元的思路和实现 什么意思? 拾取 最简单的理解拾取的方式大概是到(http://www.yakergong.net/nehe/course/t ...
- Modern OpenGL用Shader拾取VBO内单一图元的思路和实现(2)
Modern OpenGL用Shader拾取VBO内单一图元的思路和实现(2) 上一篇里介绍了Color-Coded Picking的思路和最基本的实现.在处理GL_POINTS时已经没有问题,但是处 ...
- [Modern OpenGL系列(四)]在OpenGL中使用Shader
本文已同步发表在CSDN:http://blog.csdn.net/wenxin2011/article/details/51347440 在上一篇文章中已经介绍了OpenGL窗口的创建.本文接着说如 ...
- OpenGL图形渲染管线、VBO、VAO、EBO概念及用例
图形渲染管线(Pipeline) 图形渲染管线指的是对一些原始数据经过一系列的处理变换并最终把这些数据输出到屏幕上的整个过程. 图形渲染管线的整个处理流程可以被划分为几个阶段,上一个阶段的输出数据作为 ...
- OpenGL中的拾取模式( Picking)
1. Opengl中的渲染模式有三种:(1)渲染模式,默认的模式:(2)选择模式, (3)反馈模式.如下 GLint glRenderMode(GLenum mode) mode可以选取以下三种模式之 ...
- 【OpenGL ES】关于VBO(Vertex Buffer Object)的一些坑——解析一些关于glBuffer的函数
最近在写毕设的时候用到OpenGL ES中的VBO,由于对一些接口用到的变量不了解被坑得很惨,在此记录一下防止以后再被坑. 本文为大便一箩筐的原创内容,转载请注明出处,谢谢:http://www.cn ...
- [Modern OpenGL系列(三)]用OpenGL绘制一个三角形
本文已同步发表在CSDN:http://blog.csdn.net/wenxin2011/article/details/51347008 在上一篇文章中已经介绍了OpenGL窗口的创建.本文接着说如 ...
- [Modern OpenGL系列(二)]创建OpenGL窗口
本文已同步发表在CSDN:http://blog.csdn.net/wenxin2011/article/details/51295663 在博主的上一篇文章中已经介绍了OpenGL开发环境的搭建,本 ...
- [Modern OpenGL系列(一)]十步搞定OpenGL开发环境
本文已同步发表在CSDN:http://blog.csdn.net/wenxin2011/article/details/51292143 OpenGL官网:https://www.opengl.or ...
随机推荐
- linux安装jdk(非rpm命令)
首先查看当前linux上安装的jdk版本: java -version 复制build 后面的jdk信息 卸载: rpm -e java-1.6.0_22-fcs 或者 yum -y remove j ...
- P87LPC760/61/62/64/67/68/69/78/79芯片解密单片机破解价格
NXP恩智浦P87LPC760/61/62/64/67/68/69/78/79芯片解密单片机破解 NXP LPC700系列单片机解密型号: P87LPC759.P87LPC760.P87LPC761. ...
- 网页中插入外部视频的几种方法(PC与手机网页通用)
网页中加入视频的几种方法(PC与手机网页通用) 方法一: <!doctype html> <html> <head> <meta charset=" ...
- Tomcat的粗略介绍
因为工作的缘故很多项目启动需要通过Tomcat修改配置文件进行启动项目,所以相应的就了解了下Tomcat便于在以后比我更新的新人面前装逼. 1.bin目录 我们能用到的无非一个启动跟一个关闭没什么好说 ...
- SQL 数字分割的字符串
:表示包含正数或者负数.或者0 即表示,数字的字段! select * from 表名 where isnull(字段名,'')<>'' 同时排除空值和null的情况 select coo ...
- iOS CoreData primitive accessor
Given an entity with an attribute firstName, Core Data automatically generates firstName, setFirstNa ...
- 用户名 不在 sudoers文件中
切换到root用户,然后加上某个账户 pzdn@CentOs$ su #输入root密码 root@CentOs cd /etc/ chmod 770 sudoers vim sudoers # 找到 ...
- 【签名之坑】Decmail.GetBits()
decimal类型有GetBits()方法 可以获取到值的int[4]值,进而获取到byte[16]值 在c#里,0m和0.00m获取到的byte[]是不一样的(具体为何不一样,自己百度) 在sql里 ...
- 【ORACLE】MD5加密
今天乌干达充值卡入库时,发现有资源已经存在的异常, 异常原因经过核实是由于卡资源密码在库中已经存在, 为进一步查找存在的原因, 因此需要对导入文件密码的MD5 加密, 通过MD5加密后的字符串 ...
- 分布式系统:怎么简单地解释Paxos算法?从二段提交、三段提交讲到Paxos
原文:https://www.quora.com/Distributed-Systems/What-is-a-simple-explanation-of-the-Paxos-algorithm 作者: ...