Kinect For Windows V2开发日志六:人体的轮廓的表示
> Kinect中带了一种数据源,叫做`BodyIndex`,简单来说就是它利用深度摄像头识别出最多6个人体,并且用数据将属于人体的部分标记,将人体和背景区别开来。利用这一特性,就可以在环境中显示出人体的轮廓而略去背景的细节。我采用了下面两种方式来实现。
用OpenCV表示
代码
#include <iostream>

#include <Kinect.h>

#include <opencv2\highgui.hpp>

using	namespace	std;

using	namespace	cv;

int	main(void)

{

	IKinectSensor	* mySensor = nullptr;			    //Sensor

	GetDefaultKinectSensor(&mySensor);

	mySensor->Open();

	IBodyIndexFrameSource	* mySource = nullptr;		//Source

	mySensor->get_BodyIndexFrameSource(&mySource);

	int	height = 0, width = 0;

	IFrameDescription	* myDescription = nullptr;

	mySource->get_FrameDescription(&myDescription);

	myDescription->get_Height(&height);

	myDescription->get_Width(&width);

	IBodyIndexFrameReader	* myReader = nullptr;		//Reader

	mySource->OpenReader(&myReader);

	IBodyIndexFrame		* myFrame = nullptr;		    //Frame

	Mat	img(height,width,CV_8UC3);

	Vec3b	color[7] = { Vec3b(0,0,255),Vec3b(0,255,255),Vec3b(255,255,255),Vec3b(0,255,0),Vec3b(255,0,0),Vec3b(255,0,255),Vec3b(0,0,0) };

	while (1)

	{

		if (myReader->AcquireLatestFrame(&myFrame) == S_OK)

		{

			UINT	size = 0;

			BYTE	* buffer = nullptr;

			myFrame->AccessUnderlyingBuffer(&size,&buffer);

			for (int i = 0; i < height; i++)

				for (int j = 0; j < width; j++)

				{

					int	index = buffer[i * width + j];		//0-5代表人体,其它值代表背景,用此将人体和背景渲染成不同颜色

					if (index <= 5)

						img.at<Vec3b>(i, j) = color[index];

					else

						img.at<Vec3b>(i, j) = color[6];

				}

			imshow("TEST",img);

			myFrame->Release();

		}

		if (waitKey(30) == VK_ESCAPE)

			break;

	}

	myReader->Release();

	myDescription->Release();

	mySource->Release();

	mySensor->Close();

	mySensor->Release();

	return	0;

}
详细说明
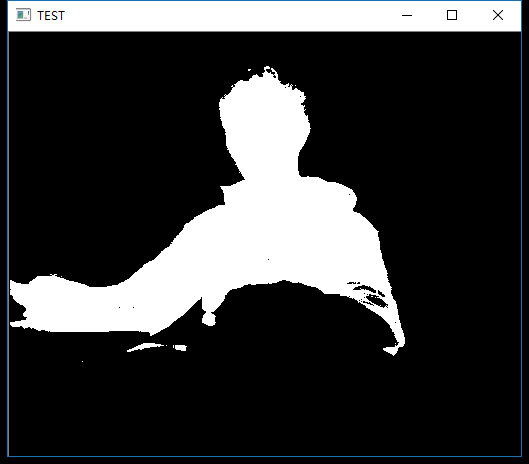
步骤和前面相似,不再赘述,关键在于对数据的处理。IBodyIndexFrame 里的数据分两种,值在0-5之间的点代表的是人体(因此最多识别出6个人),大于5的值代表的是背景。所以要显示人体时,只要简单的把代表人体的点渲染成一种颜色,背景渲染成另外一种颜色就可以了。值得注意的是在写颜色表color时,要用Vec3b把数据强转一下,不然会有问题。
最终的效果就是这样:
直接用数据勾画出人体
代码:
#include <iostream>

#include <Kinect.h>

#include <Windows.h>

using	namespace	std;

using	namespace	cv;

int	main(void)

{

	IKinectSensor	* mySensor = nullptr;			//Sensor

	GetDefaultKinectSensor(&mySensor);

	mySensor->Open();

	IBodyIndexFrameSource	* mySource = nullptr;		//Source

	mySensor->get_BodyIndexFrameSource(&mySource);

	int	height = 0, width = 0;

	IFrameDescription	* myDescription = nullptr;

	mySource->get_FrameDescription(&myDescription);

	myDescription->get_Height(&height);

	myDescription->get_Width(&width);

	IBodyIndexFrameReader	* myReader = nullptr;		//Reader

	mySource->OpenReader(&myReader);

	IBodyIndexFrame		* myFrame = nullptr;		    //Frame

	while (1)

	{

		Sleep(1000);

		if (myReader->AcquireLatestFrame(&myFrame) == S_OK)

		{

			UINT	size = 0;

			BYTE	* buffer = nullptr;

			myFrame->AccessUnderlyingBuffer(&size,&buffer);

			for (int i = 50; i < 350; i++)		    //调出一个合适的尺寸

			{

				for (int j = 0; j < width; j++)

				{

					int	index = buffer[i * width + j];

					if (index <= 5)

						cout << 0;

					else

						cout << 1;

				}

				cout << endl;

			}

			cout << endl << endl;

			myFrame->Release();

		}

	}

	myReader->Release();

	myDescription->Release();

	mySource->Release();

	mySensor->Close();

	mySensor->Release();

	return	0;

}
说明
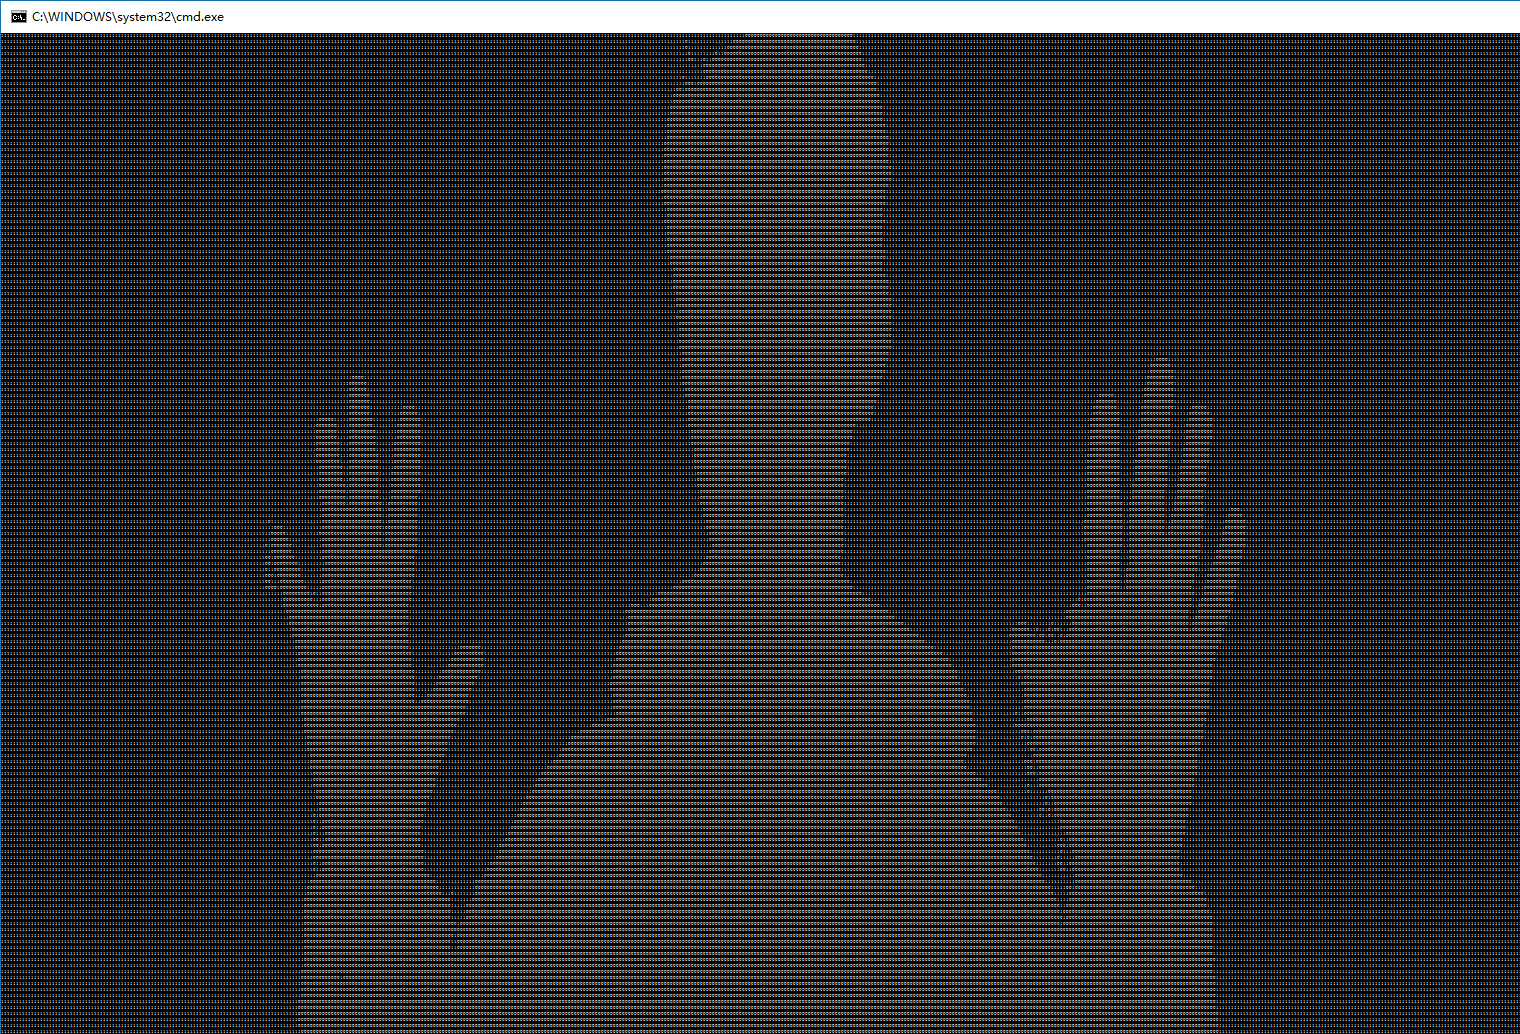
实际上,因为有可以用数字来区别人体和背景这一特性,所以甚至可以不用openCV,直接用数据来显示人体。将识别为人体的数据作为0输出,背景作为1输出,同时把控制台的窗口调大一些,字体调到最小,每秒钟输出一帧,就能直接看到数据画出的图。真是有趣。
效果如下:
Kinect For Windows V2开发日志六:人体的轮廓的表示的更多相关文章
- Kinect For Windows V2开发日志七:照片合成与背景消除
上一篇里讲到了Kinect可以从环境中区分出人体来.因此可以利用这个功能,来把摄像头前的人合成进照片里,和利用Photoshop不同的是,这样合成进去的人是动态且实时的. 简单的思路 BodyInde ...
- Kinect For Windows V2开发日志八:侦测、追踪人体骨架
简介 Kinect一个很强大的功能就是它可以侦测到人体的骨骼信息并追踪,在Kinect V2的SDK 2.0中,它最多可以同时获取到6个人.每个人25个关节点的信息,并且通过深度摄像头,可以同时获取到 ...
- Kinect For Windows V2开发日志九:侦测并绘制人体骨架
简介 在上一篇<侦测.追踪人体骨架>里,介绍了关节点的使用办法,这一篇记录将关节点与OpenCV结合的绘图方法. 代码 #include <iostream> #include ...
- Kinect For Windows V2开发日志一:开发环境的配置
算是正式进军Kinect了,前段时间学的东西现在就忘了,于是从此开始记录一下. 目前为止大部分的学习资料来自于Heresy的博客,写的非常优秀,清晰明了,十分感谢.开发语言为C++,应该会一直使用,但 ...
- Kinect For Windows V2开发日志五:使用OpenCV显示彩色图像及红外图像
彩色图像 #include <iostream> #include <Kinect.h> #include <opencv2\highgui.hpp> using ...
- Kinect For Windows V2开发日志二:Kinect V2的基本参数
以下内容节选自Heresy的博客: 彩色影像:1920 x 1080 @ 30 / 15 FPS(根据环境亮度) 深度影像:512 x 424 @ 30 FPS.16bit 距离值(mm).可侦测 ...
- Kinect For Windows V2开发日志四:使用OpenCV显示深度图像
代码示例: #include <Kinect.h> #include <iostream> #include <opencv2\highgui.hpp> using ...
- Kinect For Windows V2开发日志三:简单的深度读取
代码示例: #include <Kinect.h> #include <iostream> using namespace std; int main(void) { IKin ...
- Kinect for Windows V2开发教程
教程 https://blog.csdn.net/openbug/article/details/80921437 Windows版Kinect SDK https://docs.microsoft. ...
随机推荐
- easyui 表单和自定义验证扩展和js自定义返回值
================jsp==========================<form method="post" id="regfrminp&qu ...
- 当类库项目中无法使用Application.StartupPath
通常我们WinForm编程时,要获取程序当前运行的文件夹路径会用Application.StartupPath ,但是Application.StartupPath在编写类库项目时却无法使用,因为我们 ...
- JavaScript寻踪OOP之路
上一集中,重点介绍了谁动了你的代码.这里先总结一下:咱们的代码从敲下来到运行出结果,经历了两个阶段:分析期与运行期.在分析期,JavaScript分析器悄悄动了我们的代码:在运行期,JavaScrip ...
- Nginx 的 RTMP 模块的在线统计功能 stat 在 multi-worker 模式下存在 Bug
< 让你的 Nginx 的 RTMP 直播具有统计某频道在线观看用户数量的功能>一文介绍了 Nginx 的在线统计模块. 我们的在线直播服务使用了 Nginx 的 Rtmp ...
- Eclipse背景颜色修改
改变背景颜色(黑底背景的设置) windows->Preferences->General->Editor->Text Editors windows->Preferen ...
- C++的优秀特性3:构造函数和析构函数
(转载请注明原创于潘多拉盒子) 构造函数和析构函数是C++中再熟悉不过的概念了,几乎每个了解一点C++的人都知道这两个概念是什么意思.一个对象的全部生命期中构造函数和析构函数执行的时机如下: 1. 为 ...
- Study notes for Clustering and K-means
1. Clustering Analysis Clustering is the process of grouping a set of (unlabeled) data objects into ...
- Cocos2D-x权威指南:通过节点控制屏幕中的全体渲染对象
本节,已经能够利用我们眼下所学的知识做出一些有趣的东西.之前已经说过,CCNode类没有贴图,也就是说在屏幕上单独建立一个节点是没有不论什么效果的,可是能够通过这个"无形"的节点来 ...
- [Angular2 Router] Optional Route Query Parameters - The queryParams Directive and the Query Parameters Observable
In this tutorial we are going to learn how to use the Angular 2 router to pass optional query parame ...
- [Angular-Scaled Web] 7. Refactor code into Models
In the previous code, both categories and bookmarks are binded to $rootscope, or let says the same s ...