Spring Cloud Alibaba | Nacos服务中心初探
Spring Cloud Alibaba | Nacos服务注册与发现
Springboot: 2.1.6.RELEASE
SpringCloud: Greenwich.SR1
如无特殊说明,本系列文章全采用以上版本
上一篇《Spring Cloud Alibaba | Nacos服务中心初探》我们聊了什么是Nacos以及Nacos如何搭建,这一篇我们接着聊Nacos如何简单使用。
首先,Nacos是一个服务注册和服务发现的注册中心,在Spring Cloud中,可以替代Eureka的功能,我们先聊一下Nacos如何和Spring Cloud集成做一个注册中心。
整体流程为:
- 先启动注册中心Nacos
- 启动服务的提供者将提供服务,并将服务注册到注册中心Nacos上
- 启动服务的消费者,在Nacos中找到服务并完成消费
1. 服务提供者
新建一个producer的项目,项目依赖如下:
1.1 pom.xml项目依赖
<?xml version="1.0" encoding="UTF-8"?>

<project xmlns="http://maven.apache.org/POM/4.0.0" xmlns:xsi="http://www.w3.org/2001/XMLSchema-instance"

	xsi:schemaLocation="http://maven.apache.org/POM/4.0.0 http://maven.apache.org/xsd/maven-4.0.0.xsd">

	<modelVersion>4.0.0</modelVersion>

	<parent>

		<groupId>org.springframework.boot</groupId>

		<artifactId>spring-boot-starter-parent</artifactId>

		<version>2.1.6.RELEASE</version>

		<relativePath/> <!-- lookup parent from repository -->

	</parent>

	<groupId>com.springcloud</groupId>

	<artifactId>producer</artifactId>

	<version>0.0.1-SNAPSHOT</version>

	<name>producer</name>

	<description>Demo project for Spring Boot</description>

	<properties>

		<java.version>1.8</java.version>

	</properties>

	<dependencies>

		<dependency>

			<groupId>org.springframework.boot</groupId>

			<artifactId>spring-boot-starter-web</artifactId>

		</dependency>

		<dependency>

			<groupId>org.springframework.cloud</groupId>

			<artifactId>spring-cloud-starter-alibaba-nacos-discovery</artifactId>

			<version>0.9.0.RELEASE</version>

		</dependency>

		<dependency>

			<groupId>org.springframework.boot</groupId>

			<artifactId>spring-boot-starter-test</artifactId>

			<scope>test</scope>

		</dependency>

	</dependencies>

	<build>

		<plugins>

			<plugin>

				<groupId>org.springframework.boot</groupId>

				<artifactId>spring-boot-maven-plugin</artifactId>

			</plugin>

		</plugins>

	</build>

</project>
增加Nacos的服务发现的依赖:spring-cloud-starter-alibaba-nacos-discovery,根据版本SpringCloud和SpringBoot的版本,这里我们使用0.9.0.RELEASE版本。其他版本使用请看上一篇《Spring Cloud Alibaba | Nacos服务中心初探》。
1.2 配置文件application.yml
server:

  port: 9000

spring:

  application:

    name: spring-cloud-nacos-producer

  cloud:

    nacos:

      discovery:

        server-addr: localhost:8848
1.3 启动类ProducerApplication.java
package com.springcloud.producer;

import org.springframework.boot.SpringApplication;

import org.springframework.boot.autoconfigure.SpringBootApplication;

import org.springframework.cloud.client.discovery.EnableDiscoveryClient;

@SpringBootApplication

@EnableDiscoveryClient

public class ProducerApplication {

	public static void main(String[] args) {

		SpringApplication.run(ProducerApplication.class, args);

	}

}
@EnableDiscoveryClient 注册服务至Nacos。
1.4 controller
package com.springcloud.producer.controller;

import org.springframework.web.bind.annotation.RequestMapping;

import org.springframework.web.bind.annotation.RequestParam;

import org.springframework.web.bind.annotation.RestController;

/**

 * Created with IntelliJ IDEA.

 *

 * @Date: 2019/7/14

 * @Time: 10:04

 * @email: inwsy@hotmail.com

 * Description:

 */

@RestController

public class HelloController {

    @RequestMapping("/hello")

    public String hello(@RequestParam String name) {

        return "hello "+name+",producer is ready";

    }

}
1.5 测试
启动服务producer,在浏览器访问链接:http://localhost:9000/hello?name=nacos, 可以看到页面显示hello nacos,producer is ready。
打开Nacos显示页面,可以看到服务spring-cloud-nacos-producer正常上线。
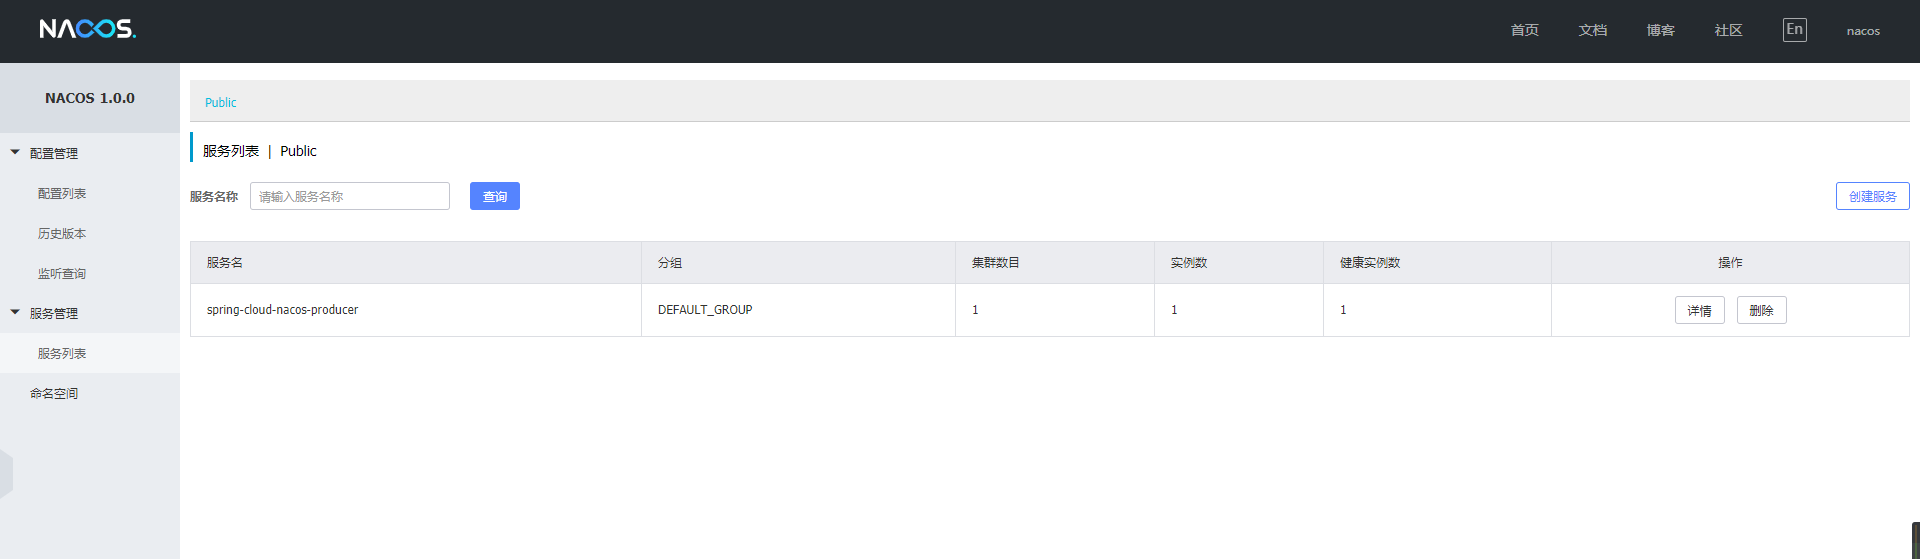
到这里,我们的服务提供者已经正常搭建完毕。
2. 服务消费者
2.1 pom.xml项目依赖
<?xml version="1.0" encoding="UTF-8"?>

<project xmlns="http://maven.apache.org/POM/4.0.0" xmlns:xsi="http://www.w3.org/2001/XMLSchema-instance"

	xsi:schemaLocation="http://maven.apache.org/POM/4.0.0 http://maven.apache.org/xsd/maven-4.0.0.xsd">

	<modelVersion>4.0.0</modelVersion>

	<parent>

		<groupId>org.springframework.boot</groupId>

		<artifactId>spring-boot-starter-parent</artifactId>

		<version>2.1.6.RELEASE</version>

		<relativePath/> <!-- lookup parent from repository -->

	</parent>

	<groupId>com.spring</groupId>

	<artifactId>nacos-cosumers</artifactId>

	<version>0.0.1-SNAPSHOT</version>

	<name>nacos-cosumers</name>

	<description>Demo project for Spring Boot</description>

	<properties>

		<java.version>1.8</java.version>

		<spring-cloud.version>Greenwich.SR2</spring-cloud.version>

	</properties>

	<dependencies>

		<dependency>

			<groupId>org.springframework.boot</groupId>

			<artifactId>spring-boot-starter-web</artifactId>

		</dependency>

		<dependency>

			<groupId>org.springframework.cloud</groupId>

			<artifactId>spring-cloud-starter-openfeign</artifactId>

		</dependency>

		<dependency>

			<groupId>org.springframework.cloud</groupId>

			<artifactId>spring-cloud-starter-alibaba-nacos-discovery</artifactId>

			<version>0.9.0.RELEASE</version>

		</dependency>

		<dependency>

			<groupId>org.springframework.boot</groupId>

			<artifactId>spring-boot-starter-test</artifactId>

			<scope>test</scope>

		</dependency>

	</dependencies>

	<dependencyManagement>

		<dependencies>

			<dependency>

				<groupId>org.springframework.cloud</groupId>

				<artifactId>spring-cloud-dependencies</artifactId>

				<version>${spring-cloud.version}</version>

				<type>pom</type>

				<scope>import</scope>

			</dependency>

		</dependencies>

	</dependencyManagement>

	<build>

		<plugins>

			<plugin>

				<groupId>org.springframework.boot</groupId>

				<artifactId>spring-boot-maven-plugin</artifactId>

			</plugin>

		</plugins>

	</build>

</project>
这里增加了spring-cloud-starter-openfeign依赖包
2.2 配置文件application.yml
server:

  port: 8080

spring:

  application:

    name: spring-cloud-nacos-consumers

  cloud:

    nacos:

      discovery:

        server-addr: localhost:8848
2.3 启动类NacosCosumersApplication.java
package com.spring.nacoscosumers;

import org.springframework.boot.SpringApplication;

import org.springframework.boot.autoconfigure.SpringBootApplication;

import org.springframework.cloud.client.discovery.EnableDiscoveryClient;

import org.springframework.cloud.openfeign.EnableFeignClients;

@SpringBootApplication

@EnableDiscoveryClient

@EnableFeignClients

public class NacosCosumersApplication {

	public static void main(String[] args) {

		SpringApplication.run(NacosCosumersApplication.class, args);

	}

}
@EnableFeignClients这个注解是声明Feign远程调用
2.4 Feign远程调用
创建一个remote接口
package com.spring.nacoscosumers.remote;

import org.springframework.cloud.openfeign.FeignClient;

import org.springframework.web.bind.annotation.RequestMapping;

import org.springframework.web.bind.annotation.RequestParam;

@FeignClient(name= "spring-cloud-nacos-producer")

public interface HelloRemote {

    @RequestMapping(value = "/hello")

    String hello(@RequestParam(value = "name") String name);

}
2.5 web层调用远程接口 Controller
package com.spring.nacoscosumers.controller;

import com.spring.nacoscosumers.remote.HelloRemote;

import org.springframework.beans.factory.annotation.Autowired;

import org.springframework.web.bind.annotation.PathVariable;

import org.springframework.web.bind.annotation.RequestMapping;

import org.springframework.web.bind.annotation.RestController;

/**

 * Created with IntelliJ IDEA.

 *

 * @Date: 2019/7/14

 * @Time: 10:24

 * @email: inwsy@hotmail.com

 * Description:

 */

@RestController

public class HelloController {

    @Autowired

    HelloRemote helloRemote;

    @RequestMapping("/hello/{name}")

    public String index(@PathVariable("name") String name) {

        return helloRemote.hello(name);

    }

}
2.6 测试
启动服务消费者nacos-consumers,打开浏览器访问链接:http://localhost:8080/hello/nacos, 这时页面正常返回hello nacos,producer is ready,证明我们的已经通过Nacos作为注册中心已经正常提供了服务注册与发现。
3. 集成Gateway
上面介绍了Nacos可以和Feign集成使用,更多的情况下,我们需要和API网关来集成。
这里我们还是使用之前的服务提供者,新建一个服务网关。
这里我们使用了Gateway做演示,想使用Zuul的朋友可以作为参考,在原有Zuul+Eureka的基础上只需要更换配置和依赖包就可以,无需其他过多的修改。
3.1 pom.xml项目依赖
<?xml version="1.0" encoding="UTF-8"?>

<project xmlns="http://maven.apache.org/POM/4.0.0" xmlns:xsi="http://www.w3.org/2001/XMLSchema-instance"

	xsi:schemaLocation="http://maven.apache.org/POM/4.0.0 http://maven.apache.org/xsd/maven-4.0.0.xsd">

	<modelVersion>4.0.0</modelVersion>

	<parent>

		<groupId>org.springframework.boot</groupId>

		<artifactId>spring-boot-starter-parent</artifactId>

		<version>2.1.6.RELEASE</version>

		<relativePath/> <!-- lookup parent from repository -->

	</parent>

	<groupId>com.spring</groupId>

	<artifactId>nacos-gateway</artifactId>

	<version>0.0.1-SNAPSHOT</version>

	<name>nacos-gateway</name>

	<description>Demo project for Spring Boot</description>

	<properties>

		<java.version>1.8</java.version>

		<spring-cloud.version>Greenwich.SR2</spring-cloud.version>

	</properties>

	<dependencies>

		<dependency>

			<groupId>org.springframework.cloud</groupId>

			<artifactId>spring-cloud-starter-gateway</artifactId>

		</dependency>

		<dependency>

			<groupId>org.springframework.cloud</groupId>

			<artifactId>spring-cloud-starter-alibaba-nacos-discovery</artifactId>

			<version>0.9.0.RELEASE</version>

		</dependency>

		<dependency>

			<groupId>org.springframework.boot</groupId>

			<artifactId>spring-boot-starter-test</artifactId>

			<scope>test</scope>

		</dependency>

	</dependencies>

	<dependencyManagement>

		<dependencies>

			<dependency>

				<groupId>org.springframework.cloud</groupId>

				<artifactId>spring-cloud-dependencies</artifactId>

				<version>${spring-cloud.version}</version>

				<type>pom</type>

				<scope>import</scope>

			</dependency>

		</dependencies>

	</dependencyManagement>

	<build>

		<plugins>

			<plugin>

				<groupId>org.springframework.boot</groupId>

				<artifactId>spring-boot-maven-plugin</artifactId>

			</plugin>

		</plugins>

	</build>

</project>
3.2 配置文件application.xml
server:

  port: 8088

spring:

  application:

    name: spring-cloud-nacos-gateway

  cloud:

    nacos:

      discovery:

        server-addr: localhost:8848

    gateway:

      discovery:

        locator:

          enabled: true

      routes:

        - id: hello_route

          #格式为:lb://应用注册服务名

          uri: lb://spring-cloud-nacos-producer

          predicates:

            - Method=GET
3.3 启动类NacosGatewayApplication.java
package com.spring.nacosgateway;

import org.springframework.boot.SpringApplication;

import org.springframework.boot.autoconfigure.SpringBootApplication;

@SpringBootApplication

public class NacosGatewayApplication {

	public static void main(String[] args) {

		SpringApplication.run(NacosGatewayApplication.class, args);

	}

}
3.4 测试
我们启动Gateway,打开浏览器访问链接:http://localhost:8088/spring-cloud-nacos-producer/hello?name=nacos, 浏览器正常返回:hello nacos,producer is ready, 证明我们通过服务网关来访问服务是正常的。
最后,我们打开看一下Nacos的服务列表:
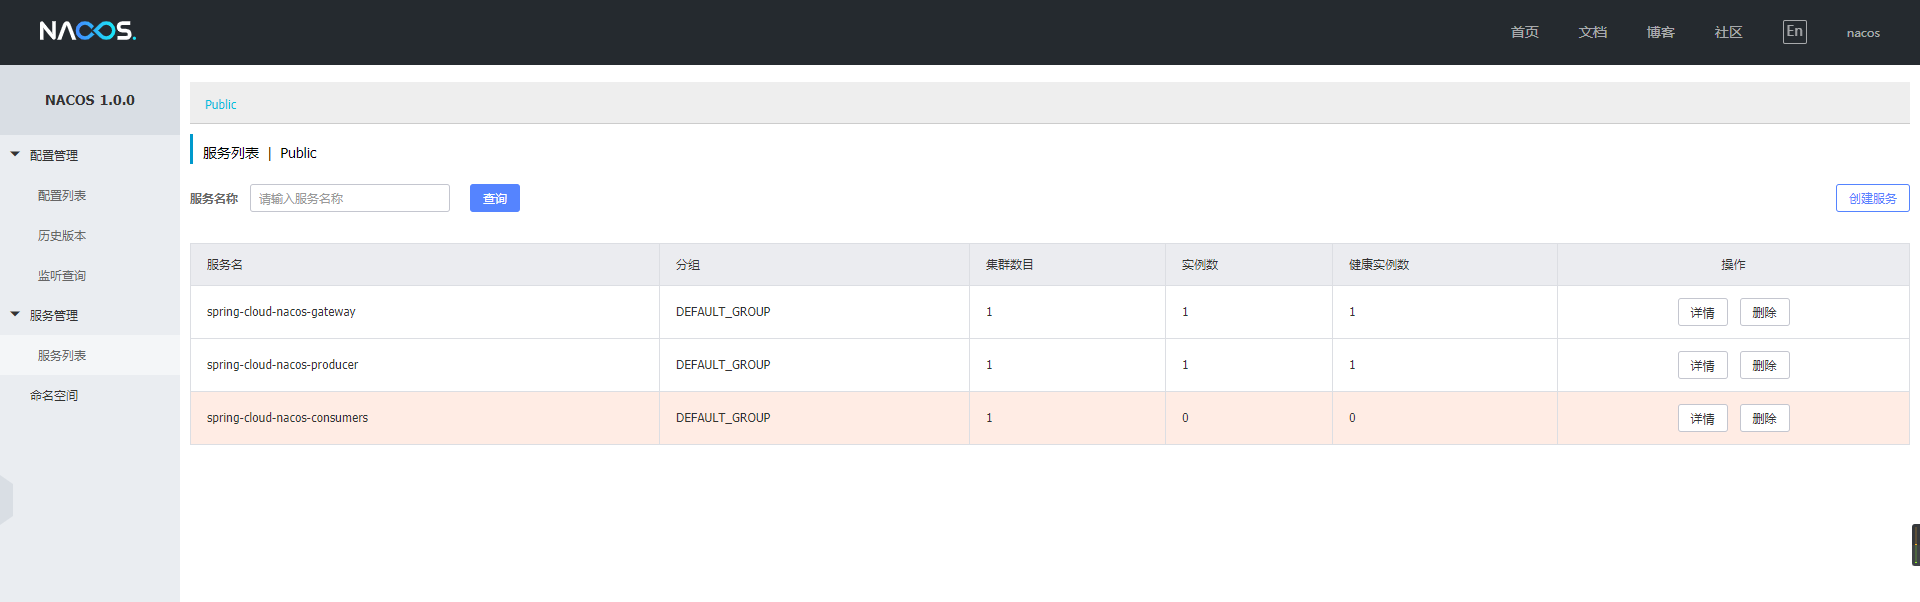
这里我把消费者服务停止掉了,可以看到Nacos可以实时的显示出来。
Nacos就介绍到这里,有不清楚的可以给我留言~
Spring Cloud Alibaba | Nacos服务中心初探的更多相关文章
- Spring Cloud Alibaba | Nacos服务注册与发现
目录 Spring Cloud Alibaba | Nacos服务注册与发现 1. 服务提供者 1.1 pom.xml项目依赖 1.2 配置文件application.yml 1.3 启动类Produ ...
- Spring Cloud Alibaba | Nacos配置管理
目录 Spring Cloud Alibaba | Nacos配置管理 1. pom.xml 项目依赖 2. 在 bootstrap.properties 中配置 Nacos server 的地址和应 ...
- Spring Cloud Alibaba | Nacos集群部署
目录 Spring Cloud Alibaba | Nacos集群部署 1. Nacos支持三种部署模式 2. 集群模式下部署Nacos 2.1 架构图 2.2 下载源码或者安装包 2.3 配置集群配 ...
- 0.9.0.RELEASE版本的spring cloud alibaba nacos+feign实例
这里的feign依然是原来的feign,只不过将注册中心由eureka换成了nacos.服务提供方参见0.9.0.RELEASE版本的spring cloud alibaba nacos实例,消费方跟 ...
- 0.9.0.RELEASE版本的spring cloud alibaba nacos实例
简而言之,nacos与eureka的不同之处有三:后台老板.部署方式.功能.nacos是阿里的,eureka是奈飞的:nacos有自己的安装包,需要独立部署,eureka仅作为一个服务组件,引入jar ...
- Spring Cloud Alibaba Nacos
1. Spring Cloud Alibaba 介绍 Spring Cloud Alibaba 为分布式应用程序开发提供了一站式解决方案.它包含了开发分布式应用程序所需的所有组件,使得你可以轻松地使用 ...
- Spring Cloud Alibaba+Nacos搭建微服务架构
1. Spring Cloud Alibaba 简介 Spring Cloud Alibaba是阿里巴巴为分布式应用提供的一站式解决方案,能够更方便快捷地搭建分布式平台,nacos拥有着替换eu ...
- Spring Cloud Alibaba Nacos Config 实战
Nacos 提供用于存储配置和其他元数据的 key/value 存储,为分布式系统中的外部化配置提供服务器端和客户端支持.使用 Spring Cloud Alibaba Nacos Config,您可 ...
- Spring Cloud Alibaba Nacos Config 的使用
Spring Cloud Alibaba Nacos Config 的使用 一.需求 二.实现功能 1.加载 product-provider-dev.yaml 配置文件 2.实现配置的自动刷新 3. ...
随机推荐
- jquery table 隔行变色+点谁谁变色
<!DOCTYPE html><html><head><meta http-equiv="Content-Type" content=&q ...
- php 将一个二维数组中两个相同的value 相同 指定值相加
array(3) { [0]=> array(7) { ["mlid"]=> int(1) ["num"]=> int(1) ["c ...
- 用蓝牙连接debian和诺基亚手机
本方法已经用debian 4.0.诺基亚9300和一个hl-united牌子的USB蓝牙适配器测试过了,效果很好. 1.安装必要的软件包: #apt-get install ...
- delphi文件操作(比较全)
Delphi中默认有input和output两个文件变量,使用可以不用定义,直接使用. 但: input:只读.output:只写.用时注意以免引起异常. 文件是由文件名标识的一组数据的集合,文件通常 ...
- Windows 10开发基础——XML和JSON (一)
主要内容: JSON的序列化与反序列化 XML的序列化与反序列化 1.JSON的序列化与反序列化 JSON(JavaScript Object Notation)是一种轻量级的数据交换语言,它 ...
- AFN小结(简单的封装)
AFN小结 1,AFN概念.原理 2,AFN的封装使用 3,AFN与其它框架对比 ————————————————————————————————— 1 , AFN的概念原理: AFN的基础是NSUR ...
- SQL Server 事务复制分发到订阅同步慢
原文:SQL Server 事务复制分发到订阅同步慢 最近发现有一个发布经常出现问题,每几天就出错不同步,提示要求初始化.重新调整同步后,复制还是很慢!每天白天未分发的命令就达五六百万条!要解决慢的问 ...
- C#添加应用路径到系统PATH变量
var dllDirectory = @"C:/some/path"; Environment.SetEnvironmentVariable("PATH", E ...
- 用JavaScriptSerializer解析JSON
引用System.Web.Extensions using System.Web.Script.Serialization; var serializer = new JavaScriptSerial ...
- eclipse 插件编写(二)
上篇文章简单写了下怎么新建一个eclipse插件工程,这次写一下怎么在上次的工程中添加几个菜单,如菜单栏菜单.工具栏菜单.右键菜单等. 创建一个完成的菜单需要了解三个扩展点,即menus.comman ...