
abp(net core)+easyui+efcore实现仓储管理系统——EasyUI之货物管理一 (十九)
abp(net core)+easyui+efcore实现仓储管理系统目录
abp(net core)+easyui+efcore实现仓储管理系统——ABP总体介绍(一)
abp(net core)+easyui+efcore实现仓储管理系统——解决方案介绍(二)
abp(net core)+easyui+efcore实现仓储管理系统——领域层创建实体(三)
abp(net core)+easyui+efcore实现仓储管理系统——定义仓储并实现 (四)
abp(net core)+easyui+efcore实现仓储管理系统——创建应用服务(五)
abp(net core)+easyui+efcore实现仓储管理系统——展现层实现增删改查之控制器(六)
abp(net core)+easyui+efcore实现仓储管理系统——展现层实现增删改查之列表视图(七)
abp(net core)+easyui+efcore实现仓储管理系统——展现层实现增删改查之增删改视图(八)
abp(net core)+easyui+efcore实现仓储管理系统——展现层实现增删改查之菜单与测试(九)
abp(net core)+easyui+efcore实现仓储管理系统——多语言(十)
abp(net core)+easyui+efcore实现仓储管理系统——使用 WEBAPI实现CURD (十一)
abp(net core)+easyui+efcore实现仓储管理系统——使用 WEBAPI实现CURD (十二)
abp(net core)+easyui+efcore实现仓储管理系统——使用 WEBAPI实现CURD (十三)
abp(net core)+easyui+efcore实现仓储管理系统——使用 WEBAPI实现CURD (十四)
abp(net core)+easyui+efcore实现仓储管理系统——使用 WEBAPI实现CURD (十五)
abp(net core)+easyui+efcore实现仓储管理系统——菜单-上 (十六)
abp(net core)+easyui+efcore实现仓储管理系统——菜单-下(十七)
abp(net core)+easyui+efcore实现仓储管理系统——EasyUI前端页面框架 (十八)
通过上一篇(abp(net core)+easyui+efcore实现仓储管理系统——EasyUI前端页面框架 (十八))文章,我们已经将EasyUI添加到我们的项目中了。下面我们通过EasyUI做为前端页面的UI控件来展现一个货物信息管理的前端功能,并使用创建相应的实体类,服务类等来实现后台功能。
四、创建Cargo实体
1. 在Visual Studio 2017的“解决方案资源管理器”中,右键单击“ABP.TPLMS.Core”项目的“Entitys”文件夹,在弹出菜单中选择“添加” >
> “类”。 将类命名为 Cargo,然后选择“添加”。
2.创建Cargo类继承自Entity<int>,通过实现审计模块中的IHasCreationTime来实现保存创建时间。代码如下:
using Abp.Domain.Entities;

using Abp.Domain.Entities.Auditing;

using System;

using System.Collections.Generic;

using System.ComponentModel.DataAnnotations;

using System.ComponentModel.DataAnnotations.Schema;

using System.Text;

namespace ABP.TPLMS.Entitys

{

    public class Cargo : Entity<int>, IHasCreationTime

    {

        public Cargo()

        {

            this.Id = ;

            this.SupplierId = ;

            this.CargoCode = string.Empty;

            this.CargoName = string.Empty;

            this.Brand = string.Empty;

            this.Country = string.Empty;

            this.CreationTime = DateTime.Now;

            this.Curr = string.Empty;

            this.GrossWt = ;

            this.Height = ;

            this.HSCode = string.Empty;

            this.Length = ;

            this.MaxNum = ;

            this.MinNum = ;

            this.NetWt = ;

            this.Package = string.Empty;

            this.Price = ;

            this.Remark = string.Empty;

            this.Spcf = string.Empty;

            this.Unit = string.Empty;

            this.UpdateTime = DateTime.Now;

            this.UpdOper = string.Empty;

            this.Vol = ;

            this.Width = ;

        }

        public int SupplierId { get; set; }

        [StringLength()]

        public string CargoCode { get; set; }

        [StringLength()]

        public string HSCode { get; set; }

        [StringLength()]

        public string CargoName { get; set; }

        [StringLength()]

        public string Spcf { get; set; }

        public string Unit { get; set; }

        public string Country { get; set; }

        public string Brand { get; set; }

        public string Curr { get; set; }

        public string Package { get; set; }

        public decimal Length { get; set; }

        public decimal Width { get; set; }

        public decimal Height { get; set; }

        public decimal Vol { get; set; }

        public decimal MinNum { get; set; }

        public decimal MaxNum { get; set; }

        public decimal Price { get; set; }

        public decimal GrossWt { get; set; }

         public decimal NetWt { get; set; }

        public string Remark { get; set; }

        public DateTime CreationTime { get; set; }

        public DateTime UpdateTime { get; set; }

        public string UpdOper { get; set; }

    }

}
3.定义好实体之后,我们去“ABP.TPLMS.EntityFrameworkCore”项目中的“TPLMSDbContext”类中定义实体对应的DbSet,以应用Code First 数据迁移。添加以下代码
using Microsoft.EntityFrameworkCore;

using Abp.Zero.EntityFrameworkCore;

using ABP.TPLMS.Authorization.Roles;

using ABP.TPLMS.Authorization.Users;

using ABP.TPLMS.MultiTenancy;

using ABP.TPLMS.Entitys;

namespace ABP.TPLMS.EntityFrameworkCore

{

    public class TPLMSDbContext : AbpZeroDbContext<Tenant, Role, User, TPLMSDbContext>

    {

        /* Define a DbSet for each entity of the application */

        public TPLMSDbContext(DbContextOptions<TPLMSDbContext> options)

            : base(options)

        {

        }

        public DbSet<Module> Modules { get; set; }

        public DbSet<Supplier> Suppliers { get; set; }

  public DbSet<Cargo> Cargos { get; set; }

    }

}
4.从菜单中选择“工具->NuGet包管理器器—>程序包管理器控制台”菜单。
5. 在PMC中,默认项目选择EntityframeworkCore对应的项目后。输入以下命令:Add-Migration AddEntityCargo,创建迁移。
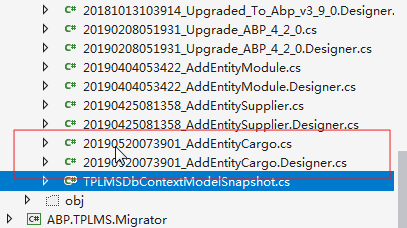
6. 在上面的命令执行完毕之后,创建成功后,会在Migrations文件夹下创建时间_AddEntityCargo格式的类文件,这些代码是基于DbContext指定的模型。如下图。
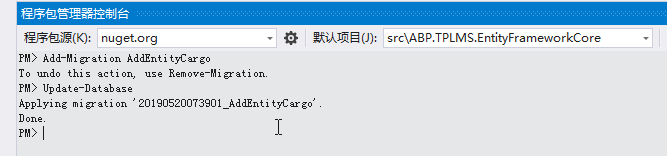
7.在程序包管理器控制台,输入Update-Database,回车执行迁移。执行成功后,如下图。
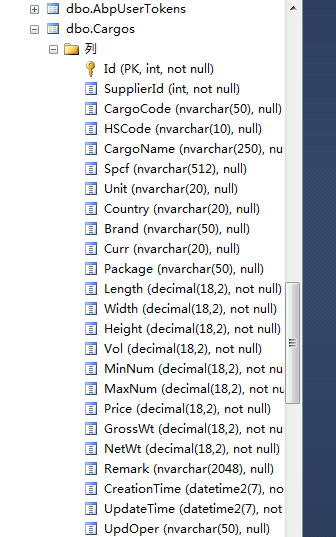
8. 在SQL Server Management Studio中查看数据库,Cargos表创建成功。
五、定义应用服务接口需要用到的分页类
为了在进行查询时使用, PagedCargoResultRequestDto被用来将货物查询条件的数据传递到给应用层.
1. 在Visual Studio 2017的“解决方案资源管理器”中,右键单击“ABP.TPLMS.Application”项目,在弹出菜单中选择“添加” > “新建文件夹”,并重命名为“Cargos”
2. 使用鼠标右键单击我们刚才创建的“Cargos”文件夹,在弹出菜单中选择“添加” > “新建文件夹”,并重命名为“Dto”。
3.右键单击“Dto”文件夹,然后选择“添加” > “类”。 将类命名为 Paged CargoResultRequestDto,然后选择“添加”。代码如下。
using Abp.Application.Services.Dto;

using System;

using System.Collections.Generic;

using System.Text;

namespace ABP.TPLMS.Cargos.Dto

{

    public class PagedCargoResultRequestDto : PagedResultRequestDto

    {

        public string Keyword { get; set; }

    }

}
4.右键单击“Dto”文件夹,然后选择“添加” > “类”。 将类命名为 CargoDto,然后选择“添加”。代码如下。
using Abp.Application.Services.Dto;

using Abp.AutoMapper;

using ABP.TPLMS.Entitys;

using System;

using System.Collections.Generic;

using System.Text;

namespace ABP.TPLMS.Cargos.Dto

{

    [AutoMapFrom(typeof(Cargo))]

    public class CargoDto:EntityDto<int>

    {

        public int SupplierId { get; set; }

        public string CargoCode { get; set; }

        public string HSCode { get; set; }

        public string CargoName { get; set; }

        public string Spcf { get; set; }

        public string Unit { get; set; }

        public string Country { get; set; }

        public string Brand { get; set; }

        public string Curr { get; set; }

        public string Package { get; set; }

        public decimal Length { get; set; }

        public decimal Width { get; set; }

        public decimal Height { get; set; }

       public decimal Vol { get; set; }

         public decimal MinNum { get; set; }

        public decimal MaxNum { get; set; }

        public decimal Price { get; set; }

        public decimal GrossWt { get; set; }

        public decimal NetWt { get; set; }

        public string Remark { get; set; }

        public DateTime CreationTime { get; set; }

        public DateTime UpdateTime { get; set; }

        public string UpdOper { get; set; }

    }

}
5.右键单击“Dto”文件夹,然后选择“添加” > “类”。 将类命名为 CreateUpdateCargoDto,然后选择“添加”。代码如下。
using Abp.Application.Services.Dto;

using Abp.AutoMapper;

using ABP.TPLMS.Entitys;

using System;

using System.Collections.Generic;

using System.ComponentModel.DataAnnotations;

using System.Text;

namespace ABP.TPLMS.Cargos.Dto

{

    [AutoMapTo(typeof(Cargo))]

    public class CreateUpdateCargoDto : EntityDto<int>

    {

        public int SupplierId { get; set; }

        [StringLength()]

        public string CargoCode { get; set; }

        [StringLength()]

        public string HSCode { get; set; }

        [StringLength()]

        public string CargoName { get; set; }

        [StringLength()]

        public string Spcf { get; set; }

        [StringLength()]

        public string Unit { get; set; }

        [StringLength()]

        public string Country { get; set; }

        [StringLength()]

        public string Brand { get; set; }

        [StringLength()]

        public string Curr { get; set; }

        [StringLength()]

        public string Package { get; set; }

        public decimal Length { get; set; }

        public decimal Width { get; set; }

        public decimal Height { get; set; }

        public decimal Vol { get; set; }

        public decimal MinNum { get; set; }

        public decimal MaxNum { get; set; }

        public decimal Price { get; set; }

        public decimal GrossWt { get; set; }

        public decimal NetWt { get; set; }

        [StringLength()]

        public string Remark { get; set; }

        public DateTime CreationTime { get; set; }

        public DateTime UpdateTime { get; set; }

        [StringLength()]

        public string UpdOper { get; set; }

    }

}
abp(net core)+easyui+efcore实现仓储管理系统——EasyUI之货物管理一 (十九)的更多相关文章
- abp(net core)+easyui+efcore实现仓储管理系统——EasyUI之货物管理二 (二十)
abp(net core)+easyui+efcore实现仓储管理系统目录 abp(net core)+easyui+efcore实现仓储管理系统——ABP总体介绍(一) abp(net core)+ ...
- abp(net core)+easyui+efcore实现仓储管理系统——EasyUI之货物管理三 (二十一)
abp(net core)+easyui+efcore实现仓储管理系统目录 abp(net core)+easyui+efcore实现仓储管理系统——ABP总体介绍(一) abp(net core)+ ...
- abp(net core)+easyui+efcore实现仓储管理系统——EasyUI之货物管理四 (二十二)
abp(net core)+easyui+efcore实现仓储管理系统目录 abp(net core)+easyui+efcore实现仓储管理系统——ABP总体介绍(一) abp(net core)+ ...
- abp(net core)+easyui+efcore实现仓储管理系统——EasyUI之货物管理五 (二十三)
abp(net core)+easyui+efcore实现仓储管理系统目录 abp(net core)+easyui+efcore实现仓储管理系统——ABP总体介绍(一) abp(net core)+ ...
- abp(net core)+easyui+efcore实现仓储管理系统——EasyUI之货物管理六(二十四)
abp(net core)+easyui+efcore实现仓储管理系统目录 abp(net core)+easyui+efcore实现仓储管理系统——ABP总体介绍(一) abp(net core)+ ...
- abp(net core)+easyui+efcore实现仓储管理系统——EasyUI之货物管理七(二十五)
abp(net core)+easyui+efcore实现仓储管理系统目录 abp(net core)+easyui+efcore实现仓储管理系统——ABP总体介绍(一) abp(net core)+ ...
- abp(net core)+easyui+efcore实现仓储管理系统——EasyUI之货物管理八(二十六)
abp(net core)+easyui+efcore实现仓储管理系统目录 abp(net core)+easyui+efcore实现仓储管理系统——ABP总体介绍(一) abp(net core)+ ...
- abp(net core)+easyui+efcore实现仓储管理系统——出库管理之二(五十)
abp(net core)+easyui+efcore实现仓储管理系统目录 abp(net core)+easyui+efcore实现仓储管理系统--ABP总体介绍(一) abp(net core)+ ...
- abp(net core)+easyui+efcore实现仓储管理系统——EasyUI前端页面框架 (十八)
目录 abp(net core)+easyui+efcore实现仓储管理系统——ABP总体介绍(一) abp(net core)+easyui+efcore实现仓储管理系统——解决方案介绍(二) ab ...
随机推荐
- 拼写单词[哈希表]----leetcode周赛150_1001
题目描述: 给你一份『词汇表』(字符串数组) words 和一张『字母表』(字符串) chars. 假如你可以用 chars 中的『字母』(字符)拼写出 words 中的某个『单词』(字符串),那么我 ...
- 为何你还不懂得如何使用Python协程
关于我 一个有思想的程序猿,终身学习实践者,目前在一个创业团队任team lead,技术栈涉及Android.Python.Java和Go,这个也是我们团队的主要技术栈. Github:https:/ ...
- 什么是CWS、WBS、OBS
今天公司进行CMMI资质审核,审核人提到了WBS,以前对这些名词没有太过于注意,后经过审核人的审核对这个名词有了一个大致的了解,并结合项目经验和网上的一些资料,编此文档.不为别人,主要怕自己忘记了. ...
- 字典更新与K-SVD
字典更新与K-SVD 凯鲁嘎吉 - 博客园 http://www.cnblogs.com/kailugaji/ 1. 矩阵的奇异值分解 (Singular Value Decomposition, S ...
- 上个月,我赚了2W外快。。。
前段时间和室友一起给某个公司做了一个管理系统,每个人分2W多.这里和大家分享一下做完项目后一点点感受,想到啥就说点啥. 核心竞争力 两个月就挣了2W块,挣了我爸妈两个人一年的收入,每天还贼辛苦,披星戴 ...
- Linux权限管理(7)
权限的基本介绍: rwx权限详解: rwx作用到文件: [r]:代表可读,可以读取.查看 [w]:代表可写,可以修改,但不代表可以删除该文件,删除一个文件的前提条件是对该文件所在的目录有写权限才能删除 ...
- Unity进阶:用AssetBundle和Json做了一个玩家登陆界面
版权申明: 本文原创首发于以下网站: 博客园『优梦创客』的空间:https://www.cnblogs.com/raymondking123 优梦创客的官方博客:https://91make.top ...
- 解决ionic 上拉加载组件 ion-infinite-scroll自动调用多次的问题
ionic 中一个上拉刷新的组件 ion-infinite-scroll,如果页面未填充满页面高度,会自动检测并无限调用多次加载更多的函数:当然,主要会导致首次调用的时候,会执行几次加载更多的函数: ...
- Codeforces 976C
题意略. 思路:由于题中只要让我们找出嵌套的段就行了,那么我们只需要排序一下就好了. 排序方式:按左端由小到大排,左端一样的时候,右端小的排在前. 如果你担心1会因为2的阻隔而不能嵌套3的话,那么2可 ...
- Delphi - Indy TIdThreadComponent 线程研究
Indy IdThreadComponent 线程研究 前几天在开发数据实时解析功能模块的时候,发现解析数据量巨大,特别耗时,程序一跑起来界面假死. 为了优化用户体验,采用了Indy 自带的IdThr ...