
abp(net core)+easyui+efcore实现仓储管理系统——EasyUI之货物管理二 (二十)
abp(net core)+easyui+efcore实现仓储管理系统目录
abp(net core)+easyui+efcore实现仓储管理系统——ABP总体介绍(一)
abp(net core)+easyui+efcore实现仓储管理系统——解决方案介绍(二)
abp(net core)+easyui+efcore实现仓储管理系统——领域层创建实体(三)
abp(net core)+easyui+efcore实现仓储管理系统——定义仓储并实现 (四)
abp(net core)+easyui+efcore实现仓储管理系统——创建应用服务(五)
abp(net core)+easyui+efcore实现仓储管理系统——展现层实现增删改查之控制器(六)
abp(net core)+easyui+efcore实现仓储管理系统——展现层实现增删改查之列表视图(七)
abp(net core)+easyui+efcore实现仓储管理系统——展现层实现增删改查之增删改视图(八)
abp(net core)+easyui+efcore实现仓储管理系统——展现层实现增删改查之菜单与测试(九)
abp(net core)+easyui+efcore实现仓储管理系统——多语言(十)
abp(net core)+easyui+efcore实现仓储管理系统——使用 WEBAPI实现CURD (十一)
abp(net core)+easyui+efcore实现仓储管理系统——使用 WEBAPI实现CURD (十二)
abp(net core)+easyui+efcore实现仓储管理系统——使用 WEBAPI实现CURD (十三)
abp(net core)+easyui+efcore实现仓储管理系统——使用 WEBAPI实现CURD (十四)
abp(net core)+easyui+efcore实现仓储管理系统——使用 WEBAPI实现CURD (十五)
abp(net core)+easyui+efcore实现仓储管理系统——菜单-上 (十六)
abp(net core)+easyui+efcore实现仓储管理系统——菜单-下(十七)
abp(net core)+easyui+efcore实现仓储管理系统——EasyUI前端页面框架 (十八)
abp(net core)+easyui+efcore实现仓储管理系统——EasyUI之货物管理一 (十九)
通过上一篇文章(abp(net core)+easyui+efcore实现仓储管理系统——EasyUI之货物管理一 (十九))中,我们已经将创建了货物信息实体 与查询所用到的分页类。下面我们来实现货物信息管理功能所需要的服务类与控制器类,页面呈现。
六、定义ICargoAppService接口
6. 在Visual Studio 2017的“解决方案资源管理器”中,鼠标右键单击“Cargos”文件夹,然后选择“添加” > “新建项”,在弹出对话框中选择“接口”。为应用服务定义一个名为 ICargoAppService 的接口。代码如下。
using Abp.Application.Services;

using ABP.TPLMS.Cargos.Dto;

using System;

using System.Collections.Generic;

using System.Text;

namespace ABP.TPLMS.Cargos

{

    public interface ICargoAppService : IAsyncCrudAppService<//定义了CRUD方法

             CargoDto, //用来展示货物信息

             int, //Cargo实体的主键

             PagedCargoResultRequestDto, //获取货物信息的时候用于分页

             CreateUpdateCargoDto, //用于创建货物信息

             CreateUpdateCargoDto> //用于更新货物信息

    {

    }

}
七、实现ICargoAppService
7.在Visual Studio 2017的“解决方案资源管理器”中,右键单击“Cargos”文件夹,然后选择“添加” > “新建项”,在弹出对话框中选择“类”。为应用服务定义一个名为 CargoAppService 的服务类。代码如下。
using Abp.Application.Services;

using Abp.Domain.Repositories;

using ABP.TPLMS.Entitys;

using ABP.TPLMS.Cargos.Dto;

using System;

using System.Collections.Generic;

using System.Text;

using System.Threading.Tasks;

namespace ABP.TPLMS.Cargos

{

   public class CargoAppService :AsyncCrudAppService<Cargo, CargoDto, int, PagedCargoResultRequestDto,

                            CreateUpdateCargoDto, CreateUpdateCargoDto>,ICargoAppService

    {

        public CargoAppService(IRepository<Cargo, int> repository)

            : base(repository)

    {

    }

    }

}
八 创建CargoController继承自TPLMSControllerBase
1. 在Visual Studio 2017的“解决方案资源管理器”中,右键单击在领域层“ABP.TPLMS.Web.Core”项目中的Controller目录。 找到TPLMSControllerBase文件,添加一个新的方法JsonEasyUI。此方法的功能是实现对实体对象进行序列化为JSON字符串,并且JSON字符串的格式符合EasyUI的DataGrid要求的数据格式。代码如下。
protected dynamic JsonEasyUI(dynamic t,int total)

  {

      var obj= new

      {

          total = total,

           rows = t

      };

      var  json = Json(obj);

       return json;

   }
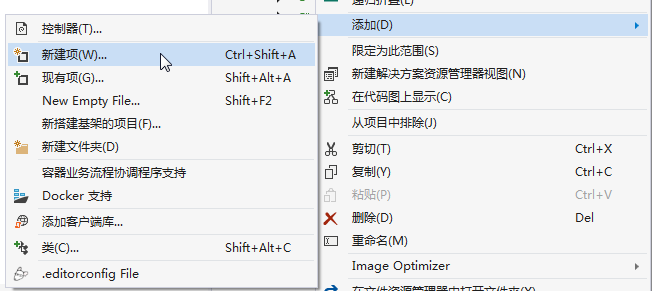
2. 在Visual Studio 2017的“解决方案资源管理器”中,右键单击在领域层“ABP.TPLMS.Web.Mvc”项目中的Controller目录。 选择“添加” > “新建项…”。如下图。
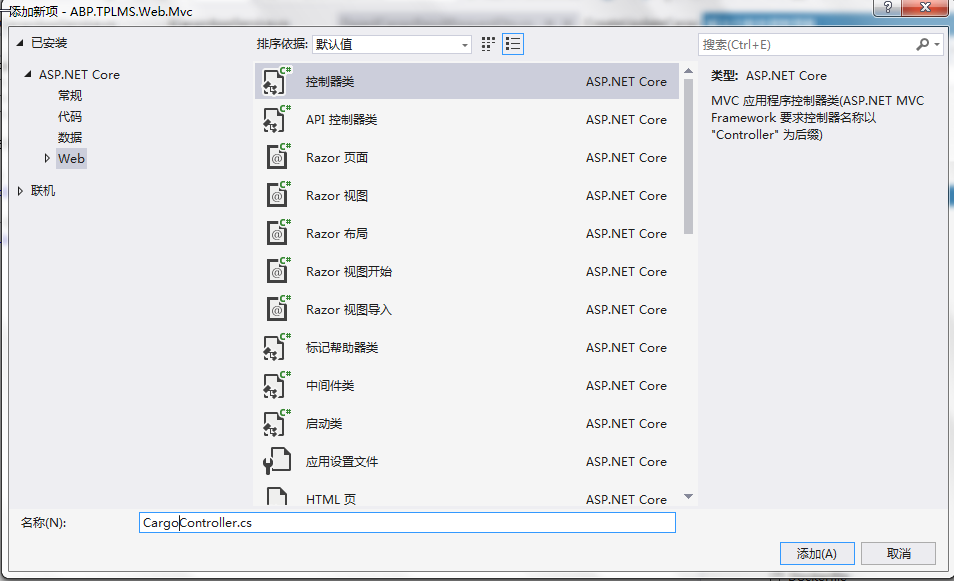
3. 在弹出对话框“添加新项-ABP.TPLMS.Web.Mvc”中选择“控制器类”,然后在名称输入框中输入“CargoController”,然后点击“添加”按钮。如下图。
4.在CargoController.cs文件中输入如下代码,通过构造函数注入对应用服务的依赖。
using System;

using System.Collections.Generic;

using System.Linq;

using System.Threading.Tasks;

using Abp.Application.Services.Dto;

using Abp.AspNetCore.Mvc.Authorization;

using Abp.Runtime.Validation;

using ABP.TPLMS.Controllers;

using ABP.TPLMS.Cargos;

using ABP.TPLMS.Cargos.Dto;

using Microsoft.AspNetCore.Mvc;

using Microsoft.EntityFrameworkCore;

namespace ABP.TPLMS.Web.Controllers

{

    [AbpMvcAuthorize]

    public class CargoController : TPLMSControllerBase

    {

        const int MaxNum= ;

        // GET: /<controller>/

        public IActionResult Index()

        {

            ViewData["SupplierId"] = "";

            return View();

        }

        private readonly ICargoAppService _cargoAppService;

        public CargoController(ICargoAppService cargoAppService)

        {

            _cargoAppService = cargoAppService;

        }

        public JsonResult List()

        {

             var page = Request.Form["page"].ToString();

            var size = Request.Form["rows"].ToString();

            int pageIndex = page == null ?  : int.Parse(page);

            int pageSize = size == null ?  : int.Parse(size);

            PagedCargoResultRequestDto paged = new PagedCargoResultRequestDto();

            paged.MaxResultCount = pageSize;

            paged.SkipCount = ((pageIndex-)<?: pageIndex - ) * pageSize;

            var userList = _cargoAppService.GetAll(paged).GetAwaiter().GetResult().Items;

            int total = ;

            var json = JsonEasyUI(userList,total);

            return json;

     }

    }

}
九、使用EasyUI创建货物管理页面
1. 在Visual Studio 2017的“解决方案资源管理器”中,右键单击在领域层“ABP.TPLMS.Web.Mvc”项目中的Views目录。 选择“添加” > “新建文件夹”。并重命名为“Cargo”。
2. 在Visual Studio 2017的“解决方案资源管理器”中,鼠标右键单击“Cargo”文件夹,然后选择“添加” > “新建项…”。 在“添加新项-ABP.TPLMS.Web.Mvc”对话框中,选择“Razor视图”,并将名称命名为Index.cshmtl。
3. 在我们刚才创建的Index.cshmtl文件中,编写如下代码:
@using ABP.TPLMS.Web.Startup

@{

    ViewData["Title"] = PageNames.Cargo;

}

@section scripts

    {

    <script src="~/view-resources/Views/Cargo/cargomgr.js" asp-append-version="true"></script>

    <script type="text/javascript">

        $(function () {

            initable();

            init();

            reloaded();

            updCargoInfo();

            showCargoDialog();

            deleteCargo();

        });

    </script>

}

<div data-options="region:'center'" style="overflow: hidden;">

    <div id="containter" style="width: 1000px; height: auto; margin: 0px auto;">

        <!--toolbar-->

        <div style="margin-bottom:1px;font-weight:bold;">

            <a href="#" id="add" class="easyui-linkbutton" data-options="iconCls:'icon-add'"
style="width:100px; height:30px; ">添加</a>

            <a href="#" id="del" class="easyui-linkbutton" data-options="iconCls:'icon-remove'"
style="width:100px; height:30px; ">删除</a>

            <a href="#" id="edit" class="easyui-linkbutton" data-options="iconCls:'icon-edit'"
style="width:100px; height:30px; ">修改</a>

            <a href="#" id="reload" class="easyui-linkbutton" data-options="iconCls:'icon-reload'"
style="width:100px; height:30px; ">刷新</a>

        </div>

        <!--panel-->

        <div data-options="region:'center',split:false" style="height:500px;">

            <!--表格-->

            <table id="dgCargo"></table>

        </div>

    </div>

</div>

<!---------------------------新增修改货物信息---------------------------->

<div id="divAddUpdCargo" class="easyui-dialog" closed="true" data-options="buttons: '#dlg-buttons'">

    <table>

        <tr>

            <td><input type="hidden" name="ID" id="IDUpdate" /></td>

        </tr>

        <tr>

            <td>供应商:</td>

            <td>

                <input type="text" id="SupplierIdUpdate" name="USupplierId"
class="form-control input-sm" value=@ViewData["SupplierId"].ToString() />

            </td>

            <td> 货物代码:</td>

            <td><input type="text" id="UpdCargoCode" name="UCargoCode"
class="form-control input-sm" /></td>

            <td>货物名称:</td>

            <td>

                <input type="text" id="CargoNameUpdate" name="UCargoName" class="form-control input-sm" />

            </td>

        </tr>

        <tr>

            <td>品牌:</td>

            <td>

                <input type="text" id="BrandUpdate" name="UBrand" class="form-control input-sm" />

            </td>

            <td> 规格型号:</td>

            <td colspan=""><input type="text" id="SpcfUpdate" name="USpcf"
class="form-control input-sm" /></td>

        </tr>

        <tr>

            <td>HSCode:</td>

            <td>

                <input type="text" id="HSCodeUpdate" name="UHSCode" class="form-control input-sm" />

            </td>

            <td>单价:</td>

            <td>

                <input type="number" id="PriceUpdate" name="UPrice" class="form-control input-sm" />

            </td>

            <td> 计量单位:</td>

            <td><input type="text" id="UnitUpdate" name="UUnit" class="form-control input-sm" /></td>

        </tr>

        <tr>

            <td>货币:</td>

            <td>

                <input type="text" id="CurrUpdate" name="UCurr" class="form-control input-sm" />

            </td>

            <td>包装:</td>

            <td>

                <input type="text" id="PackageUpdate" name="UPackage" class="form-control input-sm" />

            </td>

            <td>体积:</td>

            <td>

                <div class="input-group">

                    <input type="text" id="VolUpdate" name="UVol" class="form-control input-sm" readonly />

                    <span class="input-group-addon" id="basic-addon2">立方米</span>

                </div>

            </td>

        </tr>

        <tr>

            <td> 长:</td>

            <td>

                <div class="input-group">

                    <input type="number" id="LengthUpdate" name="ULength"
class="form-control input-sm" aria-describedby="basic-addon2">

                    <span class="input-group-addon" id="basic-addon2">cm *</span>

                </div>

            </td>

            <td>宽:</td>

            <td>

                <div class="input-group">

                    <input type="number" id="WidthUpdate" name="UWidth"
class="form-control input-sm" aria-describedby="basic-addon2">

                    <span class="input-group-addon" id="basic-addon2">cm * </span>

                </div>

            </td>

            <td>高:</td>

            <td>

                <div class="input-group">

                    <input type="number" id="HeightUpdate" name="UHeight"
 class="form-control input-sm" aria-describedby="basic-addon2">

                    <span class="input-group-addon" id="basic-addon2">cm</span>

                </div>

            </td>

        </tr>

        <tr>

            <td>毛重:</td>

            <td>

                <input type="number" id="GrossWtUpdate" name="UGrossWt" class="form-control input-sm" />

            </td>

            <td> 净重:</td>

            <td><input type="number" id="NetWtUpdate" name="UNetWt" class="form-control input-sm" /></td>

            <td>国家:</td>

            <td>

                <input type="text" id="CountryUpdate" name="UCountry" class="form-control input-sm" />

            </td>

        </tr>

        <tr>

            <td>安全库存:</td>

            <td>

                <input type="number" id="MinNumUpdate" name="UMinNum" class="form-control input-sm" />

            </td>

            <td> 最大库存:</td>

            <td><input type="number" id="MaxNumUpdate" name="UMaxNum" class="form-control input-sm" /></td>

            <td>创建时间:</td>

            <td>

                <input type="text" id="CreateTimeUpdate" name="UCreateTimey" class="form-control input-sm" />

            </td>

        </tr>

        <tr>

            <td>备注:</td>

            <td colspan="">

                <input type="text" id="RemarkUpdate" name="URemark" class="form-control input-sm" />

            </td>

        </tr>

    </table>

</div>

<div id="dlg-buttons">

    <input type="submit" id="btnSave" value="保存" class="btn btn-primary" />

    <input type="submit" id="btnCancle" value="取消" class="btn btn-info" />

</div>
4. 在Visual Studio 2017的“解决方案资源管理器”中,找到“ABP.TPLMS.Web.Mvc”项目中的Startup目录。 选择“PageNames.cs”文件,并双击打开。写入以下代码。
public const string Cargo = "Cargo";
abp(net core)+easyui+efcore实现仓储管理系统——EasyUI之货物管理二 (二十)的更多相关文章
- abp(net core)+easyui+efcore实现仓储管理系统——EasyUI之货物管理一 (十九)
abp(net core)+easyui+efcore实现仓储管理系统目录 abp(net core)+easyui+efcore实现仓储管理系统——ABP总体介绍(一) abp(net core)+ ...
- abp(net core)+easyui+efcore实现仓储管理系统——EasyUI之货物管理三 (二十一)
abp(net core)+easyui+efcore实现仓储管理系统目录 abp(net core)+easyui+efcore实现仓储管理系统——ABP总体介绍(一) abp(net core)+ ...
- abp(net core)+easyui+efcore实现仓储管理系统——EasyUI之货物管理四 (二十二)
abp(net core)+easyui+efcore实现仓储管理系统目录 abp(net core)+easyui+efcore实现仓储管理系统——ABP总体介绍(一) abp(net core)+ ...
- abp(net core)+easyui+efcore实现仓储管理系统——EasyUI之货物管理五 (二十三)
abp(net core)+easyui+efcore实现仓储管理系统目录 abp(net core)+easyui+efcore实现仓储管理系统——ABP总体介绍(一) abp(net core)+ ...
- abp(net core)+easyui+efcore实现仓储管理系统——EasyUI之货物管理六(二十四)
abp(net core)+easyui+efcore实现仓储管理系统目录 abp(net core)+easyui+efcore实现仓储管理系统——ABP总体介绍(一) abp(net core)+ ...
- abp(net core)+easyui+efcore实现仓储管理系统——EasyUI之货物管理七(二十五)
abp(net core)+easyui+efcore实现仓储管理系统目录 abp(net core)+easyui+efcore实现仓储管理系统——ABP总体介绍(一) abp(net core)+ ...
- abp(net core)+easyui+efcore实现仓储管理系统——EasyUI之货物管理八(二十六)
abp(net core)+easyui+efcore实现仓储管理系统目录 abp(net core)+easyui+efcore实现仓储管理系统——ABP总体介绍(一) abp(net core)+ ...
- abp(net core)+easyui+efcore实现仓储管理系统——EasyUI前端页面框架 (十八)
目录 abp(net core)+easyui+efcore实现仓储管理系统——ABP总体介绍(一) abp(net core)+easyui+efcore实现仓储管理系统——解决方案介绍(二) ab ...
- abp(net core)+easyui+efcore实现仓储管理系统——ABP WebAPI与EasyUI结合增删改查之一(二十七)
abp(net core)+easyui+efcore实现仓储管理系统目录 abp(net core)+easyui+efcore实现仓储管理系统——ABP总体介绍(一) abp(net core)+ ...
随机推荐
- 命令行通过入参调用jar包
命令行通过入参调用jar包 最近因为项目需要,需要实现一个功能,即定时执行服务器上的一个脚本去对数据库的数据进行业务处理,要操作的数据库有很多种,mysql.db2.oracle.sqlserver等 ...
- NLP(二十二)使用LSTM进行语言建模以预测最优词
预处理 数据集使用Facebook上的BABI数据集 将文件提取成可训练的数据集,包括:文章 问题 答案 def get_data(infile): stories,questions,answers ...
- JMeter使用代理进行录制
参考: http://www.cnblogs.com/zhuque/archive/2012/11/13/2767747.html JMeter支持第三方(Badboy)录制和代理录制,Badboy录 ...
- xcode删除一个项目
退出xcode. 在Finder中删除项目文件夹.
- 【HDU5409】CRB and Graph 边双联通 子树最值
HDU # 题意 有一个简单图,n个点,m条边.对于每条割边,求出删去这条边后,在两个联通块中各取一个u,v.使得u<v,并且u尽量大而v尽量小. # 思路 求出边双联通是肯定的. 答案的限制条 ...
- hdu-6601 Keen On Everything But Triangle
题目连接: http://acm.hdu.edu.cn/showproblem.php?pid=6601 Description N sticks are arranged in a row, and ...
- JavaScript中的Cookie 和 Json的使用
JavaScript中的Cookie 和 Json的使用 JSON JSON(JavaScript Object Notation)是一种轻量级的数据交换格式.采用的是完全独立于编程语言的文本格式来存 ...
- js中鼠标点击、移动和光标移动的事件触发
事件有三要素:事件源.事件数据.事件处理程序 事件冒泡:当元素嵌套的时候,内部元素激发某个事件后,默认情况下外部元素相应的事件也会跟着依次触发 可以加return false;是阻止默认操作 oncl ...
- 网络流---最大流(Edmond-Karp算法)的学习
先上个代码,等有空补充详解 #include<iostream> #include<cstdio> #include<cstring> #include<cm ...
- 关于BFC的一些事
BFC的生成 在实现CSS的布局时,假设我们不知道BFC的话,很多地方我们生成了BFC但是不知道.在布局中,一个元素是block元素还是inline元素是必须要知道的.而BFC就是用来格式化块状元素盒 ...