
SpringBoot从入门到精通教程(六)
之前学了,这么多东西
thyemeaf、MyBatis还有 配置文件等等,今天我们就来做一个小案例
CRUD,程序员的必备
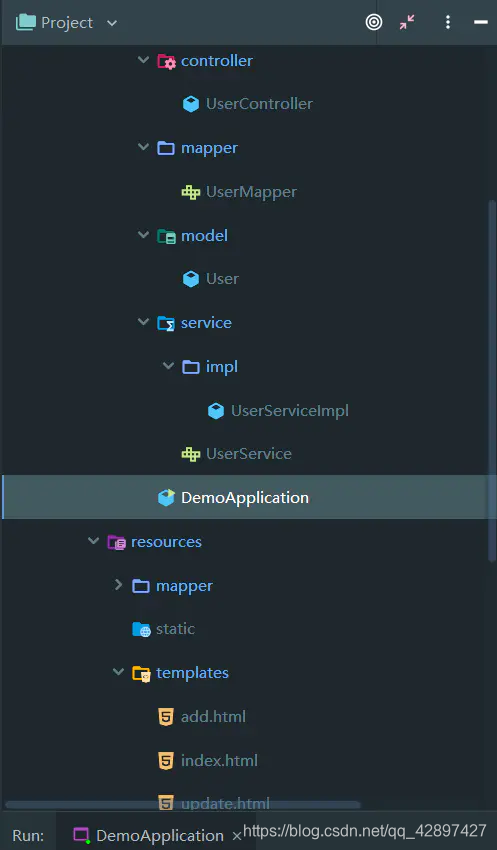
项目结构
pom.xml
        <!-- mybatis 相关依赖 -->

        <dependency>

            <groupId>mysql</groupId>

            <artifactId>mysql-connector-java</artifactId>

        </dependency>

        <dependency>

            <groupId>org.mybatis.spring.boot</groupId>

            <artifactId>mybatis-spring-boot-starter</artifactId>

            <version>1.1.1</version>

        </dependency>

        <!-- thymeleaf 相关依赖 -->

        <dependency>

            <groupId>org.springframework.boot</groupId>

            <artifactId>spring-boot-starter-thymeleaf</artifactId>

        </dependency>
3. application.properties
logging.level.org.springframework=DEBUG

#springboot   mybatis

mybatis.mapper-locations = classpath:mapper/*Mapper.xml

mybatis.config-location = classpath:mapper/config/sqlMapConfig.xml

mybatis.type-aliases-package = com.spiritmark.demo.model

#数据库

spring.datasource.driver-class-name= com.mysql.jdbc.Driver

spring.datasource.url = jdbc:mysql://localhost:3306/springboot_test?serverTimezone=GMT

spring.datasource.username = root

spring.datasource.password = 123qwe
- UserController.java
package com.spiritmark.demo.controller;

import java.util.List;

import com.spiritmark.demo.model.User;

import com.spiritmark.demo.service.UserService;

import org.springframework.beans.factory.annotation.Autowired;

import org.springframework.stereotype.Controller;

import org.springframework.ui.Model;

import org.springframework.web.bind.annotation.RequestMapping;

@Controller

public class UserController {

    @Autowired

    private UserService userService;

    @RequestMapping("/index")

    public String showUser(Model model){

        List<User> list = userService.findAll();

        model.addAttribute("list",list);

        return "index";

    }

    // 进入添加界面

    @RequestMapping("/intoAdd")

    public String intoAdd(){

        return "add";

    }

    // 添加用户

    @RequestMapping("/add")

    public String add(User user){

        userService.add(user);

        return "redirect:/index";

    }

    // 删除用户

    @RequestMapping("/delete")

    public String delete(int id){

        userService.delete(id);

        return "redirect:/";

    }

    // 进入修改用户

    @RequestMapping("/intoUpdate")

    public String intoUpdate(Model model,int id){

        User user = userService.findById(id);

        model.addAttribute("user",user);

        return "update";

    }

    // 修改用户

    @RequestMapping("/update")

    public String update(User user){

        userService.update(user);

        return "redirect:/index";

    }

}
- UserMapper.java
package com.spiritmark.demo.mapper;

import com.spiritmark.demo.model.User;

import org.apache.ibatis.annotations.Mapper;

import java.util.List;

@Mapper

public interface UserMapper {

    // 获取所有

    List<User> findAll();

    // 新增

    void add(User user);

    // 删除

    void delete(int id);

    // 编辑

    void update(User user);

    // 查询

    User findById(int id);

}
- UserServiceImpl.java
package com.spiritmark.demo.service.impl;

import java.util.List;

import java.util.Map;

import com.spiritmark.demo.mapper.UserMapper;

import com.spiritmark.demo.model.User;

import com.spiritmark.demo.service.UserService;

import org.springframework.beans.factory.annotation.Autowired;

import org.springframework.stereotype.Service;

@Service

public class UserServiceImpl implements UserService {

    @Autowired

    private UserMapper userMapper;

    // 获取所有

    @Override

    public List<User> findAll() {

        return userMapper.findAll();

    }

    // 新增

    @Override

    public void add(User user) {

        userMapper.add(user);

    }

    // 删除

    @Override

    public void delete(int id) {

        userMapper.delete(id);

    }

    // 修改

    @Override

    public void update(User user) {

        userMapper.update(user);

    }

    // 查询

    @Override

    public User findById(int id) {

        return userMapper.findById(id);

    }

}
- UserService.java
package com.spiritmark.demo.service;

import com.spiritmark.demo.model.User;

import java.util.List;

public interface UserService {

    // 获取所有

    List<User> findAll();

    // 新增

    void add(User user);

    // 删除

    void delete(int id);

    // 编辑

    void update(User user);

    // 查询

    User findById(int id);

}
- UserMapper.xml
<?xml version="1.0" encoding="UTF-8" ?>

<!DOCTYPE mapper PUBLIC "-//mybatis.org//DTD Mapper 3.0//EN" "http://mybatis.org/dtd/mybatis-3-mapper.dtd" >

<mapper namespace="com.spiritmark.demo.mapper.UserMapper">

    <select id="findAll" resultType="com.spiritmark.demo.model.User">

        select * from user

    </select>

    <insert id="add" parameterType="com.spiritmark.demo.model.User">

        insert into user (username, password)

        values (#{username,jdbcType=VARCHAR}, #{password,jdbcType=VARCHAR})

    </insert>

    <delete id="delete" parameterType="java.lang.Integer">

        delete from user where id= #{id,jdbcType=INTEGER}

    </delete>

    <select id="findById" resultType="com.spiritmark.demo.model.User">

        select * from user where id= #{id,jdbcType=INTEGER}

    </select>

    <update id="update" parameterType="com.spiritmark.demo.model.User">

        update user set

        username= #{username,jdbcType=VARCHAR},

        password = #{password,jdbcType=VARCHAR}

        where id= #{id,jdbcType=INTEGER}

    </update>

</mapper>
index.html
<!DOCTYPE html>

<html xmlns="http://www.w3.org/1999/xhtml"

      xmlns:th="http://www.thymeleaf.org"

      xmlns:sec="http://www.thymeleaf.org/thymeleaf-extras-springsecurity3">

<head>

    <title></title>

</head>

<body>

<a th:href="@{/intoAdd}">添加</a>

<table>

    <thead>

    <tr>

        <th>id</th>

        <th>username</th>

        <th>password</th>

        <th>op</th>

    </tr>

    </thead>

    <tbody>

    <tr th:each="user : ${list}">

        <td th:text="${user.id}"></td>

        <td th:text="${user.username}"></td>

        <td th:text="${user.password}"></td>

        <td><a th:href="@{/delete(id=${user.id})}">删除</a><a th:href="@{/intoUpdate(id=${user.id})}">修改</a></td>

    </tr>

    </tbody>

</table>

</body>

</html>
add.html
<!DOCTYPE html>

<html xmlns="http://www.w3.org/1999/xhtml"

      xmlns:th="http://www.thymeleaf.org"

      xmlns:sec="http://www.thymeleaf.org/thymeleaf-extras-springsecurity3">

<head>

    <title></title>

</head>

<body>

    <form th:action="@{/add}" method="post">

        <input type="text" id="username" name="username">

        <input type="text" id="password" name="password">

        <input type="submit">

    </form>

</body>

</html>
update.html
<!DOCTYPE html>

<html xmlns="http://www.w3.org/1999/xhtml"

      xmlns:th="http://www.thymeleaf.org"

      xmlns:sec="http://www.thymeleaf.org/thymeleaf-extras-springsecurity3">

<head>

    <title></title>

</head>

<body>

<form th:action="@{/update}" th:object="${user}" method="post">

    <input type="hidden" name="id" th:value="*{id}">

    <input type="text" name="username" id="username" th:value="*{username}">

    <input type="text" name="password" id="password" th:value="*{password}">

    <input type="submit">

</form>

</body>

</html>
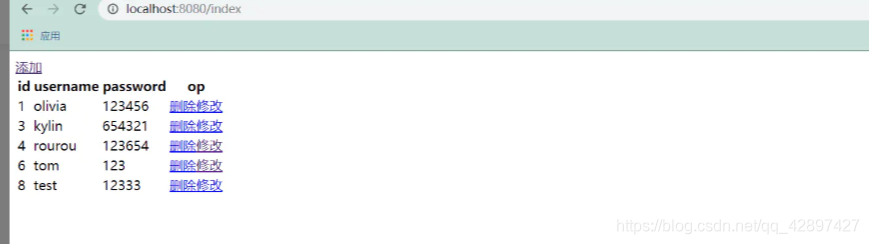
大功告成
SpringBoot从入门到精通教程(六)的更多相关文章
- SpringBoot从入门到精通教程(二)
SpringBoot 是为了简化 Spring 应用的创建.运行.调试.部署等一系列问题而诞生的产物,自动装配的特性让我们可以更好的关注业务本身而不是外部的XML配置,我们只需遵循规范,引入相关的依赖 ...
- SpringBoot从入门到精通教程(七)
今天,我们继续讲SpringBoot整合Redis ,也就缓存,它将与我们的Springboot整合 Redis 简介 Redis 是当前比较热门的NOSQL系统之一,它是一个开源的使用ANSI c语 ...
- SpringBoot从入门到精通教程(三)
在上一篇中,我们已经讲了,SpringBoot 如何构建项目,和SpringBoot的HelloWorld, 那这一节我们继续讲 Thymeleaf Thymeleaf 官网: Thymeleaf T ...
- SpringBoot从入门到精通教程(一)
写在前面的话: 在很早之前,记笔记时候,我就一直在思考一个问题,我记笔记是为了什么,我一直想不明白 ,后面发现技术跟新迭代的速度实在太快了,笔记刚纪完,技术又跟新了,于是我想了想干脆边写博客,边记笔记 ...
- SpringBoot从入门到精通教程(八)
本主要介绍ElasticSearch 和 SpringBoot 的整合 ,对您有帮助的话,点个关注哦 ElastSearch 介绍 ElasticSearch是一个基于Lucene的搜索服务器.它提供 ...
- SpringBoot从入门到精通教程(五)
上节,我们讲了 SpringBoot 如何使用MyBatis 今天我们讲讲 Springboot Logo自定义的问题, 我们在启动 SpringBoot 时,控制台会打印 SpringBoot Lo ...
- SpringBoot从入门到精通教程(四)
前端时间整合SSM ,发现了一个现象,在整合的时候 配置文件过于复杂. 1.建工程,建目录,导入jar包. 2.配置 数据源 映射信息 等等 ... 3. 还有 各种 拦截器,控制器 ,头都大了... ...
- 深入浅出!springboot从入门到精通,实战开发全套教程!
前言 之前一直有粉丝想让我出一套springboot实战开发的教程,我这边总结了很久资料和经验,在最近总算把这套教程的大纲和内容初步总结完毕了,这份教程从springboot的入门到精通全部涵盖在内, ...
- Spring Boot从入门到精通(六)集成Redis实现缓存机制
Redis(Remote Dictionary Server ),即远程字典服务,是一个开源的使用ANSI C语言编写.支持网络.可基于内存亦可持久化的日志型.Key-Value数据库,并提供多种语言 ...
随机推荐
- 3种办法教你解决Vegas预览画面卡顿问题
做视频的小伙伴都知道,剪视频的时候最烦躁的就是卡顿,不能编辑,不能预览.最近很多同学就反映在使用Vegas的时候,预览窗口播放非常卡顿,有时候根本预览不了,这该如何解决呢? 制作视频并不是简单的拼拼凑 ...
- (1)Hello World
语出<论语·卫灵公>:子贡问为仁.子曰:"工欲善其事,必先利其器.居是邦也,事其大夫之贤者,友其士之仁者." 2020年11月终于下定决心开始 Visual C++ 的 ...
- LeetCode双周赛#36
1604. 警告一小时内使用相同员工卡大于等于三次的人 题目链接 题意 给定两个字符串数组keyName和keyTime,分别表示名字为keytime[i]的人,在某一天内使用员工卡的时间(格式为24 ...
- python应用(5):变量类型与数据结构
如前所说,写程序如同给算法写壳,而算法就是流程,所以流程是程序的主角(但这个流程不一定要你来设计).在程序中,为了配合流程(算法)的实现,除了顺序.分支与循环语句的使用,还要借助"变量&qu ...
- GoLang 自学系列(二)—— defer
defer 关键字 首先来看官网的定义: A "defer" statement invokes a function whose execution is deferred to ...
- moviepy音视频开发:音频合成类CompositeAudioClip介绍
☞ ░ 前往老猿Python博文目录 ░ CompositeAudioClip是AudioClip的直接子类,用于将几个音频剪辑合成为一个音频剪辑.CompositeAudioClip类只有一个构造方 ...
- Python特殊序列\d能匹配哪些数字?
在缺省语言环境下,老猿对\d的匹配范围做了个测试,下面的数字包含半角数字.全角数字.中文数字,测试语句如下: >>> m=re.search(r'(\d*)(\D*)(\d*)',' ...
- 第14.5节 利用浏览器获取的http信息构造Python网页访问的http请求头
一. 引言 在<第14.3节 使用google浏览器获取网站访问的http信息>和<第14.4节 使用IE浏览器获取网站访问的http信息>中介绍了使用Google浏览器和IE ...
- JAVA课堂随机出题
一.设计思路 1.利用随机数来确定两个数字. 2.生成0-4的随机数,分别代表 加 减 乘 除. 3.输入的题数利用for循环来出题,每行输出几道题便在循环中加入if语句,当前出题数与每行输出题数求余 ...
- LoadRunner 多用户并发 登录,上传数据,登出的脚本教程
这里记录 Web/Http 模式,模拟多用户并发进行 : 登录,上传数据,退出登录一整套流程.并发的用户量多少,可自定义.这里不介绍录屏的方式,是自己写脚本去执行的. 1.安装loadRunner ...