25、springboot与缓存整合Redis


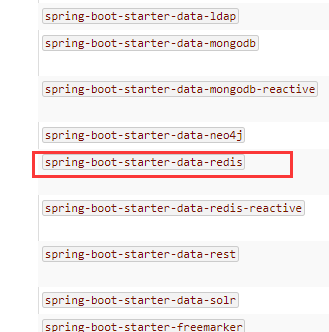
<dependency>

    <groupId>org.springframework.boot</groupId>

    <artifactId>spring-boot-starter-data-redis</artifactId>

</dependency>
public class RedisAutoConfiguration {

    public RedisAutoConfiguration() {

    }

    @Bean

    @ConditionalOnMissingBean(

        name = {"redisTemplate"}

    )

    public RedisTemplate<Object, Object> redisTemplate(RedisConnectionFactory redisConnectionFactory) throws UnknownHostException {

        RedisTemplate<Object, Object> template = new RedisTemplate();

        template.setConnectionFactory(redisConnectionFactory);

        return template;

    }

    @Bean

    @ConditionalOnMissingBean

    public StringRedisTemplate stringRedisTemplate(RedisConnectionFactory redisConnectionFactory) throws UnknownHostException {

        StringRedisTemplate template = new StringRedisTemplate();

        template.setConnectionFactory(redisConnectionFactory);

        return template;

    }

}
在配置文件中引入redis的地址:

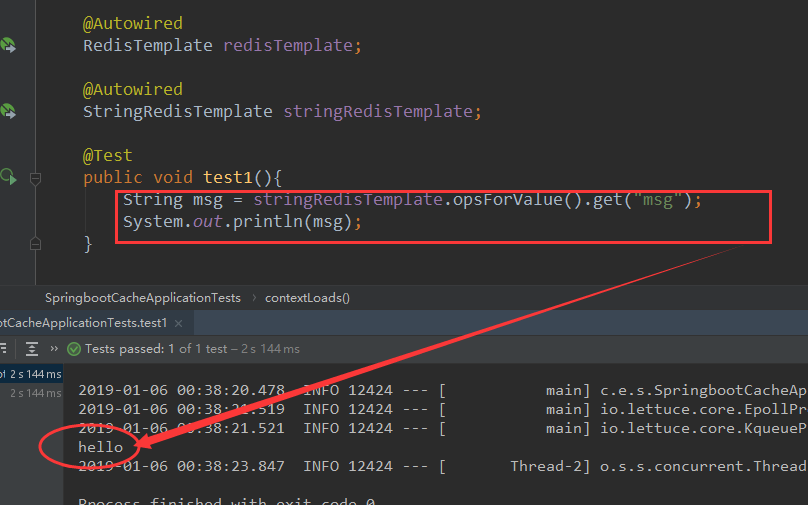
//操作kv键值对的

@Autowired

RedisTemplate redisTemplate;

//操作kv都是字符串

@Autowired

StringRedisTemplate stringRedisTemplate;

测试:
public class Employee implements Serializable {
//测试保存对象
@Test
public void test2(){
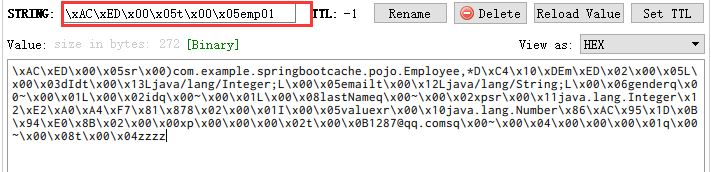
//保存的是emp的对象
Employee emp = employeeMapper.getEmpById();
//保存的是employee的对象
//默认如果使用保存对象,使用jdk序列化机制,序列化后的数据保存在redis中
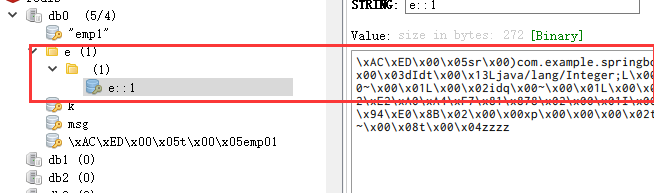
redisTemplate.opsForValue().set("emp01",emp);
}
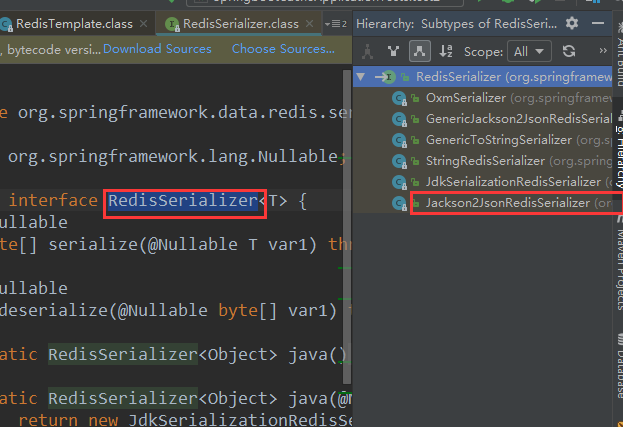
@Configuration

public class redisConfig {

    //专门序列化Employee

    @Bean

    public RedisTemplate<Object, Employee> redisTemplateEmp(RedisConnectionFactory redisConnectionFactory) throws UnknownHostException {

        RedisTemplate<Object, Employee> template = new RedisTemplate();

        template.setConnectionFactory(redisConnectionFactory);

        Jackson2JsonRedisSerializer<Employee> json = new Jackson2JsonRedisSerializer<Employee>(Employee.class);

        template.setDefaultSerializer(json);

        return template;

    }

}
@Autowired
RedisTemplate redisTemplateEmp; //测试保存对象
@Test
public void test2(){
//保存的是emp的对象
Employee emp = employeeMapper.getEmpById();
//将数据以json的方式
//实现redisTemplate默认的序列化规则,改变默认的序列化规则
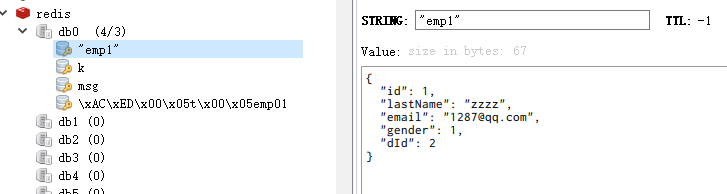
redisTemplateEmp.opsForValue().set("emp1",emp);
}
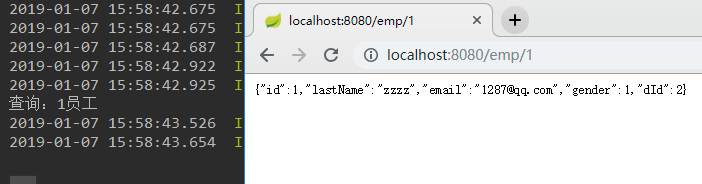
测试缓存:
RedisCacheConfiguration.class

@Bean

public RedisCacheManager cacheManager(RedisConnectionFactory redisConnectionFactory, ResourceLoader resourceLoader) {

    RedisCacheManagerBuilder builder = RedisCacheManager.builder(redisConnectionFactory).cacheDefaults(this.determineConfiguration(resourceLoader.getClassLoader()));

    List<String> cacheNames = this.cacheProperties.getCacheNames();

    if (!cacheNames.isEmpty()) {

        builder.initialCacheNames(new LinkedHashSet(cacheNames));

    }

    return (RedisCacheManager)this.customizerInvoker.customize(builder.build());

}
protected Collection<RedisCache> loadCaches() {

    List<RedisCache> caches = new LinkedList();

    Iterator var2 = this.initialCacheConfiguration.entrySet().iterator();

    while(var2.hasNext()) {

        Entry<String, RedisCacheConfiguration> entry = (Entry)var2.next();

        caches.add(this.createRedisCache((String)entry.getKey(), (RedisCacheConfiguration)entry.getValue()));

    }

    return caches;

}
@Bean

public RedisCacheManager cacheManager(RedisConnectionFactory redisConnectionFactory, ResourceLoader resourceLoader) {

    RedisCacheManagerBuilder builder = RedisCacheManager.builder(redisConnectionFactory).cacheDefaults(this.determineConfiguration(resourceLoader.getClassLoader()));

    List<String> cacheNames = this.cacheProperties.getCacheNames();

    if (!cacheNames.isEmpty()) {

        builder.initialCacheNames(new LinkedHashSet(cacheNames));

    }

    return (RedisCacheManager)this.customizerInvoker.customize(builder.build());

}
public class RedisAutoConfiguration {

    @Bean

    @ConditionalOnMissingBean(

        name = {"redisTemplate"}

    )

    public RedisTemplate<Object, Object> redisTemplate(RedisConnectionFactory redisConnectionFactory) throws UnknownHostException {

        RedisTemplate<Object, Object> template = new RedisTemplate();

        template.setConnectionFactory(redisConnectionFactory);

        return template;

    }
RedisTemplate.java

public void afterPropertiesSet() {

    super.afterPropertiesSet();

    boolean defaultUsed = false;

    if (this.defaultSerializer == null) {

        this.defaultSerializer = new JdkSerializationRedisSerializer(this.classLoader != null ? this.classLoader : this.getClass().getClassLoader());

    }

}

25、springboot与缓存整合Redis的更多相关文章
- MyBatis功能点一应用:二级缓存整合redis
Mybatis提供了默认的cache实现PerpetualCache,那为什么还要整合第三方的框架redis?因为Mybatis提供的cache实现为单机版,无法实现分布式存储(即本机存储的数据,其他 ...
- 【快学springboot】11.整合redis实现session共享
前言 这里都是基于前面的项目基础上的.springboot整合redis非常的方便,这也是springboot的宗旨,简化配置.这篇文章就教大家如何使用springboot整合redis来实现sess ...
- springboot 2.x整合redis,spring aop实现接口缓存
pox.xml: <dependency> <groupId>org.springframework.boot</groupId> <artifactId&g ...
- SpringBoot + MySQL + MyBatis 整合 Redis 实现缓存操作
本地安装 Redis Redis 安装:https://www.cnblogs.com/oukele/p/11373052.html 项目结构: SpringBootRedis 工程项目结构如下: ...
- redis(Springboot中封装整合redis,java程序如何操作redis的5种基本数据类型)
平常测试redis操作命令,可能用的是cmd窗口 操作redis,记录一下 java程序操作reids, 操作redis的方法 可以用Jedis ,在springboot 提供了两种 方法操作 Red ...
- SpringBoot学习:整合Redis
项目下载地址:http://download.csdn.NET/detail/aqsunkai/9805821 pom.xml添加对redis的依赖: <!-- https://mvnrepos ...
- springboot笔记10——整合Redis
依赖 <dependencies> <!--web依赖--> <dependency> <groupId>org.springframework.boo ...
- SpringBoot:Shiro 整合 Redis
前言 前段时间做了一个图床的小项目,安全框架使用的是Shiro.为了使用户7x24小时访问,决定把项目由单机升级为集群部署架构.但是安全框架shiro只有单机存储的SessionDao,尽管Shrio ...
- 【快学springboot】13.操作redis之String数据结构
前言 在之前的文章中,讲解了使用redis解决集群环境session共享的问题[快学springboot]11.整合redis实现session共享,这里已经引入了redis相关的依赖,并且通过spr ...
随机推荐
- protobuf简单测试应用
protobuf是google推出的一种数据交换协议,比较适合应用于底层服务交互,nodejs提供protobufjs包的实现,下面是一个简单的测试demo: 首先是.proto文件: package ...
- 六、yarn运行模式
简介 spark的yarn运行模式根据Driver在集群中的位置分成两种: 1)yarn-client 客户端模式 2)yarn-cluster 集群模式 yarn模式和standalone模式不同, ...
- 用Lua控制Nginx静态文件的url访问权限
需求背景:比如我们有一个存储文件的web服务器,一般通过url可直接访问到:http://127.0.0.1/uploads/test.rar,如果我们需要限制别人的访问,可以通过添加lua脚本来控制 ...
- [JAVA IDEA]在使用maven项目中,无法读取resources文件夹中的配置文件的一种解决方案
1.在通过配置文件来连接数据库时,在resouces文件中放入了db.properties配置文件,但无法正常读取到 读取配置文件信息的代码: InputStream input=JdbcUtil.c ...
- SuperSubScriptHelper——Unicode上下标辅助类
在项目的实施过程中,类似化学分子式.平方.立方等,需要处理上.下标字符. 上下标字符的实现,大致有两种方式,一种是字符本身包含上下标信息,另一种方式是通过格式化标记实现上下标字符的显示. Word中的 ...
- Oracle数据库基本操作 (六) —— 数据的导出与导入
一.cmd 下登录oracle数据库下的指定用户 方式一:命令行明文连接登录 打开cmd,输入:sqlplus/nolog 输入:conn username/passworld@数据库实例名 方式二: ...
- MySQL的预编译功能
1.预编译的好处 大家平时都使用过JDBC中的PreparedStatement接口,它有预编译功能.什么是预编译功能呢?它有什么好处呢? 当客户发送一条SQL语句给服务器后,服务器总是需要校验S ...
- 初级篇html。
什么是html? 超文本标记语言,标准通用标记语言下的一个应用. “超文本”就是指页面内可以包含图片.链接,甚至音乐.程序等非文字元素. 超文本标记语言的结构包括“头”部分(英语:Head).和“主 ...
- GDAL读取影像并插值
影像读取 并缩放 读取大影像某一部分,并缩放到指定大小,我们有时会用如下代码: #include "gdal.h" #include "gdal_priv.h" ...
- Eclipse 分屏显示同一个代码文件
描述: 今天在使用Eclipse开发的时候不知按错哪个键,出现编辑框分屏显示同一个代码,由于之前没有使用过这一功能,所以就去查了一下,原来是Eclipse的分屏功能. 快捷键: 方式一:Window ...