Android之ProgressBar
今天复习一下以前的知识,补充一下ProgressBar控件
progressBar是进度条组件,通常用于用户展示某个耗时操作完成的进度,而不让用户感觉是程序失去了响应,从而更好地提升用户界面的友好性。
1)制定ProgressBar显示风格
2)ProgressBar的分类
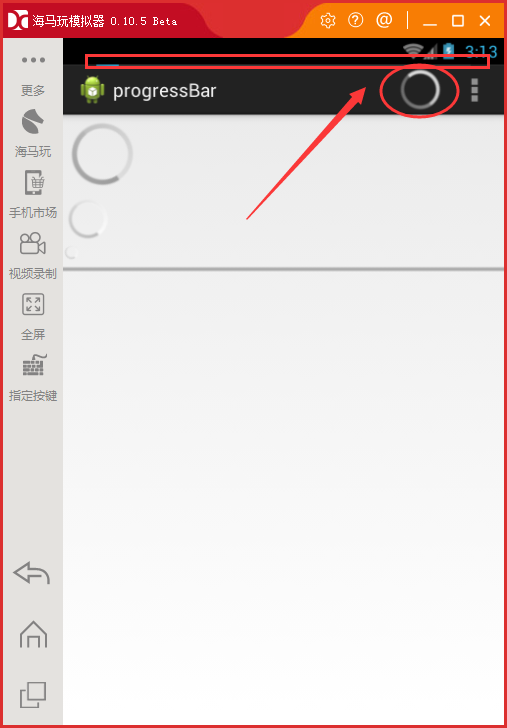
3)标题上ProgressBar的设置
4)ProgressBar的关键属性
5)ProgressBar的关键方法
6)ProgressDialog的基础使用
7)自定义ProgressBar样式
1)制定ProgressBar显示风格
style = "?android:attr/progressBarStyleLarge" 大环形进度条
style = "?android:attr/progressBarStyleSmall" 小环形进度条
style = "?android:attr/progressBarStyleHorizontal" 水平进度条

2)ProgressBar的分类
1.可以精确显示进度(可以显示刻度或者百分比)
2.不可以精确显示精度(一直转啊转,类似于一个过场动画)
3)标题上ProgressBar的设置
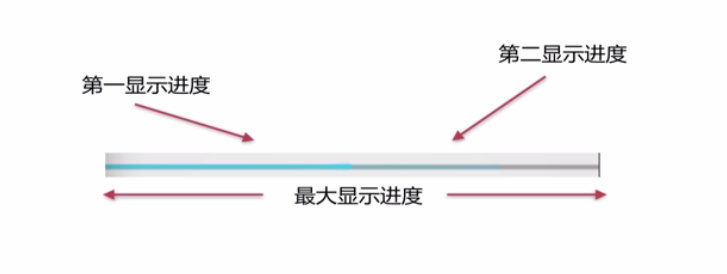
4)ProgressBar的关键属性
android:max = "100" ——最大显示进度
android:progress = "50" ——第一显示进度
android:secondaryProgress = "80" ——第二显示进度
android:indeterminate = "true" ——设置是否精确显示
(true表示不精确显示进度,false表示精确显示进度)
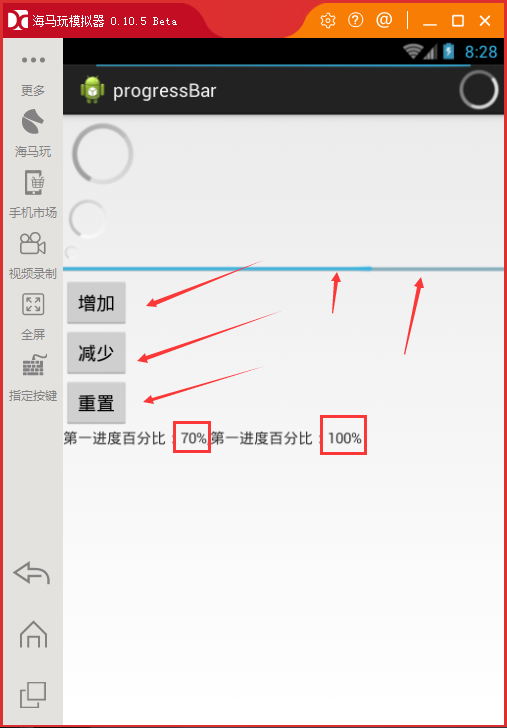
5)ProgressBar的关键方法
1)setProgress(int) 设置第一进度
2)setSecondaryProgress(int) 设置第二进度
3)getProgress() 获取第一进度
4)getSecondaryProgress() 获取第二进度
5)incrementProgressBy(int) 增加或减少第一进度
6)incrementSecondaryProgressBy(int) 增加或减少第二进度
7)getMax() 获取最大进度
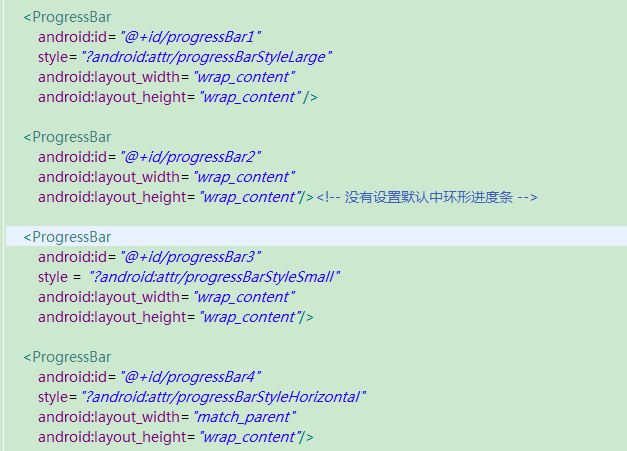
案例:
 <LinearLayout xmlns:android="http://schemas.android.com/apk/res/android"

     xmlns:tools="http://schemas.android.com/tools"

     android:layout_width="match_parent"

     android:layout_height="match_parent"

     android:orientation="vertical"

     tools:context="com.example.progressbar.MainActivity" >

     <ProgressBar

         android:id="@+id/progressBar1"

         style="?android:attr/progressBarStyleLarge"

         android:layout_width="wrap_content"

         android:layout_height="wrap_content" />

     <ProgressBar

         android:id="@+id/progressBar2"

         android:layout_width="wrap_content"

         android:layout_height="wrap_content"/><!-- 没有设置默认中环形进度条 -->

     <ProgressBar

         android:id="@+id/progressBar3"

         style = "?android:attr/progressBarStyleSmall"

         android:layout_width="wrap_content"

         android:layout_height="wrap_content"/>

     <ProgressBar

         android:secondaryProgress="80"

         android:progress="50"

         android:max="100"

         android:id="@+id/horiz"

         style="?android:attr/progressBarStyleHorizontal"

         android:layout_width="match_parent"

         android:layout_height="wrap_content"/>

     <Button

         android:id="@+id/add"

         android:layout_width="wrap_content"

         android:layout_height="wrap_content"

         android:text="增加" />

     <Button

         android:id="@+id/reduce"

         android:layout_width="wrap_content"

         android:layout_height="wrap_content"

         android:text="减少" />

     <Button

         android:id="@+id/reset"

         android:layout_width="wrap_content"

         android:layout_height="wrap_content"

         android:text="重置" />

     <TextView

         android:id="@+id/text"

         android:layout_width="wrap_content"

         android:layout_height="wrap_content"/>

 </LinearLayout>
activity_main.xml
 package com.example.progressbar;

 import android.app.Activity;

 import android.os.Bundle;

 import android.view.View;

 import android.view.View.OnClickListener;

 import android.view.Window;

 import android.widget.Button;

 import android.widget.ProgressBar;

 import android.widget.TextView;

 public class MainActivity extends Activity implements OnClickListener {

     private ProgressBar progress ;

     private Button add;

     private Button reduce;

     private Button reset;

     private TextView text;

     @Override

     protected void onCreate(Bundle savedInstanceState) {

         super.onCreate(savedInstanceState);

         //启用窗口特征,启用带进度和不带进度的进度条

         requestWindowFeature(Window.FEATURE_PROGRESS);

         requestWindowFeature(Window.FEATURE_INDETERMINATE_PROGRESS);

         setContentView(R.layout.activity_main);

         //显示两种进度条

         setProgressBarVisibility(true);//水平进度条

         setProgressBarIndeterminateVisibility(true);//环形进度条

         //Max = 10000

         setProgress(9999);

         init();

     }

     private void init() {

         progress = (ProgressBar) findViewById(R.id.horiz);

         add = (Button) findViewById(R.id.add);

         reduce = (Button) findViewById(R.id.reduce);

         reset = (Button) findViewById(R.id.reset);

         text = (TextView) findViewById(R.id.text);

         //getPeogress()获取第一进度

         int first = progress.getProgress();

         //获取第二进度

         int second = progress.getSecondaryProgress();

         //获取最大进度

         int max = progress.getMax();

         text.setText("第一进度百分比:"+(int)(first/(float)max*100)+"%,第一进度百分比:"+(int)(second/(float)max*100)+"%");

         add.setOnClickListener(this);

         reduce.setOnClickListener(this);

         reset.setOnClickListener(this);

     }

     @Override

     public void onClick(View v) {

         switch(v.getId()){

             case R.id.add :{

                 //增加第一进度第二进度10个刻度

                 progress.incrementProgressBy(10);

                 progress.incrementSecondaryProgressBy(10);

                 break ;

             }

             case R.id.reduce :{

                 progress.incrementProgressBy(-10);

                 progress.incrementSecondaryProgressBy(-10);

                 break ;

             }

             case R.id.reset :{

                 progress.setProgress(50);

                 progress.setSecondaryProgress(80);

                 break ;

             }

         }

         text.setText("第一进度百分比:"+(int)(progress.getProgress()/(float)progress.getMax()*100)+"%,第一进度百分比:"+(int)(progress.getSecondaryProgress()/(float)progress.getMax() * 100)+"%");

     }

 }
MainActivity.java
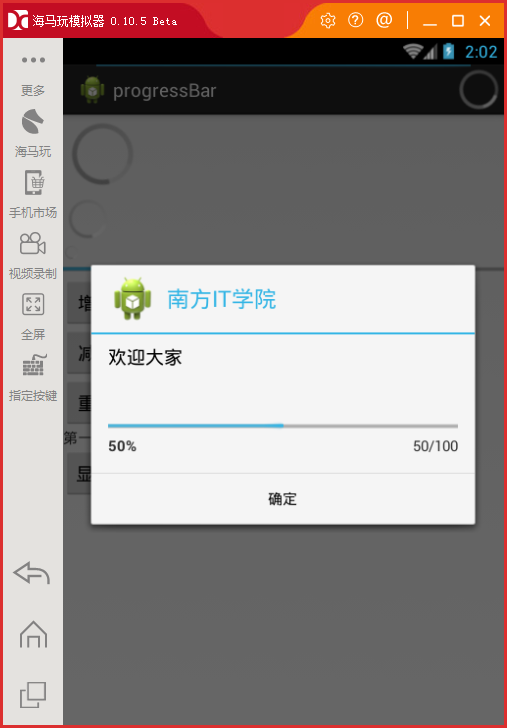
6)ProgressDialog的基础使用
 private ProgressDialog prodialog ;

 private Button show;

 show = (Button) findViewById(R.id.show);

 show.setOnClickListener(this);

 case R.id.show :{

 /**

 * 页面显示风格

 */

 //新建ProgressDialog对象

 prodialog = new ProgressDialog(MainActivity.this);

 //设置显示风格

 prodialog.setProgressStyle(ProgressDialog.STYLE_HORIZONTAL);

 //设置标题

 prodialog.setTitle("南方IT学院");

 //设置对话框文字信息

 prodialog.setMessage("欢迎大家");

 //设置图标

 prodialog.setIcon(R.drawable.ic_launcher);

 /**

 * 设置关于ProgressBar属性

 */

 //设置最大进度

 prodialog.setMax(100);

 //设定初始化已经增长到的进度

 prodialog.incrementProgressBy(50);

 //进度条是明显显示进度的

 prodialog.setIndeterminate(false);

 /**

 * 设定一个确定按钮

 */

 prodialog.setButton(DialogInterface.BUTTON_POSITIVE, "确定", new DialogInterface.OnClickListener() {

 @Override

 public void onClick(DialogInterface dialog, int which) {

 Toast.makeText(MainActivity.this, "欢迎", Toast.LENGTH_LONG).show();

 }

 });

 //是否可以通过返回按钮退出对话框

 prodialog.setCancelable(true);

 //显示ProgressDialog

 prodialog.show();

 break ;

 }
MainActivity
7)自定义ProgressBar样式

style="@android:style/Widget.ProgressBar.Horizontal"
android:progressDrawable="@drawable/progress_bar"
 <?xml version="1.0" encoding="utf-8"?>

 <layer-list xmlns:android="http://schemas.android.com/apk/res/android" >

     <item android:id="@android:id/background">

         <shape>

             <corners android:radius="5dip" />

         <solid android:color="#88000000"/>

         </shape>

     </item>

     <item android:id="@android:id/secondaryProgress">

         <clip>

             <shape>

                 <corners android:radius="5dip" />

                 <gradient

                     android:angle="270"

                     android:centerColor="#C6B7FF"

                     android:centerY="0.75"

                     android:endColor="#C3B2FF"

                     android:startColor="#B9A4FF" />

             </shape>

         </clip>

     </item>

     <item android:id="@android:id/progress">

         <clip>

             <shape>

                 <corners android:radius="5dip" />

             <gradient

                 android:angle="270"

                 android:centerColor="#74EBFF"

                 android:centerY="0.75"

                 android:endColor="#8EEFFF"

                 android:startColor="#57E8FF" />

             </shape>

         </clip>

     </item>

 </layer-list>
progress_bar.xmml
Android之ProgressBar的更多相关文章
- Android之ProgressBar初步应用
这里利用 ProgressBar 即时显示下载进度. 途中碰到的问题: 1.主线程中不能打开 URL,和只能在主线程中使用 Toast 等 2.子线程不能修改 UI 3.允许网络协议 4.暂停下载和继 ...
- java.lang.ClassCastException: android.view.AbsSavedState$1 cannot be cast to android.widget.ProgressBar$SavedState
java.lang.ClassCastException: android.view.AbsSavedState$1 cannot be cast to android.widget.Progress ...
- Android自定义progressBar
通过继承系统ProgressBar实现 效果图 实现 HorizontalProgressBarWithNumber 自定义属性 <?xml version="1.0" en ...
- Android的ProgressBar以及自定义进度条
1.xml文件 activity_main.xml <LinearLayout xmlns:android="http://schemas.android.com/apk/res/an ...
- Android的ProgressBar
注意点: 必须在setContentView 前面设置,否则会报错. 重要的方法: progress.incrementProgressBy(int diff);//参数为进度数,进度满了为100.不 ...
- Android的ProgressBar进度条-android学习之旅(三十一)
ProgressBar 简介 ProgressBar是一种很常用的Ui,用于给复杂的操作显示进度,提供更好的用户相应.使用setProgress()incrementProgressBy()来设置进度 ...
- Android自定义ProgressBar样式
我们使用的进度条多种多样,下面有几种自定义的进度条的样式,下面介绍几个. 进度条的有基本的四种样式: 默认风格的进度条: android:progressBarStyle 水平长型进度条: andro ...
- Android 使用ProgressBar实现进度条
ProgressBar简介ProgressBar是进度条组件,通常用于向用户展示某个耗时操作完成的进度,而不让用户感觉是程序失去了响应,从而更好地提升用户界面的友好型. 课程目标(1)制定Progre ...
- android 自定义progressbar 样式
在res下创建drawable文件夹,新建文件drawable/progressbar_color.xml <layer-list xmlns:android="http://sche ...
随机推荐
- 如何在RichTextBox中改变多个字符串的颜色以及字体
目标:传入目标富文本框以及需要查找的字符串,如果文本框中存在字符串,则改变其颜色和字体 可能因为这个问题比较简单,在网上找了很久,也没有一个好的方法.少有的一些方法,也只是改变第一个找到的字符串的颜色 ...
- 进击的docker 一 : Docker 简介
Docker简介 1.什么是docker 1.1.docker 起源 开源项目 诞生2013年初 GO语言开发实现 遵从了Apache2.0协议 项目代码在GitHub维护 1.2.docker目标 ...
- git&sourcetree安装及在IntelliIJ下拉取项目基础使用
be careful: 1)git版本与Sourcetree版本最好一致 ,不能git为2.5,sourcetree为1.8 2)先安装git再安装Sourcetree 3)拥有git和sourcet ...
- What is SPI?
原文地址:http://www.fpga4fun.com/SPI1.html SPI is a simple interface that allows one chip to communicate ...
- NHibernate系列文章二十八:NHibernate Mapping之Auto Mapping(附程序下载)
摘要 上一篇文章介绍了Fluent NHibernate基础知识.但是,Fluent NHibernate提供了一种更方便的Mapping方法称为Auto Mapping.只需在代码中定义一些Conv ...
- Sublime Text 全程指引
Sublime Text 全程指引 by Lucida 包含sublime 的常用快捷操作
- Centos下安装Mongodb
转自:http://nnzhp.cn/article/10/ Mongodb是一种nosql类型的数据库,高性能.易部署.易使用的特点在IT行业非常流行. 下面介绍一下mongodb的安装方式,这里我 ...
- cocos2d-js去掉左下角的三行数字(帧数)
project.json 里面"showFPS": true, 改成 false 就行了... 调整帧率也在这里调整 或者是 同cocos2dx,cocos2d-js左下角的FPS ...
- Oracle 的递归查询将层级变成字符串
select A.PARENT_GROUP_ID, A.GROUP_ID,sys_connect_by_path(A.GROUP_ID,'/') || '/' path from dam_dataen ...
- c#跨线程访问控件帮助类
1.背景 对于winform程序来说,当我们点击按钮,需要消耗一定时长才能拿到数据后才能显示在界面上某个控件上的情况,我们通常会专门开一个线程去拿数据,这样不会造成界面处于假死状态 2.常规做法 // ...