Android 长按Listview显示CheckBox,实现批量删除。
ListView实现的列表,如果是可编辑,可删除的,一般都要提供批量删除功能,否则的话,一项一项的删除体验很不好,也给用户带来了很大的麻烦。
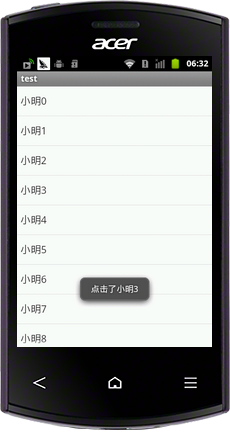
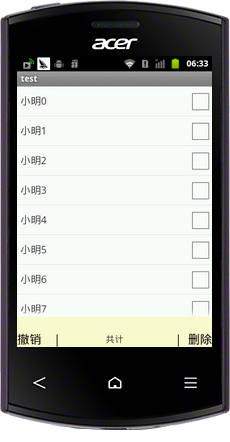
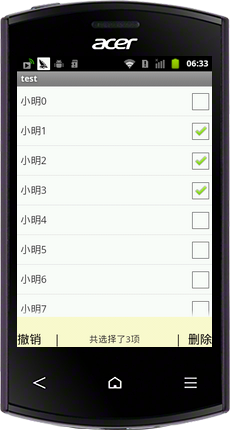
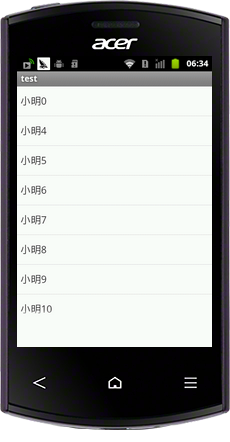
实现效果图
具体实现代码
select.xml
主布局文件包含一个ListView还有一个隐藏的布局,包含了两个Button一个TextView,默认布局为gone,当监听到长按响应事件时候显示。
 <?xml version="1.0" encoding="utf-8"?>

 <LinearLayout xmlns:android="http://schemas.android.com/apk/res/android"

     android:layout_width="match_parent"

     android:layout_height="match_parent"

     android:orientation="vertical" >

     <ListView

         android:id="@+id/list"

         android:layout_width="match_parent"

         android:layout_height="match_parent"

         android:layout_weight="1"

         android:cacheColorHint="#FFF" >

         </ListView>

     <RelativeLayout

         android:id="@+id/relative"

         android:layout_width="fill_parent"

         android:layout_height="50dp"

         android:gravity="bottom"

         android:background="@color/lemonchiffon"

         android:visibility="gone"

         >

         <Button

             android:id="@+id/cancle"

             android:layout_width="wrap_content"

             android:layout_height="wrap_content"

             android:text="撤销    |"

             android:textSize="20sp"

             android:background="@null"

             android:layout_centerVertical="true"

             />

         <TextView

             android:id="@+id/txtcount"

             android:layout_width="wrap_content"

             android:layout_height="wrap_content"

             android:text="共计"

             android:textSize="15sp"

             android:layout_centerInParent="true"

             />

         <Button

             android:id="@+id/delete"

             android:layout_width="wrap_content"

             android:layout_height="wrap_content"

             android:text="|  删除"

             android:textSize="20sp"

             android:background="@null"

             android:layout_alignParentRight="true"

             android:layout_centerVertical="true"

             />

     </RelativeLayout>

 </LinearLayout>
item.xml
包含一个TextView 一个CheckBox
 <?xml version="1.0" encoding="utf-8"?>

 <LinearLayout xmlns:android="http://schemas.android.com/apk/res/android"

     android:layout_width="match_parent"

     android:layout_height="match_parent"

     android:orientation="horizontal" >

     <TextView

         android:id="@+id/txtName"

         android:layout_width="match_parent"

         android:layout_height="wrap_content"

         android:layout_alignParentLeft="true"

         android:layout_centerVertical="true"

         android:layout_gravity="center_vertical"

         android:layout_marginLeft="5dp"

         android:layout_weight="1"

         android:text="444444444444"

         android:textSize="17sp"

         android:textColor="#333" />

     <CheckBox

         android:id="@+id/check"

         android:layout_width="wrap_content"

         android:layout_height="wrap_content"

         android:visibility="gone"

         android:clickable="false"

         />

 </LinearLayout>
通过自定义Adapter绑定ListView数据源,实现长按监听,在长按监听时候,切记将监听事件返回ture。
 /**

      * @author ieasy360_1

      * 自定义Adapter

      */

     class Adapter extends BaseAdapter{

         private Context context;

         private LayoutInflater inflater=null;

         private HashMap<Integer, View> mView ;

         public  HashMap<Integer, Integer> visiblecheck ;//用来记录是否显示checkBox

         public  HashMap<Integer, Boolean> ischeck;

         private TextView txtcount;

         public Adapter(Context context,TextView txtcount)

         {

             this.context = context;

             this.txtcount = txtcount;

             inflater = (LayoutInflater)context.getSystemService(Context.LAYOUT_INFLATER_SERVICE);

             mView = new HashMap<Integer, View>();

             visiblecheck = new HashMap<Integer, Integer>();

             ischeck      = new HashMap<Integer, Boolean>();

             if(isMulChoice){

                 for(int i=0;i<array.size();i++){

                     ischeck.put(i, false);

                     visiblecheck.put(i, CheckBox.VISIBLE);

                 }

             }else{

                 for(int i=0;i<array.size();i++)

                 {

                     ischeck.put(i, false);

                     visiblecheck.put(i, CheckBox.INVISIBLE);

                 }

             }

         }

         public int getCount() {

             // TODO Auto-generated method stub

             return array.size();

         }

         public Object getItem(int position) {

             // TODO Auto-generated method stub

             return array.get(position);

         }

         public long getItemId(int position) {

             // TODO Auto-generated method stub

             return 0;

         }

         public View getView(final int position, View convertView, ViewGroup parent) {

             // TODO Auto-generated method stub

             View view = mView.get(position);

             if(view==null)

             {

                 view = inflater.inflate(R.layout.item, null);

                 TextView txt = (TextView)view.findViewById(R.id.txtName);

                 final CheckBox ceb = (CheckBox)view.findViewById(R.id.check);

                 txt.setText(array.get(position));

                 ceb.setChecked(ischeck.get(position));

                 ceb.setVisibility(visiblecheck.get(position));

                 view.setOnLongClickListener(new Onlongclick());

                 view.setOnClickListener(new OnClickListener() {

                     public void onClick(View v) {

                         // TODO Auto-generated method stub

                         if(isMulChoice){

                             if(ceb.isChecked()){

                                 ceb.setChecked(false);

                                 selectid.remove(array.get(position));

                             }else{

                                 ceb.setChecked(true);

                                 selectid.add(array.get(position));

                             }

                             txtcount.setText("共选择了"+selectid.size()+"项");

                         }else {

                             Toast.makeText(context, "点击了"+array.get(position), Toast.LENGTH_LONG).show();

                         }

                     }

                 });

                 mView.put(position, view);

             }

             return view;

         }

         class Onlongclick implements OnLongClickListener{

             public boolean onLongClick(View v) {

                 // TODO Auto-generated method stub

                 isMulChoice = true;

                 selectid.clear();

                 layout.setVisibility(View.VISIBLE);

                 for(int i=0;i<array.size();i++)

                 {

                     adapter.visiblecheck.put(i, CheckBox.VISIBLE);

                 }

                 adapter = new Adapter(context,txtcount);

                 listview.setAdapter(adapter);

                 return true;

             }

         }

     }
全部实现代码
 package com.example.test;

 import java.util.ArrayList;

 import java.util.HashMap;

 import java.util.List;

 import android.app.Activity;

 import android.content.Context;

 import android.os.Bundle;

 import android.view.ContextMenu;

 import android.view.ContextMenu.ContextMenuInfo;

 import android.view.LayoutInflater;

 import android.view.View;

 import android.view.View.OnClickListener;

 import android.view.View.OnLongClickListener;

 import android.view.ViewGroup;

 import android.widget.BaseAdapter;

 import android.widget.Button;

 import android.widget.CheckBox;

 import android.widget.ListView;

 import android.widget.RelativeLayout;

 import android.widget.TextView;

 import android.widget.Toast;

 /**

  * @author ieasy360_1

  *

  */

 public class MulSelect extends Activity implements OnClickListener {

     private ListView listview;

     private Context  context;

     private List<String> array = new ArrayList<String>();

     private List<String> selectid = new ArrayList<String>();

     private boolean isMulChoice = false; //是否多选

     private Adapter  adapter;

     private RelativeLayout layout;

     private Button cancle,delete;

     private TextView txtcount;

     @Override

     protected void onCreate(Bundle savedInstanceState) {

         // TODO Auto-generated method stub

         super.onCreate(savedInstanceState);

         setContentView(R.layout.select);

         context = this;

         listview = (ListView)findViewById(R.id.list);

         layout = (RelativeLayout)findViewById(R.id.relative);

         txtcount = (TextView)findViewById(R.id.txtcount);

         cancle   = (Button)findViewById(R.id.cancle);

         delete   = (Button)findViewById(R.id.delete);

         cancle.setOnClickListener(this);

         delete.setOnClickListener(this);

         init();

         adapter = new Adapter(context,txtcount);

         listview.setAdapter(adapter);

     }

     void init()

     {

         for(int i=0;i<20;i++)

         {

             array.add("小明"+i);

         }

     }

     public void onClick(View v) {

         // TODO Auto-generated method stub

         switch (v.getId()) {

         case R.id.cancle:

             isMulChoice = false;

             selectid.clear();

             adapter = new Adapter(context,txtcount);

             listview.setAdapter(adapter);

             layout.setVisibility(View.INVISIBLE);

             break;

         case R.id.delete:

             isMulChoice =false;

             for(int i=0;i<selectid.size();i++){

                 for(int j=0;j<array.size();j++){

                     if(selectid.get(i).equals(array.get(j))){

                         array.remove(j);

                     }

                 }

             }

             selectid.clear();

             adapter = new Adapter(context,txtcount);

             listview.setAdapter(adapter);

             layout.setVisibility(View.INVISIBLE);

             break;

         default:

             break;

         }

     }

     @Override

     public void onCreateContextMenu(ContextMenu menu, View v,

             ContextMenuInfo menuInfo) {

         // TODO Auto-generated method stub

         super.onCreateContextMenu(menu, v, menuInfo);

         menu.setHeaderTitle("操作");

     }

     /**

      * @author ieasy360_1

      * 自定义Adapter

      */

     class Adapter extends BaseAdapter{

         private Context context;

         private LayoutInflater inflater=null;

         private HashMap<Integer, View> mView ;

         public  HashMap<Integer, Integer> visiblecheck ;//用来记录是否显示checkBox

         public  HashMap<Integer, Boolean> ischeck;

         private TextView txtcount;

         public Adapter(Context context,TextView txtcount)

         {

             this.context = context;

             this.txtcount = txtcount;

             inflater = (LayoutInflater)context.getSystemService(Context.LAYOUT_INFLATER_SERVICE);

             mView = new HashMap<Integer, View>();

             visiblecheck = new HashMap<Integer, Integer>();

             ischeck      = new HashMap<Integer, Boolean>();

             if(isMulChoice){

                 for(int i=0;i<array.size();i++){

                     ischeck.put(i, false);

                     visiblecheck.put(i, CheckBox.VISIBLE);

                 }

             }else{

                 for(int i=0;i<array.size();i++)

                 {

                     ischeck.put(i, false);

                     visiblecheck.put(i, CheckBox.INVISIBLE);

                 }

             }

         }

         public int getCount() {

             // TODO Auto-generated method stub

             return array.size();

         }

         public Object getItem(int position) {

             // TODO Auto-generated method stub

             return array.get(position);

         }

         public long getItemId(int position) {

             // TODO Auto-generated method stub

             return 0;

         }

         public View getView(final int position, View convertView, ViewGroup parent) {

             // TODO Auto-generated method stub

             View view = mView.get(position);

             if(view==null)

             {

                 view = inflater.inflate(R.layout.item, null);

                 TextView txt = (TextView)view.findViewById(R.id.txtName);

                 final CheckBox ceb = (CheckBox)view.findViewById(R.id.check);

                 txt.setText(array.get(position));

                 ceb.setChecked(ischeck.get(position));

                 ceb.setVisibility(visiblecheck.get(position));

                 view.setOnLongClickListener(new Onlongclick());

                 view.setOnClickListener(new OnClickListener() {

                     public void onClick(View v) {

                         // TODO Auto-generated method stub

                         if(isMulChoice){

                             if(ceb.isChecked()){

                                 ceb.setChecked(false);

                                 selectid.remove(array.get(position));

                             }else{

                                 ceb.setChecked(true);

                                 selectid.add(array.get(position));

                             }

                             txtcount.setText("共选择了"+selectid.size()+"项");

                         }else {

                             Toast.makeText(context, "点击了"+array.get(position), Toast.LENGTH_LONG).show();

                         }

                     }

                 });

                 mView.put(position, view);

             }

             return view;

         }

         class Onlongclick implements OnLongClickListener{

             public boolean onLongClick(View v) {

                 // TODO Auto-generated method stub

                 isMulChoice = true;

                 selectid.clear();

                 layout.setVisibility(View.VISIBLE);

                 for(int i=0;i<array.size();i++)

                 {

                     adapter.visiblecheck.put(i, CheckBox.VISIBLE);

                 }

                 adapter = new Adapter(context,txtcount);

                 listview.setAdapter(adapter);

                 return true;

             }

         }

     }

 }
Android 长按Listview显示CheckBox,实现批量删除。的更多相关文章
- Android — 长按ListView 利用上下文菜单(ActionMode) 进行批量事件处理
好久没写博客拉``````` 近期最终略微闲一点了``````` 无聊拿手机清理短信.发现批量事件的处理还是挺管用的`````` 那么自己也来山寨一记看看效果吧````` 闲话少说,首先,我们来看下手 ...
- 作业:汽车查询--弹窗显示详情,批量删除 ajax做法(0521)
作业:显示以下界面: 作业要求: 1.查看详细信息,以弹窗的形式显示,使用ajax2.批量删除 一.主页面 <!DOCTYPE html PUBLIC "-//W3C//DTD XHT ...
- 作业:汽车查询--弹窗显示详情,批量删除 php做法(0521)
作业:显示以下界面: 作业要求: 1.查看详细信息,以弹窗的形式显示,使用ajax2.批量删除 一.主页面: <!DOCTYPE html PUBLIC "-//W3C//DTD XH ...
- 完整地mybatis + springmvc用checkbox实现批量删除
因为自己在网上找了半天,都找不到完整地代码(脑袋笨,不会变通到自己项目里),所以在这里记下了近乎完整的代码 前端代码 <span style="cursor:pointer;" ...
- jsp中利用checkbox进行批量删除
一.将前台jsp页面中的所有你要用到checkbox的name值设为相同,如 <input type="checkbox" name="userid"&g ...
- Android开发之ListView条目批量选择删除
ListView实现的列表,假设是可编辑,可删除的,一般都要提供批量删除功能,否则的话,一项一项的删除体验非常不好,也给用户带来了非常大的麻烦. 实现效果图 详细实现代码 select.xml 主布局 ...
- Android在listview添加checkbox实现单选多选操作问题(转)
转自:http://yangshen998.iteye.com/blog/1310183 在Android某些开发需求当中,有时候需要在listveiw中加入checkbox实现单选,多选操作.表面上 ...
- android UI进阶之实现listview中checkbox的多选与记录
今天继续和大家分享涉及到listview的内容.在很多时候,我们会用到listview和checkbox配合来提供给用户一些选择操作.比如在一个 清单页面,我们需要记录用户勾选了哪些条目.这个的实现并 ...
- 【转】android UI进阶之实现listview中checkbox的多选与记录--不错
原文网址:http://www.cnblogs.com/notice520/archive/2012/02/17/2355415.html 今天继续和大家分享涉及到listview的内容.在很多时候, ...
随机推荐
- 二维码扫描利用ZBar实现
上次是根据系统的属性自己封装的一个二维码扫描,这次给大家介绍一下基于ZBar集成的类似于QQ二维码扫描界面的二维码扫描的效果. ...
- Modernizr的介绍和使用
传统浏览器目前不会被完全取代,令你难以将最新的 CSS3 或 HTML5 功能嵌入你的网站. Modernizr 正是为解决这一难题应运而生,作为一个开源的 JavaScript 库,Moderniz ...
- H5文件操作API
引言 在之前我们操作本地文件都是使用flash.silverlight或者第三方的activeX插件等技术,由于使用了这些技术后就很难进行跨平台.或者跨浏览器.跨设备等情况下实现统一的表现,从另外一个 ...
- Linux文件I/O学习
Linux内核的VFS子系统: 文件描述符 对于内核而言,所有打开的文件都通过文件描述符引用.文件描述符是一个非负整数.当打开一个现有文件或创建一个新文件时,内核向进程返回一个文件描述符.当读 ...
- Linux主流發行版本介紹
一.简介 而工欲善其事,必先利其器,Linux的世界相當廣大,除了最著名的Ubuntu以外還有不少發行版.然文人相輕,自古皆然,了解不同發行版的優勢不只嘴上攻防用的上,也是學Linux一個有趣的地方! ...
- ASN.1(抽象语法标记)
一.简介 ASN.1是一种对分布式计算机系统间交换的数据消息进行抽象描述的规范化语言. 二.教程 http://www.epubit.com.cn/book/onlinechapter/14877
- css常见问题
CSS: 1.垂直居中布局 (1)已知宽高 (2)未知宽高 https://segmentfault.com/q/1010000004073623 2.文字退格 text-indent: 4em; 3 ...
- mac下 ssh免密码登陆设置
由于mac os 是基于unix的操作系统终端和linux非常类似,所以不用借助类似于windows下的putty 和CRT工具即可远程登陆linux服务器,只需简单地3步即可免密码ssh远程. 1 ...
- [翻译]为你的服务器选择正确的.NET
英文原文 By Daniel Roth ASP.NET 5 is based on the .NET Execution Environment (DNX), which supports runni ...
- jquery 实现邮箱输入自动提示功能:(二)
上篇文章写到了一个不错的jquery实现邮箱输入自动提示功能,发现还有一个不错的自动提示插件: 先展示结果如图: html代码: <center> <h1>输入邮箱试试!< ...