Netty源码分析 (五)----- 数据如何在 pipeline 中流动
在上一篇文章中,我们已经了解了pipeline在netty中所处的角色,像是一条流水线,控制着字节流的读写,本文,我们在这个基础上继续深挖pipeline在事件传播
Unsafe
顾名思义,unsafe是不安全的意思,就是告诉你不要在应用程序里面直接使用Unsafe以及他的衍生类对象。
netty官方的解释如下
Unsafe operations that should never be called from user-code. These methods are only provided to implement the actual transport, and must be invoked from an I/O thread
Unsafe 在Channel定义,属于Channel的内部类,表明Unsafe和Channel密切相关
下面是unsafe接口的所有方法
interface Unsafe {

   RecvByteBufAllocator.Handle recvBufAllocHandle();

   SocketAddress localAddress();

   SocketAddress remoteAddress();

   void register(EventLoop eventLoop, ChannelPromise promise);

   void bind(SocketAddress localAddress, ChannelPromise promise);

   void connect(SocketAddress remoteAddress, SocketAddress localAddress, ChannelPromise promise);

   void disconnect(ChannelPromise promise);

   void close(ChannelPromise promise);

   void closeForcibly();

   void beginRead();

   void write(Object msg, ChannelPromise promise);

   void flush();

   ChannelPromise voidPromise();

   ChannelOutboundBuffer outboundBuffer();

}
按功能可以分为分配内存,Socket四元组信息,注册事件循环,绑定网卡端口,Socket的连接和关闭,Socket的读写,看的出来,这些操作都是和jdk底层相关
Unsafe 继承结构
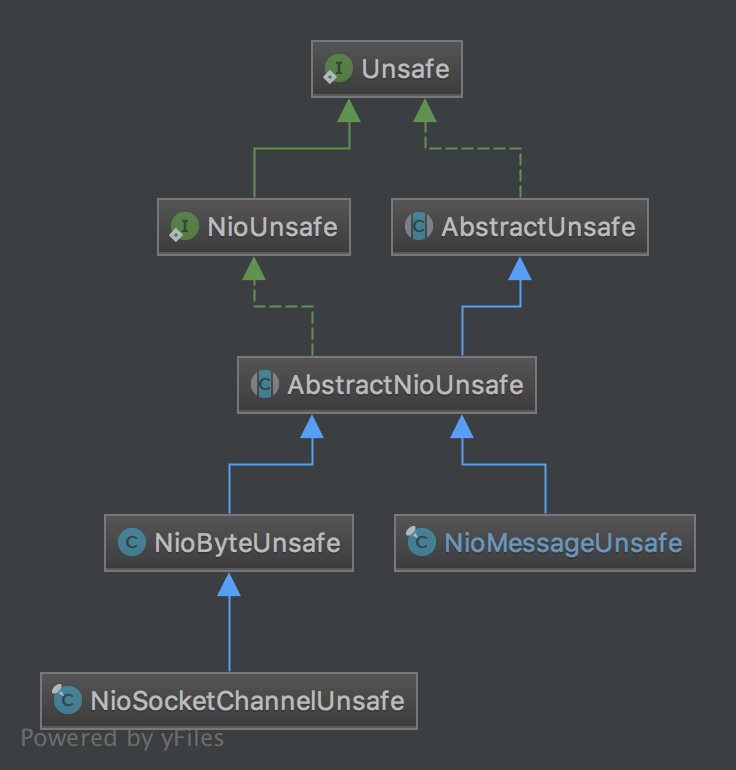
NioUnsafe 在 Unsafe基础上增加了以下几个接口
public interface NioUnsafe extends Unsafe {

    SelectableChannel ch();

    void finishConnect();

    void read();

    void forceFlush();

}
从增加的接口以及类名上来看,NioUnsafe 增加了可以访问底层jdk的SelectableChannel的功能,定义了从SelectableChannel读取数据的read方法
Unsafe的分类
从以上继承结构来看,我们可以总结出两种类型的Unsafe分类,一个是与连接的字节数据读写相关的NioByteUnsafe,一个是与新连接建立操作相关的NioMessageUnsafe
NioByteUnsafe中的读:委托到外部类NioSocketChannel
protected int doReadBytes(ByteBuf byteBuf) throws Exception {

    final RecvByteBufAllocator.Handle allocHandle = unsafe().recvBufAllocHandle();

    allocHandle.attemptedBytesRead(byteBuf.writableBytes());

    return byteBuf.writeBytes(javaChannel(), allocHandle.attemptedBytesRead());

}
最后一行已经与jdk底层以及netty中的ByteBuf相关,将jdk的 SelectableChannel的字节数据读取到netty的ByteBuf中
NioMessageUnsafe中的读:委托到外部类NioSocketChannel
protected int doReadMessages(List<Object> buf) throws Exception {

    SocketChannel ch = javaChannel().accept();

    if (ch != null) {

        buf.add(new NioSocketChannel(this, ch));

        return 1;

    }

    return 0;

}
NioMessageUnsafe 的读操作很简单,就是调用jdk的accept()方法,新建立一条连接
NioByteUnsafe中的写:委托到外部类NioSocketChannel
@Override

protected int doWriteBytes(ByteBuf buf) throws Exception {

    final int expectedWrittenBytes = buf.readableBytes();

    return buf.readBytes(javaChannel(), expectedWrittenBytes);

}
最后一行已经与jdk底层以及netty中的ByteBuf相关,将netty的ByteBuf中的字节数据写到jdk的 SelectableChannel中
pipeline中的head
NioEventLoop
private void processSelectedKey(SelectionKey k, AbstractNioChannel ch) {

     final AbstractNioChannel.NioUnsafe unsafe = ch.unsafe();

     //新连接的已准备接入或者已存在的连接有数据可读

     if ((readyOps & (SelectionKey.OP_READ | SelectionKey.OP_ACCEPT)) != 0 || readyOps == 0) {

         unsafe.read();

     }

}
NioByteUnsafe
@Override
public final void read() {
final ChannelConfig config = config();
final ChannelPipeline pipeline = pipeline();
// 创建ByteBuf分配器
final ByteBufAllocator allocator = config.getAllocator();
final RecvByteBufAllocator.Handle allocHandle = recvBufAllocHandle();
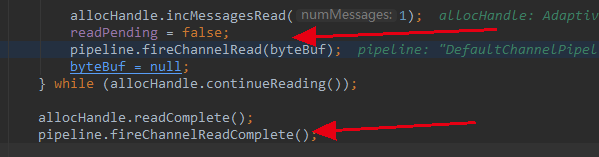
allocHandle.reset(config); ByteBuf byteBuf = null;
do {
// 分配一个ByteBuf
byteBuf = allocHandle.allocate(allocator);
// 将数据读取到分配的ByteBuf中去
allocHandle.lastBytesRead(doReadBytes(byteBuf));
if (allocHandle.lastBytesRead() <= 0) {
byteBuf.release();
byteBuf = null;
close = allocHandle.lastBytesRead() < 0;
break;
} // 触发事件,将会引发pipeline的读事件传播
pipeline.fireChannelRead(byteBuf);
byteBuf = null;
} while (allocHandle.continueReading());
pipeline.fireChannelReadComplete();
}
同样,我抽出了核心代码,细枝末节先剪去,NioByteUnsafe 要做的事情可以简单地分为以下几个步骤
- 拿到Channel的config之后拿到ByteBuf分配器,用分配器来分配一个ByteBuf,ByteBuf是netty里面的字节数据载体,后面读取的数据都读到这个对象里面
- 将Channel中的数据读取到ByteBuf
- 数据读完之后,调用
pipeline.fireChannelRead(byteBuf);从head节点开始传播至整个pipeline - 最后调用fireChannelReadComplete();
这里,我们的重点其实就是 pipeline.fireChannelRead(byteBuf);
DefaultChannelPipeline
final AbstractChannelHandlerContext head;

//...

head = new HeadContext(this);

public final ChannelPipeline fireChannelRead(Object msg) {

    AbstractChannelHandlerContext.invokeChannelRead(head, msg);

    return this;

}
结合这幅图
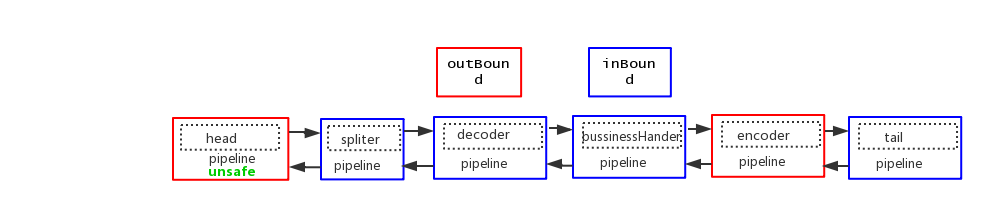
可以看到,数据从head节点开始流入,在进行下一步之前,我们先把head节点的功能过一遍
HeadContext
final class HeadContext extends AbstractChannelHandlerContext

        implements ChannelOutboundHandler, ChannelInboundHandler {

    private final Unsafe unsafe;

    HeadContext(DefaultChannelPipeline pipeline) {

        super(pipeline, null, HEAD_NAME, false, true);

        unsafe = pipeline.channel().unsafe();

        setAddComplete();

    }

    @Override

    public ChannelHandler handler() {

        return this;

    }

    @Override

    public void handlerAdded(ChannelHandlerContext ctx) throws Exception {

        // NOOP

    }

    @Override

    public void handlerRemoved(ChannelHandlerContext ctx) throws Exception {

        // NOOP

    }

    @Override

    public void bind(

            ChannelHandlerContext ctx, SocketAddress localAddress, ChannelPromise promise)

            throws Exception {

        unsafe.bind(localAddress, promise);

    }

    @Override

    public void connect(

            ChannelHandlerContext ctx,

            SocketAddress remoteAddress, SocketAddress localAddress,

            ChannelPromise promise) throws Exception {

        unsafe.connect(remoteAddress, localAddress, promise);

    }

    @Override

    public void disconnect(ChannelHandlerContext ctx, ChannelPromise promise) throws Exception {

        unsafe.disconnect(promise);

    }

    @Override

    public void close(ChannelHandlerContext ctx, ChannelPromise promise) throws Exception {

        unsafe.close(promise);

    }

    @Override

    public void deregister(ChannelHandlerContext ctx, ChannelPromise promise) throws Exception {

        unsafe.deregister(promise);

    }

    @Override

    public void read(ChannelHandlerContext ctx) {

        unsafe.beginRead();

    }

    @Override

    public void write(ChannelHandlerContext ctx, Object msg, ChannelPromise promise) throws Exception {

        unsafe.write(msg, promise);

    }

    @Override

    public void flush(ChannelHandlerContext ctx) throws Exception {

        unsafe.flush();

    }

    @Override

    public void exceptionCaught(ChannelHandlerContext ctx, Throwable cause) throws Exception {

        ctx.fireExceptionCaught(cause);

    }

    @Override

    public void channelRegistered(ChannelHandlerContext ctx) throws Exception {

        invokeHandlerAddedIfNeeded();

        ctx.fireChannelRegistered();

    }

    @Override

    public void channelUnregistered(ChannelHandlerContext ctx) throws Exception {

        ctx.fireChannelUnregistered();

        // Remove all handlers sequentially if channel is closed and unregistered.

        if (!channel.isOpen()) {

            destroy();

        }

    }

    @Override

    public void channelActive(ChannelHandlerContext ctx) throws Exception {

        ctx.fireChannelActive();

        readIfIsAutoRead();

    }

    @Override

    public void channelInactive(ChannelHandlerContext ctx) throws Exception {

        ctx.fireChannelInactive();

    }

    @Override

    public void channelRead(ChannelHandlerContext ctx, Object msg) throws Exception {

        ctx.fireChannelRead(msg);

    }

    @Override

    public void channelReadComplete(ChannelHandlerContext ctx) throws Exception {

        ctx.fireChannelReadComplete();

        readIfIsAutoRead();

    }

    private void readIfIsAutoRead() {

        if (channel.config().isAutoRead()) {

            channel.read();

        }

    }

    @Override

    public void userEventTriggered(ChannelHandlerContext ctx, Object evt) throws Exception {

        ctx.fireUserEventTriggered(evt);

    }

    @Override

    public void channelWritabilityChanged(ChannelHandlerContext ctx) throws Exception {

        ctx.fireChannelWritabilityChanged();

    }

}
从head节点继承的两个接口看,TA既是一个ChannelHandlerContext,同时又属于inBound和outBound Handler
在传播读写事件的时候,head的功能只是简单地将事件传播下去,如ctx.fireChannelRead(msg);
在真正执行读写操作的时候,例如在调用writeAndFlush()等方法的时候,最终都会委托到unsafe执行,而当一次数据读完,channelReadComplete方法会被调用
pipeline中的inBound事件传播
我们接着上面的 AbstractChannelHandlerContext.invokeChannelRead(head, msg); 这个静态方法看,参数传入了 head,我们知道入站数据都是从 head 开始的,以保证后面所有的 handler 都由机会处理数据流。
我们看看这个静态方法内部是怎么样的:
static void invokeChannelRead(final AbstractChannelHandlerContext next, Object msg) {

    final Object m = next.pipeline.touch(ObjectUtil.checkNotNull(msg, "msg"), next);

    EventExecutor executor = next.executor();

    if (executor.inEventLoop()) {

        next.invokeChannelRead(m);

    } else {

        executor.execute(new Runnable() {

            public void run() {

                next.invokeChannelRead(m);

            }

        });

    }

}
调用这个 Context (也就是 head) 的 invokeChannelRead 方法,并传入数据。我们再看看head中 invokeChannelRead 方法的实现,实际上是在headContext的父类AbstractChannelHandlerContext中:
AbstractChannelHandlerContext
private void invokeChannelRead(Object msg) {

    if (invokeHandler()) {

        try {

            ((ChannelInboundHandler) handler()).channelRead(this, msg);

        } catch (Throwable t) {

            notifyHandlerException(t);

        }

    } else {

        fireChannelRead(msg);

    }

}

public ChannelHandler handler() {

    return this;

}
上面 handler()就是headContext中的handler,也就是headContext自身,也就是调用 head 的 channelRead 方法。那么这个方法是怎么实现的呢?
@Override

public void channelRead(ChannelHandlerContext ctx, Object msg) throws Exception {

    ctx.fireChannelRead(msg);

}
什么都没做,调用 Context 的 fire 系列方法,将请求转发给下一个节点。我们这里是 fireChannelRead 方法,注意,这里方法名字都挺像的。需要细心区分。下面我们看看 Context 的成员方法 fireChannelRead:
AbstractChannelHandlerContext
@Override

public ChannelHandlerContext fireChannelRead(final Object msg) {

    invokeChannelRead(findContextInbound(), msg);

    return this;

}
这个是 head 的抽象父类 AbstractChannelHandlerContext 的实现,该方法再次调用了静态 fire 系列方法,但和上次不同的是,不再放入 head 参数了,而是使用 findContextInbound 方法的返回值。从这个方法的名字可以看出,是找到入站类型的 handler。我们看看方法实现:
private AbstractChannelHandlerContext findContextInbound() {

    AbstractChannelHandlerContext ctx = this;

    do {

        ctx = ctx.next;

    } while (!ctx.inbound);

    return ctx;

}
该方法很简单,找到当前 Context 的 next 节点(inbound 类型的)并返回。这样就能将请求传递给后面的 inbound handler 了。我们来看看 invokeChannelRead(findContextInbound(), msg);
static void invokeChannelRead(final AbstractChannelHandlerContext next, Object msg) {

    final Object m = next.pipeline.touch(ObjectUtil.checkNotNull(msg, "msg"), next);

    EventExecutor executor = next.executor();

    if (executor.inEventLoop()) {

        next.invokeChannelRead(m);

    } else {

        executor.execute(new Runnable() {

            public void run() {

                next.invokeChannelRead(m);

            }

        });

    }

}
上面我们找到了next节点(inbound类型的),然后直接调用 next.invokeChannelRead(m);如果这个next是我们自定义的handler,此时我们自定义的handler的父类是AbstractChannelHandlerContext,则又回到了AbstractChannelHandlerContext中实现的invokeChannelRead,代码如下:
AbstractChannelHandlerContext
private void invokeChannelRead(Object msg) {

    if (invokeHandler()) {

        try {

            ((ChannelInboundHandler) handler()).channelRead(this, msg);

        } catch (Throwable t) {

            notifyHandlerException(t);

        }

    } else {

        fireChannelRead(msg);

    }

}

public ChannelHandler handler() {

    return this;

}
此时的handler()就是我们自定义的handler了,然后调用我们自定义handler中的 channelRead(this, msg);
请求进来时,pipeline 会从 head 节点开始输送,通过配合 invoker 接口的 fire 系列方法,实现 Context 链在 pipeline 中的完美传递。最终到达我们自定义的 handler。
注意:此时如果我们想继续向后传递该怎么办呢?我们前面说过,可以调用 Context 的 fire 系列方法,就像 head 的 channelRead 方法一样,调用 fire 系列方法,直接向后传递就 ok 了。
如果所有的handler都调用了fire系列方法,则会传递到最后一个inbound类型的handler,也就是——tail节点,那我们就来看看tail节点
pipeline中的tail
final class TailContext extends AbstractChannelHandlerContext implements ChannelInboundHandler {

    TailContext(DefaultChannelPipeline pipeline) {

        super(pipeline, null, TAIL_NAME, true, false);

        setAddComplete();

    }

    @Override

    public ChannelHandler handler() {

        return this;

    }

    @Override

    public void channelRegistered(ChannelHandlerContext ctx) throws Exception { }

    @Override

    public void channelUnregistered(ChannelHandlerContext ctx) throws Exception { }

    @Override

    public void channelActive(ChannelHandlerContext ctx) throws Exception { }

    @Override

    public void channelInactive(ChannelHandlerContext ctx) throws Exception { }

    @Override

    public void channelWritabilityChanged(ChannelHandlerContext ctx) throws Exception { }

    @Override

    public void handlerAdded(ChannelHandlerContext ctx) throws Exception { }

    @Override

    public void handlerRemoved(ChannelHandlerContext ctx) throws Exception { }

    @Override

    public void userEventTriggered(ChannelHandlerContext ctx, Object evt) throws Exception {

        // This may not be a configuration error and so don't log anything.

        // The event may be superfluous for the current pipeline configuration.

        ReferenceCountUtil.release(evt);

    }

    @Override

    public void exceptionCaught(ChannelHandlerContext ctx, Throwable cause) throws Exception {

        onUnhandledInboundException(cause);

    }

    @Override

    public void channelRead(ChannelHandlerContext ctx, Object msg) throws Exception {

        onUnhandledInboundMessage(msg);

    }

    @Override

    public void channelReadComplete(ChannelHandlerContext ctx) throws Exception { }

}
正如我们前面所提到的,tail节点的大部分作用即终止事件的传播(方法体为空)
channelRead
protected void onUnhandledInboundMessage(Object msg) {

    try {

        logger.debug(

                "Discarded inbound message {} that reached at the tail of the pipeline. " +

                        "Please check your pipeline configuration.", msg);

    } finally {

        ReferenceCountUtil.release(msg);

    }

}
tail节点在发现字节数据(ByteBuf)或者decoder之后的业务对象在pipeline流转过程中没有被消费,落到tail节点,tail节点就会给你发出一个警告,告诉你,我已经将你未处理的数据给丢掉了
总结一下,tail节点的作用就是结束事件传播,并且对一些重要的事件做一些善意提醒
pipeline中的outBound事件传播
上一节中,我们在阐述tail节点的功能时,忽略了其父类AbstractChannelHandlerContext所具有的功能,这一节中,我们以最常见的writeAndFlush操作来看下pipeline中的outBound事件是如何向外传播的
典型的消息推送系统中,会有类似下面的一段代码
Channel channel = getChannel(userInfo);

channel.writeAndFlush(pushInfo);
这段代码的含义就是根据用户信息拿到对应的Channel,然后给用户推送消息,跟进 channel.writeAndFlush
NioSocketChannel
public ChannelFuture writeAndFlush(Object msg) {

    return pipeline.writeAndFlush(msg);

}
从pipeline开始往外传播
public final ChannelFuture writeAndFlush(Object msg) {

    return tail.writeAndFlush(msg);

}
Channel 中大部分outBound事件都是从tail开始往外传播, writeAndFlush()方法是tail继承而来的方法,我们跟进去
AbstractChannelHandlerContext
public ChannelFuture writeAndFlush(Object msg) {

    return writeAndFlush(msg, newPromise());

}

public ChannelFuture writeAndFlush(Object msg, ChannelPromise promise) {

    write(msg, true, promise);

    return promise;

}
AbstractChannelHandlerContext
private void write(Object msg, boolean flush, ChannelPromise promise) {

    AbstractChannelHandlerContext next = findContextOutbound();

    final Object m = pipeline.touch(msg, next);

    EventExecutor executor = next.executor();

    if (executor.inEventLoop()) {

        if (flush) {

            next.invokeWriteAndFlush(m, promise);

        } else {

            next.invokeWrite(m, promise);

        }

    } else {

        AbstractWriteTask task;

        if (flush) {

            task = WriteAndFlushTask.newInstance(next, m, promise);

        }  else {

            task = WriteTask.newInstance(next, m, promise);

        }

        safeExecute(executor, task, promise, m);

    }

}
先调用findContextOutbound()方法找到下一个outBound()节点
AbstractChannelHandlerContext
private AbstractChannelHandlerContext findContextOutbound() {

    AbstractChannelHandlerContext ctx = this;

    do {

        ctx = ctx.prev;

    } while (!ctx.outbound);

    return ctx;

}
找outBound节点的过程和找inBound节点类似,反方向遍历pipeline中的双向链表,直到第一个outBound节点next,然后调用next.invokeWriteAndFlush(m, promise)
AbstractChannelHandlerContext
private void invokeWriteAndFlush(Object msg, ChannelPromise promise) {

    if (invokeHandler()) {

        invokeWrite0(msg, promise);

        invokeFlush0();

    } else {

        writeAndFlush(msg, promise);

    }

}
调用该节点的ChannelHandler的write方法,flush方法我们暂且忽略,后面会专门讲writeAndFlush的完整流程
AbstractChannelHandlerContext
private void invokeWrite0(Object msg, ChannelPromise promise) {

    try {

        ((ChannelOutboundHandler) handler()).write(this, msg, promise);

    } catch (Throwable t) {

        notifyOutboundHandlerException(t, promise);

    }

}
可以看到,数据开始出站,从后向前开始流动,和入站的方向是反的。那么最后会走到哪里呢,当然是走到 head 节点,因为 head 节点就是 outbound 类型的 handler。
HeadContext
public void write(ChannelHandlerContext ctx, Object msg, ChannelPromise promise) throws Exception {

    unsafe.write(msg, promise);

}
调用了 底层的 unsafe 操作数据,这里,加深了我们对head节点的理解,即所有的数据写出都会经过head节点
当执行完这个 write 方法后,方法开始退栈。逐步退到 unsafe 的 read 方法,回到最初开始的地方,然后继续调用 pipeline.fireChannelReadComplete() 方法
总结
总结一下一个请求在 pipeline 中的流转过程:
- 调用 pipeline 的 fire 系列方法,这些方法是接口 invoker 设计的,pipeline 实现了 invoker 的所有方法,inbound 事件从 head 开始流入,outbound 事件从 tail 开始流出。
- pipeline 会将请求交给 Context,然后 Context 通过抽象父类 AbstractChannelHandlerContext 的 invoke 系列方法(静态和非静态的)配合 AbstractChannelHandlerContext 的 fire 系列方法再配合 findContextInbound 和 findContextOutbound 方法完成各个 Context 的数据流转。
- 当入站过程中,调用 了出站的方法,那么请求就不会向后走了。后面的处理器将不会有任何作用。想继续相会传递就调用 Context 的 fire 系列方法,让 Netty 在内部帮你传递数据到下一个节点。如果你想在整个通道传递,就在 handler 中调用 channel 或者 pipeline 的对应方法,这两个方法会将数据从头到尾或者从尾到头的流转一遍。
Netty源码分析 (五)----- 数据如何在 pipeline 中流动的更多相关文章
- 【Netty源码分析】数据读取过程
首先客户端连接到服务端时服务端会开启一个线程,不断的监听客户端的操作.
- Netty数据如何在 pipeline 中流动
前言 在之前文章中,我们已经了解了pipeline在netty中所处的角色,像是一条流水线,控制着字节流的读写,本文,我们在这个基础上继续深挖pipeline在事件传播 Unsafe对象 顾名思义,u ...
- Netty源码分析 (二)----- ServerBootstrap
BootStrap在netty的应用程序中负责引导服务器和客户端.netty包含了两种不同类型的引导: 1. 使用服务器的ServerBootStrap,用于接受客户端的连接以及为已接受的连接创建子通 ...
- Netty源码分析 (三)----- 服务端启动源码分析
本文接着前两篇文章来讲,主要讲服务端类剩下的部分,我们还是来先看看服务端的代码 /** * Created by chenhao on 2019/9/4. */ public final class ...
- Netty源码分析第5章(ByteBuf)---->第10节: SocketChannel读取数据过程
Netty源码分析第五章: ByteBuf 第十节: SocketChannel读取数据过程 我们第三章分析过客户端接入的流程, 这一小节带大家剖析客户端发送数据, Server读取数据的流程: 首先 ...
- Netty源码分析第7章(编码器和写数据)---->第5节: Future和Promies
Netty源码分析第七章: 编码器和写数据 第五节: Future和Promise Netty中的Future, 其实类似于jdk的Future, 用于异步获取执行结果 Promise则相当于一个被观 ...
- 【Netty源码分析】发送数据过程
前面两篇博客[Netty源码分析]Netty服务端bind端口过程和[Netty源码分析]客户端connect服务端过程中我们分别介绍了服务端绑定端口和客户端连接到服务端的过程,接下来我们分析一下数据 ...
- Netty源码分析第7章(编码器和写数据)---->第1节: writeAndFlush的事件传播
Netty源码分析第七章: 编码器和写数据 概述: 上一小章我们介绍了解码器, 这一章我们介绍编码器 其实编码器和解码器比较类似, 编码器也是一个handler, 并且属于outbounfHandle ...
- Netty源码分析第7章(编码器和写数据)---->第2节: MessageToByteEncoder
Netty源码分析第七章: Netty源码分析 第二节: MessageToByteEncoder 同解码器一样, 编码器中也有一个抽象类叫MessageToByteEncoder, 其中定义了编码器 ...
随机推荐
- xpath定位的一些方法
- Linux(Ubuntu)安装Swift和Swiftlint
很多时候iOS开发完毕需要接入CI中,而很多CI是基于Linux的,需要在Linux平台安装Swift和Swiftlint,下面就是针对这两个软件的安装步骤. Swift安装 环境 系统:Ubuntu ...
- 用 bat 文件实现 excel 周报复制
又要写周报???? 写周报就算了每次都要改这一大堆的日期,什么鬼嘛,最骚的我还总是有的忘记改.... 作为一个正儿八经的程序员,固定每周某天干重复的一件事,哦~~ 这是机器人 程序应 ...
- 【0730 | Day 4】Python基础(二)
Part 7 数据类型基础 一.什么是数据类型? 我们要和计算机进行交流,那么彼此肯定需要进行信息交互.我们想要让计算机认识我们,需要提供我们的身高.体重以及爱好等等.那么,不同的数据分别对应不同的数 ...
- Navicat连接MYsql报错
在Windows中安装mysql8后,使用Navicat连接数据库是出现“ Client does not support authentication protocol requested by s ...
- Dubbo的基本介绍及使用
一,前言 在面对新技术新事物的时候,我们首先应该了解这是一个什么东东,了解为什么使用这门技术,如果我们不使用又会有什么影响.比如,本篇博客介绍Dubbo的基本使用,此时我们应该先要明白我为什么要使 ...
- (五)c#Winform自定义控件-复选框
前提 入行已经7,8年了,一直想做一套漂亮点的自定义控件,于是就有了本系列文章. 开源地址:https://gitee.com/kwwwvagaa/net_winform_custom_control ...
- 在linux中用同一个版本的R 同时安装 Seurat2 和 Seurat3
在linux中用同一个版本的R 同时安装 Seurat 2 和 Seurat 3 Seurat 作为单细胞分析中的重量级R包,有多好用用,用过的人都知道.Seurat 分析流程基本涵盖了单细胞分析中 ...
- Linux系统@根目录下各目录作用归纳图
- 回顾js中的cookie/localstorage
1.首先简单总结下cookie cookie:可以做会话跟踪 特点: 1.大小限制(不能超过4k) 2.每个域下cookie不能超过50个 3.有效期(和设定时间有关), ...