
ROS探索总结(六)——使用smartcar进行仿真
转自:https://www.ncnynl.com/archives/201609/843.html
总结:
一、机器人描述文件三个:
机器人主体body文件:
gazebo属性文件:
主文件 smartcar.urdf:
二、启动文件smartcar_display.rviz.launch:启动节点和模拟器。
三、新增smartcar_description/config/smartcar_arbotix.yaml文件:
四、urdf.rviz文件:
cp /opt/ros/indigo/share/urdf_tutorial/rviz/urdf.rviz
1.indigo版本机器人主体文件:smartcar_description/urdf/smartcar_body.urdf.xacro
- 修改
property,为xacro:property - 修改
include, 为xacro:include
<?xml version="1.0"?>

<robot name="smartcar" xmlns:xacro="http://ros.org/wiki/xacro">

  <xacro:property name="M_PI" value="3.14159"/>

  <!-- Macro for SmartCar body. Including Gazebo extensions, but does not include Kinect -->

  <xacro:include filename="$(find smartcar_description)/urdf/gazebo.urdf.xacro"/>

  <xacro:property name="base_x" value="0.33" />

  <xacro:property name="base_y" value="0.33" />

  <xacro:macro name="smartcar_body">

    <link name="base_link">

    <inertial>

      <origin xyz="0 0 0.055"/>

      <mass value="1.0" />

      <inertia ixx="1.0" ixy="0.0" ixz="0.0" iyy="1.0" iyz="0.0" izz="1.0"/>

    </inertial>

    <visual>

      <geometry>

        <box size="0.25 .16 .05"/>

      </geometry>

      <origin rpy="0 0 0" xyz="0 0 0.055"/>

      <material name="blue">

      <color rgba="0 0 .8 1"/>

      </material>

   </visual>

   <collision>

      <origin rpy="0 0 0" xyz="0 0 0.055"/>

      <geometry>

        <box size="0.25 .16 .05" />

      </geometry>

    </collision>

  </link>

 <link name="left_front_wheel">

    <inertial>

      <origin  xyz="0.08 0.08 0.025"/>

      <mass value="0.1" />

       <inertia ixx="1.0" ixy="0.0" ixz="0.0" iyy="1.0" iyz="0.0" izz="1.0"/>

    </inertial>

    <visual>

      <geometry>

        <cylinder length=".02" radius="0.025"/>

      </geometry>

      <material name="black">

        <color rgba="0 0 0 1"/>

      </material>

    </visual>

    <collision>

      <origin rpy="0 1.57075 1.57075" xyz="0.08 0.08 0.025"/>

      <geometry>

         <cylinder length=".02" radius="0.025"/>

      </geometry>

    </collision>

  </link>

  <joint name="left_front_wheel_joint" type="continuous">

    <axis xyz="0 0 1"/>

    <parent link="base_link"/>

    <child link="left_front_wheel"/>

    <origin rpy="0 1.57075 1.57075" xyz="0.08 0.08 0.025"/>

    <limit effort="" velocity=""/>

    <joint_properties damping="0.0" friction="0.0"/>

  </joint>

  <link name="right_front_wheel">

    <inertial>

      <origin xyz="0.08 -0.08 0.025"/>

      <mass value="0.1" />

       <inertia ixx="1.0" ixy="0.0" ixz="0.0" iyy="1.0" iyz="0.0" izz="1.0"/>

    </inertial>

    <visual>

      <geometry>

        <cylinder length=".02" radius="0.025"/>

      </geometry>

      <material name="black">

        <color rgba="0 0 0 1"/>

      </material>

    </visual>

    <collision>

      <origin rpy="0 1.57075 1.57075" xyz="0.08 -0.08 0.025"/>

      <geometry>

         <cylinder length=".02" radius="0.025"/>

      </geometry>

    </collision>

  </link>

  <joint name="right_front_wheel_joint" type="continuous">

    <axis xyz="0 0 1"/>

    <parent link="base_link"/>

    <child link="right_front_wheel"/>

    <origin rpy="0 1.57075 1.57075" xyz="0.08 -0.08 0.025"/>

    <limit effort="" velocity=""/>

    <joint_properties damping="0.0" friction="0.0"/>

 </joint>

 <link name="left_back_wheel">

    <inertial>

      <origin xyz="-0.08 0.08 0.025"/>

      <mass value="0.1" />

       <inertia ixx="1.0" ixy="0.0" ixz="0.0" iyy="1.0" iyz="0.0" izz="1.0"/>

    </inertial>

    <visual>

      <geometry>

        <cylinder length=".02" radius="0.025"/>

      </geometry>

      <material name="black">

        <color rgba="0 0 0 1"/>

      </material>

   </visual>

   <collision>

       <origin rpy="0 1.57075 1.57075" xyz="-0.08 0.08 0.025"/>

      <geometry>

         <cylinder length=".02" radius="0.025"/>

      </geometry>

    </collision>

  </link>

  <joint name="left_back_wheel_joint" type="continuous">

    <axis xyz="0 0 1"/>

    <parent link="base_link"/>

    <child link="left_back_wheel"/>

    <origin rpy="0 1.57075 1.57075" xyz="-0.08 0.08 0.025"/>

    <limit effort="" velocity=""/>

    <joint_properties damping="0.0" friction="0.0"/>

  </joint>

  <link name="right_back_wheel">

    <inertial>

       <origin xyz="-0.08 -0.08 0.025"/>

       <mass value="0.1" />

       <inertia ixx="1.0" ixy="0.0" ixz="0.0" iyy="1.0" iyz="0.0" izz="1.0"/>

    </inertial>

    <visual>

      <geometry>

        <cylinder length=".02" radius="0.025"/>

      </geometry>

      <material name="black">

        <color rgba="0 0 0 1"/>

      </material>

   </visual>

   <collision>

      <origin rpy="0 1.57075 1.57075" xyz="-0.08 -0.08 0.025"/>

      <geometry>

         <cylinder length=".02" radius="0.025"/>

      </geometry>

    </collision>

  </link>

  <joint name="right_back_wheel_joint" type="continuous">

    <axis xyz="0 0 1"/>

    <parent link="base_link"/>

    <child link="right_back_wheel"/>

    <origin rpy="0 1.57075 1.57075" xyz="-0.08 -0.08 0.025"/>

    <limit effort="" velocity=""/>

    <joint_properties damping="0.0" friction="0.0"/>

  </joint>

  <link name="head">

    <inertial>

      <origin xyz="0.08 0 0.08"/>

      <mass value="0.1" />

      <inertia ixx="1.0" ixy="0.0" ixz="0.0" iyy="1.0" iyz="0.0" izz="1.0"/>

    </inertial>

    <visual>

      <geometry>

        <box size=".02 .03 .03"/>

      </geometry>

      <material name="white">

        <color rgba="1 1 1 1"/>

      </material>

     </visual>

     <collision>

      <origin xyz="0.08 0 0.08"/>

      <geometry>

         <cylinder length=".02" radius="0.025"/>

      </geometry>

    </collision>

  </link>

  <joint name="tobox" type="fixed">

    <parent link="base_link"/>

    <child link="head"/>

    <origin xyz="0.08 0 0.08"/>

  </joint>

  </xacro:macro>

</robot>
2.gazebo属性部分 smartcar_description/urdf/gazebo.urdf.xacro
<?xml version="1.0"?>

<robot xmlns:controller="http://playerstage.sourceforge.net/gazebo/xmlschema/#controller"

    xmlns:interface="http://playerstage.sourceforge.net/gazebo/xmlschema/#interface"

    xmlns:sensor="http://playerstage.sourceforge.net/gazebo/xmlschema/#sensor"

    xmlns:xacro="http://ros.org/wiki/xacro"

    name="smartcar_gazebo">

<!-- ASUS Xtion PRO camera for simulation -->

<!-- gazebo_ros_wge100 plugin is in kt2_gazebo_plugins package -->

<xacro:macro name="smartcar_sim">

    <gazebo reference="base_link">

        <material>Gazebo/Blue</material>

    </gazebo>

    <gazebo reference="right_front_wheel">

        <material>Gazebo/FlatBlack</material>

    </gazebo>

    <gazebo reference="right_back_wheel">

        <material>Gazebo/FlatBlack</material>

    </gazebo>

    <gazebo reference="left_front_wheel">

        <material>Gazebo/FlatBlack</material>

    </gazebo>

    <gazebo reference="left_back_wheel">

        <material>Gazebo/FlatBlack</material>

    </gazebo>

    <gazebo reference="head">

        <material>Gazebo/White</material>

    </gazebo>

</xacro:macro>

</robot>
3.主文件:smartcar_description/urdf/smartcar.urdf.xacro
<?xml version="1.0"?>

<robot name="smartcar"

    xmlns:xi="http://www.w3.org/2001/XInclude"

    xmlns:gazebo="http://playerstage.sourceforge.net/gazebo/xmlschema/#gz"

    xmlns:model="http://playerstage.sourceforge.net/gazebo/xmlschema/#model"

    xmlns:sensor="http://playerstage.sourceforge.net/gazebo/xmlschema/#sensor"

    xmlns:body="http://playerstage.sourceforge.net/gazebo/xmlschema/#body"

    xmlns:geom="http://playerstage.sourceforge.net/gazebo/xmlschema/#geom"

    xmlns:joint="http://playerstage.sourceforge.net/gazebo/xmlschema/#joint"

    xmlns:controller="http://playerstage.sourceforge.net/gazebo/xmlschema/#controller"

    xmlns:interface="http://playerstage.sourceforge.net/gazebo/xmlschema/#interface"

    xmlns:rendering="http://playerstage.sourceforge.net/gazebo/xmlschema/#rendering"

    xmlns:renderable="http://playerstage.sourceforge.net/gazebo/xmlschema/#renderable"

    xmlns:physics="http://playerstage.sourceforge.net/gazebo/xmlschema/#physics"

    xmlns:xacro="http://ros.org/wiki/xacro">

  <xacro:include filename="$(find smartcar_description)/urdf/smartcar_body.urdf.xacro" />

  <!-- Body of SmartCar, with plates, standoffs and Create (including sim sensors) -->

  <smartcar_body/>

  <smartcar_sim/>

</robot>
二、lanuch文件,smartcar_description/launch/smartcar_display.rviz.launch
<launch>

    <param name="/use_sim_time" value="false" />

    <!-- Load the URDF/Xacro model of our robot -->

    <arg name="urdf_file" default="$(find xacro)/xacro.py '$(find smartcar_description)/urdf/smartcar.urdf.xacro'" />

    <arg name="gui" default="false" />

    <param name="robot_description" command="$(arg urdf_file)" />

    <param name="use_gui" value="$(arg gui)"/>

    <node name="arbotix" pkg="arbotix_python" type="arbotix_driver" output="screen">

        <rosparam file="$(find smartcar_description)/config/smartcar_arbotix.yaml" command="load" />

        <param name="sim" value="true"/>

    </node>

    <node name="joint_state_publisher" pkg="joint_state_publisher" type="joint_state_publisher" >

    </node>

    <node name="robot_state_publisher" pkg="robot_state_publisher" type="state_publisher">

        <param name="publish_frequency" type="double" value="20.0" />

    </node>

     <!-- We need a static transforms for the wheels -->

    <node pkg="tf" type="static_transform_publisher" name="odom_left_wheel_broadcaster" args="0 0 0 0 0 0 /base_link /left_front_link 100" />

    <node pkg="tf" type="static_transform_publisher" name="odom_right_wheel_broadcaster" args="0 0 0 0 0 0 /base_link /right_front_link 100" />

    <node name="rviz" pkg="rviz" type="rviz" args="-d $(find smartcar_description)/urdf.rviz" />

</launch>
4.在indigo版本里,新增smartcar_description/config/smartcar_arbotix.yaml文件,内容为:
port: /dev/ttyUSB0

baud:

rate:

sync_write: True

sync_read: True

read_rate:

write_rate:

controllers: {

   #  Pololu motors:  cpr = 0.3888105m travel =  ticks per meter (empirical: )

   base_controller: {type: diff_controller, base_frame_id: base_link, base_width: 0.26, ticks_meter: , Kp: , Kd: , Ki: , Ko: , accel_limit: 1.0 }

}
5.urdf.rviz文件:(或者自己按照目录找到了copy过来,如果没有就先安装这个包:urdf_tutorial
$ cp /opt/ros/indigo/share/urdf_tutorial/rviz/urdf.rviz
三、仿真测试
首先运行lanuch,既可以看到rviz中的机器人:
roslaunch smartcar_description smartcar_display.rviz.launch
然后在新建终端中运行:
rostopic pub -r /cmd_vel geometry_msgs/Twist '{linear: {x: 0.5, y: 0, z: 0}, angular: {x: 0, y: 0, z: 0.5}}'
运行结果:
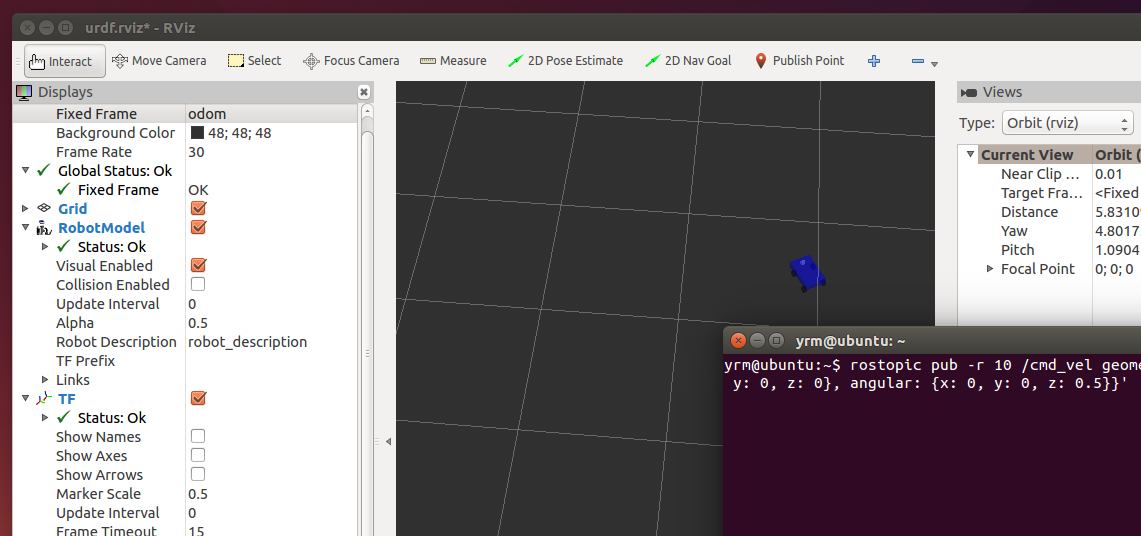
如果小车跑不起来,把Global中的fixed frame改成odom,就好了
ROS探索总结(六)——使用smartcar进行仿真的更多相关文章
- Robot Operating System (ROS)学习笔记2---使用smartcar进行仿真
搭建环境:XMWare Ubuntu14.04 ROS(indigo) 转载自古月居 转载连接:http://www.guyuehome.com/248 一.模型完善 文件夹urdf下,创建ga ...
- ROS学习记录(二)————使用smartcar进行仿真(用.xacro文件来运行rviz)
我发现一个学习ROS系统的好网站: 创客智造http://www.ncnynl.com/ 这里面关于ROS的各个方面都有很详细的介绍. 这周,不,上周我对整个ROS是绝望的,我用一个一个下午的时间在敲 ...
- ROS探索总结(一)——ROS简介
转自古-月 ROS探索总结(一)——ROS简介 一.历史 随着机器人领域的快速发展和复杂化,代码的复用性和模块化的需求原来越强烈,而已有的开源机器人系统又不能很好的适应需求.2010年Willow G ...
- ROS学习笔记六:xxx.launch文件详解
每当我们需要运行一个ROS节点或工具时,都需要打开一个新的终端运行一个命令.当系统中的节点数量不断增加时,每个节点一个终端的模式会变得非常麻烦.那么有没有一种方式可以一次性启动所有节点呢?答案当然是肯 ...
- ROS探索总结(十八)——重读tf
在之前的博客中,有讲解tf的相关内容,本篇博客重新整理了tf的介绍和学习内容,对tf的认识会更加系统. 1 tf简介 1.1 什么是tf tf是一个让用户随时间跟踪多个参考系的功能包,它使用一种树型数 ...
- ROS_Kinetic_07 ROS中机器人三维物理引擎高保真仿真利器gazebo 7.0
ROS_Kinetic_07 ROS中机器人三维物理引擎高保真仿真利器gazebo 7.0 ROS kinetic中的gazebo版本是7.0,有很多新的特性. 首先,启动gazebo: ~$ gaz ...
- ROS探索总结(二)——ROS总体框架
个人分类: ROS 所属专栏: ROS探索总结 一. 总体结构 根据ROS系统代码的维护者和分布来标示,主要有两大部分: (1)main:核心部分,主要由Willow G ...
- 【kinetic】操作系统探索总结(六)使用smartcar进行仿真
p { margin-bottom: 0.1in; direction: ltr; line-height: 120%; text-align: justify } a:link { color: r ...
- ROS进阶学习手记 7.2 -- RViz仿真实例2:Create SmartCar
上一节玩了 exbot 在RViz里的仿真控制,这里我们用urdf文件写个自己的小车模型,ref: http://blog.csdn.net/hcx25909/article/details/8904 ...
随机推荐
- 15-THREE.JS 方向光
<!DOCTYPE html> <html> <head> <title></title> <script src="htt ...
- 数组中累加和为k的最大子数组的长度
package com.hzins.suanfa; import java.util.HashMap; public class demo { /** * 数组中累加和为k的最大子数组的长度 * @p ...
- SQL使用指南(1)—— 数据定义语言(DDL)
1.使用create 语句创建表 CREATE TABLE table_name (column_name datatype[null|not null], column_name datatype[ ...
- git 远程库 创建私钥
1.创建SSH Key.在用户主目录下,看看有没有.ssh目录,如果有,再看看这个目录下有没有id_rsa和id_rsa.pub这两个文件,如果已经有了,可直接跳到下一步.如果没有,打开Shell(W ...
- JSONP原理及实现跨域方式
今天做页面时,后台给了个接口:https://a.a.com/a/a.json,我页面的上线地址是:http://b.b.com.显而易见,因为浏览器同源策略的限制,通过ajax无法无法取得json的 ...
- PADS Layout CAM 的中高级焊盘选项
PADS Layout CAM 的中高级焊盘选项 PADS CAM Gerber 输出非常灵活. 以至于很多人跳坑. 以这个这选项,最好的方式就是不勾.
- python list和元祖
一,元祖 在python中元祖是只能查询和读取的一组数据,在()内的赋值就是元祖,只有查询和读取的功能: 1.len()方法:查询元祖有多少个元素 s = (') print(len(s)) 结果: ...
- [转载]网络虚拟化中的 offload 技术:LSO/LRO、GSO/GRO、TSO/UFO、VXLAN
offload 现在,越来越多的网卡设备支持 offload 特性,来提升网络收/发性能.offload 是将本来该操作系统进行的一些数据包处理(如分片.重组等)放到网卡硬件中去做,降低系统 CPU ...
- java流。基础
总结:read()方法返回类型是int型??不知道该怎么用好循环> package com.da; import java.io.*; public class fgbv { public st ...
- PV 和 UV IP
PV(page view),即页面浏览量,或点击量;通常是衡量一个网络新闻频道或网站甚至一条网络新闻的主要指标. 高手对pv的解释是,一个访问者在24小时(0点到24点)内到底看了你网站几个页面.这里 ...