
【kinetic】操作系统探索总结(六)使用smartcar进行仿真
p { margin-bottom: 0.1in; direction: ltr; line-height: 120%; text-align: justify }
a:link { color: rgba(0, 0, 255, 1) }
之前的博客中,我们使用rviz进行了TurtleBot的仿真,而且使用urdf文件建立了自己的机器人smartcar,本篇博客是将两者进行结合,使用smartcar机器人在rviz中进行仿真。
一、模型完善
之前我们使用的都是urdf文件格式的模型,在很多情况下,ROS对urdf文件的支持并不是很好,使用宏定义的.xacro文件兼容性更好,扩展性也更好。所以我们把之前的urdf文件重新整理编写成.xacro文件。
.xacro文件主要分为三部分(以下文件均创建在urdf文件夹下,上一章节创建的文件可以删除):
1、机器人主体(smartcar_body.urdf.xacro)
<?xml version="1.0"?>

<robot name="smartcar" xmlns:xacro="http://ros.org/wiki/xacro">

  <xacro:property name="M_PI" value="3.14159"/>

  <!-- Macro for SmartCar body. Including Gazebo extensions, but does not include Kinect -->

  <xacro:include filename="$(find smartcar_description)/urdf/gazebo.urdf.xacro"/>

  <xacro:property name="base_x" value="0.33" />

  <xacro:property name="base_y" value="0.33" />

  <xacro:macro name="smartcar_body">

    <link name="base_link">

    <inertial>

      <origin xyz="0 0 0.055"/>

      <mass value="1.0" />

      <inertia ixx="1.0" ixy="0.0" ixz="0.0" iyy="1.0" iyz="0.0" izz="1.0"/>

    </inertial>

    <visual>

      <geometry>

        <box size="0.25 .16 .05"/>

      </geometry>

      <origin rpy="0 0 0" xyz="0 0 0.055"/>

      <material name="blue">

      <color rgba="0 0 .8 1"/>

      </material>

   </visual>

   <collision>

      <origin rpy="0 0 0" xyz="0 0 0.055"/>

      <geometry>

        <box size="0.25 .16 .05" />

      </geometry>

    </collision>

  </link>

 <link name="left_front_wheel">

    <inertial>

      <origin  xyz="0.08 0.08 0.025"/>

      <mass value="0.1" />

       <inertia ixx="1.0" ixy="0.0" ixz="0.0" iyy="1.0" iyz="0.0" izz="1.0"/>

    </inertial>

    <visual>

      <geometry>

        <cylinder length=".02" radius="0.025"/>

      </geometry>

      <material name="black">

        <color rgba="0 0 0 1"/>

      </material>

    </visual>

    <collision>

      <origin rpy="0 1.57075 1.57075" xyz="0.08 0.08 0.025"/>

      <geometry>

         <cylinder length=".02" radius="0.025"/>

      </geometry>

    </collision>

  </link>

  <joint name="left_front_wheel_joint" type="continuous">

    <axis xyz="0 0 1"/>

    <parent link="base_link"/>

    <child link="left_front_wheel"/>

    <origin rpy="0 1.57075 1.57075" xyz="0.08 0.08 0.025"/>

    <limit effort="100" velocity="100"/>

    <joint_properties damping="0.0" friction="0.0"/>

  </joint>

  <link name="right_front_wheel">

    <inertial>

      <origin xyz="0.08 -0.08 0.025"/>

      <mass value="0.1" />

       <inertia ixx="1.0" ixy="0.0" ixz="0.0" iyy="1.0" iyz="0.0" izz="1.0"/>

    </inertial>

    <visual>

      <geometry>

        <cylinder length=".02" radius="0.025"/>

      </geometry>

      <material name="black">

        <color rgba="0 0 0 1"/>

      </material>

    </visual>

    <collision>

      <origin rpy="0 1.57075 1.57075" xyz="0.08 -0.08 0.025"/>

      <geometry>

         <cylinder length=".02" radius="0.025"/>

      </geometry>

    </collision>

  </link>

  <joint name="right_front_wheel_joint" type="continuous">

    <axis xyz="0 0 1"/>

    <parent link="base_link"/>

    <child link="right_front_wheel"/>

    <origin rpy="0 1.57075 1.57075" xyz="0.08 -0.08 0.025"/>

    <limit effort="100" velocity="100"/>

    <joint_properties damping="0.0" friction="0.0"/>

 </joint>

 <link name="left_back_wheel">

    <inertial>

      <origin xyz="-0.08 0.08 0.025"/>

      <mass value="0.1" />

       <inertia ixx="1.0" ixy="0.0" ixz="0.0" iyy="1.0" iyz="0.0" izz="1.0"/>

    </inertial>

    <visual>

      <geometry>

        <cylinder length=".02" radius="0.025"/>

      </geometry>

      <material name="black">

        <color rgba="0 0 0 1"/>

      </material>

   </visual>

   <collision>

       <origin rpy="0 1.57075 1.57075" xyz="-0.08 0.08 0.025"/>

      <geometry>

         <cylinder length=".02" radius="0.025"/>

      </geometry>

    </collision>

  </link>

  <joint name="left_back_wheel_joint" type="continuous">

    <axis xyz="0 0 1"/>

    <parent link="base_link"/>

    <child link="left_back_wheel"/>

    <origin rpy="0 1.57075 1.57075" xyz="-0.08 0.08 0.025"/>

    <limit effort="100" velocity="100"/>

    <joint_properties damping="0.0" friction="0.0"/>

  </joint>

  <link name="right_back_wheel">

    <inertial>

       <origin xyz="-0.08 -0.08 0.025"/>

       <mass value="0.1" />

       <inertia ixx="1.0" ixy="0.0" ixz="0.0" iyy="1.0" iyz="0.0" izz="1.0"/>

    </inertial>

    <visual>

      <geometry>

        <cylinder length=".02" radius="0.025"/>

      </geometry>

      <material name="black">

        <color rgba="0 0 0 1"/>

      </material>

   </visual>

   <collision>

      <origin rpy="0 1.57075 1.57075" xyz="-0.08 -0.08 0.025"/>

      <geometry>

         <cylinder length=".02" radius="0.025"/>

      </geometry>

    </collision>

  </link>

  <joint name="right_back_wheel_joint" type="continuous">

    <axis xyz="0 0 1"/>

    <parent link="base_link"/>

    <child link="right_back_wheel"/>

    <origin rpy="0 1.57075 1.57075" xyz="-0.08 -0.08 0.025"/>

    <limit effort="100" velocity="100"/>

    <joint_properties damping="0.0" friction="0.0"/>

  </joint>

  <link name="head">

    <inertial>

      <origin xyz="0.08 0 0.08"/>

      <mass value="0.1" />

      <inertia ixx="1.0" ixy="0.0" ixz="0.0" iyy="1.0" iyz="0.0" izz="1.0"/>

    </inertial>

    <visual>

      <geometry>

        <box size=".02 .03 .03"/>

      </geometry>

      <material name="white">

        <color rgba="1 1 1 1.5"/>

      </material>

     </visual>

     <collision>

      <origin xyz="0.08 0 0.08"/>

      <geometry>

         <cylinder length=".02" radius="0.025"/>

      </geometry>

    </collision>

  </link>

  <joint name="tobox" type="fixed">

    <parent link="base_link"/>

    <child link="head"/>

    <origin xyz="0.08 0 0.08"/>

  </joint>

  </xacro:macro>

</robot>
p { margin-bottom: 0.1in; direction: ltr; line-height: 120%; text-align: justify }
a:link { color: rgba(0, 0, 255, 1) }
2、gazebo属性部分(gazebo.urdf.xacro)
<?xml version="1.0"?>

<robot xmlns:controller="http://playerstage.sourceforge.net/gazebo/xmlschema/#controller"

    xmlns:interface="http://playerstage.sourceforge.net/gazebo/xmlschema/#interface"

    xmlns:sensor="http://playerstage.sourceforge.net/gazebo/xmlschema/#sensor"

    xmlns:xacro="http://ros.org/wiki/xacro"

    name="smartcar_gazebo">

<!-- ASUS Xtion PRO camera for simulation -->

<!-- gazebo_ros_wge100 plugin is in kt2_gazebo_plugins package -->

<xacro:macro name="smartcar_sim">

    <gazebo reference="base_link">

        <material>Gazebo/Blue</material>

    </gazebo>

    <gazebo reference="right_front_wheel">

        <material>Gazebo/FlatBlack</material>

    </gazebo>

    <gazebo reference="right_back_wheel">

        <material>Gazebo/FlatBlack</material>

    </gazebo>

    <gazebo reference="left_front_wheel">

        <material>Gazebo/FlatBlack</material>

    </gazebo>

    <gazebo reference="left_back_wheel">

        <material>Gazebo/FlatBlack</material>

    </gazebo>

    <gazebo reference="head">

        <material>Gazebo/White</material>

    </gazebo>

</xacro:macro>

</robot>
p { margin-bottom: 0.1in; direction: ltr; line-height: 120%; text-align: justify }
a:link { color: rgba(0, 0, 255, 1) }
3、主文件(smartcar.urdf.xacro)
<?xml version="1.0"?>

<robot name="smartcar"

    xmlns:xi="http://www.w3.org/2001/XInclude"

    xmlns:gazebo="http://playerstage.sourceforge.net/gazebo/xmlschema/#gz"

    xmlns:model="http://playerstage.sourceforge.net/gazebo/xmlschema/#model"

    xmlns:sensor="http://playerstage.sourceforge.net/gazebo/xmlschema/#sensor"

    xmlns:body="http://playerstage.sourceforge.net/gazebo/xmlschema/#body"

    xmlns:geom="http://playerstage.sourceforge.net/gazebo/xmlschema/#geom"

    xmlns:joint="http://playerstage.sourceforge.net/gazebo/xmlschema/#joint"

    xmlns:controller="http://playerstage.sourceforge.net/gazebo/xmlschema/#controller"

    xmlns:interface="http://playerstage.sourceforge.net/gazebo/xmlschema/#interface"

    xmlns:rendering="http://playerstage.sourceforge.net/gazebo/xmlschema/#rendering"

    xmlns:renderable="http://playerstage.sourceforge.net/gazebo/xmlschema/#renderable"

    xmlns:physics="http://playerstage.sourceforge.net/gazebo/xmlschema/#physics"

    xmlns:xacro="http://ros.org/wiki/xacro">

  <include filename="$(find smartcar_description)/urdf/smartcar_body.urdf.xacro" />

  <!-- Body of SmartCar, with plates, standoffs and Create (including sim sensors) -->

  <smartcar_body/>

  <smartcar_sim/>

</robot>
p { margin-bottom: 0.1in; direction: ltr; line-height: 120%; text-align: justify }
a:link { color: rgba(0, 0, 255, 1) }
二、lanuch文件(smartcar_display.rviz.launch)
在launch文件中要启动节点和模拟器。
<launch>

   <param name="/use_sim_time" value="false" />

   <!-- Load the URDF/Xacro model of our robot -->

   <arg name="urdf_file" default="$(find xacro)/xacro '$(find smartcar_description)/urdf/smartcar.urdf.xacro' --inorder" />

   <arg name="gui" default="false" />

   <param name="robot_description" command="$(arg urdf_file)" />

   <param name="use_gui" value="$(arg gui)"/>

   <node name="arbotix" pkg="arbotix_python" type="arbotix_driver" output="screen">

       <param name="sim" value="true"/>

   </node>

    <node name="joint_state_publisher" pkg="joint_state_publisher" type="joint_state_publisher" >

    </node>

    <node name="robot_state_publisher" pkg="robot_state_publisher" type="state_publisher">

        <param name="publish_frequency" type="double" value="20.0" />

    </node>

     <!-- We need a static transforms for the wheels -->

    <node pkg="tf" type="static_transform_publisher" name="odom_left_wheel_broadcaster" args="0 0 0 0 0 0 /base_link /left_front_link 100" />

    <node pkg="tf" type="static_transform_publisher" name="odom_right_wheel_broadcaster" args="0 0 0 0 0 0 /base_link /right_front_link 100" />

   <node name="rviz" pkg="rviz" type="rviz" args="-d $(find smartcar_description)/urdf.rviz" />

</launch>
再在smartcar_description文件夹下的config文件夹中建立下面的文件
(如果不想进行这一步,把launch文件中的
<rosparam file="$(find smartcar_description)/config/smartcar_arbotix.yaml" command="load" />
这行代码注释即可。):
$ cd ~/catkin_ws/src/config

$ touch smartcar_arbotix.yaml
把下面的代码粘进去。
port: /dev/ttyUSB0

baud: 115200

rate: 20

sync_write: True

sync_read: True

read_rate: 20

write_rate: 20

controllers: {

   #  Pololu motors: 1856 cpr = 0.3888105m travel = 4773 ticks per meter (empirical: 4100)

   base_controller: {type: diff_controller, base_frame_id: base_link, base_width: 0.26, ticks_meter: 4100, Kp: 12, Kd: 12, Ki: 0, Ko: 50, accel_limit: 1.0 }

}
复制使用cp指令将/opt/ros/kinetic/share/urdf_tutorial 目录下的 urdf.rviz拷贝到项目目录 ~/catkin_ws/src/smartcar_description 下
p { margin-bottom: 0.1in; direction: ltr; line-height: 120%; text-align: justify }
a:link { color: rgba(0, 0, 255, 1) }
三、仿真测试
首先运行lanuch,既可以看到rviz中的机器人:
roslaunch smartcar_description smartcar_display.rviz.launch
rostopic pub -1 /cmd_vel geometry_msgs/Twist '{}' 《停止运动》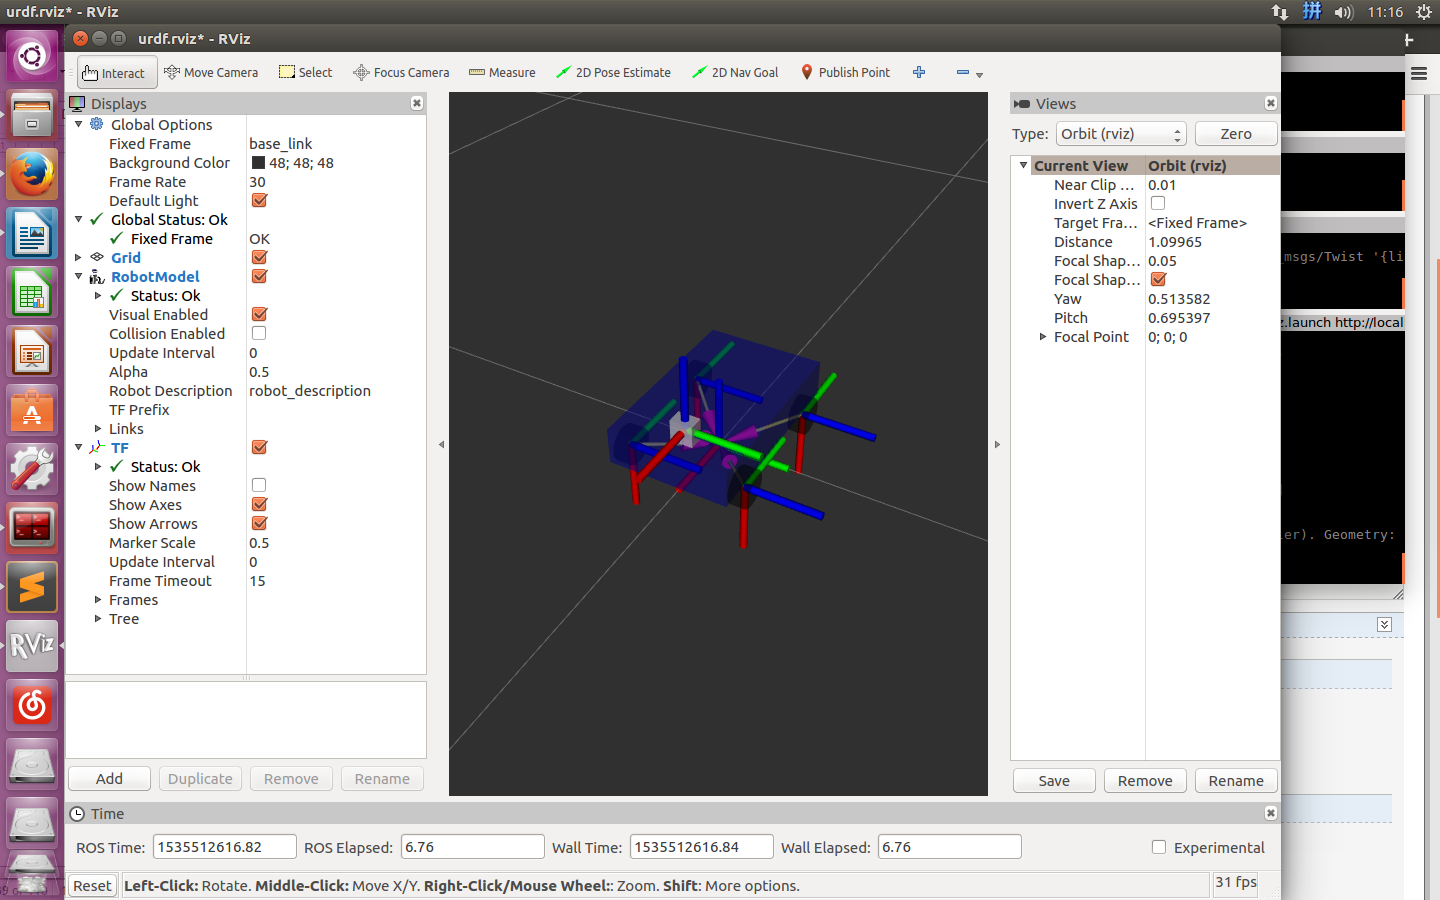
发布一条动作的消息。
01.rostopic pub -r 10 /cmd_vel geometry_msgs/Twist '{linear: {x: 0.5, y: 0, z: 0}, angular: {x: 0, y: 0, z: 0.5}}'
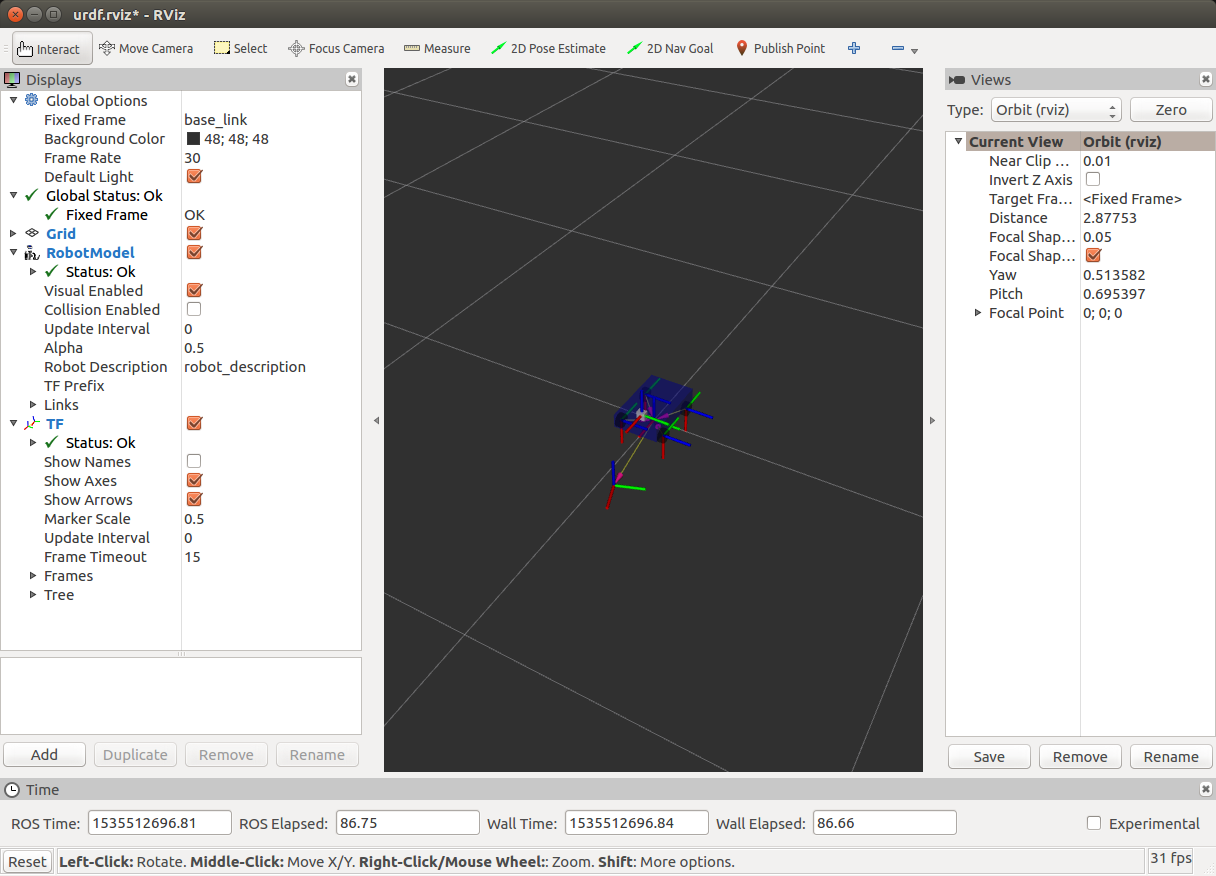
却发现是一个坐标轴在运动。这明显和我们想要的结果不同。
这里,我们需要对rviz客户端进行设置。
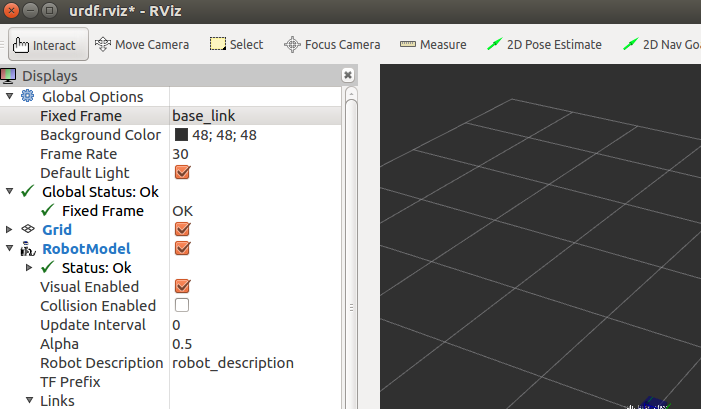
将Global Options下的Fixed Frame更改为odom,这样我们的小车就能正常的运行了。
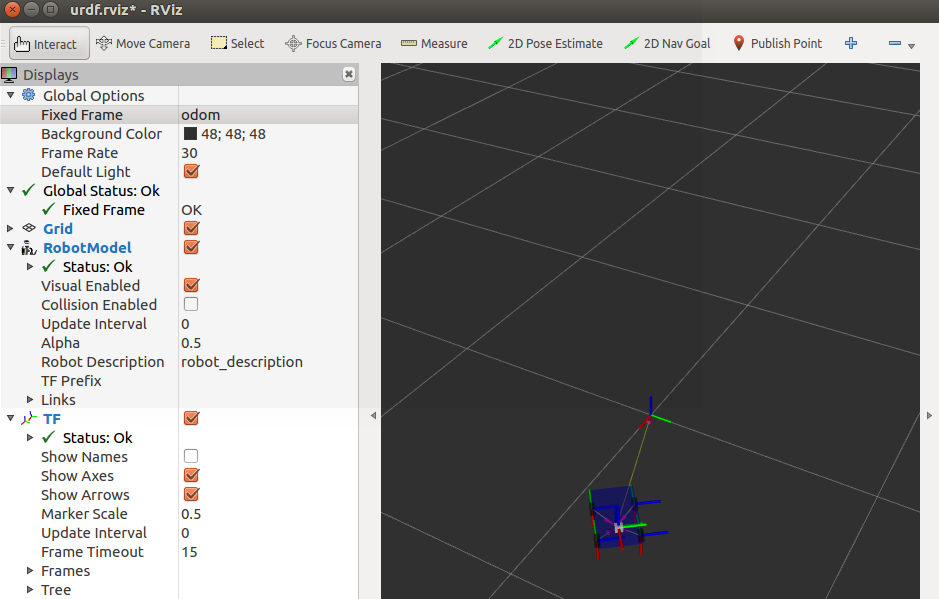
但是,我们之前的历程中有指示小车的方向,这里要怎么设置呢?我们需要在窗口的左下角的Add按钮中添加 Odometry模块,并选中话题odom。

下面我们选中rviz窗口,按下Ctrl+S,将会把当前的设置保存到urdf.rviz文件中。
保存后的urdf.rviz的内容如下:
Panels:

  - Class: rviz/Displays

    Help Height: 78

    Name: Displays

    Property Tree Widget:

      Expanded:

        - /Global Options1

        - /Status1

        - /RobotModel1

        - /RobotModel1/Links1

        - /TF1

        - /TF1/Tree1/odom1

        - /TF1/Tree1/odom1/base_link1

      Splitter Ratio: 0.5

    Tree Height: 561

  - Class: rviz/Selection

    Name: Selection

  - Class: rviz/Tool Properties

    Expanded:

      - /2D Pose Estimate1

      - /2D Nav Goal1

      - /Publish Point1

    Name: Tool Properties

    Splitter Ratio: 0.588679016

  - Class: rviz/Views

    Expanded:

      - /Current View1

    Name: Views

    Splitter Ratio: 0.5

  - Class: rviz/Time

    Experimental: false

    Name: Time

    SyncMode: 0

    SyncSource: ""

Visualization Manager:

  Class: ""

  Displays:

    - Alpha: 0.5

      Cell Size: 1

      Class: rviz/Grid

      Color: 160; 160; 164

      Enabled: true

      Line Style:

        Line Width: 0.0299999993

        Value: Lines

      Name: Grid

      Normal Cell Count: 0

      Offset:

        X: 0

        Y: 0

        Z: 0

      Plane: XY

      Plane Cell Count: 10

      Reference Frame: <Fixed Frame>

      Value: true

    - Alpha: 0.5

      Class: rviz/RobotModel

      Collision Enabled: false

      Enabled: true

      Links:

        All Links Enabled: true

        Expand Joint Details: false

        Expand Link Details: false

        Expand Tree: false

        Link Tree Style: Links in Alphabetic Order

        base_link:

          Alpha: 1

          Show Axes: false

          Show Trail: false

          Value: true

        head:

          Alpha: 1

          Show Axes: false

          Show Trail: false

          Value: true

        left_back_wheel:

          Alpha: 1

          Show Axes: false

          Show Trail: false

          Value: true

        left_front_wheel:

          Alpha: 1

          Show Axes: false

          Show Trail: false

          Value: true

        right_back_wheel:

          Alpha: 1

          Show Axes: false

          Show Trail: false

          Value: true

        right_front_wheel:

          Alpha: 1

          Show Axes: false

          Show Trail: false

          Value: true

      Name: RobotModel

      Robot Description: robot_description

      TF Prefix: ""

      Update Interval: 0

      Value: true

      Visual Enabled: true

    - Class: rviz/TF

      Enabled: true

      Frame Timeout: 15

      Frames:

        All Enabled: true

        base_link:

          Value: true

        head:

          Value: true

        left_back_wheel:

          Value: true

        left_front_link:

          Value: true

        left_front_wheel:

          Value: true

        odom:

          Value: true

        right_back_wheel:

          Value: true

        right_front_link:

          Value: true

        right_front_wheel:

          Value: true

      Marker Scale: 0.5

      Name: TF

      Show Arrows: true

      Show Axes: true

      Show Names: true

      Tree:

        odom:

          base_link:

            head:

              {}

            left_back_wheel:

              {}

            left_front_link:

              {}

            left_front_wheel:

              {}

            right_back_wheel:

              {}

            right_front_link:

              {}

            right_front_wheel:

              {}

      Update Interval: 0

      Value: true

    - Angle Tolerance: 0.100000001

      Class: rviz/Odometry

      Covariance:

        Orientation:

          Alpha: 0.5

          Color: 255; 255; 127

          Color Style: Unique

          Frame: Local

          Offset: 1

          Scale: 1

          Value: true

        Position:

          Alpha: 0.300000012

          Color: 204; 51; 204

          Scale: 1

          Value: true

        Value: true

      Enabled: true

      Keep: 100

      Name: Odometry

      Position Tolerance: 0.100000001

      Shape:

        Alpha: 1

        Axes Length: 1

        Axes Radius: 0.100000001

        Color: 255; 25; 0

        Head Length: 0.300000012

        Head Radius: 0.100000001

        Shaft Length: 1

        Shaft Radius: 0.0500000007

        Value: Arrow

      Topic: /odom

      Unreliable: false

      Value: true

  Enabled: true

  Global Options:

    Background Color: 48; 48; 48

    Default Light: true

    Fixed Frame: odom

    Frame Rate: 30

  Name: root

  Tools:

    - Class: rviz/Interact

      Hide Inactive Objects: true

    - Class: rviz/MoveCamera

    - Class: rviz/Select

    - Class: rviz/FocusCamera

    - Class: rviz/Measure

    - Class: rviz/SetInitialPose

      Topic: /initialpose

    - Class: rviz/SetGoal

      Topic: /move_base_simple/goal

    - Class: rviz/PublishPoint

      Single click: true

      Topic: /clicked_point

  Value: true

  Views:

    Current:

      Class: rviz/Orbit

      Distance: 6.47174978

      Enable Stereo Rendering:

        Stereo Eye Separation: 0.0599999987

        Stereo Focal Distance: 1

        Swap Stereo Eyes: false

        Value: false

      Focal Point:

        X: 0

        Y: 0

        Z: 0

      Focal Shape Fixed Size: true

      Focal Shape Size: 0.0500000007

      Invert Z Axis: false

      Name: Current View

      Near Clip Distance: 0.00999999978

      Pitch: 0.695397019

      Target Frame: <Fixed Frame>

      Value: Orbit (rviz)

      Yaw: 0.513581991

    Saved: ~

Window Geometry:

  Displays:

    collapsed: false

  Height: 848

  Hide Left Dock: false

  Hide Right Dock: false

  QMainWindow State: 000000ff00000000fd00000004000000000000016a000002c0fc0200000008fb0000001200530065006c0065006300740069006f006e00000001e10000009b0000006400fffffffb0000001e0054006f006f006c002000500072006f007000650072007400690065007302000001ed000001df00000185000000a3fb000000120056006900650077007300200054006f006f02000001df000002110000018500000122fb000000200054006f006f006c002000500072006f0070006500720074006900650073003203000002880000011d000002210000017afb000000100044006900730070006c0061007900730100000028000002c0000000dd00fffffffb0000002000730065006c0065006300740069006f006e00200062007500660066006500720200000138000000aa0000023a00000294fb00000014005700690064006500530074006500720065006f02000000e6000000d2000003ee0000030bfb0000000c004b0069006e0065006300740200000186000001060000030c00000261000000010000010f000002c0fc0200000003fb0000001e0054006f006f006c002000500072006f00700065007200740069006500730100000041000000780000000000000000fb0000000a005600690065007700730100000028000002c0000000b000fffffffb0000001200530065006c0065006300740069006f006e010000025a000000b200000000000000000000000200000490000000a9fc0100000001fb0000000a00560069006500770073030000004e00000080000002e10000019700000003000004c000000044fc0100000002fb0000000800540069006d00650100000000000004c00000030000fffffffb0000000800540069006d006501000000000000045000000000000000000000023b000002c000000004000000040000000800000008fc0000000100000002000000010000000a0054006f006f006c00730100000000ffffffff0000000000000000

  Selection:

    collapsed: false

  Time:

    collapsed: false

  Tool Properties:

    collapsed: false

  Views:

    collapsed: false

  Width: 1216

  X: 65

  Y: 24
【kinetic】操作系统探索总结(六)使用smartcar进行仿真的更多相关文章
- ROS学习记录(二)————使用smartcar进行仿真(用.xacro文件来运行rviz)
我发现一个学习ROS系统的好网站: 创客智造http://www.ncnynl.com/ 这里面关于ROS的各个方面都有很详细的介绍. 这周,不,上周我对整个ROS是绝望的,我用一个一个下午的时间在敲 ...
- 在ROS Kinetic和Gazebo 8中使用智能汽车仿真演示
在ROS Kinetic和Gazebo 8中使用智能汽车仿真演示 智能车无人驾驶技术是目前人工智能和机器人技术的研究热点,有许多开源平台可以使我们零基础零成本入门无人驾驶技术.本文分享一下目前ROS官 ...
- 【kinetic】操作系统探索总结(五)创建简单的机器人模型smartcar
p { margin-bottom: 0.1in; direction: ltr; line-height: 120%; text-align: justify } a:link { color: r ...
- 【kinetic】操作系统探索总结(八)键盘控制
如果尝试过前面的例子,有没有感觉每次让机器人移动还要在终端里输入指令,这也太麻烦了,有没有办法通过键盘来控制机器人的移动呢?答案室当然的了.我研究了其他几个机器人键盘控制的代码,还是有所收获的,最后移 ...
- ROS探索总结(六)——使用smartcar进行仿真
转自:https://www.ncnynl.com/archives/201609/843.html 总结: 一.机器人描述文件三个: 机器人主体body文件: gazebo属性文件: 主文件 sma ...
- 操作系统笔记(六)页面置换算法 FIFO法 LRU最近最久未使用法 CLOCK法 二次机会法
前篇在此: 操作系统笔记(五) 虚拟内存,覆盖和交换技术 操作系统 笔记(三)计算机体系结构,地址空间.连续内存分配(四)非连续内存分配:分段,分页 内容不多,就不做index了. 功能:当缺页中断发 ...
- AI 人工智能 探索 (六)
这次我为 角色 attribute 添加了 多个属性 其中 att 是 好人 坏人 等属性, 显然 数字不同 就要打起来. grade 是智商属性 ,今天先做了 3的智商.也就是小兵智商.碰到就打 逃 ...
- iOS自动化探索(六)自动化测试框架pytest - fixtures
Fixture介绍 fixture是pytest特有的功能,它用pytest.fixture标识,定义在函数前面.在编写测试函数的时候,可以将此函数名称做为传入参数,pytest将会以依赖注入方式,将 ...
- Scrapy研究探索(六)——自己主动爬取网页之II(CrawlSpider)
原创,转载注明:http://blog.csdn.net/u012150179/article/details/34913315 一.目的. 在教程(二)(http://blog.csdn.net/u ...
随机推荐
- java44
1.使用封装工具类思想:三种输入模式下的工具类. dateUtils类, StringUtils类(判断字符串值是否为空), 调用工具类: String res = dateUtils.datetoS ...
- Eclipse的新建工作空间如何用以前工作空间的配置
1.找到以前工作空间的配置目录:\.metadata\.plugins\org.eclipse.core.runtime 2.替换掉新的工作空间的配置目录:\.metadata\.plugins\or ...
- 七. Vue Router详解
1. 认识路由 1.1 路由概念 路由是什么? 路由是一个网络工程里面的术语. 路由(routing)就是通过互联的网络把信息从源地址传输到目的地址的活动 --- 维基百科 路由器提供了两种机制:路由 ...
- centos7 yum搭建lamp
环境 系统:centos7 安装apache #yum 安装apache [root@localhost ~]# yum install httpd httpd-devel #启动httpd服务 [r ...
- 小程序image无法显示图片
图片路径中有中文 图片地址为http开头,图片只能在调试模式中显示,真机也必须开调试. 图片名称有空格 图片的后缀必须为小写的.png或者.jpg
- 对 精致码农大佬 说的 Task.Run 会存在 内存泄漏 的思考
一:背景 1. 讲故事 这段时间项目延期,加班比较厉害,博客就稍微停了停,不过还是得持续的技术输出呀! 园子里最近挺热闹的,精致码农大佬分享了三篇文章: 为什么要小心使用 Task.Run [http ...
- es6 Object对象扩展新方法
ES6给Object拓展了许多新的方法,如: keys(obj):获取对象的所有key形成的数组 var obj = { foo: 'bar', baz: 42 }; Object.keys ...
- CF392B Tower of Hanoi
题目链接. Description 三塔汉诺塔问题,给一个 \(3 \times 3\) 的矩阵 \(t\),\(t_{i, j}\) 表示从 \(i\) 塔移动一个盘子到 \(j\) 塔的花费. 初 ...
- OpenWrt下基于OLSR的Ad-Hoc组网实现网络摄像头多节点访问
文章目录 Ad-Hoc组网配置 摄像头端口映射 PC连接设置 结果 Ad-Hoc组网配置 参照博客 链接: link. 摄像头端口映射 这里使用到了海康网络摄像头,先将网络摄像头的网口连接到任意一个节 ...
- 在线CC攻击网站源码
源码目录 index.html 首页 cc.php 核心文件 count.php 使用统计 pv.php 访问测试页面 ip.txt 代理IP数据文件 运行方式 域名/?url=目标网址 要先获取代{ ...