
Spring 4 MVC+Apache Tiles 3 Example
In this post we will integrate Apache Tiles 3 with Spring MVC 4, using annotation-based configuration. Apache Tiles is a template based, composite view framework: it allows to reuse page pieces across the application, keeping consistent look and feel. Page layouts in general contains several page-fragments like header,footer, menu & content. In a consistent layout, only content changes between page navigation while other page fragments like header,footer & menu remains fixed most of the time.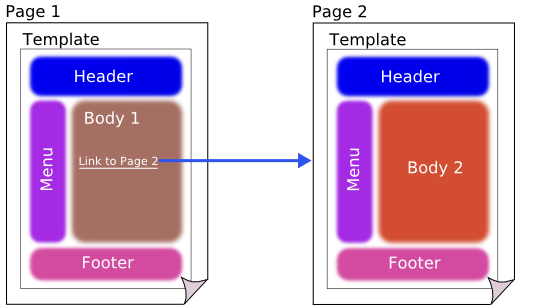
Tiles allows developers to define these page fragments which can be assembled into a complete pages at runtime.

- AngularJS+Spring Security using Basic Authentication
- Secure Spring REST API using OAuth2
- Secure Spring REST API using Basic Authentication
- Spring 4 MVC+JPA2+Hibernate Many-to-many Example
- Spring 4 Caching Annotations Tutorial
- Spring 4 Cache Tutorial with EhCache
- Spring 4 Email Template Library Example
- Spring 4 Email With Attachment Tutorial
- Spring 4 Email Integration Tutorial
- Spring MVC 4+JMS+ActiveMQ Integration Example
- Spring 4+JMS+ActiveMQ @JmsLister @EnableJms Example
- Spring 4+JMS+ActiveMQ Integration Example
- Spring MVC 4+Spring Security 4 + Hibernate Integration Example
- Spring MVC 4+AngularJS Example
- Spring MVC 4+AngularJS Server communication example : CRUD application using ngResource $resource service
- Spring MVC 4+AngularJS Routing with UI-Router Example
- Spring MVC 4+Hibernate 4 Many-to-many JSP Example
- Spring MVC 4+Hibernate 4+MySQL+Maven integration + Testing example using annotations
- Spring Security 4 Hibernate Integration Annotation+XML Example
- Spring MVC4 FileUpload-Download Hibernate+MySQL Example
- Spring MVC 4 Form Validation and Resource Handling
- Spring Batch- MultiResourceItemReader & HibernateItemWriter example
Following technologies being used:
- Spring 4.2.6.RELEASE
- Apache Tiles 3.0.5
- Maven 3
- JDK 1.7
- Tomcat 8.0.21
- Eclipse MARS.1 Release 4.5.1
Let’s begin.
Step 1: Create the directory structure
Following will be the final project structure: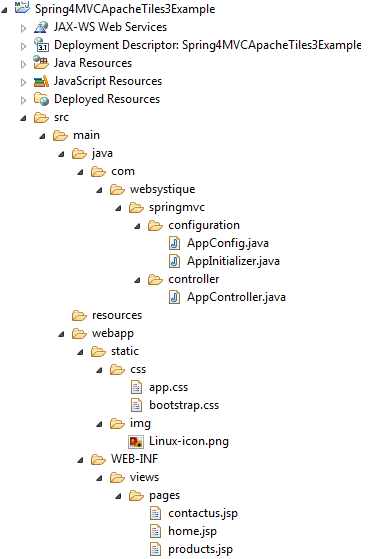
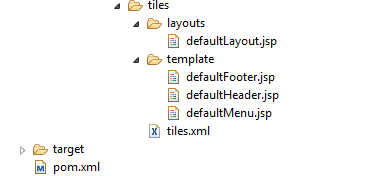
Let’s now add the content mentioned in above structure explaining each in detail.
Step 2: Update pom.xml to include required dependencies
<project xsi:schemaLocation="http://maven.apache.org/POM/4.0.0 http://maven.apache.org/xsd/maven-4.0.0.xsd" <modelVersion>4.0.0</modelVersion> <groupId>com.websystique.springmvc</groupId> <artifactId>Spring4MVCApacheTiles3Example</artifactId> <packaging>war</packaging> <version>1.0.0</version> <name>Spring4MVCApacheTiles3Example</name> <properties> <springframework.version>4.2.6.RELEASE</springframework.version> <apachetiles.version>3.0.5</apachetiles.version> </properties> <dependencies> <!-- Spring --> <dependency> <groupId>org.springframework</groupId> <artifactId>spring-core</artifactId> <version>${springframework.version}</version> </dependency> <dependency> <groupId>org.springframework</groupId> <artifactId>spring-web</artifactId> <version>${springframework.version}</version> </dependency> <dependency> <groupId>org.springframework</groupId> <artifactId>spring-webmvc</artifactId> <version>${springframework.version}</version> </dependency> <!-- Apache Tiles --> <dependency> <groupId>org.apache.tiles</groupId> <artifactId>tiles-core</artifactId> <version>${apachetiles.version}</version> </dependency> <dependency> <groupId>org.apache.tiles</groupId> <artifactId>tiles-api</artifactId> <version>${apachetiles.version}</version> </dependency> <dependency> <groupId>org.apache.tiles</groupId> <artifactId>tiles-servlet</artifactId> <version>${apachetiles.version}</version> </dependency> <dependency> <groupId>org.apache.tiles</groupId> <artifactId>tiles-jsp</artifactId> <version>${apachetiles.version}</version> </dependency> <!-- Servlet+JSP+JSTL --> <dependency> <groupId>javax.servlet</groupId> <artifactId>javax.servlet-api</artifactId> <version>3.1.0</version> </dependency> <dependency> <groupId>javax.servlet.jsp</groupId> <artifactId>javax.servlet.jsp-api</artifactId> <version>2.3.1</version> </dependency> <dependency> <groupId>javax.servlet</groupId> <artifactId>jstl</artifactId> <version>1.2</version> </dependency> </dependencies> <build> <pluginManagement> <plugins> <plugin> <groupId>org.apache.maven.plugins</groupId> <artifactId>maven-compiler-plugin</artifactId> <version>3.2</version> <configuration> <source>1.7</source> <target>1.7</target> </configuration> </plugin> <plugin> <groupId>org.apache.maven.plugins</groupId> <artifactId>maven-war-plugin</artifactId> <version>2.4</version> <configuration> <warSourceDirectory>src/main/webapp</warSourceDirectory> <warName>Spring4MVCApacheTiles3Example</warName> <failOnMissingWebXml>false</failOnMissingWebXml> </configuration> </plugin> </plugins> </pluginManagement> <finalName>Spring4MVCApacheTiles3Example</finalName> </build></project> |
Apart from usual Spring dependencies, We have also added few dependencies for Apache Tiles 3. Additional dependencies can be added for more advanced tiles usage. Maven Apache-tiles page lists all the dependencies from basic to advanced usages.
Step 3: Configure Tiles
Configure tiles in Spring Application configuration file.
package com.websystique.springmvc.configuration;import org.springframework.context.annotation.Bean;import org.springframework.context.annotation.ComponentScan;import org.springframework.context.annotation.Configuration;import org.springframework.web.servlet.config.annotation.EnableWebMvc;import org.springframework.web.servlet.config.annotation.ResourceHandlerRegistry;import org.springframework.web.servlet.config.annotation.ViewResolverRegistry;import org.springframework.web.servlet.config.annotation.WebMvcConfigurerAdapter;import org.springframework.web.servlet.view.tiles3.TilesConfigurer;import org.springframework.web.servlet.view.tiles3.TilesViewResolver;@Configuration@EnableWebMvc@ComponentScan(basePackages = "com.websystique.springmvc")public class AppConfig extends WebMvcConfigurerAdapter{ /** * Configure TilesConfigurer. */ @Bean public TilesConfigurer tilesConfigurer(){ TilesConfigurer tilesConfigurer = new TilesConfigurer(); tilesConfigurer.setDefinitions(new String[] {"/WEB-INF/views/**/tiles.xml"}); tilesConfigurer.setCheckRefresh(true); return tilesConfigurer; } /** * Configure ViewResolvers to deliver preferred views. */ @Override public void configureViewResolvers(ViewResolverRegistry registry) { TilesViewResolver viewResolver = new TilesViewResolver(); registry.viewResolver(viewResolver); } /** * Configure ResourceHandlers to serve static resources like CSS/ Javascript etc... */ @Override public void addResourceHandlers(ResourceHandlerRegistry registry) { registry.addResourceHandler("/static/**").addResourceLocations("/static/"); } } |
Highlights of above configurations are TilesConfigurer & TilesViewResolver. TilesConfigurer simply configures a TilesContainer using a set of files containing definitions, to be accessed by TilesView instances. Definition files are basically XML files containing layout definitions.
In our Spring MVC application, we also need a ViewResolver. Spring comes with a Tiles specific ViewResolver named TilesViewResolver. Once configured, the view names returned from your controller methods will be treated as tiles view and Spring will look for a definition having the same name in definitions XML files.
Step 4: Create tiles definitions
Shown below is the definition file tiles.xml
<?xml version="1.0" encoding="UTF-8" ?><!DOCTYPE tiles-definitions PUBLIC "-//Apache Software Foundation//DTD Tiles Configuration 3.0//EN" "http://tiles.apache.org/dtds/tiles-config_3_0.dtd"> <tiles-definitions> <!-- Base Definition --> <definition name="base-definition" template="/WEB-INF/views/tiles/layouts/defaultLayout.jsp"> <put-attribute name="title" value="" /> <put-attribute name="header" value="/WEB-INF/views/tiles/template/defaultHeader.jsp" /> <put-attribute name="menu" value="/WEB-INF/views/tiles/template/defaultMenu.jsp" /> <put-attribute name="body" value="" /> <put-attribute name="footer" value="/WEB-INF/views/tiles/template/defaultFooter.jsp" /> </definition> <!-- Home Page --> <definition name="home" extends="base-definition"> <put-attribute name="title" value="Welcome" /> <put-attribute name="body" value="/WEB-INF/views/pages/home.jsp" /> </definition> <!-- Product Page --> <definition name="products" extends="base-definition"> <put-attribute name="title" value="Products" /> <put-attribute name="body" value="/WEB-INF/views/pages/products.jsp" /> </definition> <!-- Contact-us Page --> <definition name="contactus" extends="base-definition"> <put-attribute name="title" value="Contact Us" /> <put-attribute name="body" value="/WEB-INF/views/pages/contactus.jsp" /> </definition> </tiles-definitions> |
In above definition file, we have defined a base-definition and several other definitions extending base-definition. Other defintions are just overwriting the part they are specialized for. template attribute in definition-block is used to specify the actual layout file. Each of the definition (by name) can be treated as a tiles-view.
Step 5: Create Layouts
In our case we have defined a basic layout [/WEB-INF/views/tiles/layouts/defaultLayout.jsp] pinned with definition using template attribte.
defaultLayout.jsp
<%@ page language="java" contentType="text/html; charset=ISO-8859-1" pageEncoding="ISO-8859-1"%><%@ page isELIgnored="false" %><%@ taglib prefix="c" uri="http://java.sun.com/jsp/jstl/core"%><%@ taglib uri="http://tiles.apache.org/tags-tiles" prefix="tiles"%><html><head> <meta http-equiv="Content-Type" content="text/html; charset=ISO-8859-1"> <title><tiles:getAsString name="title" /></title> <link href="<c:url value='/static/css/bootstrap.css' />" rel="stylesheet"></link> <link href="<c:url value='/static/css/app.css' />" rel="stylesheet"></link></head> <body> <header id="header"> <tiles:insertAttribute name="header" /> </header> <section id="sidemenu"> <tiles:insertAttribute name="menu" /> </section> <section id="site-content"> <tiles:insertAttribute name="body" /> </section> <footer id="footer"> <tiles:insertAttribute name="footer" /> </footer></body></html> |
This layout file provides the consistent look-n-feel across your application. If you want to change layout, define a corresponding layout file and attach to the definition using template attribute.
As you can see, we have a header,footer,menu & body. We are using tags-tiles tag library to provide the placeholder within layout file. Attributes specified using insertAttribute will be provided by corresponding definition(or the one extending it).
Step 6: Create views
We have created some default views[used when the extending definition does not overwrite them] and some specific ones.defaultHeader.jsp
<div> <h1>Tiles Demo</h1></div> |
defaultFooter.jsp
<div> Made in this world.</div> |
defaultMenu.jsp
<nav> <a href="${pageContext.request.contextPath}/"><img class="logo" src="${pageContext.request.contextPath}/static/img/Linux-icon.png"></a> <ul id="menu"> <li><a href="${pageContext.request.contextPath}/">Home</a></li> <li><a href="${pageContext.request.contextPath}/products">Products</a></li> <li><a href="${pageContext.request.contextPath}/contactus">Contact Us</a></li> </ul></nav> |
home.jsp
<h2>Welcome to Home page</h2> |
products.jsp
<h2>Products page</h2> |
contactus.jsp
<h2>Contact Us Page</h2> |
Step 7: Create Controller
package com.websystique.springmvc.controller;import org.springframework.stereotype.Controller;import org.springframework.ui.ModelMap;import org.springframework.web.bind.annotation.RequestMapping;import org.springframework.web.bind.annotation.RequestMethod;@Controller@RequestMapping("/")public class AppController { @RequestMapping(value = { "/"}, method = RequestMethod.GET) public String homePage(ModelMap model) { return "home"; } @RequestMapping(value = { "/products"}, method = RequestMethod.GET) public String productsPage(ModelMap model) { return "products"; } @RequestMapping(value = { "/contactus"}, method = RequestMethod.GET) public String contactUsPage(ModelMap model) { return "contactus"; }} |
Look at each of these controller methods. The returned value from them is treated as tiles-view [Thanks to TilesViewResolver] and corresponding tiles-definition gets consulted.
Step 8: Create Initializer
package com.websystique.springmvc.configuration;import org.springframework.web.servlet.support.AbstractAnnotationConfigDispatcherServletInitializer;public class AppInitializer extends AbstractAnnotationConfigDispatcherServletInitializer { @Override protected Class<?>[] getRootConfigClasses() { return new Class[] { AppConfig.class }; } @Override protected Class<?>[] getServletConfigClasses() { return null; } @Override protected String[] getServletMappings() { return new String[] { "/" }; }} |
Step 9: Build, deploy and Run Application
Now build the war (either by eclipse as was mentioned in previous tutorials) or via maven command line( mvn clean install). Deploy the war to a Servlet 3.0 container . Since here i am using Tomcat, i will simply put this war file into tomcat webapps folder and click on startup.bat inside tomcat/bin directory.
If you prefer to deploy from within Eclipse using tomcat: For those of us, who prefer to deploy and run from within eclipse, and might be facing difficulties setting Eclipse with tomcat, the detailed step-by-step solution can be found at : How to setup tomcat with Eclipse.
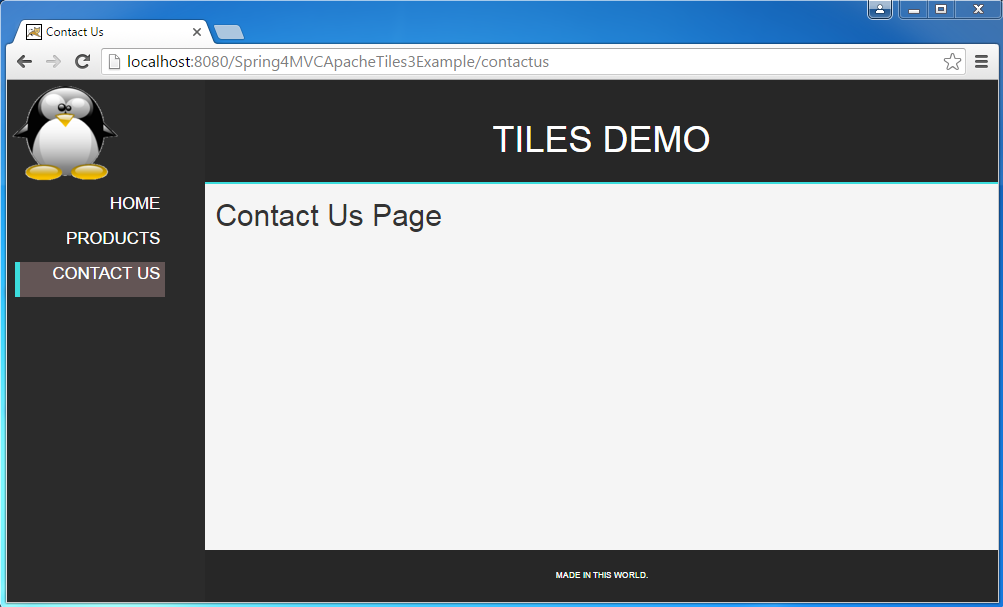
Open browser and browse at http://localhost:8080/Spring4MVCApacheTiles3Example/
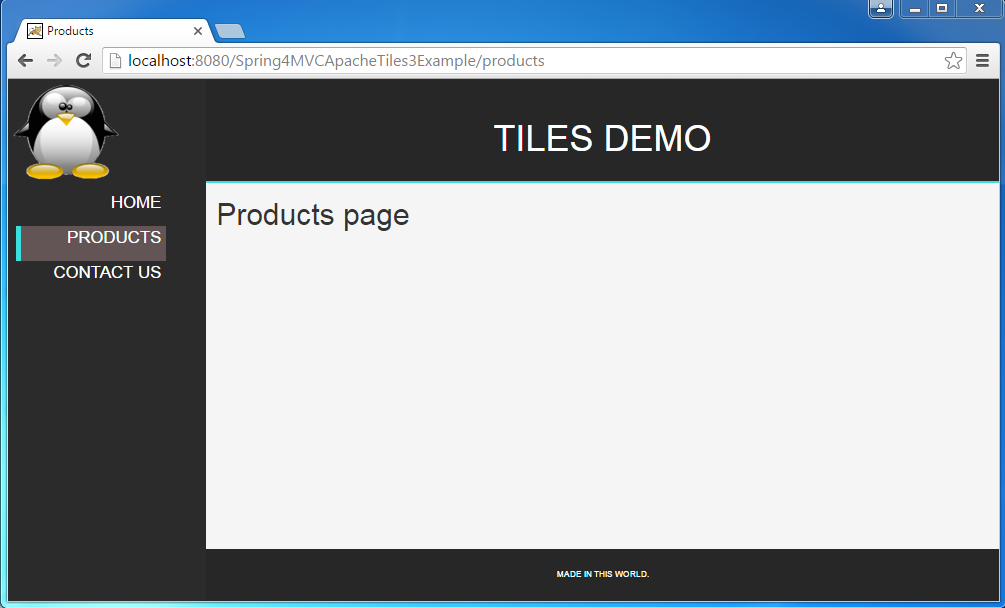
Click on different menu items to see the content gets changes while preserving the actual look-n-feel.
Download Source Code
References
http://websystique.com/springmvc/spring-4-mvc-apache-tiles-3-annotation-based-example/
Spring 4 MVC+Apache Tiles 3 Example的更多相关文章
- spring项目报org.apache.tiles.definition.DefinitionsFactoryException: I/O错误原因及解决办法。
今天升级一个spring项目遇到如下错: HTTP Status 500 - Request processing failed; nested exception is org.apache.til ...
- spring 3 mvc hello world + mavern +jetty
Spring 3 MVC hello world example By mkyong | August 2, 2011 | Updated : June 15, 2015 In this tutori ...
- 菜鸟学习Spring Web MVC之二
有文章从结构上详细讲解了Spring Web MVC,我个菜鸟就不引据来讲了.说说强悍的XP环境如何配置运行环境~~ 最后我配好的环境Tomcat.Spring Tool Suites.Maven目前 ...
- Spring - Sring MVC入门
2.1.Spring Web MVC是什么 Spring Web MVC是一种基于Java的实现了Web MVC设计模式的请求驱动类型的轻量级Web框架,即使用了MVC架构模式的思想,将web层进行职 ...
- Apache Tiles 2.x 应用指南(转)
转自:http://jaymsimusic.iteye.com/blog/1138906 Apache Tiles 2.x 应用指南 博客分类: Apache Tiles Jakarta Tile ...
- [页面模板框架对比] Apache Tiles VS Sitemesh
1. 原理对比 (1) Apache Tiles 顾名思义,Tile是瓷砖的意思,也就是说一个网页是由多个Tile组成的. 用户通过访问一个页面的Apache Tiles定义名,就可以访问一个由定义文 ...
- Spring 4 MVC+Hibernate 4+MySQL+Maven使用注解集成实例
Spring 4 MVC+Hibernate 4+MySQL+Maven使用注解集成实例 转自:通过注解的方式集成Spring 4 MVC+Hibernate 4+MySQL+Maven,开发项目样例 ...
- Spring 4 MVC example with Maven
In this tutorial, we show you a Spring 4 MVC example, using Maven build tool. Technologies used : Sp ...
- Spring 4 MVC example with Maven - [Source Code Download]
In this tutorial, we show you a Spring 4 MVC example, using Maven build tool. Technologies used : Sp ...
随机推荐
- PythonAdvanced
PythonAdvanced function 函数 (要多使用函数,方便,少变量,好改错) 函数是可以重复执行的语句块,可以重复使用 作用: 1.用于封装语句块,提高代码的重用性 2.定义用户级别的 ...
- mysql 存相同内容:utb8mb4 会比 utf8 占用更多的内存吗,utf8mb4 浪费内存吗?utf8 utf8mb4 区别
原文:mysql 存相同内容:utb8mb4 会比 utf8 占用更多的内存吗,utf8mb4 浪费内存吗?utf8 utf8mb4 区别 参考:http://www.fengyunxiao.cn u ...
- AE开发概念辨析
樱木 原文 AE开发之概念辨析2,AE开发涉及相关概念,AE开发相关概念 1 AE中的类库 AE总共包括了21个子库,分别是SYSTEM,SYSTEMUI,GEOMETRY,DISPLAY,SERVE ...
- php课程 3-12 回调参数怎么用
php课程 3-12 回调参数怎么用 一.总结 一句话总结:有时候需要在一个函数中使用另外一个函数,使用回调的话,那么那个函数的几十行代码就不用写了,其实很基础,就是函数名的字符串的替换,超级基础的. ...
- google analytics是什么(免费的网站流量分析服务:比如分析有多少个人来了你的网站,告诉你怎么样才能在网站上面实现最大收益。)
google analytics是什么(免费的网站流量分析服务:比如分析有多少个人来了你的网站,告诉你怎么样才能在网站上面实现最大收益.) 一.总结 免费的网站流量分析服务:比如分析有多少个人来了你的 ...
- 从源码角度实现一个自己的Promise
原文链接:https://geniuspeng.github.io/2017/12/14/my-promise/ 关于Promise的概念以及意义就不在这里介绍了,最近看到了一些实现Promise的核 ...
- 解决Eclipse中的卡死现象
解决Eclipse中的卡死现象 取消验证 windows–>perferences–>validation 把 除了manual 下面的全部点掉,build下只留 classpath de ...
- 实现拖拽上传文件的一款小控件——dropzone
由于专注所以专业.非常多小巧的东西乍一看非常不起眼,却在特定的领域表现不俗,就是由于集中了热情. dropzone就是这样一款小控件,实现拖拽上传.它不依赖于其他像jquery等JS库.并且支持多方面 ...
- 【solr基础教程之九】客户端 分类: H4_SOLR/LUCENCE 2014-07-30 15:28 904人阅读 评论(0) 收藏
一.Java Script 1.由于Solr本身可以返回Json格式的结果,而JavaScript对于处理Json数据具有天然的优势,因此使用JavaScript实现Solr客户端是一个很好的选择. ...
- 使用Apache FtpServer搭建FTP服务器 [FlashFXP]
<server xmlns="http://mina.apache.org/ftpserver/spring/v1" xmlns:xsi="http://www.w ...