
使用scrapy-crawlSpider 爬取tencent 招聘
Tencent 招聘信息网站
创建项目
scrapy startproject Tencent
创建爬虫
scrapy genspider -t crawl tencent
1. 起始url start_url = 'https://hr.tencent.com/position.php'
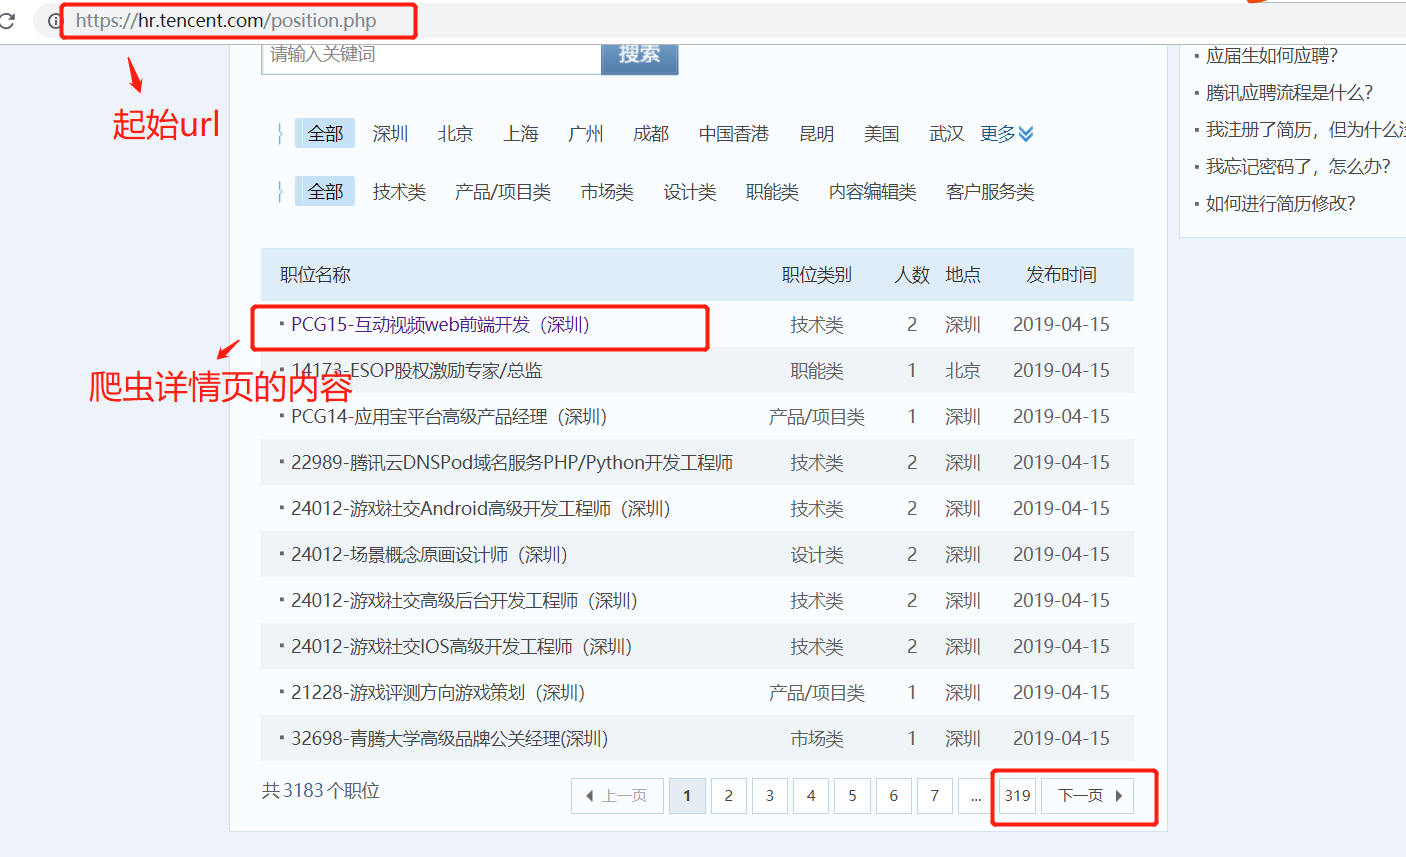
在起始页面,需要获取该也页面上的每个职位的详情页的url,同时需要提取下一页的url地址,做同样的操作。
因此起始页url地址的提取,分为两类:
1. 每个职位详情页的url地址的提取
2. 下一页url地址的提取,并且得到的页面做的操作和起始页的操作一样。
url地址的提取
1. 提取详情页url,详情页的url地址如下:
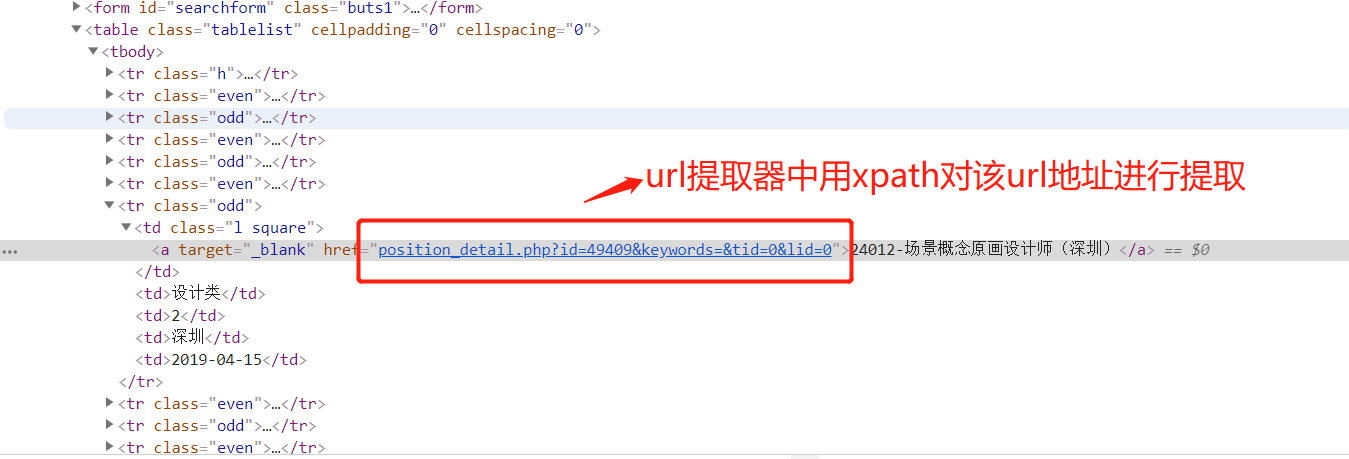
提取规则详情页的规则:
rules = (

        # 提取详情页的url地址  ,详情页url地址对应的响应,需要进行数据提取,所有需要有回调函数,用来解析数据

        Rule(LinkExtractor(restrict_xpaths=("//table[@class='tablelist']//td[@class='l square']")), callback='parse_item')

    )
提取下一页的htmlj所在的位置:
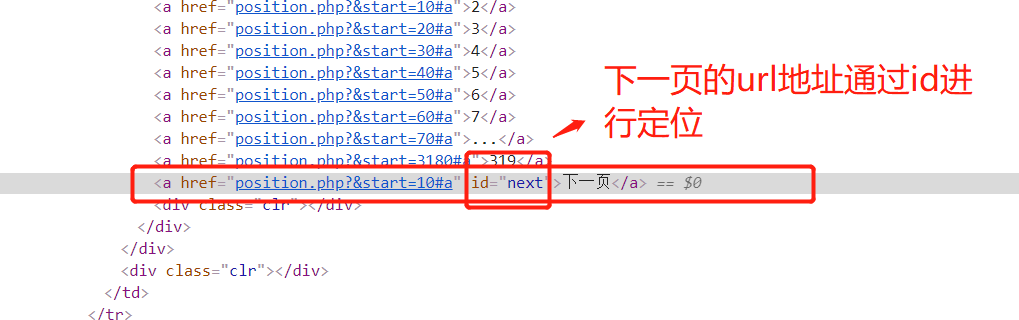
2 获取下一页的url 规则:
rules = (

        # 提取详情页的url地址

        # Rule(LinkExtractor(allow=r'position_detail.php?id=\d+\&keywords=&tid=0&lid=0'), callback='parse_item'), # 这个表达式有错,这里不用正则

        Rule(LinkExtractor(restrict_xpaths=("//table[@class='tablelist']//td[@class='l square']")), callback='parse_item'),

        # 翻页

        Rule(LinkExtractor(restrict_xpaths=("//a[@id='next']")), follow=True),

    )
获取详情页数据

1.详情数据提取(爬虫逻辑)
1.获取标题

xpath:
item['title'] = response.xpath('//td[@id="sharetitle"]/text()').extract_first()
2. 获取工作地点,职位,招聘人数
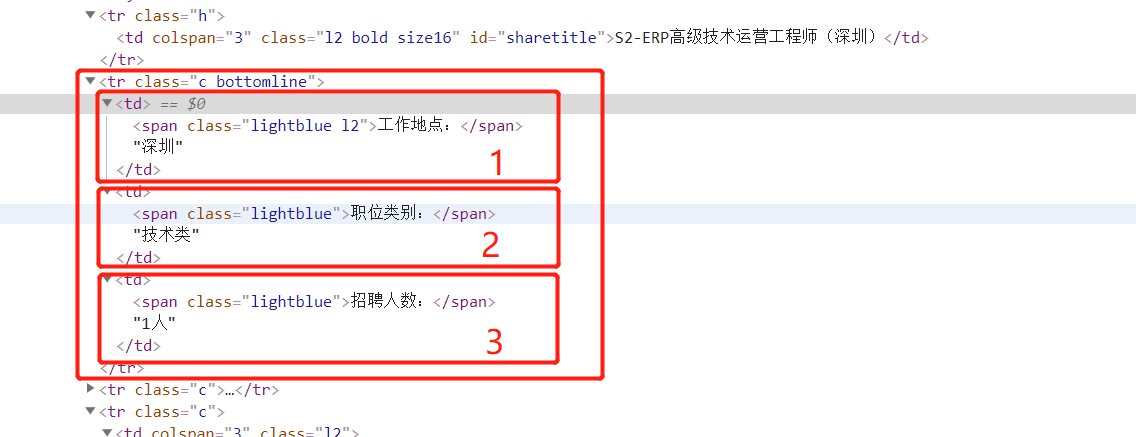
xpath:
 item['addr'] = response.xpath('//tr[@class="c bottomline"]/td[1]//text()').extract()[1]

 item['position'] = response.xpath('//tr[@class="c bottomline"]/td[2]//text()').extract()[1]

 item['num'] = response.xpath('//tr[@class="c bottomline"]/td[3]//text()').extract()[1]
3.工作要求抓取
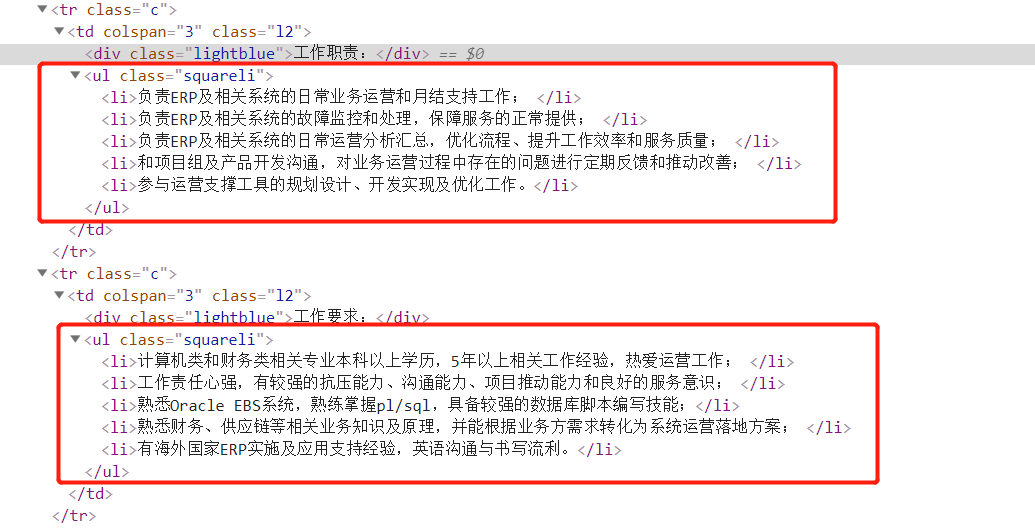
xpath:
item['skill'] =response.xpath('//ul[@class="squareli"]/li/text()').extract()
爬虫的代码:
# -*- coding: utf-8 -*-

import scrapy

from scrapy.linkextractors import LinkExtractor

from scrapy.spiders import CrawlSpider, Rule

from ..items import TencentItem

class TencentSpider(CrawlSpider):

    name = 'tencent'

    allowed_domains = ['hr.tencent.com']

    start_urls = ['https://hr.tencent.com/position.php']

    rules = (

        # 提取详情页的url地址

        # Rule(LinkExtractor(allow=r'position_detail.php?id=\d+\&keywords=&tid=0&lid=0'), callback='parse_item'), # 这个表达式有错

        Rule(LinkExtractor(restrict_xpaths=("//table[@class='tablelist']//td[@class='l square']")), callback='parse_item'),

        # 翻页

        Rule(LinkExtractor(restrict_xpaths=("//a[@id='next']")), follow=True),

    )

    def parse_item(self, response):

        item = TencentItem()

        item['title'] = response.xpath('//td[@id="sharetitle"]/text()').extract_first()

        item['addr'] = response.xpath('//tr[@class="c bottomline"]/td[1]//text()').extract()[0]

        item['position'] = response.xpath('//tr[@class="c bottomline"]/td[2]//text()').extract()[0]

        item['num'] = response.xpath('//tr[@class="c bottomline"]/td[3]//text()').extract()[0]

        item['skill'] =response.xpath('//ul[@class="squareli"]/li/text()').extract()

        print(dict(item))

        return item
tencent.py
2. 数据存储
1.settings.py 配置文件,配置如下信息
ROBOTSTXT_OBEY = False

USER_AGENT = 'Mozilla/5.0 (Macintosh; Intel Mac OS X 10_13_2) AppleWebKit/537.36 (KHTML, like Gecko) Chrome/63.0.3239.132 Safari/537.36'

ITEM_PIPELINES = {

   'jd.pipelines.TencentPipeline': 300,

}
2. items.py 中:
import scrapy

class TencentItem(scrapy.Item):

    # define the fields for your item here like:

    title = scrapy.Field()

    addr = scrapy.Field()

    position = scrapy.Field()

    num = scrapy.Field()

    skill = scrapy.Field()
3. pipeline.py中:
import  pymongo

class TencentPipeline(object):

    def open_spider(self,spider):

        # 爬虫开启是连接数据库

        client = pymongo.MongoClient()

        collention = client.tencent.ten

        self.client =client

        self.collention = collention

        pass

    def process_item(self, item, spider):

        # 数据保存在mongodb 中

        self.collention.insert(dict(item))

        return item

    def colse_spdier(self,spider):

        # 爬虫结束,关闭数据库

        self.client.close()
启动项目
1.先将MongoDB数据库跑起来。
2.执行爬虫命令:
scrapy crawl tencent
3. 执行程序后的效果:

使用scrapy-crawlSpider 爬取tencent 招聘的更多相关文章
- Scrapy框架——CrawlSpider爬取某招聘信息网站
CrawlSpider Scrapy框架中分两类爬虫,Spider类和CrawlSpider类. 它是Spider的派生类,Spider类的设计原则是只爬取start_url列表中的网页, 而Craw ...
- Python爬虫【实战篇】scrapy 框架爬取某招聘网存入mongodb
创建项目 scrapy startproject zhaoping 创建爬虫 cd zhaoping scrapy genspider hr zhaopingwang.com 目录结构 items.p ...
- Python+Scrapy+Crawlspider 爬取数据且存入MySQL数据库
1.Scrapy使用流程 1-1.使用Terminal终端创建工程,输入指令:scrapy startproject ProName 1-2.进入工程目录:cd ProName 1-3.创建爬虫文件( ...
- 简单的scrapy实战:爬取腾讯招聘北京地区的相关招聘信息
简单的scrapy实战:爬取腾讯招聘北京地区的相关招聘信息 简单的scrapy实战:爬取腾讯招聘北京地区的相关招聘信息 系统环境:Fedora22(昨天已安装scrapy环境) 爬取的开始URL:ht ...
- 爬虫07 /scrapy图片爬取、中间件、selenium在scrapy中的应用、CrawlSpider、分布式、增量式
爬虫07 /scrapy图片爬取.中间件.selenium在scrapy中的应用.CrawlSpider.分布式.增量式 目录 爬虫07 /scrapy图片爬取.中间件.selenium在scrapy ...
- scrapy-redis + Bloom Filter分布式爬取tencent社招信息
scrapy-redis + Bloom Filter分布式爬取tencent社招信息 什么是scrapy-redis 什么是 Bloom Filter 为什么需要使用scrapy-redis + B ...
- scrapy-redis分布式爬取tencent社招信息
scrapy-redis分布式爬取tencent社招信息 什么是scrapy-redis 目标任务 安装爬虫 创建爬虫 编写 items.py 编写 spiders/tencent.py 编写 pip ...
- python-scrapy爬取某招聘网站(二)
首先要准备python3+scrapy+pycharm 一.首先让我们了解一下网站 拉勾网https://www.lagou.com/ 和Boss直聘类似的网址设计方式,与智联招聘不同,它采用普通的页 ...
- 使用scrapy框架爬取自己的博文(2)
之前写了一篇用scrapy框架爬取自己博文的博客,后来发现对于中文的处理一直有问题- - 显示的时候 [u'python\u4e0b\u722c\u67d0\u4e2a\u7f51\u9875\u76 ...
随机推荐
- ODAC(V9.5.15) 学习笔记(四)TMemDataSet (1)
所有的数据集类组件都是从TMemDataSet继承下来的,该组件实现了内存中对数据的管理,其主要的属性.方法和事件如下. 1.数据更新 名称 类型 说明 CachedUpdates Boolean 数 ...
- Spring Boot 笔记之 MVC 分层结构
视图层view:用于展示数据,与用户进行交互. 控制层controller:用于分发控制到来的请求,并将请求分发给相应的业务层.以及将数据返回给视图层展示. 业务层service:业务处理,调用数据访 ...
- bzoj1566: [NOI2009]管道取珠 DP
题目链接 https://www.lydsy.com/JudgeOnline/problem.php?id=1566 思路 n个球,第i个球颜色为ai,对于颜色j,对答案的贡献为颜色为j的球的个数的平 ...
- SpringBoot 整合使用dubbo
这里主要是按照teaey作者的spring-boot-starter-dubbo框架进行一些变化的使用 依赖包: <dependency> <groupId>com.aliba ...
- Android中EditText焦点问题
https://www.jianshu.com/p/3d31d681f4bc 问题:当EditText失去焦点时做内容校验 场景:用户编辑EditText将内容清空,当点击空白地方时关闭软键盘,同时校 ...
- Shiro学习笔记(一)
首先展示一下项目的结构目录 工程是用maven创建的 主要是方便管理Jar包 maven的 pom文件中所需要的jar包 <dependencies> <dependency ...
- Docker save & load
docker save Estimated reading time: 1 minute Description Save one or more images to a tar archive (s ...
- 2、iptables基本应用
iptables:规则管理工具 添加.修改.删除.显示等: 规则和链有计数器: pkts: 由规则或链所匹配到的报文的个数: bytes:由规则或链匹配到的所有报文大小之和: iptables命令: ...
- NOI1999 生日蛋糕
#include<iostream> #include<cstdio> #include<cmath> using namespace std; #define I ...
- 使用git上传项目到github的最基础命令
一.前言 把github作为自己项目托管的地方,实在是一个明智的选择.就算你不为自己项目考虑,你也要为你团队项目开发而学呀!可能有些初学者(比如我)会觉得git命令好多啊,又是各种术语,觉得好难上手. ...