
QEMU KVM libvirt 手册(1): 安装
安装
对虚拟化的支持通常在BIOS中是禁掉的,必须开启才可以。
对于Intel CPU,我们可以通过下面的命令查看是否支持虚拟化。
# grep "vmx" /proc/cpuinfo
flags : fpu vme de pse tsc msr pae mce cx8 apic sep mtrr pge mca cmov pat pse36 clflush dts acpi mmx fxsr sse sse2 ss ht tm pbe syscall nx pdpe1gb rdtscp lm constant_tsc arch_perfmon pebs bts rep_good nopl xtopology nonstop_tsc aperfmperf eagerfpu pni pclmulqdq dtes64 monitor ds_cpl vmx smx est tm2 ssse3 cx16 xtpr pdcm pcid dca sse4_1 sse4_2 x2apic popcnt tsc_deadline_timer aes xsave avx f16c rdrand lahf_lm ida arat epb xsaveopt pln pts dtherm tpr_shadow vnmi flexpriority ept vpid fsgsbase smep erms
对于AMD CPU,则执行下面的命令
grep "svm" /proc/cpuinfo
KSM: Kernel Same Page Merging
Kernel SamePage Merging (KSM) (also: Kernel Shared Memory, Memory Merging) lets the hypervisor system share identical memory pages amongst different processes or virtualized guests.
This is done by scanning through the memory finding duplicate pages. The duplicate pair is then merged into a single page, and mapped into both original locations. The page is also marked as "copy-on-write", so the kernel will automatically separate them again should one process modify its data.
KSM was originally intended to run more virtual machines on one host by sharing memory between processes as well as virtual machines.
查看是否支持
# cat /boot/config-3.13.0-27-generic | grep KSM
CONFIG_KSM=y
查看是否enable
# cat /sys/kernel/mm/ksm/run
0
这是disable,设为1则为enable
在ubuntu下面安装
apt-get install kvm qemu-kvm
KVM kernel modules
# lsmod | grep kvm
kvm_intel 143060 27
kvm 451511 1 kvm_intel
可以通过如下的命令加载内核模块
modprobe kvm
modprobe kvm_intel
dmesg命令用于打印Linux系统开机启动信息,kernel会将开机信息存储在ring buffer中。您若是开机时来不及查看信息,可利用dmesg来查看(print or control the kernel ring buffer)。开机信息亦保存在/var/log/dmesg的文件里。某些硬件设备(比如七号信令卡、语音卡之类)在安装的时候,通常会安装驱动程序(内核模块),会打印一些信息,就可以通过dmesg命令来查看。
查看启动的时候是否Load了kvm
dmesg | grep kvm
Quick Start
要创建一个虚拟机需要下面的过程:
- 创建一个virutal hard disk
- qemu或者kvm用这个disk启动,并指定安装iso
- 像安装一个普通操作系统一样安装
qemu-img create -f qcow2 /tmp/centos5.8.img 10G
virt-install --virt-type qemu --name centos-5.8 --ram 2048 --noreboot --disk path=/tmp/centos5.8.img,format=qcow2,bus=virtio,device=disk --cdrom=/tmp/CentOS-5.8-x86_64-bin-DVD-1of2.iso --network network=default --graphics vnc,listen=0.0.0.0 --noautoconsole
qemu-img convert -O qcow2 -c centos-5.8.img centos-5.8.1.qcow2
使用qemu
qemu-img create -f qcow2 ubuntutest.img 5G
# qemu-system-x86_64 -enable-kvm -m 2048 -hda ubuntutest.img -cdrom ubuntu-14.04-server-amd64.iso -boot d
Could not initialize SDL(No available video device) - exiting
SDL(Simple DirectMedia Layer)是一个用C语言编写的、跨平台的、免费和开源的多媒体程序库,它提供了一个简单的接口用于操作硬件平台的图形显示、声音、输入设备等。
在QEMU模拟器中的图形显示默认就是使用SDL的。
SDL的功能很好用,也比较强大,不过它也有一个局限性,就是在创建客户机并以SDL方式显示时,它会直接弹出一个窗口,所以SDL方式只能在图形界面中使用。如果在非图形界面中(如ssh连接到宿主机中),使用SDL时会出现如下的错误信息。
由于我们是在ssh模式下,所以要关闭SDL,使用vnc
# qemu-system-x86_64 -enable-kvm -name ubuntutest -m 2048 -hda ubuntutest.img -cdrom ubuntu-14.04-server-amd64.iso -boot d -vnc :19
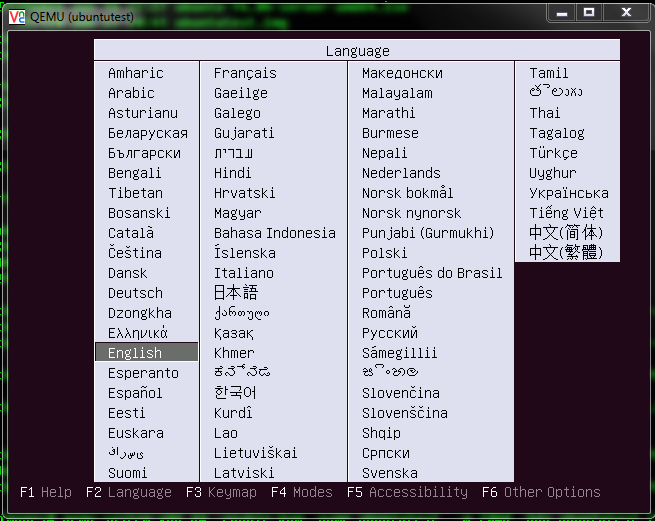
安装完了后,就可以从硬盘启动了
当然上面的启动是无法联网的。所以我们还需要配置网络。
qemu的网络配置有以下几种:
- none :Disables a network card emulation on VM Guest. Only the loopback lo network interface is available.
- bridge:Uses a specified network helper to configure the TAP interface and attach it to a specified bridge.
- nic:Creates a new Network Interface Card (NIC) and connects it to a specified Virtual Local Area Network (VLAN).
- user:Specifies a user-mode networking.
- tap:Specifies a bridged or routed networking.
我们通常可以通过下面的方法定义一张虚拟网卡
-net nic,vlan=1,macaddr=00:16:35:AF:94:4B,model=virtio,name=ncard1
vlan=1是虚拟网络的id,如果不指定则默认为0,这个虚拟网络和IEEE 802.1Q完全两回事。是指qemu自己定义的网络而已。
可以指定mac地址
model可以查看
# qemu-system-x86_64 -enable-kvm -net nic,model=?
qemu: Supported NIC models: ne2k_pci,i82551,i82557b,i82559er,rtl8139,e1000,pcnet,virtio
配置User Networking (SLIRP)
This is the default networking backend and generally is the easiest to use. It does not require root / Administrator privileges. It has the following limitations:
- there is a lot of overhead so the performance is poor
- ICMP traffic does not work (so you cannot use ping within a guest)
- the guest is not directly accessible from the host or the external network
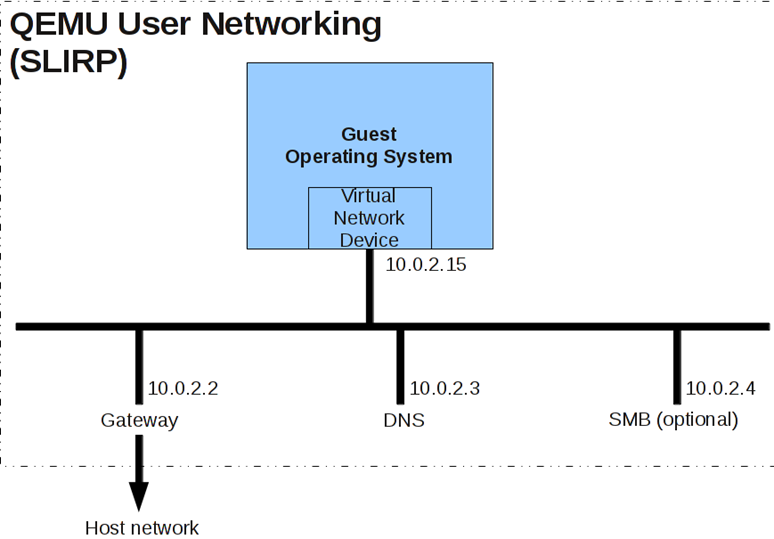
qemu-system-x86_64 -enable-kvm -name ubuntutest -m 2048 -hda ubuntu-14.04.img -boot c -vnc :19 -net user -net nic,model=virtio
The VM Guest allocates an IP address from a virtual DHCP server. VM Host Server (the DHCP server) is reachable at 10.0.2.2, while the IP address range for allocation starts from 10.0.2.15. You can use ssh to connect to VM Host Server at 10.0.2.2, and scp to copy files back and forth.
配置Bridge Networking
With the -net tap option, QEMU creates a network bridge by connecting the host TAP network device to a specified VLAN of VM Guest. Its network interface is then visible to the rest of the network.
bridge=br0
- Name of the bridge device.
tap=$(sudo tunctl -u $(whoami) -b)
- Prepare a new TAP device and assign it to the user who runs the script. TAP devices are virtual network devices often used for virtualization and emulation setups.
sudo ip link set $tap up
- Bring up the newly created TAP network interface.
sudo brctl addif $bridge $tap
- Add the new TAP device to the network bridge br0.
qemu-kvm -m 512 -hda /images/sles11sp1_base.raw
-net nic,vlan=0,model=virtio,macaddr=00:16:35:AF:94:4B
-net tap,vlan=0,ifname=$tap,script=no,downscript=no
- The ifname= suboption specifies the name of the TAP network interface used for bridging.
- Before qemu-kvm connects to a network bridge, it checks the script and downscript values. If it finds the specified scripts on the VM Host Server file system, it runs the script before it connects to the network bridge and downscript after it exits the network environment. You can use these scripts to first set up and bring up the bridged network devices, and then to deconfigure them. By default, /etc/qemu-ifup and /etc/qemu-ifdown are examined. If script=no and downscript=no are specified, the script execution is disabled and you have to take care manually.
sudo brctl delif $bridge $tap
- Deletes the TAP interface from a network bridge br0.
sudo ip link set $tap down
- Sets the state of the TAP device to 'down'.
sudo tunctl -d $tap
- Deconfigures the TAP device.
(1) 在Host机器上创建bridge br0
brctl addbr br0
(2) 将br0设为up
ip link set br0 up
(3) 创建tap device
# tunctl -b
tap0
(4) 将tap0设为up
ip link set tap0 up
(5) 将tap0加入到br0上
brctl addif br0 tap0
(6) 启动虚拟机
qemu-system-x86_64 -enable-kvm -name ubuntutest -m 2048 -hda ubuntu-14.04.img -boot c -vnc :19 -net nic,model=virtio -net tap,ifname=tap0,script=no,downscript=no
虚拟机连接tap0,tap0连接br0
(7) 虚拟机启动后,网卡没有配置,所以无法连接外网,先给br0设置一个ip
ifconfig br0 192.168.57.1/24
(8) 在虚拟机里面,给网卡设置地址
ifconfig eth0 192.168.57.2/24
这个时候在虚拟机里面可以ping的通192.168.57.1了,但是还是无法访问外网
(9) 在Host上设置NAT,并且enable ip forwarding
# sysctl -p
net.ipv4.ip_forward = 1
sudo iptables -t nat -A POSTROUTING -o eth0 -j MASQUERADE
(10) 在虚拟机里面设置默认网关
route add –net default gw 192.168.57.1
这个时候,可以ping的通外网网关了
ping 16.158.164.1
(11) 然后在虚拟机里面设置dns,则可以进行apt-get
# cat /etc/resolv.conf
# Dynamic resolv.conf(5) file for glibc resolver(3) generated by resolvconf(8)
# DO NOT EDIT THIS FILE BY HAND -- YOUR CHANGES WILL BE OVERWRITTEN
nameserver 16.110.135.52
nameserver 16.110.135.51
QEMU KVM libvirt 手册(1): 安装的更多相关文章
- QEMU KVM Libvirt手册(10):Managing Virtual Machines with libvirt
libvirt is a library that provides a common API for managing popular virtualization solutions, among ...
- QEMU KVM Libvirt手册(11): Managing Storage
When managing a VM Guest on the VM Host Server itself, it is possible to access the complete file sy ...
- QEMU KVM Libvirt手册(7): 硬件虚拟化
在openstack中,如果我们启动一个虚拟机,我们会看到非常复杂的参数 qemu-system-x86_64 -enable-kvm -name instance-00000024 -S -mach ...
- QEMU KVM libvirt手册(4) – images
RAW raw是默认的格式,格式简单,容易转换为其他的格式.需要文件系统的支持才能支持sparse file 创建image # qemu-img create -f raw flat.img 10G ...
- QEMU KVM libvirt 手册(3) - Storage Media
访问Hard Drive 使用-hda –hdb qemu-system-x86_64 -enable-kvm -name ubuntutest -m 2048 -hda ubuntutest.im ...
- QEMU KVM Libvirt手册(10): KVM的各种限制
Overcommits KVM allows for both memory and disk space overcommit. However, hard errors resulting fro ...
- QEMU KVM Libvirt手册(8): 半虚拟化设备virtio
KVM本身并不提供半虚拟化功能,是通过virtio来实现的 The benefits of virtio drivers are of lower overhead and higher perfor ...
- QEMU KVM Libvirt手册(5) – snapshots
前面讲了QEMU的qcow2格式的internal snapshot和external snapshot,这都是虚拟机文件格式的功能. 这是文件级别的. 还可以是文件系统级别的,比如很多文件系统支持s ...
- QEMU KVM libvirt手册(2): monitor
Administrating Virtual Machines with QEMU Monitor When QEMU is running, a monitor console is provide ...
随机推荐
- Python基础-python流程控制之循环结构(五)
循环结构 循环结构可以减少源程序重复书写的代码量,用来描述重复执行某段算法的问题. Python中循环结构分为两类,分别是 while 和 for .. in. 一.while循环 格式1: whil ...
- Unity正交模式摄像机与屏幕适配的方法
public class CameraAuto : MonoBehaviour { float fDefaultRatio = 720.0f / 1280.0f;//预先设定屏幕大小1280*720 ...
- 如何通过SSH工具(SecureCRT、XShell)连接Vmware虚拟机中的Linux(CentOS7)
本文主要解决的问题:如何通过SSH工具连接到VMWare中改的Linux系统(CentOS7) 核心内容:Linux中需要安装openssh-server,并且启动了openssh-server服务. ...
- 2018年 js 简易控制滚动条滚动的简单方法
首先是es2015 的新api Element.scrollIntoView() // 滚动到最上方 等同于 dom.scrollIntoView(true) Element.scrollIntoVi ...
- devexpress总结 accordionControl 加载panelcontrol 的快捷方式
先说保存: UserControl control; private void barButtonItem1_ItemClick(object sender, DevExpress.XtraBars. ...
- Unity3D-RayMarch-几何图元-3添加阴影
效果图: 在RayMarch渲染算法中计算阴影非常简单,当射线碰撞到物体,从碰撞点逆着光源方向再次执行射线步进算法,如果这一过程中碰撞到了其他物体,则碰撞点被其他物体遮挡,该处具有阴影. shader ...
- 颜色16进制转为RGB格式
<script> 2 function getRGB(str){ var arr = str.split(""); var myred = arr[1]+arr[2]; ...
- linux学习第十九天 (Linux就该这么学) 结课了
今天最后一天课程了,结课了,还有点舍不得那,在些也祝 李老师 事业蒸蒸日上,超来超好, 今天内容是部署了 LNMP 部署动态网站环境(linux +nginx+mysql+php) 安装文件挺别多, ...
- easyui-combobox的option选项为true与false时的问题
如题,我们使用easyui-combobox,当我们的选择项为true与false时,即选择是否,后台返回一个boolean类型的变量,那么这时候,通过form表单进行反显会出现这样的问题:表单里ea ...
- 【linux】工作时使用的命令
几个基本操作: 1.查看当前文件夹下的内容: list 2.查看当前所在的文件夹:pwd 3.切换当前工作文件夹:cd 4.文件不存在时,新建文件:touch 5.创建目录:mkdir 6.删除指定的 ...