C#编写Windows服务程序图文教程(转载)
Windows Service这一块并不复杂,但是注意事项太多了,网上资料也很凌乱,偶尔自己写也会丢三落四的。所以本文也就产生了,本文不会写复杂的东西,完全以基础应用的需求来写,所以不会对Windows Service写很深入。
本文介绍了如何用C#创建、安装、启动、监控、卸载简单的Windows Service 的内容步骤和注意事项。
一、创建一个Windows Service
1)创建Windows Service项目
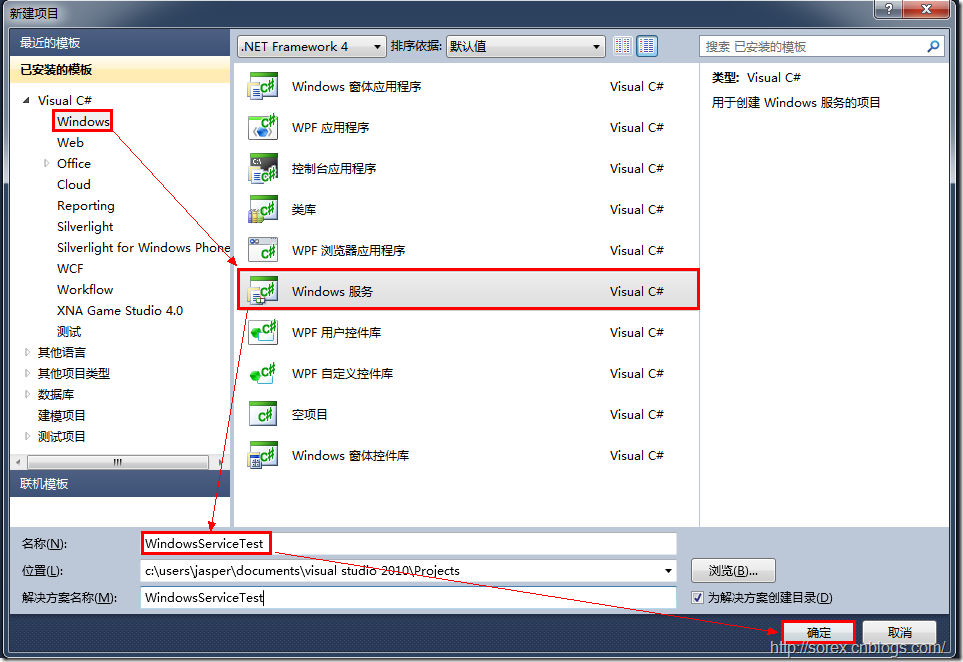
2)对Service重命名
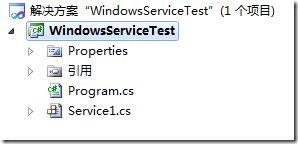
将Service1重命名为你服务名称,这里我们命名为ServiceTest。
二、创建服务安装程序
1)添加安装程序
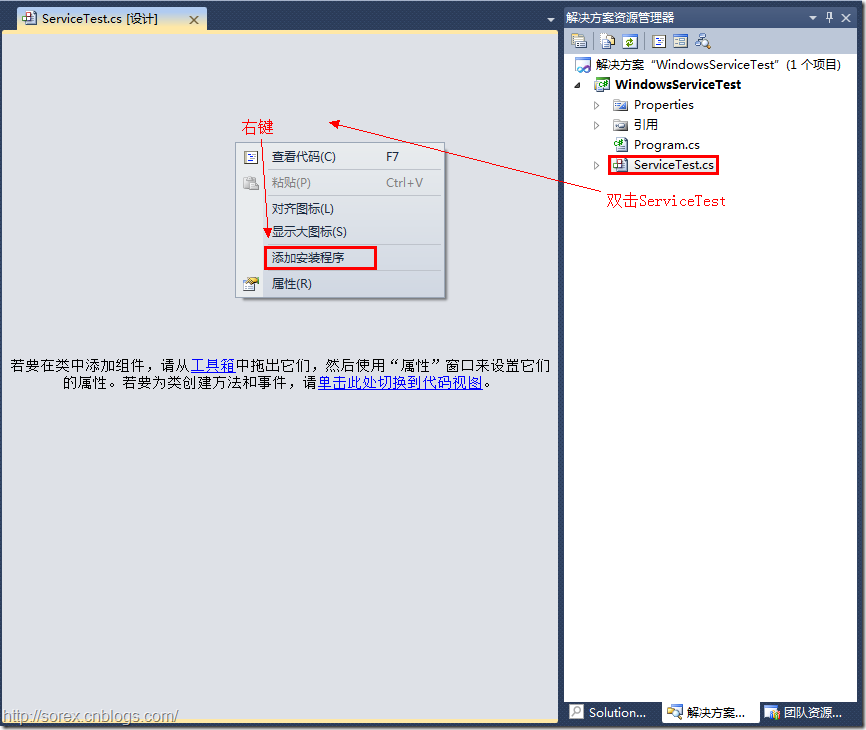
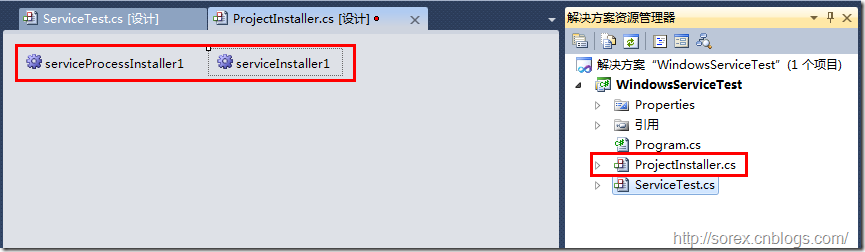
之后我们可以看到上图,自动为我们创建了ProjectInstaller.cs以及2个安装的组件。
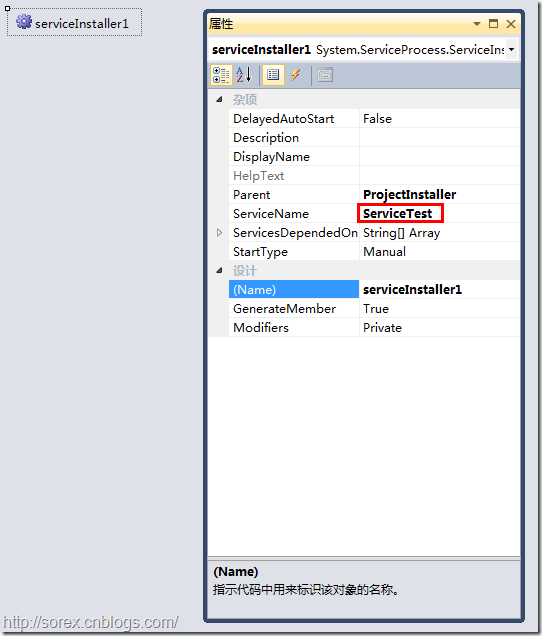
2)修改安装服务名
右键serviceInsraller1,选择属性,将ServiceName的值改为ServiceTest。
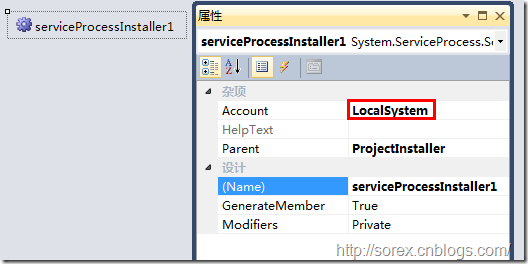
3)修改安装权限
右键serviceProcessInsraller1,选择属性,将Account的值改为LocalSystem。
三、写入服务代码
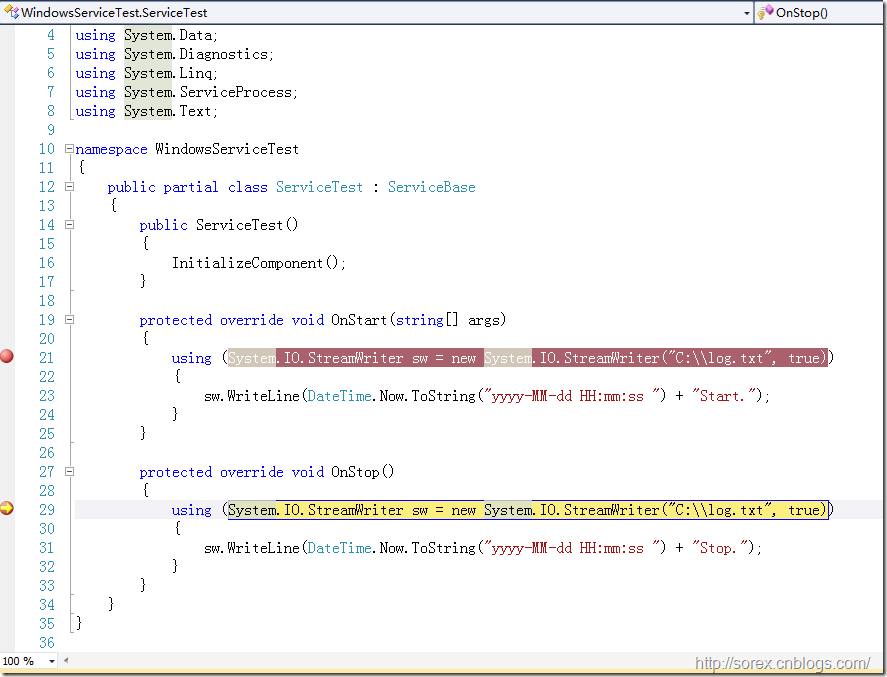
1)打开ServiceTest代码
右键ServiceTest,选择查看代码。
2)写入Service逻辑
添加如下代码:
using System;

using System.Collections.Generic;

using System.ComponentModel;

using System.Data;

using System.Diagnostics;

using System.Linq;

using System.ServiceProcess;

using System.Text;

namespace WindowsServiceTest

{

    public partial class ServiceTest : ServiceBase

    {

        public ServiceTest()

        {

            InitializeComponent();

        }

        protected override void OnStart(string[] args)

        {

            using (System.IO.StreamWriter sw = new System.IO.StreamWriter("C:\\log.txt", true))

            {

                sw.WriteLine(DateTime.Now.ToString("yyyy-MM-dd HH:mm:ss ") + "Start.");

            }

        }

        protected override void OnStop()

        {

            using (System.IO.StreamWriter sw = new System.IO.StreamWriter("C:\\log.txt", true))

            {

                sw.WriteLine(DateTime.Now.ToString("yyyy-MM-dd HH:mm:ss ") + "Stop.");

            }

        }

    }

}
这里我们的逻辑很简单,启动服务的时候写个日志,关闭的时候再写个日志。
四、创建安装脚本
在项目中添加2个文件如下(必须是ANSI或者UTF-8无BOM格式):
1)安装脚本Install.bat
%SystemRoot%\Microsoft.NET\Framework\v4.0.30319\installutil.exe WindowsServiceTest.exe

Net Start ServiceTest

sc config ServiceTest start= auto
2)卸载脚本Uninstall.bat
%SystemRoot%\Microsoft.NET\Framework\v4.0.30319\installutil.exe /u WindowsServiceTest.exe
3)安装脚本说明
第二行为启动服务。
第三行为设置服务为自动运行。
这2行视服务形式自行选择。
4)脚本调试
如果需要查看脚本运行状况,在脚本最后一行加入pause
五、在C#中对服务进行控制
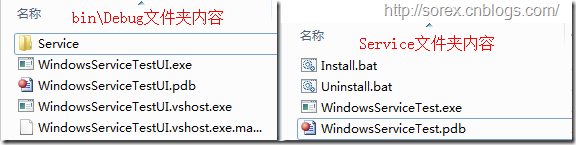
0)配置目录结构
简历一个新WPF项目,叫WindowsServiceTestUI,添加对System.ServiceProcess的引用。
在WindowsServiceTestUI的bin\Debug目录下建立Service目录。
将WindowsServiceTest的生成目录设置为上面创建的Service目录。
生成后目录结构如下图
1)安装
安装时会产生目录问题,所以安装代码如下:
string CurrentDirectory = System.Environment.CurrentDirectory;

System.Environment.CurrentDirectory = CurrentDirectory + "\\Service";

Process process = new Process();

process.StartInfo.UseShellExecute = false;

process.StartInfo.FileName = "Install.bat";

process.StartInfo.CreateNoWindow = true;

process.Start();

System.Environment.CurrentDirectory = CurrentDirectory;
2)卸载
卸载时也会产生目录问题,所以卸载代码如下:
string CurrentDirectory = System.Environment.CurrentDirectory;

System.Environment.CurrentDirectory = CurrentDirectory + "\\Service";

Process process = new Process();

process.StartInfo.UseShellExecute = false;

process.StartInfo.FileName = "Uninstall.bat";

process.StartInfo.CreateNoWindow = true;

process.Start();

System.Environment.CurrentDirectory = CurrentDirectory;
3)启动
代码如下:
using System.ServiceProcess;

ServiceController serviceController = new ServiceController("ServiceTest");

serviceController.Start();
4)停止
ServiceController serviceController = new ServiceController("ServiceTest");

if (serviceController.CanStop)

    serviceController.Stop();
5)暂停/继续
ServiceController serviceController = new ServiceController("ServiceTest");

if (serviceController.CanPauseAndContinue)

{

    if (serviceController.Status == ServiceControllerStatus.Running)

        serviceController.Pause();

    else if (serviceController.Status == ServiceControllerStatus.Paused)

        serviceController.Continue();

}
6)检查状态
ServiceController serviceController = new ServiceController("ServiceTest");

string Status = serviceController.Status.ToString();
六、调试Windows Service
1)安装并运行服务
2)附加进程
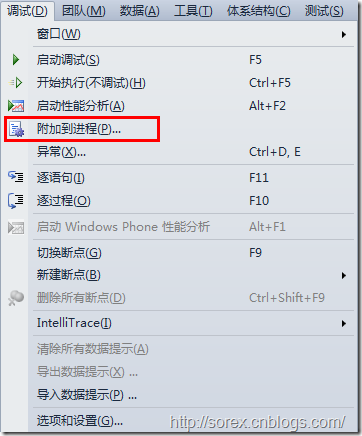
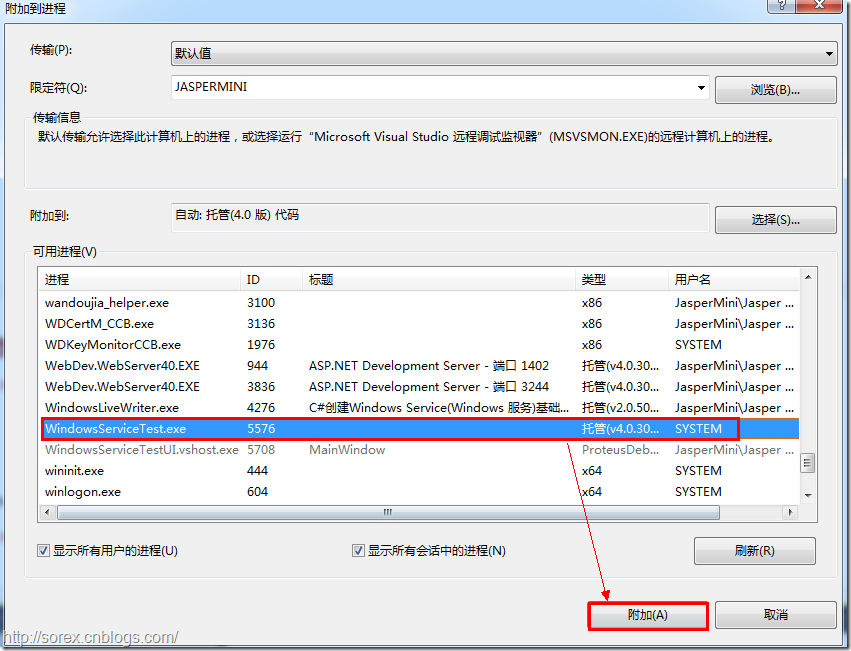
3)在代码中加入断点进行调试
七、总结
本文对Windows service的上述配置都未做详细解释,但是按上述步骤就可以制作可运行的Windows Service,从而达到了工作的需求。
C#编写Windows服务程序图文教程(转载)的更多相关文章
- C#编写Windows服务程序图文教程
安装服务程序C:\WINDOWS\Microsoft.NET\Framework\v4.0.30319\InstallUtil.exe 要安装的服务程序路径(如F:\***.exe)卸载服务程序C: ...
- C语言编写Windows服务程序
原文:C语言编写Windows服务程序 #include <Windows.h> #include <stdio.h> #define SLEEP_TIME 5000 // 间 ...
- Github for Windows使用图文教程_西西软件资讯
body{ font-family: "Microsoft YaHei UI","Microsoft YaHei",SimSun,"Segoe UI& ...
- 编写windows服务程序
2012-11-02 08:54 (分类:计算机程序) windows服务是一个运行在后台并实现勿需用户交互的任务的控制台程序,对于隐藏程序有很大帮助. 用了几天时间概括了编写windows服务程序的 ...
- C# 编写Windows Service(windows服务程序)【转载】
[转]http://www.cnblogs.com/bluestorm/p/3510398.html Windows Service简介: 一个Windows服务程序是在Windows操作系统下能完成 ...
- 用 C 语言编写 Windows 服务程序的五个步骤
Windows 服务被设计用于需要在后台运行的应用程序以及实现没有用户交互的任务.为了学习这种控制台应用程序的基础知识,C(不是C++)是最佳选择.本文将建立并实现一个简单的服务程序,其功能是查询系统 ...
- 用C语言编写Windows服务程序的五个步骤
Windows 服务被设计用于需要在后台运行的应用程序以及实现没有用户交互的任务.为了学习这种控制台应用程序的基础知识,C(不是C++)是最佳选择.本文将建立并实现一个简单的服务程序,其功能是查询系统 ...
- Python3编写Windows服务程序
最近做了公司签到的小工具,有同事要求做成Windows服务,开机自启.先说下怎么用Python写Windows服务程序. #encoding=utf-8 import win32serviceutil ...
- Windows+Git+TortoiseGit+COPSSH安装图文教程 转载
准备工作: 1. Git-1.8.1.2-preview20130201.exe 下载地址: https://code.google.com/p/msysgit/downloads/list 2. C ...
随机推荐
- Objective-C Delegate
ios设计模式中的委托 Delegate 官方文档解释如下: Delegation is a simple and powerful pattern in which one object in a ...
- js带箭头左右翻动控制
<!DOCTYPE html PUBLIC "-//W3C//DTD XHTML 1.0 Transitional//EN" "http://www.w3.org/ ...
- 【转】C++中的位拷贝与值拷贝
[转]http://blog.csdn.net/liam1122/article/details/1966617 为了便于说明我们以String类为例: 首先定义String类,而并不实现其成员函数. ...
- 【干货】国外程序员整理的 C++ 资源大全【转】
来自 https://github.com/fffaraz/awesome-cpp A curated list of awesome C/C++ frameworks, libraries, res ...
- tomcat 显示目录文件列表
conf/web.xml中,listings改为true,重启 http://liusu.iteye.com/blog/794613 <servlet> <servlet-name& ...
- Linux下的管道命令有这些:
Linux下的管道命令有这些: 选取命令:cat grep 排序命令:sort wc uniq 双向重定向:tee 字符转换命令: tr, col, join, paste, expand 切割命令: ...
- ulimit -t 引起的kill血案
http://my.oschina.net/leejun2005/blog/80975 http://www.cnblogs.com/hazir/p/systemtap_introduction.ht ...
- Qt编译慢吗?
1. “用Qt写的程序编译比MFC慢”的说法是错误的绝对错误,单位代码行数编译Qt远比MFC快得多,因为Qt库的头文件设计非常好,尽量都使用了前置声明,避免了头文件嵌套,几乎所有类都使用了公有类和私有 ...
- pyglet: a cross-platform windowing and multimedia
pyglet pyglet: a cross-platform windowing and multimedia library for Python.
- poj 3186 Treats for the Cows(区间dp)
Description FJ has purchased N (1 <= N <= 2000) yummy treats for the cows who get money for gi ...