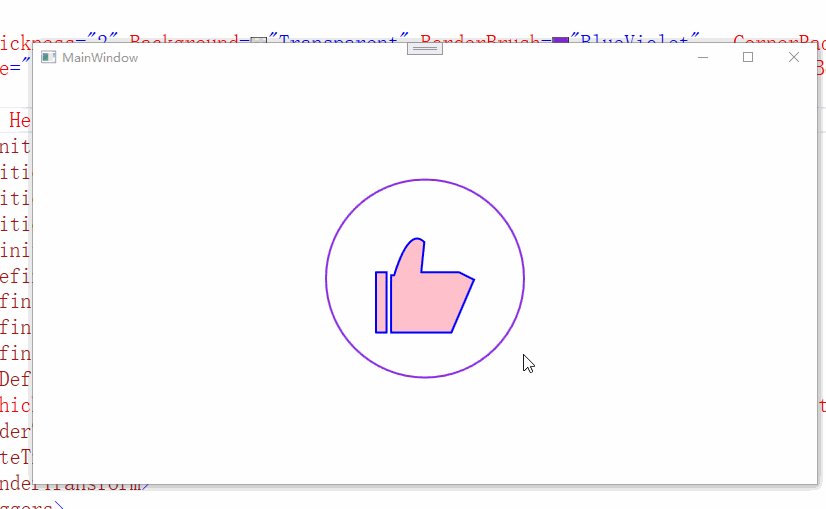
WPF 使用动画绘制一个点赞大拇指
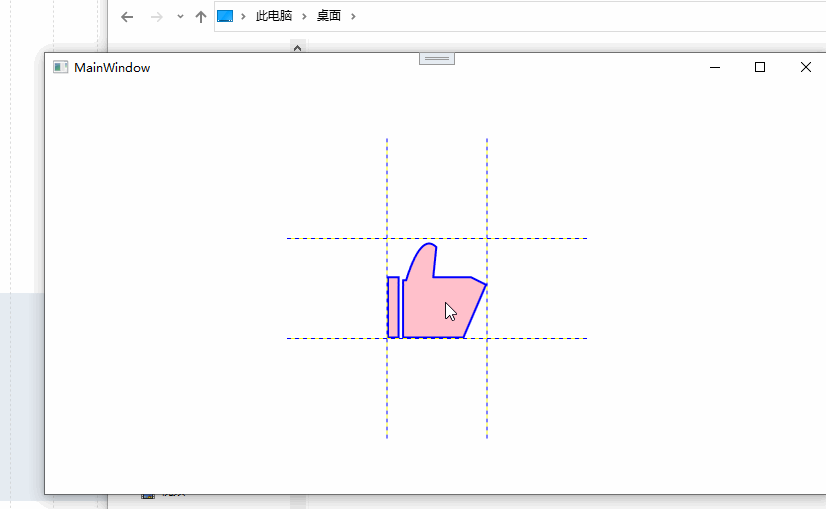
效果图
好久没有写wpf了。
最近看到飞书的点赞动画非常有意思,决定试试,虽然不及飞书那样的绚丽,但是练手还是可以的,希望自己的手艺还在!
那么如何写一个这样的动画呢?
首先需要刨析这个动画的构成:
外圈圆
大拇指-1竖着
大拇指-2握着
颤动动画
中心旋转动画
展开中心旋转动画
当我们分析这些东西剩下的就好办了。
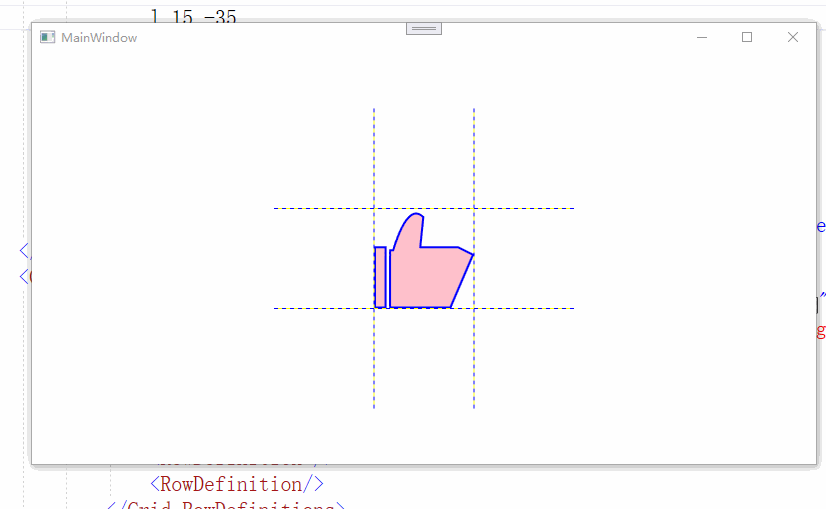
首先我们先办了这个最难的东西大拇指。

这个东西的构成,我们使用Path 直接去写。显然我们就会得到这样的代码
  <Geometry  x:Key="t1">

            M 20 40

                v 0 40

                h 0 7

                v 0 -40

                z

                M 30 42

                v 0  38

                h 40 0

                l 15 -35

                l -10 -5

                h -25 0

                l 2 -20

            <!--小褶皱-->

            q -10 -10, -20 22

               z

  </Geometry>
当我们在path 100*100的大小的时候使用脑补进行绘制就就可以了。
至于这个小褶皱我曾经不想要,但是看到了自己的猪爪...还是决定加上了。
这代码的原理非常简单,基本都是基本的直线绘制,最难的就是用了个贝塞尔来制造大拇指背部的弧度.
不管咋样还是弄出来个简单的赞。
剩下就是握着的状态了
那么我们只需要修改部分代码就可以达到了~
也就是
 <Geometry  x:Key="t2">

            M 20 40

                v 0 40

                h 0 7

                v 0 -40

                z

                M 30 42

                v 0  38

                h 40 0

                l 15 -35

                l -10 -5

                h -25 0

                l 2  0

            <!--小褶皱-->

            q -10 -10, -20 0

                z

        </Geometry>
我们修改了最后两行代码的 l 的y参数和q最后的end point参数的y的值都是降到0了 这样会形成一个简单的弧度

哈 这样子 我们就是得到了两个手掌的不同状态了。
剩下的事情就是来组装吧~~~~
首先是大拇指张开和大拇指握住的状态转换。
做到这事情最简单的动画就是使用eventtigger来做,我们使用简单的鼠标按下事件作为启动,当然了 想要丰富过程也是可以使用鼠标浮动事件作为启动事件之一。
          <Path.Triggers>

                    <EventTrigger  RoutedEvent="MouseLeftButtonDown">

                        <BeginStoryboard x:Name="Bs1">

                            <Storyboard>

                                <ObjectAnimationUsingKeyFrames BeginTime="0:0:0" Storyboard.TargetProperty="Data">

                                    <DiscreteObjectKeyFrame KeyTime="0:0:0.01">

                                        <DiscreteObjectKeyFrame.Value>

                                            <StaticResource ResourceKey="t2"/>

                                        </DiscreteObjectKeyFrame.Value>

                                    </DiscreteObjectKeyFrame>

                                </ObjectAnimationUsingKeyFrames>

                 </Storyboard>

                        </BeginStoryboard>

             </EventTrigger>

                </Path.Triggers>
为了做件事 ,我们把geometry作为window的资源 所以子啊写动画的时候 用离弦值就非常方便了。
观察代码,我们仅仅只是在点下的时候让path转换为握住的data,因为我们需要在松开左键的时候才让拇指竖起来。
所以还需要补上一个MouseLeftButtonUp的动画
这最终的代码就是
 <Path.Triggers>

                    <EventTrigger  RoutedEvent="MouseLeftButtonDown">

                        <BeginStoryboard x:Name="Bs1">

                            <Storyboard>

                                <ObjectAnimationUsingKeyFrames BeginTime="0:0:0" Storyboard.TargetProperty="Data">

                                    <DiscreteObjectKeyFrame KeyTime="0:0:0.01">

                                        <DiscreteObjectKeyFrame.Value>

                                            <StaticResource ResourceKey="t2"/>

                                        </DiscreteObjectKeyFrame.Value>

                                    </DiscreteObjectKeyFrame>

                                </ObjectAnimationUsingKeyFrames>

                 </Storyboard>

                        </BeginStoryboard>

             </EventTrigger>

             <EventTrigger RoutedEvent="MouseLeftButtonUp">

                        <RemoveStoryboard BeginStoryboardName="Bs1"/>

                    </EventTrigger>

                </Path.Triggers>
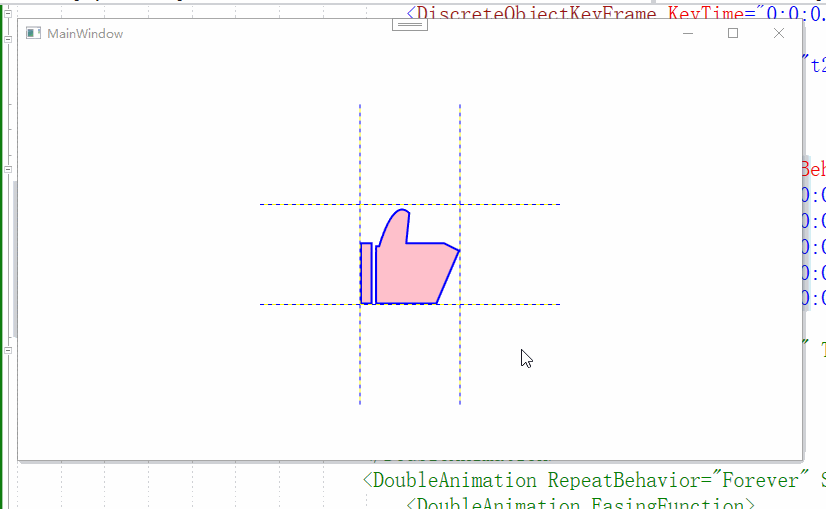
效果图
莫名的搞笑....
基础的东西我们构建好了,剩下就是补全了。
不全颤抖啊,补全中心旋转动画,也就是手指握住后有一个向下的动画。
首先这个颤动 我们可以简单的理解为位移,一个快速的上下左右的位移
正好WPF有这种动画 所以我们就可以得到如下的代码
                  <ThicknessAnimationUsingKeyFrames RepeatBehavior="Forever" Duration="0:0:0.4"  Storyboard.TargetProperty="Margin" >

                                    <SplineThicknessKeyFrame KeyTime="0:0:0.0" Value="4,3,0,0"/>

                                    <SplineThicknessKeyFrame KeyTime="0:0:0.2" Value="3,4,0,0"/>

                                    <SplineThicknessKeyFrame KeyTime="0:0:0.3" Value="0,0,4,0"/>

                                    <SplineThicknessKeyFrame KeyTime="0:0:0.35" Value="0,0,4,3"/>

                                    <SplineThicknessKeyFrame KeyTime="0:0:0.4" Value="4,3,0,0"/>

                                </ThicknessAnimationUsingKeyFrames>
我们可以直代码放到path的eventtriger中
看得出来 离散动画的值就是简单的marigin的位移,代码非常简单。
就是在这里颤抖...
虽然看上去不是很好看,但是我们结合下一个动画,也就是手掌向下就会好很多了
这个动画很明显是一个旋转动画,所以我们需要提前准备一个roteate的transofrom
代码如下
 <Path.RenderTransform>

                    <RotateTransform x:Name="rote" Angle="0"/>

  </Path.RenderTransform>
动画代码如下
   <DoubleAnimation   Duration="0:0:0.1" To="30" Storyboard.TargetName="rote" Storyboard.TargetProperty="Angle">

                                    <DoubleAnimation.EasingFunction>

                                        <CubicEase/>

                                    </DoubleAnimation.EasingFunction>

       </DoubleAnimation>
我们简单的使用了一个函数,提升一下效果的动感...
但是感觉没啥用
效果图就是这样的了
虽然看上去已经非常不错了,但是还有些不做,想想 我们的手都朝下了 松开之后为啥没有一个向上的弹簧动作呢?
也就是
我们需要在抬起时加上一个角度的旋转。
也就是
 <EventTrigger RoutedEvent="MouseLeftButtonUp">

                        <BeginStoryboard x:Name="Bs2">

                            <Storyboard>

                                <DoubleAnimation  FillBehavior="Stop"  Duration="0:0:0.5" To="-30" Storyboard.TargetName="rote" Storyboard.TargetProperty="Angle">

                                    <DoubleAnimation.EasingFunction>

                                        <CubicEase EasingMode="EaseOut"/>

                                    </DoubleAnimation.EasingFunction>

                                </DoubleAnimation>

                            </Storyboard>

                        </BeginStoryboard>

                        <RemoveStoryboard BeginStoryboardName="Bs1"/>

                    </EventTrigger>
代码可以说手掌向下的反向操作。
顺便播放完把bs1动画解除掉。
剩下的就是圈的构造和动画。
圆圈呢,我们可以是直接的圆圈,也可以是broder,看个人喜欢了。
我就不罗嗦直接上代码
  <Border  BorderThickness="2" Background="Transparent" BorderBrush="Transparent"   CornerRadius="100" Width="200" Height="{Binding  RelativeSource={RelativeSource Mode=Self}, Path=Width}" Grid.Column="1" Grid.Row="1">

            <Border x:Name="sor" Visibility="Hidden" BorderThickness="2" Background="Transparent" BorderBrush="Transparent"   CornerRadius="100" Width="200" Height="{Binding  RelativeSource={RelativeSource Mode=Self}, Path=Width}" Grid.Column="1" Grid.Row="1"/>

        </Border>
构造了两个嵌套的borderr,宽度其实可以随意,只是演示的时候放大的大小而已。
动画则是放到了path的启动动画之中
也就是
      <DoubleAnimation RepeatBehavior="Forever" SpeedRatio="1.2" Duration="0:0:1.5" To="0" Storyboard.TargetName="sor" Storyboard.TargetProperty="Width">

                                    <DoubleAnimation.EasingFunction>

                                        <CubicEase/>

                                    </DoubleAnimation.EasingFunction>

                                </DoubleAnimation>

                                <ObjectAnimationUsingKeyFrames BeginTime="0:0:0" Storyboard.TargetName="sor" Storyboard.TargetProperty="Visibility">

                                    <DiscreteObjectKeyFrame KeyTime="0:0:0.1">

                                        <DiscreteObjectKeyFrame.Value>

                                            <Visibility>

                                                Visible

                                            </Visibility>

                                        </DiscreteObjectKeyFrame.Value>

                                    </DiscreteObjectKeyFrame>

                                </ObjectAnimationUsingKeyFrames>
代码非常简单,控制下内圈的大小,还有是否隐藏而已。
这样子我们就最终得到了头图的效果了
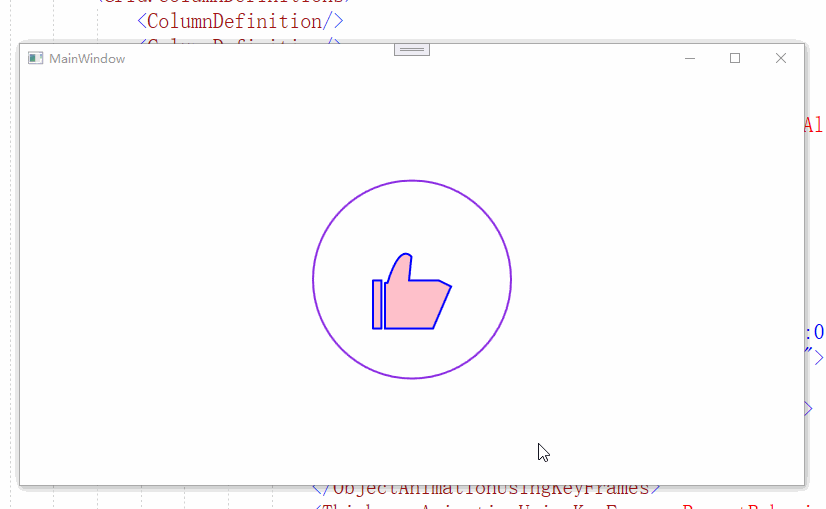
总的过程还是比较简单的。
下面是全部的代码
 <Window.Resources>

        <Geometry  x:Key="t1">

            M 20 40

                v 0 40

                h 0 7

                v 0 -40

                z

                M 30 42

                v 0  38

                h 40 0

                l 15 -35

                l -10 -5

                h -25 0

                l 2 -20

            <!--小褶皱-->

            q -10 -10, -20 22

                z

        </Geometry>

        <Geometry  x:Key="t2">

            M 20 40

                v 0 40

                h 0 7

                v 0 -40

                z

                M 30 42

                v 0  38

                h 40 0

                l 15 -35

                l -10 -5

                h -25 0

                l 2  0

            <!--小褶皱-->

            q -10 -10, -20 0

                z

        </Geometry>

        <PathGeometry  Figures="   M 20 40 l 2 -5 v 0 5 h -2 0  z" x:Key="roue"/>

    </Window.Resources>

    <Grid>

        <Border  BorderThickness="2" Background="Transparent" BorderBrush="BlueViolet"   CornerRadius="100" Width="200" Height="{Binding  RelativeSource={RelativeSource Mode=Self}, Path=Width}" Grid.Column="1" Grid.Row="1">

            <Border x:Name="sor" Visibility="Hidden" BorderThickness="2" Background="Transparent" BorderBrush="Salmon"   CornerRadius="100" Width="200" Height="{Binding  RelativeSource={RelativeSource Mode=Self}, Path=Width}" Grid.Column="1" Grid.Row="1"/>

        </Border>

        <Grid Width="300" Height="300"   ShowGridLines="False">

            <Grid.RowDefinitions>

                <RowDefinition/>

                <RowDefinition />

                <RowDefinition/>

            </Grid.RowDefinitions>

            <Grid.ColumnDefinitions>

                <ColumnDefinition/>

                <ColumnDefinition/>

                <ColumnDefinition/>

            </Grid.ColumnDefinitions>

            <Path StrokeThickness="2"   Grid.Column="1" Grid.Row="1" VerticalAlignment="Bottom" Stretch="Uniform" Fill="Pink" Width="80" Height="80" Stroke="Blue" Data="{StaticResource t1}" RenderTransformOrigin="0.5,0.5">

                <Path.RenderTransform>

                    <RotateTransform x:Name="rote" Angle="0"/>

                </Path.RenderTransform>

                <Path.Triggers>

                    <EventTrigger  RoutedEvent="MouseLeftButtonDown">

                        <BeginStoryboard x:Name="Bs1">

                            <Storyboard>

                                <ObjectAnimationUsingKeyFrames BeginTime="0:0:0" Storyboard.TargetProperty="Data">

                                    <DiscreteObjectKeyFrame KeyTime="0:0:0.01">

                                        <DiscreteObjectKeyFrame.Value>

                                            <StaticResource ResourceKey="t2"/>

                                        </DiscreteObjectKeyFrame.Value>

                                    </DiscreteObjectKeyFrame>

                                </ObjectAnimationUsingKeyFrames>

                                <ThicknessAnimationUsingKeyFrames RepeatBehavior="Forever" Duration="0:0:0.4"  Storyboard.TargetProperty="Margin" >

                                    <SplineThicknessKeyFrame KeyTime="0:0:0.0" Value="4,3,0,0"/>

                                    <SplineThicknessKeyFrame KeyTime="0:0:0.2" Value="3,4,0,0"/>

                                    <SplineThicknessKeyFrame KeyTime="0:0:0.3" Value="0,0,4,0"/>

                                    <SplineThicknessKeyFrame KeyTime="0:0:0.35" Value="0,0,4,3"/>

                                    <SplineThicknessKeyFrame KeyTime="0:0:0.4" Value="4,3,0,0"/>

                                </ThicknessAnimationUsingKeyFrames>

                                <DoubleAnimation   Duration="0:0:0.1" To="30" Storyboard.TargetName="rote" Storyboard.TargetProperty="Angle">

                                    <DoubleAnimation.EasingFunction>

                                        <CubicEase/>

                                    </DoubleAnimation.EasingFunction>

                                </DoubleAnimation>

                                <DoubleAnimation RepeatBehavior="Forever" SpeedRatio="1.2" Duration="0:0:1.5" To="0" Storyboard.TargetName="sor" Storyboard.TargetProperty="Width">

                                    <DoubleAnimation.EasingFunction>

                                        <CubicEase/>

                                    </DoubleAnimation.EasingFunction>

                                </DoubleAnimation>

                                <ObjectAnimationUsingKeyFrames BeginTime="0:0:0" Storyboard.TargetName="sor" Storyboard.TargetProperty="Visibility">

                                    <DiscreteObjectKeyFrame KeyTime="0:0:0.1">

                                        <DiscreteObjectKeyFrame.Value>

                                            <Visibility>

                                                Visible

                                            </Visibility>

                                        </DiscreteObjectKeyFrame.Value>

                                    </DiscreteObjectKeyFrame>

                                </ObjectAnimationUsingKeyFrames>

                            </Storyboard>

                        </BeginStoryboard>

                    </EventTrigger>

                    <EventTrigger RoutedEvent="MouseLeftButtonUp">

                        <BeginStoryboard x:Name="Bs2">

                            <Storyboard>

                                <DoubleAnimation  FillBehavior="Stop"  Duration="0:0:0.5" To="-30" Storyboard.TargetName="rote" Storyboard.TargetProperty="Angle">

                                    <DoubleAnimation.EasingFunction>

                                        <CubicEase EasingMode="EaseOut"/>

                                    </DoubleAnimation.EasingFunction>

                                </DoubleAnimation>

                            </Storyboard>

                        </BeginStoryboard>

                        <RemoveStoryboard BeginStoryboardName="Bs1"/>

                    </EventTrigger>

                </Path.Triggers>

            </Path>

        </Grid>
WPF 使用动画绘制一个点赞大拇指的更多相关文章
- Android 利用属ObjectAnimator,AnimatorSet性动画绘制一个弹球,加速下落,到底部时挤压,然后减速上弹
属性动画主要的几个类介绍: 1.ValueAnimator:这个类提供了一个简单的计时引擎运行动画动画计算值和设置目标对象.注意:使用该类时一般都是用:ObjectAnimator,而基于Object ...
- WPF 3D:简单的Point3D和Vector3D动画创造一个旋转的正方体
原文:WPF 3D:简单的Point3D和Vector3D动画创造一个旋转的正方体 运行结果: 事实上很简单,定义好一个正方体,处理好纹理.关于MeshGeometry3D的正确定义和纹理这里就不多讲 ...
- iOS 动画绘制线条颜色渐变的折线图
效果图 .................... 概述 现状 折线图的应用比较广泛,为了增强用户体验,很多应用中都嵌入了折线图.折线图可以更加直观的表示数据的变化.网络上有很多绘制折线图的demo,有 ...
- WPF利用动画实现圆形进度条
原文:WPF利用动画实现圆形进度条 这是我的第一篇随笔,最近因为工作需要,开始学习WPF相关技术,自己想实现以下圆形进度条的效果,逛了园子发现基本都是很久以前的文章,实现方式一般都是GDI实现的,想到 ...
- WPF弹性模拟动画
原文:WPF弹性模拟动画 我们此次将要制作模拟物理中的弹性现象的交互动画,我们让一个小球向鼠标点击位置移动,这个移动的轨迹不是简单的位移,而是根据胡克定律计算得出的. 胡克定律:F=-kd F代表弹性 ...
- WPF中自定义绘制内容
先说结论:实现了在自定义大小的窗口中,加载图片,并在图片上绘制一个矩形框:且在窗口大小改变的情况,保持绘制的矩形框与图片的先对位置不变. 在WinForm中,我们可以很方便地绘制自己需要的内容,在WP ...
- WPF控制动画开始、停止、暂停和恢复
1.闲言 好久也没更新一博客了,自己有点发懒,同时确实这几个月来也有点忙.风机监测软件,项目中,有这样一个小需求:正常风机在旋转的时候,上位机软要做一个风机的图片,让它不停地旋转,一但检测到下面风机停 ...
- WPF实现动画的几种方式及其小案例
WPF实现动画的方式: 基于计时器的动画 建立一个定时器,然后根据其频率循环调用函数或者一个事件处理函数,在这个函数中可以手工更新目标属性,直到达到最终值,这时可以停止计时器. 案例: 效果图: XA ...
- WPF GDI+字符串绘制成图片(二)
原文:WPF GDI+字符串绘制成图片(二) 版权声明:本文为博主原创文章,未经博主允许不得转载. https://blog.csdn.net/BYH371256/article/details/83 ...
- WPF 使用鼠标拖动一个控件的实现[2018.7.15]
原文:WPF 使用鼠标拖动一个控件的实现[2018.7.15] Q:已经把一个Shape和一个TextBlock组合起来放到了一个Grid中,现在想要实现用鼠标拖动这个Grid到任意位置的功能,如何做 ...
随机推荐
- Ubuntu 20.04 开启root权限登陆、网卡配置
个人名片: 对人间的热爱与歌颂,可抵岁月冗长 Github:念舒_C.ying CSDN主页️:念舒_C.ying 个人博客 :念舒_C.ying Ubuntu 20.04 开启root权限登陆.网 ...
- <三>使用类模板实现STL Vector
使用类模板实现STL Vector,点击查看代码 #include <iostream> using namespace std; template<typename T> c ...
- Linux C++目标中添加git版本信息
项目代码根目录下添加一个cmake文件git_version.cmake,内容如下: # get git hash macro(get_git_hash _git_hash) set(ENV{GIT_ ...
- Python3 Scrapy 框架学习
1.安装scrapy 框架 windows 打开cmd输入 pip install Scrapy 2.新建一个项目: 比如这里我新建的项目名为first scrapy startproject fir ...
- day26-过滤器Filter
Filter过滤器 1.Filter过滤器说明 为什么需要过滤器? 先来看一个例子: 我们在登录网站页面时,需要先进行登录验证. 用户访问的正常的流程应该是: 用户先通过登录页面进行验证,然后才可以访 ...
- day 19 分组查询 & having和where区别
day19 分组查询group by having用法 用于分组关键字(group by)后面 用于对分组之后的结果集进行筛选 having关键字后面可以使用聚合函数 having和where的区别 ...
- 【SQL查询】必会的常用函数:条件函数、日期函数、文本函数、窗口函数
〇.概述 1.内容 选择(双分支.多分支) 一.条件函数 1.计算25岁以上和以下的用户数量 CASE THEN END多分支选择 SELECT (CASE WHEN age>=25 THEN ...
- 【Java SE进阶】Day01 Object类、日期时间类、System类、StringBuilder类、包装类
一.Object类 1.概述:Java语言的根类/超类,默认继承自Object类 2.常用方法 toString():返回对象的字符串表示--对象类型@内存地址值 可以对其重写@Override eq ...
- Vue GET xxxx/sockjs-node/info?t=1573626343344 net::ERR_CONNECTION
看了很多资料,都说是关闭热更新要么注释掉代码完美解决.我寻思这不就没有热更新功能了吗. 不妨试试检查下项目端口是否一致,然后查看下请求地址是否是本地地址.有可能是因为被shadowsocket代理了 ...
- Gorm源码学习-创建行记录
1. 前言 Gorm源码学习系列 Gorm源码学习-数据库连接 此文是Gorm源码学习系列的第二篇,主要梳理下通过Gorm创建表的流程. 2. 创建行记录代码示例 gorm提供了以下几个接口来创建行记 ...