iOS UI-团购案例(通过xib文件自定义UITableViewCell)
一、Model
 #import <Foundation/Foundation.h>

 @interface Goods : NSObject

 @property (nonatomic, copy) NSString *icon;

 @property (nonatomic, copy) NSString *title;

 @property (nonatomic, copy) NSString *price;

 @property (nonatomic, copy) NSString *buyCount;

 - (instancetype) initWithDict:(NSDictionary *)dict;

 + (instancetype) goodsWithDict:(NSDictionary *)dict;

 @end

 #import "Goods.h"

 @implementation Goods

 - (instancetype)initWithDict:(NSDictionary *)dict

 {

     if (self = [super init]) {

         [self setValuesForKeysWithDictionary:dict];

     }

     return self;

 }

 + (instancetype)goodsWithDict:(NSDictionary *)dict

 {

     return [[self alloc] initWithDict:dict];

 }

 @end
二、View
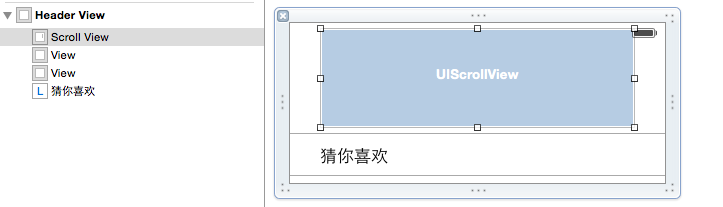
 #import <UIKit/UIKit.h>

 @interface BWHeaderView : UIView

 + (instancetype)headerView;

 @end

 #import "BWHeaderView.h"

 @interface BWHeaderView ()

 @property (weak, nonatomic) IBOutlet UIScrollView *scrollView;

 @end

 @implementation BWHeaderView

 //当这个方法被执行的时候就表示BWHeaderView已经从xib文件中创建好了

 //BWHeaderView的子控件也都创建好了,所以就可以使用UIScrollView了。

 - (void)awakeFromNib

 {

 }

 //创建headerView

 + (instancetype)headerView

 {

     BWHeaderView *headerView = [[[NSBundle mainBundle] loadNibNamed:@"BWHeaderView" owner:nil options:nil] lastObject];

     return headerView;

 }

 @end

 #import <UIKit/UIKit.h>

 // 协议命名规范:

 // 类名 + Delegate

 // 协议中的方法最好加@optional

 // 定义一个delegate属性,delegate属性用weak

 // delegate属性声明为id类型,可以用来解除对头文件的依赖

 @class BWFooterView;

 @protocol  BWFooterViewDelegate <NSObject>

 @required

 - (void)footerViewUpDateData:(BWFooterView *)footerView;

 @end

 @interface BWFooterView : UIView

 @property(weak, nonatomic) id<BWFooterViewDelegate> delegate;

 + (instancetype)footerView;

 @end

 #import "BWFooterView.h"

 @interface BWFooterView ()

 @property (weak, nonatomic) IBOutlet UIButton *btnLoadMore;

 @property (weak, nonatomic) IBOutlet UIView *waittingView;

 - (IBAction)btnLoadMoreClick:(id)sender;

 @end

 @implementation BWFooterView

 //通过xib设置tableView中的tableFooterView

 + (instancetype)footerView

 {

     BWFooterView *footerView = [[[NSBundle mainBundle] loadNibNamed:@"BWFooterView" owner:nil options:nil] lastObject];

     return footerView;

 }

 //加载按钮单击事件

 - (IBAction)btnLoadMoreClick:(id)sender {

     //1.隐藏“加载更多”按钮

     self.btnLoadMore.hidden = YES;

     //2.显示“等待指示器”所在的那个View

     self.waittingView.hidden = NO;

     dispatch_after(dispatch_time(DISPATCH_TIME_NOW, (int64_t)(1.0 * NSEC_PER_SEC)), dispatch_get_main_queue(), ^{

         //调用代理方法

         if ([self.delegate respondsToSelector:@selector(footerViewUpDateData:)]) {

             //3.增加一条数据

             //3.1创建一个模型对象

             //3.2把模型对象加载控制器的goods集合中

             //4.刷新UITableView

             [self.delegate footerViewUpDateData:self];

         }

         //5.显示“加载更多”按钮

         self.btnLoadMore.hidden = NO;

         //6.隐藏“等待指示器”所在的那个View

         self.waittingView.hidden = YES;

     });

 }

 @end
#import <UIKit/UIKit.h>
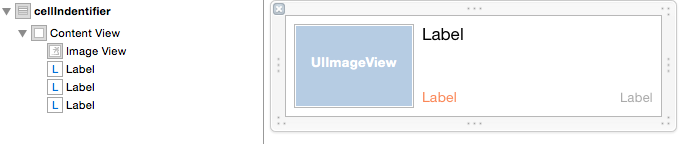
@class Goods; @interface BWGoodsCell : UITableViewCell @property (weak, nonatomic) IBOutlet UIImageView *imgView;
@property (weak, nonatomic) IBOutlet UILabel *lblName;
@property (weak, nonatomic) IBOutlet UILabel *lblPrice;
@property (weak, nonatomic) IBOutlet UILabel *lblBuyCount; @property (strong, nonatomic) Goods *myGoods; + (instancetype)goodsCellWithTableView:(UITableView *)tableView;
@end #import "BWGoodsCell.h"
#import "Goods.h" @interface BWGoodsCell () @end @implementation BWGoodsCell // 重写setMyGoods方法,把模型的数据设置给子控件
- (void)setMyGoods:(Goods *)myGoods
{
_myGoods = myGoods; self.imgView.image = [UIImage imageNamed:_myGoods.icon];
self.lblName.text = _myGoods.title;
self.lblPrice.text = [NSString stringWithFormat:@"$ %@",_myGoods.price];
self.lblBuyCount.text = [NSString stringWithFormat:@"%@个人已购买",_myGoods.buyCount];
} // 创建单元格
+ (instancetype)goodsCellWithTableView:(UITableView *)tableView
{
static NSString *cellIndentifier = @"cellIndentifier";
BWGoodsCell *cell = [tableView dequeueReusableCellWithIdentifier:cellIndentifier]; if (!cell) {
cell = [[[NSBundle mainBundle] loadNibNamed:@"BWGoodsCell" owner:nil options:nil] firstObject];
}
return cell;
}
- (void)awakeFromNib {
// Initialization code
} - (void)setSelected:(BOOL)selected animated:(BOOL)animated {
[super setSelected:selected animated:animated]; // Configure the view for the selected state
} @end
三、Controller
 #import "ViewController.h"

 #import "Goods.h"

 #import "BWGoodsCell.h"

 #import "BWFooterView.h"

 #import "BWHeaderView.h"

 @interface ViewController ()<UITableViewDataSource,BWFooterViewDelegate>

 @property (nonatomic, strong) NSMutableArray *arrayModel;

 @property (nonatomic, strong) UITableView *tableView;

 @end

 @implementation ViewController

 #pragma mark - 懒加载

 - (NSArray *)arrayModel

 {

     if (_arrayModel == nil) {

         NSString *path = [[NSBundle mainBundle] pathForResource:@"tgs.plist" ofType:nil];

         NSArray *arrayDict = [NSArray arrayWithContentsOfFile:path];

         NSMutableArray *arrayModel = [NSMutableArray array];

         for (NSDictionary *dict in arrayDict) {

             Goods *goodsModel = [Goods goodsWithDict:dict];

             [arrayModel addObject:goodsModel];

         }

         _arrayModel = arrayModel;

     }

     return _arrayModel;

 }

 #pragma mark - 加载视图

 - (void)viewDidLoad {

     [super viewDidLoad];

     self.tableView = [[UITableView alloc] initWithFrame:self.view.frame style:UITableViewStyleGrouped];

     self.tableView.dataSource =self;

     [self.view addSubview:self.tableView];

     self.tableView.rowHeight = ;

     //ps:tableView 的tableFooterView特点:只能修改x和height值,y和height不能修改

     //创建tableFooterView

     BWFooterView *footerView = [BWFooterView footerView];

     //设置footerView的代理

     footerView.delegate =self;

     self.tableView.tableFooterView = footerView;

     //创建tableHeaderView

     BWHeaderView *headerView = [BWHeaderView headerView];

     self.tableView.tableHeaderView = headerView;

 }

 #pragma mark - CZFooterView的代理方法

 - (void)footerViewUpDateData:(BWFooterView *)footerView

 {

     //3.增加一条数据

     //3.1创建一个模型对象

     Goods *model = [[Goods alloc] init];

     model.title = @"驴肉火烧";

     model.price = @"6.0";

     model.buyCount = @"";

     model.icon = @"7003217f16ed29bab85e635a3bd6b60d";

     //3.2把模型对象加载控制器的goods集合中

     [self.arrayModel addObject:model];

     //4.刷新UITableView

     [self.tableView reloadData];

     //ps:局部刷新(仅适用于UITableView的总行数没有发生变化的时候)

 //    NSIndexPath *indexpath =  [NSIndexPath indexPathForRow:self.arrayModel.count-1 inSection:0];

 //    [self.tableView reloadRowsAtIndexPaths:@[indexpath] withRowAnimation:UITableViewRowAnimationLeft];

     //5.把UITableView中最后一行滚动到最上面

     NSIndexPath *indexpath =  [NSIndexPath indexPathForRow:self.arrayModel.count- inSection:];

     [self.tableView scrollToRowAtIndexPath:indexpath atScrollPosition:UITableViewScrollPositionTop animated:YES];

 }

 #pragma mark - 数据源

 //加载组的行数

 - (NSInteger)tableView:(UITableView *)tableView numberOfRowsInSection:(NSInteger)section

 {

     return self.arrayModel.count;

 }

 //加载单元格数据

 - (UITableViewCell *)tableView:(UITableView *)tableView cellForRowAtIndexPath:(NSIndexPath *)indexPath

 {

     //1.获取数据模型

     Goods *goodsModel = self.arrayModel[indexPath.row];

     //2.创建单元格

     BWGoodsCell *cell = [BWGoodsCell goodsCellWithTableView:tableView];

 //   在控制器中直接为cell的每个子控件赋值数据造成问题

 // 1>控制器强依赖于cell,一旦cell内部的子控件发生变化,那么子控件中的代码也得改(紧耦合)

 // 2>cell封装不够完整,凡是用到cell的地方

 // 3>解决:直接把模型传递给自定义cell,然后在自定义cell内部解析model中的数据赋值给自定义cell的内部的子控件

     //3.把模型数据设置给单元格

     cell.myGoods = goodsModel;

     //4.返回单元格

     return cell;

 }

 #pragma mark - 状态栏

 - (BOOL)prefersStatusBarHidden

 {

     return YES;

 }

 #pragma mark - 内存

 - (void)didReceiveMemoryWarning {

     [super didReceiveMemoryWarning];

     // Dispose of any resources that can be recreated.

 }

 @end
iOS UI-团购案例(通过xib文件自定义UITableViewCell)的更多相关文章
- iOS开发——UI进阶篇(二)自定义等高cell,xib自定义等高的cell,Autolayout布局子控件,团购案例
一.纯代码自定义等高cell 首先创建一个继承UITableViewCell的类@interface XMGTgCell : UITableViewCell在该类中依次做一下操作1.添加子控件 - ( ...
- ios – 使用UINib加载xib文件实现UITableViewCell
xib文件的实质是xml,描述界面对象,每个对象都有一个很重要的属性,identity inspector面板中class属性,加载xib文件的时候实际上是实例化界面对象相对应的这些class. xi ...
- **IOS:xib文件解析(xib和storyboard的比较,一个轻量级一个重量级)
使用Xcode做iOS项目,经常会和Xib文件打交道,因为Xib文件直观的展现出运行时视图的外观,所以上手非常容易,使用也很方便,但对于从未用纯代码写过视图的童鞋,多数对Xib的理解有些片面. Xib ...
- iOS开发UI篇—使用xib自定义UItableviewcell实现一个简单的团购应用界面布局
iOS开发UI篇—使用xib自定义UItableviewcell实现一个简单的团购应用界面布局 一.项目文件结构和plist文件 二.实现效果 三.代码示例 1.没有使用配套的类,而是直接使用xib文 ...
- iOS UI基础-9.1 UITableView 团购
概述 接下来,我们要做的是团购界面的设计,最张要实现的效果图及项目结构图 团购数据的展示 思路: 系统自带的tableCell不能展示三个文本,不能满足条件,自定义tableCell 每一个 ...
- IOS第八天(2:UITableViewController团购,点击底部,xib加载更多, 代理模式)
******* HMViewController.h #import "HMViewController.h" #import "HMTg.h" #import ...
- iOS UI基础-4.2应用程序管理 Xib文件使用
Xib调整使用 1.新建xib文件 New File-->User Interface-->Empty 2.打开新建的xib文件,出现可视化窗口 (1)拖入一个UIView (不是UIVi ...
- iOS开发——UI基础-自定义构造方法,layoutSubviews,Xib文件,利用Xib自定义View
一.自定义构造方法 有时候需要快速创建对象,可以自定义构造方法 + (instancetype)shopView { return [[self alloc] init]; } - (instance ...
- IOS开发中UI编写方式——code vs. xib vs.StoryBoard
最近接触了几个刚入门的iOS学习者,他们之中存在一个普遍和困惑和疑问,就是应该如何制作UI界面.iOS应用是非常重视用户体验的,可以说绝大多数的应用成功与否与交互设计以及UI是否漂亮易用有着非常大的关 ...
随机推荐
- Python Web学习笔记之IGMP和ICMP的差别
理论技术:TCP/IP协议族(四)ICMP和IGMP协议! 应该先说IP协议的,后来考虑到层次性,还是先把支撑协议介绍完在细说IP!因为IP是我的最爱也是我的痛!呵呵! 一.ICMP协议 为什么要使用 ...
- CSS 常用语法与盒模型分析
CSS基础知识 CSS规则由两个主要的部分构成:选择器,以及一条或者多条声明 selector { property: value; property: value; ... property: va ...
- Node10.15.0的安装
1. 首先我们需要去node官网下载最近版本的压缩包,然后我们把他们解压到我们自定义的安装路径,我使用的是/usr/local/lib/nodejs VERSION=v10.15.0 DISTRO=l ...
- [BZOJ1044][HAOI2008]木棍分割 二分 + 单调队列优化dp + 滚动数组优化dp
Description 有n根木棍, 第i根木棍的长度为Li,n根木棍依次连结了一起, 总共有n-1个连接处. 现在允许你最多砍断m个连接处, 砍完后n根木棍被分成了很多段,要求满足总长度最大的一段长 ...
- HDU 6060 RXD and dividing(思维+计算贡献值)
http://acm.hdu.edu.cn/showproblem.php?pid=6060 题意: 给定一棵 n 个节点的树,1 为根.现要将节点 2 ~ n 划分为 k 块,使得每一块与根节点形成 ...
- HTTP错误 404.17 - Not Found" IIS 7.5 请求的内容似乎是脚本,因而将无法由静态文件处理程序来处理
Errore HTTP 404.2 - Not Found" IIS 7.5 请求的内容似乎是脚本,因而将无法由静态文件处理程序来处理 出现这种情况的原因通常是因为先安装了Framewo ...
- 转载:RESTful API 设计指南
http://www.ruanyifeng.com/blog/2014/05/restful_api.html 网络应用程序,分为前端和后端两个部分.当前的发展趋势,就是前端设备层出不穷(手机.平板. ...
- stack_01
A.添加/移除 A.1.void stack::push(elemValue); // 栈头 添加元素 A.2.void stack::pop(); // 栈头 移除第一个元素 B.随机存取 C.数据 ...
- 《WAP》团队第三次作业--团队项目的原型设计与开发
一· 目 录 第一部分 · 结 对 成 员 明 细 第二部分 · NABCD 模 型 第三部分 · 原 型 设 计 第四部分 · P S P 第五部分 · 结 对 过 程 第六部分 · 心 得 总 ...
- Spark与Flink大数据处理引擎对比分析!
大数据技术正飞速地发展着,催生出一代又一代快速便捷的大数据处理引擎,无论是Hadoop.Storm,还是后来的Spark.Flink.然而,毕竟没有哪一个框架可以完全支持所有的应用场景,也就说明不可能 ...