安卓Design包之CoordinatorLayout配合AppBarLayout,ToolBar,TabLaout的使用
转载:
CoordinatorLayout配合AppBarLayout,Toolbar和TabLayout的使用
控件的简单介绍:
AppBarLayout:它是继承LinerLayout实现的一个ViewGroup容器组件,是为了Material Design而设计的App Bar,支持手势滑动操作。
默认的AppBarLayout是垂直方向的,它的作用是把AppBarLayout包裹的内容都作为AppBar。
使用方式非常简单,直接在布局文件中包裹想要作为顶部栏的控件,例如Toolbar和TabLayout.
CoordinatorLayout:CoorfinatorLayout是一个增强型的FrameLayout,,它的作用就是用来协调其所包裹的子view的手势操作的.
当然在使用之前,我们需要在gradle中引入Design支持包,24.2.0也可以
compile 'com.android.support:design:23.2.0'
也可以在File-project Stucture 点击对应的项目搜索design依赖
代码实现:手指向上滚动屏幕时,reCycleView 滚动,toolbar向上滑出屏幕
    手指向下滑动时,Toolbar显示回屏幕上
xml:
<?xml version="1.0" encoding="utf-8"?>

<android.support.design.widget.CoordinatorLayout xmlns:android="http://schemas.android.com/apk/res/android"

    xmlns:tools="http://schemas.android.com/tools"

    android:layout_width="match_parent"

    android:layout_height="match_parent"

    xmlns:app="http://schemas.android.com/apk/res-auto"

    tools:context="fanggao.qf.coordinatorlayout_appbarlayout_toolbar_tablayoutbar.MainActivity">

   <android.support.design.widget.AppBarLayout

       android:id="@+id/appbarlayout"

       android:layout_width="match_parent"

       android:layout_height="wrap_content"

       >

    <!--

设置的layout_scrollFlags有如下几种选项:

scroll: 所有想滚动出屏幕的view都需要设置这个flag-没有设置这个flag的view将被固定在屏幕顶部。

enterAlways: 这个flag让任意向下的滚动都会导致该view变为可见,启用快速“返回模式”。

enterAlwaysCollapsed: 当你的视图已经设置minHeight属性又使用此标志时,

                      你的视图只能以最小高度进入,只有当滚动视图到达顶部时才扩大到完整高度。

exitUntilCollapsed: 滚动退出屏幕,最后折叠在顶端。-->

    <!--标题栏-->

    <android.support.v7.widget.Toolbar

        android:id="@+id/toolbar"

        android:layout_width = "match_parent"

        android:layout_height = "?attr/actionBarSize"

        app:layout_scrollFlags = "scroll|enterAlways"

        android:background="#0000ff"

        >

    <!--自定义view-->

    <TextView

        android:layout_width="match_parent"

        android:layout_height="wrap_content"

        android:text="标题"

        android:textSize="30sp"

        android:gravity="center"

        android:layout_gravity="center"

        />

    </android.support.v7.widget.Toolbar>

<!--选项卡-->

    <android.support.design.widget.TabLayout

        android:id="@+id/tabLayout"

        android:layout_width = "match_parent"

        android:layout_height="wrap_content"

        app:tabIndicatorColor="@android:color/holo_orange_dark"

        android:scrollbarSize="10dp"

        app:tabMode="scrollable"

        app:tabSelectedTextColor="#000000"

        app:tabTextColor="#ffffff" />

   </android.support.design.widget.AppBarLayout>

    <!--包含可滑动的布局内容(RecyclerView,NestedScrollView,不支持ListView,ScrollView)

      必须要设置app:layout_behavior="@string/appbar_scrolling_view_behavior"

      属性来告知CoordinatorLayout该组件是带有滑动行为的组件,

      然后CoordinatorLayout在接受到滑动时会通知AppBarLayout中可滑动的Toolbar可以滑出屏幕-->

    <android.support.v7.widget.RecyclerView

        android:id="@+id/recyclerView"

        android:layout_width="match_parent"

        android:layout_height="wrap_content"

        app:layout_behavior="@string/appbar_scrolling_view_behavior" />

</android.support.design.widget.CoordinatorLayout>
为了达到手势上下滚动,Toolbar显示不显示的动画效果,我们需要在ToolBar中设置如下属性
app:layout_scrollFlags = "scroll|enterAlways"
表示该bar是可滑动的
同时,为了使得Toolbar可以滑动,还需要一个条件就是CoordinatorLayout布局下包裹一个可以滑动的布局,比如: RecyclerView,NestedScrollView(ListView,ScrollView不支持)具有滑动效果的组件。
并且还需要给这些组件设置如下属性来告诉CoordinatorLayout,该组件是带有滑动行为的组件,然后CoordinatorLayout在接受到滑动时会通知AppBarLayout 中可滑动的Toolbar可以滑出屏幕了。
app:layout_behavior="@string/appbar_scrolling_view_behavior"
注意:这里我们使用了Toolbar代替ActionBar,因此需要在清单文件中设置theme为noActionBar,否则会报找不到actionBar异常
recycleview_item.xml
<?xml version="1.0" encoding="utf-8"?>

<LinearLayout xmlns:android="http://schemas.android.com/apk/res/android"

    android:orientation="vertical" android:layout_width="match_parent"

    android:layout_height="wrap_content"

    android:background="#000000"

    android:padding="2dp">

    <TextView

        android:id="@+id/tv_text"

        android:layout_width="match_parent"

        android:layout_height="wrap_content"

        android:textSize="30dp"

        android:textColor="#ffffff"

        android:text="文字"

        android:gravity="center"

        android:padding="20dp"

        android:background="@android:color/darker_gray"/>

</LinearLay>
主程序代码:
public class MainActivity extends AppCompatActivity {

    private Toolbar toolbar;

    private RecyclerView recyclerView;

    private TabLayout tablayout;

    private List<String> dataList =  new ArrayList<String>(); ;

    private RecycleViewAdapter recycleViewAdapter;

    @Override

    protected void onCreate(Bundle savedInstanceState) {

        super.onCreate(savedInstanceState);

        setContentView(R.layout.activity_main);

        initData(1);

        initView();

    }

    private void initData(int page) {

        for (int i = 0; i < 50; i++) {

            dataList.add("第"+page+"页第"+(i+1)+"条数据");

        }

    }

    private void initView() {

        toolbar = (Toolbar) findViewById(R.id.toolbar);

        //toolabar替换actionBar,需在清单文件中设置style = noActionBar

        setSupportActionBar(toolbar);

        tablayout = (TabLayout) findViewById(R.id.tabLayout);

        //设置TabLayout

        for (int i = 0; i < 30; i++) {

            tablayout.addTab(tablayout.newTab().setText("TAB"+i));

        }

        //设置tablayout的切换监听

       tablayout.addOnTabSelectedListener(new TabLayout.OnTabSelectedListener() {

           //当页卡选择的时候调用

           @Override

           public void onTabSelected(TabLayout.Tab tab) {

               dataList.removeAll(dataList);

            //切换的时候更新RecyclerView

               initData(tab.getPosition()+1);

               recycleViewAdapter.notifyDataSetChanged();

           }

           @Override

           public void onTabUnselected(TabLayout.Tab tab) {

           }

           @Override

           public void onTabReselected(TabLayout.Tab tab) {

           }

       });

        recyclerView = (RecyclerView) findViewById(R.id.recyclerView);

        //设置布局

        recyclerView.setLayoutManager(new LinearLayoutManager(this,LinearLayoutManager.VERTICAL,false));

        //设置动画

        recyclerView.setItemAnimator(new DefaultItemAnimator());

        //设置适配器

        recycleViewAdapter = new RecycleViewAdapter(this, dataList);

        recyclerView.setAdapter(recycleViewAdapter);

    }

}
RecycleViewAdapter:
public class RecycleViewAdapter extends RecyclerView.Adapter<RecycleViewAdapter.MyViewHolder> {

    private Context context;

    private List<String> dataList;

    public RecycleViewAdapter(Context context, List<String> dataList) {

        this.context = context;

        this.dataList = dataList;

    }

    @Override

    public MyViewHolder onCreateViewHolder(ViewGroup parent, int viewType) {

        View view = LayoutInflater.from(context).inflate(R.layout.layout_recyclerview_item, parent, false);

        return new MyViewHolder(view);

    }

    @Override

    public int getItemCount() {

        return dataList.size();

    }

    @Override

    public void onBindViewHolder(MyViewHolder holder, int position) {

        holder.tv_text.setText(dataList.get(position));

    }

    public class MyViewHolder extends RecyclerView.ViewHolder {

        private TextView tv_text;

        public MyViewHolder(View itemView) {

            super(itemView);

            tv_text=(TextView) itemView.findViewById(R.id.tv_text);

        }

    }

}
效果如下:
默认: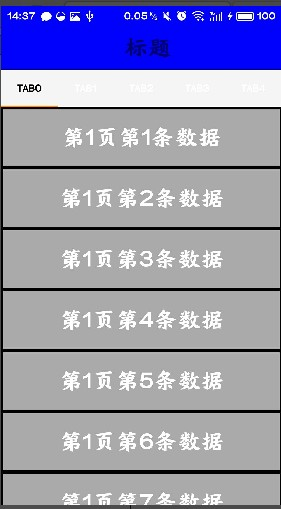
向上滑动效果:

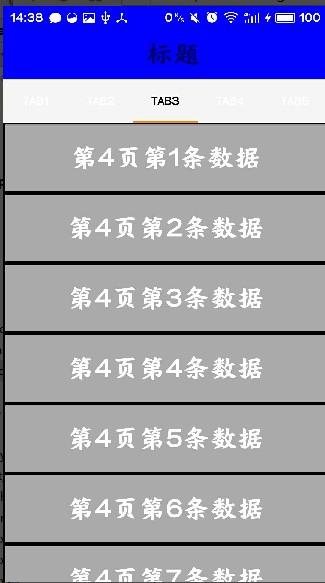
点击Tab:
安卓Design包之CoordinatorLayout配合AppBarLayout,ToolBar,TabLaout的使用的更多相关文章
- 安卓Design包之NavigationView结合DrawerLayout,toolbar的使用,FloatingActionButton
注意:使用前需要添加Design依赖包,使用toolbar时需要隐藏标题头 FloatingActionButton 悬浮按钮:FloatingActionButton是重写ImageView的,所有 ...
- 安卓Design包之Toolbar控件的使用
转自:ToolBar的使用 ToolBar的出现是为了替换之前的ActionBar的各种不灵活使用方式,相反,ToolBar的使用变得非常灵活,因为它可以让我们自由往里面添加子控件.低版本要使用的话, ...
- 安卓Design包之TabLayout控件的使用
转自: 安卓Design包之TabLayout控件的简单使用 Google在2015的IO大会上,给我们带来了更加详细的Material Design设计规范,同时,也给我们带来了全新的Android ...
- 安卓Design包之AppBar和Toolbar的联用
前面讲了Design包的的CoordinatorLayout和SnackBar的混用,现在继续理解Design包的AppBar; AppBarLayout跟它的名字一样,把容器类的组件全部作为AppB ...
- 安卓Design包之超强控件CoordinatorLayout与SnackBar的简单使用
在前面的Design中,学习使用了TabLayout,NavigationView与DrawerLayout实现的神奇效果,今天就带来本次Design包中我认为最有意义的控件CoordinatorLa ...
- 【知识必备】一文让你搞懂design设计的CoordinatorLayout和AppbarLayout联动,让Design设计更简单~
一.写在前面 其实博主在之前已经对design包的各个控件都做了博文说明,无奈个人觉得理解不够深入,所以有了这篇更加深入的介绍,希望各位看官拍砖~ 二.从是什么开始 1.首先我们得知道Coordina ...
- 安卓Design包下的TextInputLayout和FloatingActionButton的简单使用
终于介绍到Design包的最后的东西了. 也很简单,一个是TextInputLayout. TextInputLayout作为一个父容器,包含一个新的EditText,可以给EditText添加意想不 ...
- 安卓Design包之TabLayout控件的简单使用
Google在2015的IO大会上,给我们带来了更加详细的Material Design设计规范,同时,也给我们带来了全新的Android Design Support Library,在这个supp ...
- 安卓Design包之CollapsingToolbarLayout(可折叠的工具栏布局)的简单使用
转自: CollapsingToolbarLayout的使用 注意:使用前需要添加Design依赖包,使用toolbar时需要隐藏标题头 CollapsingToolbarLayout作用是提供了一个 ...
随机推荐
- 经典CSS实现三角形图标原理解析
前言: 在写这篇文章之前,我也看过很多前端大神写的代码,But,都只是粘贴代码和给出显示效果,对于初学者来说大家都喜欢刨根问底,为什么要这样做呢? 接下来就让我给大家分享一下我对CSS实现三角形的理解 ...
- [置顶] 我的设计模式学习笔记------>Java设计模式总概况
设计模式的概念最早起源于建筑设计大师Alexander的<建筑的永恒方法>一书,尽管Alexander的著作是针对建筑领域的,但是他的观点实际上用用于所有的工程设计领域,其中也包括软件设计 ...
- Flex应用程序如何启动
Flex应用程序启动 编写一个简单的Flex应用程序并不复杂,就算你从来没接触过Flex程序设计,照着帮助的实例步骤,不需花多长时间也能做出一个漂亮简捷的小程序出来.不过,随着对Flex程序编写的深入 ...
- Hibernate+Struts2完成修改数据功能
先看修改之前的数据: 下面是具体代码 view层: 顺着链接,继续: 继续: 继续 控制层和逻辑层: action: //修改 public String updateperson() { Strin ...
- 凯尔卡C68全球版汽车电脑诊断仪
产品简介: C68汽车故障诊断仪是凯尔卡公司新推出的一款集经济.简约.稳定.耐用于一体的汽车诊断设备, 该产品采用了最新的智能移植技术,集成度高:C68车型覆盖广,测试功能强大.数据准确等优点, 是目 ...
- AutoCAD 2007在win8.1安装出现——错误1606。无法访问网络位置Autodesk\AutoCAD2007\R17.0\chs\的解决
环境win 8.1 64位,AutoCAD 2007 安装CAD2007,一开始安装就出错,提示:错误1606.无法访问网络位置Autodesk\AutoCAD2007\R17.0\chs\ 百度之后 ...
- PowerShell管理Exchange
#添加Exchange管理单元get-pssnapin -registeredadd-pssnapin microsoft.exchange* #启用邮箱账号(需要域管理员权限,因为需要将某些属性写入 ...
- IOS 7 Study - UIViewController
Presenting and Managing Views with UIViewController ProblemYou want to switch among different views ...
- C#操作Excel(2)-- 打开-读取Excel文档
由于要为某软件实现导出Excel功能,故有此文. 本文的开发环境是Visual Studio 2010 ,C#, Excel 2007. 新建C#工程后打开Solution Explorer,可以看到 ...
- Eclipse中SVN的安装步骤(两种)和用法
一.给安装EclipseSVN,最常见的有两种方式:手动方式和使用安装向导方式.详细过程例如以下: 方式一:手动安装 1.从官网下载site-1.6.9.zip文件,网址是:subclipse.tig ...