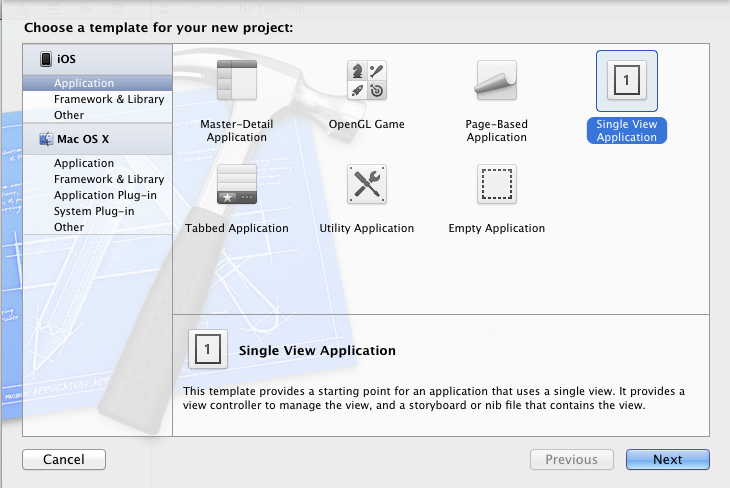
Objective-C ,ios,iphone开发基础:picker控件详解与使用,(实现省市的二级联动)
第一步:新建一个单视图(single view)的工程,
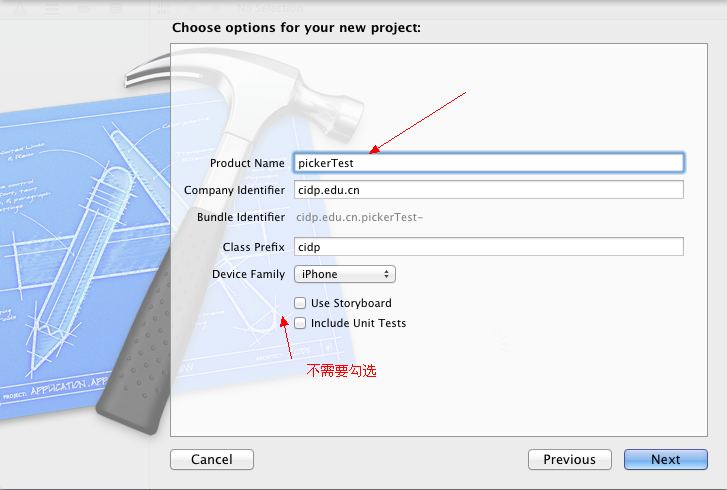
命名为pickerTest,不要勾选下面两个选项,第一个是新版本里面的,第二个是单元测试,现在用不着。
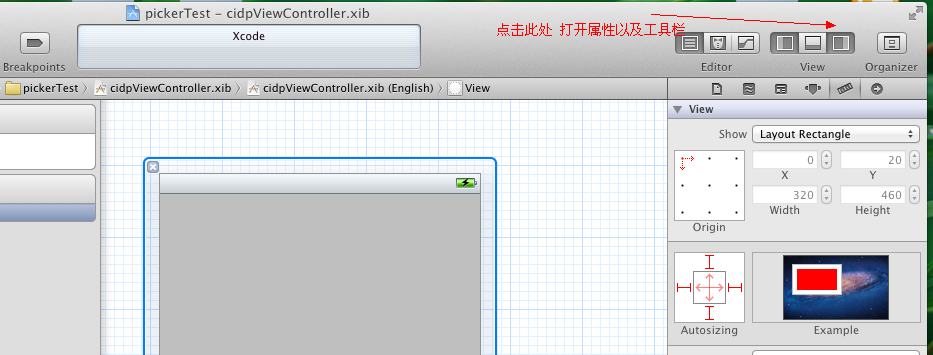
点击next ->creat之后,打开工具栏:
在下面的控件工具栏中往视图上拖放一个Picker View控件,一个UIButton控件,一个UILable控件,(所有在前端可以看得见的控件都继承自UIView)
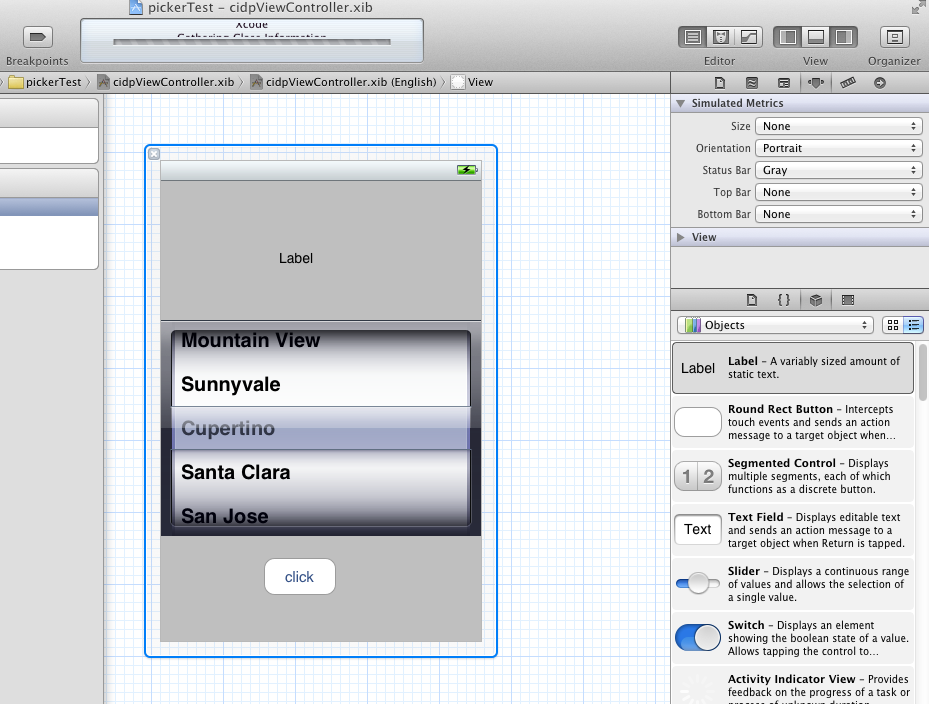
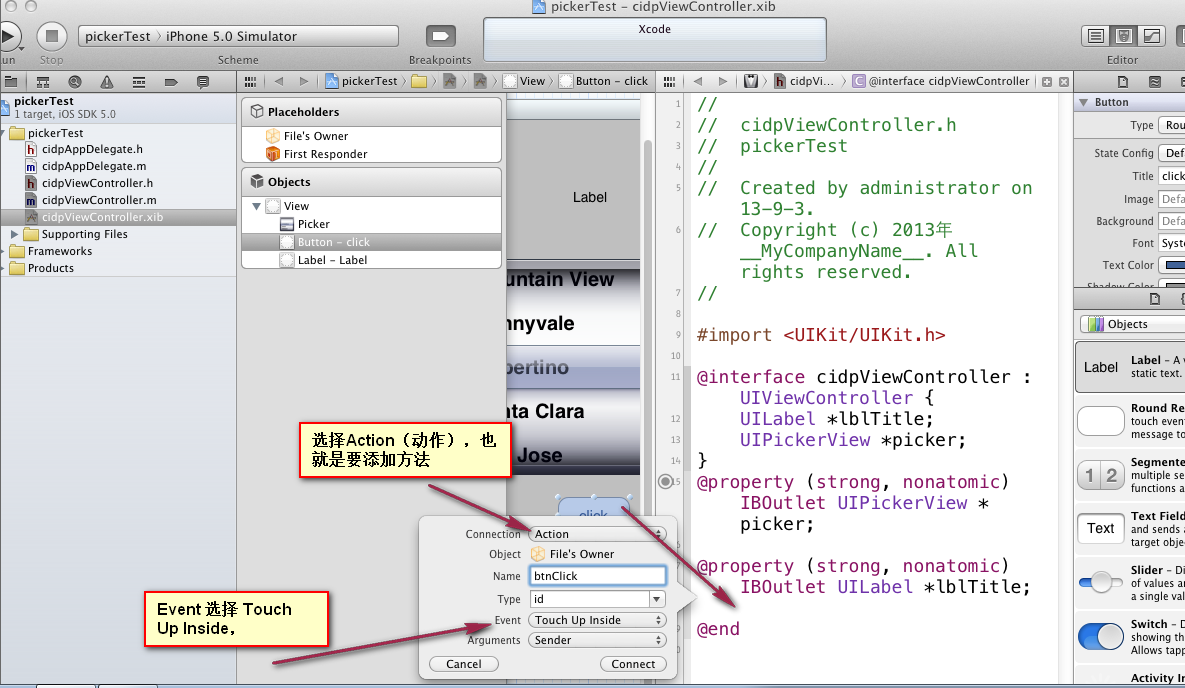
修改UIButton的title属性,设置为click 然后点击分栏按钮,为控件连线(这种方式相对于手动去写,要快速很多)。

依次为UILable 和 Picker View 控件添加插座变量,并且为UIButton添加Action
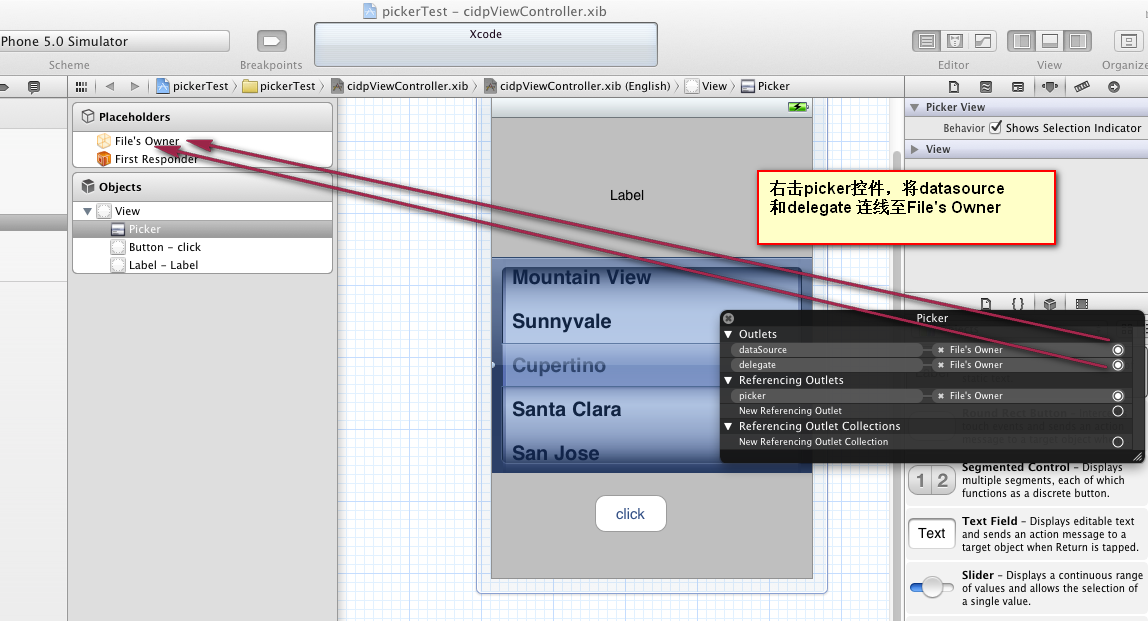
右击picker控件,将 Datesource和delegate连线至File's Owner, 设置它的数据源和代理。
在 cidpViewController.h文件中添加几个变量和遵循 UIPickerViewDelegate 协议,这样就可以用UIPickerViewDelegate里面的几个方法了 。
@interface cidpViewController : UIViewController<UIPickerViewDelegate>
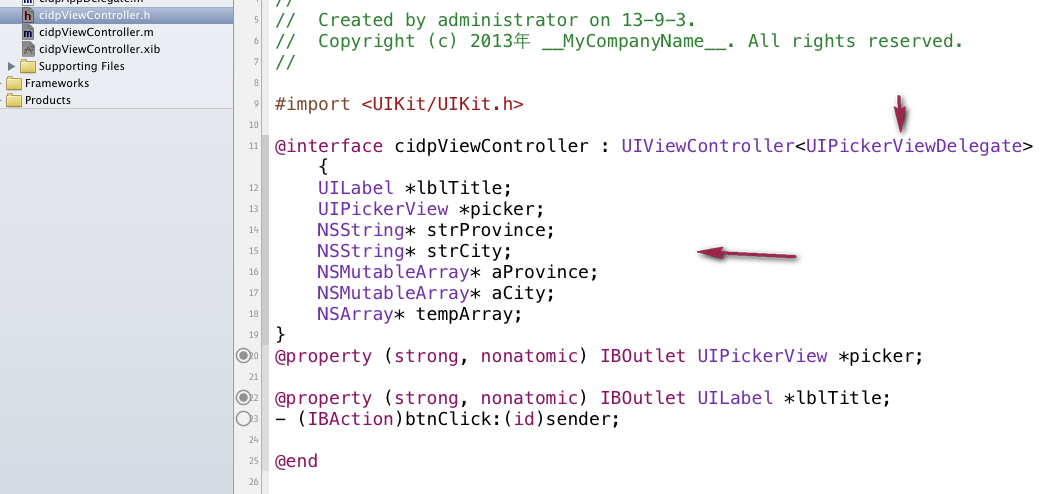
#import <UIKit/UIKit.h>

@interface cidpViewController : UIViewController<UIPickerViewDelegate> {

    UILabel *lblTitle;

    UIPickerView *picker;

    NSString* strProvince;

    NSString* strCity;

    NSMutableArray* aProvince;

    NSMutableArray* aCity;

    NSArray* tempArray;

}

@property (strong, nonatomic) IBOutlet UIPickerView *picker;

@property (strong, nonatomic) IBOutlet UILabel *lblTitle;

- (IBAction)btnClick:(id)sender;

@end
#import "cidpViewController.h"

@implementation cidpViewController

@synthesize picker;

@synthesize lblTitle;

- (void)didReceiveMemoryWarning

{

    [super didReceiveMemoryWarning];

    // Release any cached data, images, etc that aren't in use.

}

#pragma mark - View lifecycle

- (void)viewDidLoad

{

    [super viewDidLoad];

    //初始哈5个省份

    aProvince = [[NSMutableArray alloc] initWithObjects:@"北京",@"甘肃",@"山西",@"湖北",@"广州", nil];

    //初始化5个数组 ,分别初始化为5个省的城市

    NSArray* array1 = [NSArray arrayWithObjects:@"海淀",@"昌平",@"朝阳",@"西城",@"丰台", nil];

    NSArray* array2 = [NSArray arrayWithObjects:@"兰州",@"白银",@"张掖",@"陇西",@"天水", nil];

    NSArray* array3 = [NSArray arrayWithObjects:@"太原",@"大同",@"运城",@"晋城",@"五台山", nil];

    NSArray* array4 = [NSArray arrayWithObjects:@"武汉",@"荆州",@"襄阳",@"赣州", nil];

    NSArray* array5 = [NSArray arrayWithObjects:@"广州",@"佛山",@"尖沙咀",@"中山", nil];

    aCity = [[NSMutableArray alloc] initWithObjects:array1,array2,array3,array4,array5, nil];

    //tempArray 用来初始化第二个 ,并且引用一次,避免提前释放,内存出错

    tempArray = [array1 retain];

    // 用来第一次显示UIlable,负责的话就会显示 null,null

    strProvince = [aProvince objectAtIndex:];

    strCity = [tempArray objectAtIndex:];

    [aProvince release];

    [aCity release];

}

-(NSInteger)numberOfComponentsInPickerView:(UIPickerView*)pickerView{

    //返回2 表示将有两个component(滚轮)

    return ;

}

-(NSInteger)pickerView:(UIPickerView*)pivkerView numberOfRowsInComponent:(NSInteger)component{

    if(component == ){

        // 返回省份数组的长度

        return [aProvince count];

    }else{

        //返回省份对应城市数组的长度。

        [tempArray count];

}

- (NSString *)pickerView:(UIPickerView *)pickerView titleForRow:(NSInteger)row forComponent:(NSInteger)component{

        if(component == ){

            //返回对应row 的数组元素。

            return [aProvince objectAtIndex:row];

        }else{

            return [tempArray objectAtIndex:row];

        }

}

- (void)pickerView:(UIPickerView *)pickerView didSelectRow:(NSInteger)row inComponent:(NSInteger)component{

    if(component == ){

        //返回省份对应的城市数组,

        tempArray = [aCity objectAtIndex:row]

        [picker selectRow: inComponent: animated:YES];

        [picker reloadComponent:];

        strProvience = [aProvince objectAtIndex:row];

        strCity = [tempArray objectAtIndex:];

    }else{

        //城市滚轮滚动时,strCity也随着改变。

       strCity =  [tempArray objectAtIndex:];

    }

    lblTitle.text = [[NSString alloc] initWithFormat:@"%@,%@",strProvince,strCity,nil];

}

- (void)viewDidUnload

{

    [self setLblTitle:nil];

    [self setPicker:nil];

    [super viewDidUnload];

}

- (void)viewWillAppear:(BOOL)animated

{

    [super viewWillAppear:animated];

}

- (void)viewDidAppear:(BOOL)animated

{

    [super viewDidAppear:animated];

}

- (void)viewWillDisappear:(BOOL)animated

{

    [super viewWillDisappear:animated];

}

- (void)viewDidDisappear:(BOOL)animated

{

    [super viewDidDisappear:animated];

}

- (BOOL)shouldAutorotateToInterfaceOrientation:(UIInterfaceOrientation)interfaceOrientation

{

    // Return YES for supported orientations

    return (interfaceOrientation != UIInterfaceOrientationPortraitUpsideDown);

}

- (IBAction)btnClick:(id)sender {

    lblTitle.text = [[NSString alloc] initWithFormat:@"%@,%@",strProvince,strCity,nil];

}

-(void)dealloc{

    [aProvince release];

    [aCity release];

    [lblTitle release];

    [strCity release];

    [strProvince release];

    [picker release];

    [super  dealloc];

}

@end
@protocol UIPickerViewDataSource<NSObject>

@required

// returns the number of 'columns' to display.

- (NSInteger)numberOfComponentsInPickerView:(UIPickerView *)pickerView;

// returns the # of rows in each component..

- (NSInteger)pickerView:(UIPickerView *)pickerView numberOfRowsInComponent:(NSInteger)component;

@end
UIPickerViewDelegate协议中的五个方法,非必须实现,
@protocol UIPickerViewDelegate<NSObject>

@optional

// returns width of column and height of row for each component.

- (CGFloat)pickerView:(UIPickerView *)pickerView widthForComponent:(NSInteger)component;

- (CGFloat)pickerView:(UIPickerView *)pickerView rowHeightForComponent:(NSInteger)component;

// these methods return either a plain UIString, or a view (e.g UILabel) to display the row for the component.

// for the view versions, we cache any hidden and thus unused views and pass them back for reuse.

// If you return back a different object, the old one will be released. the view will be centered in the row rect

- (NSString *)pickerView:(UIPickerView *)pickerView titleForRow:(NSInteger)row forComponent:(NSInteger)component;

- (UIView *)pickerView:(UIPickerView *)pickerView viewForRow:(NSInteger)row forComponent:(NSInteger)component reusingView:(UIView *)view;

- (void)pickerView:(UIPickerView *)pickerView didSelectRow:(NSInteger)row inComponent:(NSInteger)component;

@end
Objective-C ,ios,iphone开发基础:picker控件详解与使用,(实现省市的二级联动)的更多相关文章
- picker控件详解与使用,(实现省市的二级联动)
picker控件详解与使用,(实现省市的二级联动) 第一步:新建一个单视图(single view)的工程, 命名为pickerTest,不要勾选下面两个选项,第一个是新版本里面的,第二个是单元测试, ...
- Android开发:文本控件详解——TextView(一)基本属性
一.简单实例: 新建的Android项目初始自带的Hello World!其实就是一个TextView. 在activity_main.xml中可以新建TextView,从左侧组件里拖拽到右侧预览界面 ...
- Android开发:文本控件详解——TextView(二)文字跑马灯效果实现
一.需要使用的属性: 1.android:ellipsize 作用:若文字过长,控制该控件如何显示. 对于同样的文字“Android开发:文本控件详解——TextView(二)文字跑马灯效果实现”,不 ...
- Android开发:文本控件详解——EditText(一)基本属性
一.简单实例: EditText输入的文字样式部分的属性,基本都是和TextView中的属性一样. 除此之外,EditText还有自己独有的属性. 二.基本属性: hint 输入框显示的提示文本 ...
- Android开发:文本控件详解——RadioButton和CheckBox(一)基本属性
一.RadioButton和RadioGroup: RadioButton是单个的圆形单选框,而RadioGroup是可以容纳多个RadioButton存在的容器,因此RadioButton和Radi ...
- IOS—UITextFiled控件详解
IOS—UITextFiled控件详解 //初始化textfield并设置位置及大小 UITextField *text = [[UITextField alloc]initWithFrame:CGR ...
- Spinner控件详解
Spinner控件详解 效果图 修改Spinner样式 在介绍之前,先看一下系统原生的样式 6.x & 5.x系统样式 4.x系统样式 官方文档 XML属性 方法 描述 android:dro ...
- Switch控件详解
Switch控件详解 原生效果 5.x 4.x 布局 <Switch android:id="@+id/setting_switch" android:layout_widt ...
- ToolBar控件详解
ToolBar控件详解 在Activity中添加ToolBar 1.添加库 dependencies { ... compile "com.android.support:appcompat ...
随机推荐
- Codeforces 372
A (被装的袋鼠不可以装的袋鼠)贪心,排序,从n/2分成两部分. B 好一道前缀和的题目. C 标准算法不难想,m^2的算法见http://codeforces.com/blog/entry/9907 ...
- http协议中的Content-Type
今天对http协议中的Content-Type有所理解了 它的主要功给我的感觉,还是在前台(客户端)给服务器传输数据时,描述这个数据的格式. 比如,我只传一个表单数据,但这个表单中只有文本,没有其它的 ...
- nyoj 10 skiing(记忆化搜索)
skiing 时间限制:3000 ms | 内存限制:65535 KB 难度:5 描述 Michael喜欢滑雪百这并不奇怪, 因为滑雪的确很刺激.可是为了获得速度,滑的区域必须向下倾斜,而且当 ...
- FPGA高级设计——时序分析和收敛(转)
何谓静态时序分析(Static Timing Analysis,简称STA)? 它可以简单的定义为:设计者提出一些特定的时序要求(或者说是添加特定的时序约束),套用特定的时序模型,针对特定的电路进行分 ...
- ASP.NET MVC4中用 BundleCollection
来源:http://www.cnblogs.com/madyina/p/3702314.html ASP.NET MVC4中对JS和CSS的引用又做了一次变化,在MVC3中我们这样引用资源文件: &l ...
- MemCacheManager
#region Fields private AreaRepository _areaRepository = new AreaRepository(); private ICacheManager ...
- contiki makefile框架分析 < contiki学习之一 >
在linux下的工程编译,基本都可以使用makefile这个工具来完成.Contiki OS亦如此,下面分析contiki整个Makefile的框架,对makefile的具体内容暂不做分析.本文依赖于 ...
- IDHttp的基本用法(转)
一.IDHTTP的基本用法 IDHttp和WebBrowser一样,都可以实现抓取远端网页的功能,但是http方式更快.更节约资源,缺点是需要手动维护cook,连接等 IDHttp的创建,需要引入ID ...
- windows 下实现函数打桩:拦截API方式
windows 下实现函数打桩:拦截API方式 近期由于工作须要,開始研究函数打桩的方法. 由于不想对project做过多的改动,于是放弃了使用Google gmock的想法. ...
- 使用TopShelf轻松开发Window服务
关于TopShelf 描述: Topshelf is a framework for hosting services written using the .NET framework. The cr ...