关于jQuery中实现放大镜效果
1.1.1 摘要
相信大家都见过或使用过放大镜效果,甚至实现过该效果,它一般应用于放大查看商品图片,一些电商网站(例如:凡客,京东商城,阿里巴巴等)都有类似的图片查看效果。
在接下来的博文中,我们将向大家介绍通过jQuery实现放大镜效果。
目录
1.1.2 正文
实现原理
首先,我们讲解一下放大镜效果的实现方式:
方法一:准备一张高像素的大图,当鼠标放到原图上,加载显示大图的对应位置。
方法二:对原图片进行放大,也就是调整原图的长和宽。
上面我们介绍了通过两种方式实现放大镜效果,接下来,我们将以上的两种方式应用到我们的jQuery插件中。
首先,我们需要一个img元素显示原图对象,还需要一个容器作为显示框;显示框里面存放大图对象。当鼠标移动到原图上时,通过对大图进行绝对定位来显示对应的部位,实现类似放大镜的效果。
接下来,让我们定义Index.html页面,具体实现如下:
<!doctype html>

<html lang="en-US">

<head>

  <meta http-equiv="Content-Type" content="text/html;charset=utf-8">

  <title>jQuery Image Zoom Demo</title>

  <meta name="author" content="Jackson Huang">

</head>

<body>

<div class="magnify">

<div class="large"></div>

<img class="small" src="./img/1.jpg" width="" />

</div>

</body>

</html>
上面,我们定义了small对象用于显示原图,而large对象作为一个显示框用来显示大图的对应位置。
mousemove事件
接下来,我们通过jQuery插件形式来实现放大镜效果,当鼠标移动到small对象上方时,就会在large对象中显示大图的对应位置,这就涉及到mousemove事件了,所以,我们需要实现mousemove事件的监听方法(如何定义jQuery插件可以参考《自定义jQuery插件Step by Step》)。
现在,让我们实现jquery.imagezoom.js插件吧!
(function ($) {

    $.fn.imageZoom = function (options) {

    // The native width and height of the image.

    var native_width = ,

        native_height = ,

        current_width = ,

        current_height = ,

        $small = $(".small"),

        $large = $(".large");

    $(".magnify").mousemove(function (e) {

        /* Act on the event */

        if (!native_width && !native_height) {

            var image_object = new Image();

            image_object.src = $small.attr('src');

            // Gets the image native height and width.

            native_height = image_object.height;

            native_width = image_object.width;

            // Gets the image current height and width.

            current_height = $small.height();

            current_width = $small.width();

        } else {

            // Gets .maginfy offset coordinates.

            var magnify_offset = $(this).offset(),

                // Gets coordinates within .maginfy.

                mx = e.pageX - magnify_offset.left,

                my = e.pageY - magnify_offset.top;

            // Checks the mouse within .maginfy or not.

            if (mx < $(this).width() && my < $(this).height() && mx >  && my > ) {

                $large.fadeIn();

            } else {

                $large.fadeOut();

            } if ($large.is(":visible")) {

                /* Gets the large image coordinate by ratio

                   small.x / small.width = large.x / large.width

                   small.y / small.height = large.y / large.height

                   then we need to keep pointer in the centre,

                   so deduct the half of .large width and height.

                */

                var rx = Math.round(mx / $small.width() * native_width - $large.width() / ) * -,

                    ry = Math.round(my / $small.height() * native_height - $large.height() / ) * -,

                    bgp = rx + "px " + ry + "px",

                    px = mx - $large.width() / ,

                    py = my - $large.height() / ;

                $large.css({

                    left: px,

                    top: py,

                    backgroundPosition: bgp

                });

            }

        }

    });

});
上面,我实现了mousemove事件的监听方法,当鼠标移动到magnify对象中,我们需要获取当前鼠标的相对坐标位置,下面我们通过图片讲解如何获取鼠标的相对坐标位置。
相对坐标
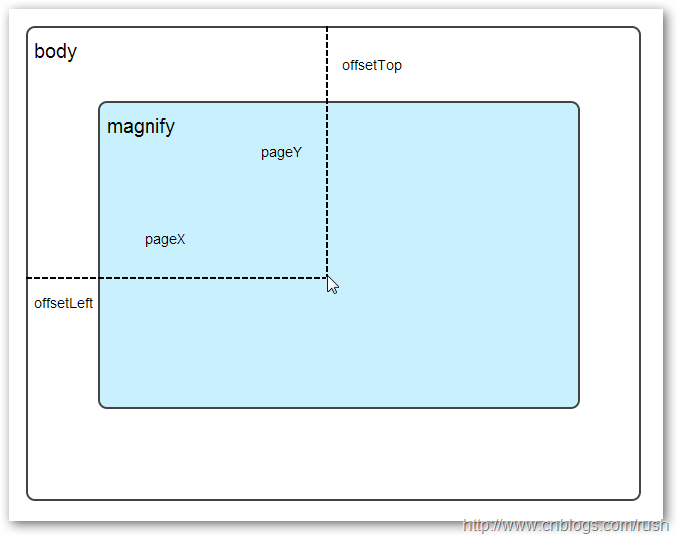
图1鼠标相对坐标位置
当鼠标移动到magnify对象中,我们需要获取鼠标在magnify中的相对坐标位置,这里我们把相对坐标定义为(mx,my),通过上图我们知道相对坐标等于(pageX - offsetLeft, pageY - offsetTop)。
现在,我们已经获取鼠标在magnify对象中的坐标值,接下来,需要获取对应大图的相应坐标,这里我们把大图的对应坐标定义为(rx,ry),我们可以通过比例关系获取(rx,ry)的值。
mx / small.width (原图的宽)= rx / native_width(大图的宽)
my / small.height (原图的长)= ry / native_height(大图的长)
通过上面的比例关系,我们知道大图的坐标(rx,ry)等于(mx/small.width*native_width, my/small.height*native_height)。
通过上述的公式,我们可以获取大图对应坐标位置,当鼠标移动到magnify对象中就显示对应位置的大图部位,接下来我们需要实现大图的加载实现了。
background-position属性
在实现大图加载显示之前,首先介绍CSS中背景定位background-position的知识。
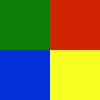
图2 CSS background-position
上面,有一个100x100像素的图片它由四种颜色组成,而且每种颜色占50 x50像素,接下来,我们将通过修改该图片CSS的background-position属性值来显示该图片的不同位置。
.da-center {margin:  auto;}?a.myLink

{

  display:block;

  background-Image:url('http://tech.pro/_sotc/sites/default/files/92/images/test.png');

  width: 50px;

  height: 50px;

}

a.myLink:hover

{

  background-position:-50px -50px;

}

.demoTable td

{

  padding:0px 10px 10px 10px;

}
HTML:
<table class="demoTable"><tr><td>

    <tr><td colspan=""><center><div style="height:100px;width:100px;background-Image:url('http://tech.pro/_sotc/sites/default/files/92/images/test.png')"></div></center></td></tr>

<tr>

<td>

<div style="height:50px;width:50px;background-Image:url('http://tech.pro/_sotc/sites/default/files/92/images/test.png');background-position:0px 0px;"></div>

</td>

<td>

<div style="height:50px;width:50px;background-Image:url('http://tech.pro/_sotc/sites/default/files/92/images/test.png');background-position:-50px 0px;"></div>

</td>

<td>

<div style="height:50px;width:50px;background-Image:url('http://tech.pro/_sotc/sites/default/files/92/images/test.png');background-position:0px -50px;"></div>

</td>

<td>

<div style="height:50px;width:50px;background-Image:url('http://tech.pro/_sotc/sites/default/files/92/images/test.png');background-position:-50px -50px;"></div>

</td>

</tr>

<tr>

<td>

<div style="height:50px;width:50px;background-Image:url('http://tech.pro/_sotc/sites/default/files/92/images/test.png');background-position:25px 25px;"></div>

</td>

<td>

<div style="height:50px;width:50px;background-Image:url('http://tech.pro/_sotc/sites/default/files/92/images/test.png');background-position:-25px 25px;"></div>

</td>

<td>

<div style="height:50px;width:50px;background-Image:url('http://tech.pro/_sotc/sites/default/files/92/images/test.png');background-position:25px -25px;"></div>

</td>

<td>

<div style="height:50px;width:50px;background-Image:url('http://tech.pro/_sotc/sites/default/files/92/images/test.png');background-position:-25px -25px;"></div>

</td>

</tr>

</table>
我们看到在大正方形下有两行小正方形,它们显示的颜色位置都不相同,这里我们通过修改每个div元素CSS的background-position属性值实现的。
例如:第一行的蓝色方形,我们设置CSS的background-position属性为:0px -50px;这相当于原图往上移动50px,第一行的其他方形也通过左右和上下移动实现的。
但第二行的方形就显得更加奇怪了,因为它们都由四种颜色组成,而且颜色的位置都不一样,这究竟是怎样实现的呢?
例如:第二行的第一个方形,我们设置CSS的background-position属性为:25px 25px;这相当于原图向下和向右移动了25px,由于image wrap的作用它会填充剩余位置的颜色。
现在,我们已经了解到了CSS的background-position属性的作用,所以我们通过修改large对象的background-position属性来显示对应的图像部分,具体实现如下:
$large.css({

    left: px,

    top: py,

    backgroundPosition: bgp

});
上面,我们通过加载大图的方式来实现放大镜效果,接下来,我们将介绍通过调整原图的长和宽来实现放大镜效果。
mousewheel事件
前面,我们通过mousemove事件来放大图片,这里我们将通过鼠标的滚轮事件实现图片放大效果。
由于,不同的浏览器有不同的滚轮事件。主要是有三种:onmousewheel(IE 6/7/8)、mousewheel(IE9,Chrome,Safari和Opera)和DOMMouseScroll(只有Firefox支持),关于这三个事件这里不做详细的介绍了。
由于不同浏览器之间存在着差异,为了实现浏览器之间的兼容,所以,我们需要监听以上三种滚轮事件(onmousewheel,mousewheel和DOMMouseScroll),具体实现如下:
$(".magnify").bind('DOMMouseScroll mousewheel onmousewheel', function(e) {

});
上面,我们实现了兼容不同浏览器的滚轮事件监听方法,接下来,判断滚轮向上或向下也要考虑不同浏览器的兼容性,主流的览器(IE、Opera、Safari、Firefox、Chrome)中Firefox 使用detail,其余四类使用wheelDelta;两者只在取值上不一致,代表含义一致,detail与wheelDelta只各取两个值,detail只取±3,wheelDelta只取±120,其中正数表示为向上,负数表示向下。
由于detail和wheelDelta都有两个值表示向上或向下滚动,所以不同浏览器间可以通过以下方式实现兼容,具体实现如下:
$(".magnify").bind('DOMMouseScroll mousewheel onmousewheel', function(e) {

    // cross-browser wheel delta

    var e = window.event || e; // old IE support.

    var delta = Math.max(-, Math.min(, (e.wheelDelta || -e.detail)));

});
上面,我们已经处理了不同浏览器滚轮监听方法,当用户滚动滚轮时需要动态地修改原图的尺寸,这里我们定义缩放比scaling为0.3,也就是说每当用户滚动一下滚轮原图就按0.3的比例进行缩放,具体实现如下:
// Gets the image scaling height and width.

native_height += (native_height * scaling * delta);

native_width += (native_width * scaling * delta);

// Update backgroud image size.

$large.css('background-size', native_width + "px " + native_height + "px");
现在,我们已经实现了通过滚轮对图片进行缩放查看的效果,完整的实现如下:
/***********************************

* Author: Jackson Huang

* Blog: http://www.cnblogs.com/rush

* Date: 8/23/2013

* Reference:

* http://www.sitepoint.com/html5-javascript-mouse-wheel/

* http://thecodeplayer.com/walkthrough/magnifying-glass-for-images-using-jquery-and-css3

***********************************/

;

(function($) {

    $.fn.imageZoom = function(options) {

        // The native width and height of the image.

        var defaults = {

            scaling: 0.3

        };

        // Combines object defaults and options.

        options = $.extend(defaults, options),

            native_width = ,

            native_height = ,

            current_width = ,

            current_height = ,

            $small = $(".small"),

            $large = $(".large");

        $(".magnify").mousemove(function(e) {

            /* Act on the event */

            if (!native_width && !native_height) {

                var image_object = new Image();

                image_object.src = $small.attr('src');

                // Gets the image native height and width.

                native_height = image_object.height;

                native_width = image_object.width;

                // Gets the image current height and width.

                current_height = $small.height();

                current_width = $small.width();

            } else {

                // Gets .maginfy offset coordinates.

                var magnify_offset = $(this).offset(),

                // Gets coordinates within .maginfy.

                    mx = e.pageX - magnify_offset.left,

                    my = e.pageY - magnify_offset.top;

                // Checks the mouse within .maginfy or not.

                if (mx < $(this).width() && my < $(this).height() && mx >  && my > ) {

                    $large.fadeIn();

                } else {

                    $large.fadeOut();

                }

                if ($large.is(":visible")) {

                    /* Gets the large image coordinate by ratio

                    small.x / small.width = large.x / large.width

                    small.y / small.height = large.y / large.height

                    then we need to keep pointer in the centre,

                    so deduct the half of .large width and height.

                    */

                    var rx = Math.round(mx / $small.width() * native_width - $large.width() / ) * -,

                        ry = Math.round(my / $small.height() * native_height - $large.height() / ) * -,

                        bgp = rx + "px " + ry + "px",

                        px = mx - $large.width() / ,

                        py = my - $large.height() / ;

                    $large.css({

                        left: px,

                        top: py,

                        backgroundPosition: bgp

                    });

                }

            }

        });

        $(".magnify").bind('DOMMouseScroll mousewheel onmousewheel', function(e) {

            var image_object = new Image();

            image_object.src = $large.attr('src');

            // cross-browser wheel delta

            e = window.event || e; // old IE support.

            var delta = Math.max(-, Math.min(, (e.wheelDelta || -e.detail)));

            // Gets the image scaling height and width.

            native_height += (native_height * defaults.scaling * delta);

            native_width += (native_width * defaults.scaling * delta);

            // The image can't smaller than the original.

            if (native_height < current_height) {

                native_height = current_height;

            }

            if (native_width < current_width) {

                native_width = current_width;

            }

            // console.log("native_height: " + native_height + " native_width: " + native_width);

            // Gets .maginfy offset coordinates.

            var magnify_offset = $(this).offset(),

                mx = e.pageX - magnify_offset.left,

                my = e.pageY - magnify_offset.top;

            // Update backgroud image size.

            $large.css('background-size', native_width + "px " + native_height + "px");

            /* Gets the large image coordinate by ratio

            small.x / small.width = large.x / large.width

            small.y / small.height = large.y / large.height

            then we need to keep pointer in the centre,

            so deduct the half of .large width and height.

            */

            var rx = Math.round(mx / $small.width() * native_width - $large.width() / ) * -,

                ry = Math.round(my / $small.height() * native_height - $large.height() / ) * -,

                bgp = rx + "px " + ry + "px",

                px = mx - $large.width() / ,

                py = my - $large.height() / ;

            $large.css({

                left: px,

                top: py,

                backgroundPosition: bgp

            });

        });

    };

})(jQuery);

上面,我们实现了放大镜效果,当我们鼠标停留在图片上方会自动放大图片的相应部位,当然我们可以通过滚轮调整放大的比例。
1.1.3 总结
在本博文中,我们介绍了如何实现放大镜效果,总的来说,我们可以通过两种方式实现放大镜效果,而且在博文中都给出了详细的介绍,通过mousemove事件实现加载大图的效果,mousewheel事件实现动态修改原图的尺寸。
这只是一个简单的程序,我们还有很大的改善空间,提供一个内容丰富和功能强大的程序是我们的目标。
关于jQuery中实现放大镜效果的更多相关文章
- jQuery实现图片放大镜效果
实现图片放大镜的原理: 给放大镜元素一个对应的html元素为<div class='right'> 设置这个div的宽高固定为某个值(350px,350px) 设置div的css为超出部分 ...
- Unity中做放大镜 效果
孙广东 2015.8.16 事实上和 小地图都几乎相同了. 还是要借助 还有一个相机 目的: 这篇文章的主要目的是 要给你一个想法 怎样做放大境效果 . 在unity中能够简单的实现放大镜效果啊 ...
- jQuery中常用网页效果应用
一.常用网页效果应用 1.表单应用 表单由表单标签.表单域和表单按钮组成. 1.1单行文本框应用 例:获取和失去焦点改变样式 首先,在网页中创建一个表单,HTML代码如下 <form actio ...
- jQuery实现放大镜效果
1.1.1 摘要 相信大家都见过或使用过放大镜效果,甚至实现过该效果,它一般应用于放大查看商品图片,一些电商网站(例如:凡客,京东商城,阿里巴巴等)都有类似的图片查看效果. 在接下来的博文中,我们将向 ...
- jquery+js实现鼠标位移放大镜效果
jQuery实现仿某东商品详情页放大镜效果 用jquery+js实现放大镜效果,效果大概如下图! 效果是不是大家很感兴趣,放大镜查看细节,下边大家可以详细看一看具体是怎么实现的.下边直接看代码! HT ...
- js---电商中常见的放大镜效果
js中的放大镜效果 在电商中,放大镜效果是很常见的,如下图所示: 当鼠标悬浮时,遮罩所在区域在右侧进行放大. 在动手写之前,我们要先理清思路,分析需求,所需知识点,再将每一块进行组装,最后进行功能的完 ...
- Jquery中的事件和动画
在学习Jquery中的过程中我们绝大部分都用到了事件的操作,也可以说事件是Jquery中必不可少的一部分,我们常见的一些事件有单击事件,鼠标事件,键盘事件等等.在Jquery中的学习中为了能使让页面以 ...
- 使用jquery实现放大镜效果
原文:使用jquery实现放大镜效果 实现原理 首先,我们讲解一下放大镜效果的实现方式: 方法一:准备一张高像素的大图,当鼠标放到原图上,加载显示大图的对应位置. 方法二:对原图片进行放大,也就是调整 ...
- js、jquery实现放大镜效果
在一些电商网站的商品详情页面,都会有放大镜效果,实现起来并不是很困难,今天用了两个小时,写了一个放大镜效果的实例,来分享给大家! 实现的效果大概是这个样子的 预览 先来看一下效果吧,点击下面的链接预览 ...
随机推荐
- linux 下 systemd-udevd 服务解析
最近在看linux下重定向的时候看到 的这个系统的服务,所以记下来备忘. 描述:systemd-udevd是监听内核发出的设备事件,并根据udev规则处理每个事件. 选项: --daemon 脱离控制 ...
- JS高程3.基本概念(3)
1.ECMAScript数值的范围 由于内存的限制,在大多数浏览器中,ECMAScript能够拿保存的数据的范围是 5e-324 ~ 1.7976931348623157e+308,其中最小的数值保存 ...
- 图标字体(IconFont)制作
图标字体(IconFont)介绍 图标字体(IconFont)现在越来越被广泛使用,大大提高了网页的多样化,解决了视网膜屏幕失真的问题. 据说微软从IE4开始支持的这个私有方法(@font-face) ...
- C# PPT Operator
来自:http://blog.csdn.net/lxzh12345/article/details/47047491 最近在写一个工具,设计到将界面内容到处到PPT中,且导出的内容能够编辑.网上搜了很 ...
- 时间戳转化为日期TimeStamp转NSDate转NSString
//时间戳处理 NSInteger time = [self.album.updatedAt integerValue] / 1000; NSNumber *timer = [NSNumber num ...
- android 性能优化
本章介绍android高级开发中,对于性能方面的处理.主要包括电量,视图,内存三个性能方面的知识点. 1.视图性能 (1)Overdraw简介 Overdraw就是过度绘制,是指在一帧的时间内(16. ...
- ArrayList 浅析示例
package com.smbea.demo; import java.util.ArrayList; import java.util.Iterator; import java.util.List ...
- php设计模式 装饰器模式
装饰器模式,可以动态地添加修改类的功能. 一个类提供了一项功能,如果要修改并添加额外的功能,传统的编程模式需要写一个子类继承它,并重新实现类的方法.使用装饰器模式,仅需要在运行时添加一个装饰器对象即可 ...
- web.xml 中的listener、 filter、servlet 加载顺序及其详解
在项目中总会遇到一些关于加载的优先级问题,近期也同样遇到过类似的,所以自己查找资料总结了下,下面有些是转载其他人的,毕竟人家写的不错,自己也就不重复造轮子了,只是略加点了自己的修饰. 首先可以肯定的是 ...
- Git 技能总结
创建和使用git ssh key 首先设置git的user name和email: git config --global user.name "xxx" git config - ...