
原生js 基于canvas写一个简单的前端 截图工具
先看效果
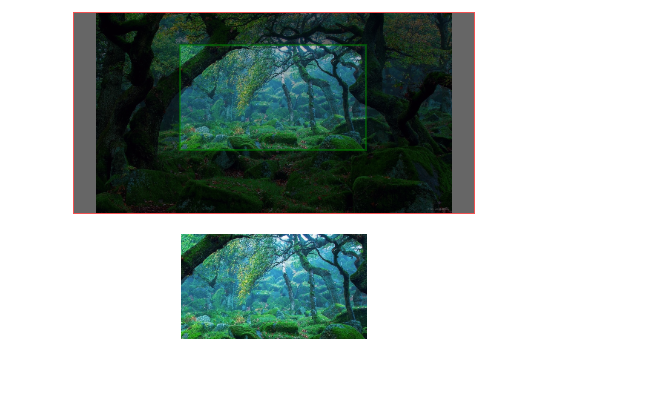

<!DOCTYPE html>

<html lang="zh">

	<head>

		<meta charset="UTF-8">

		<meta name="viewport" content="width=device-width, initial-scale=1.0">

		<meta http-equiv="X-UA-Compatible" content="ie=edge">

		<title></title>

		<style type="text/css">

			* {

				padding: 0;

				margin: 0;

				font-size: 14px;

			}

			#box {

				width: 400px;

				height: 400px;

				border: 1px solid red;

				margin: 20px auto;

				position: relative;

			}

			#operate {

				text-align: center;

				;

			}

			#operate p {

				margin-bottom: 6px;

			}

			input[type=file] {

				display: none;

			}

			label {

				display: inline-block;

				cursor: pointer;

				background: #38f;

				color: #fff;

				width: 102px;

				height: 38px;

				line-height: 38px;

				border-radius: 4px;

			}

			#clipcanvas {

				position: absolute;

				top: 0;

				left: 0;

				z-index: 10;

				width: 100%;

				height: 100%;

			}

		</style>

	</head>

	<body>

		<div id="box">

			<canvas id="canvas" width="400" height="400"></canvas>

			<canvas id="clipcanvas"></canvas>

		</div>

		<div id="operate">

			<p><label><input type="file" name="" id="bg" value="" />选择头像</label></p>

			<p><label><input type="file" name="" id="flag" value="" />选择上层</label></p>

			<p><input type="text" name="" id="posX" value="0" />请输入上层x位置</p>

			<p><input type="text" name="" id="posY" value="0" />请输入上层y位置</p>

			<p><label id="create">直接生成</label></p>

			<p><label id="reset">重新截图</label></p>

		</div>

		<a href="" download="logo.png" title="点击下载" id="down">

			<img src="" id="result">

		</a>

	</body>

	<script type="text/javascript">

		const canvas = document.getElementById("canvas");

		const ctx = canvas.getContext("2d");

		const baseW = 400;

		const flagW = 100;

		let bgConfig;

		let flagConfig;

		document.getElementById("bg").onchange = async function() {

			const file = this.files[0];

			try {

				const img = await getImageObj(file);

				const rate = compress(img, baseW);

				bgConfig = [img, 0, 0, img.width, img.height, 0, 0, rate.w, rate.h];

				drawn();

			} catch (e) {

				console.error(e);

			}

		};

		document.getElementById("flag").onchange = async function() {

			const file = this.files[0];

			try {

				const img = await getImageObj(file);

				const rate = compress(img, flagW);

				flagConfig = [img, 0, 0, img.width, img.height, 0, 0, rate.w, rate.h];

				drawn();

			} catch (e) {

				console.error(e);

			}

		};

		document.getElementById("posX").onchange = function() {

			let val = Number(this.value) || 0;

			flagConfig[5] = val;

			drawn();

		}

		document.getElementById("posY").onchange = function() {

			let val = Number(this.value) || 0;

			flagConfig[6] = val;

			drawn();

		}

		function drawn() {

			ctx.clearRect(0, 0, canvas.clientWidth, canvas.clientHeight);

			if (bgConfig) {

				ctx.drawImage(...bgConfig);

			}

			if (flagConfig) {

				ctx.drawImage(...flagConfig);

			}

		}

		//图片压缩,获取等比缩放后的结果

		function compress(img, base) {

			let w = img.width;

			let h = img.height;

			if (img.width > img.height) {

				if (img.width > base) {

					//要将宽度缩放

					w = base;

					h = (w / img.width) * img.height; // 新的 宽比 高 = 旧的宽比高  h / w = img.heigth/img.width  ;

				}

			} else {

				if (img.height > base) {

					h = base;

					w = (h / img.height) * img.width;

				}

			}

			return {

				w,

				h

			};

		}

		function getImageObj(file) {

			const url = getObjectURL(file);

			const img = new Image();

			img.src = url;

			return new Promise((resolve, reject) => {

				img.onload = function() {

					resolve(img);

				}

				img.onerror = function(e) {

					reject(e);

				}

			});

		}

		//取得该文件的url

		function getObjectURL(file) {

			var url = null;

			if (window.createObjectURL != undefined) {

				url = window.createObjectURL(file);

			} else if (window.URL != undefined) {

				url = window.URL.createObjectURL(file);

			} else if (window.webkitURL != undefined) {

				url = window.webkitURL.createObjectURL(file);

			}

			return url;

		}

		//截图

		var clipcanvas = document.getElementById("clipcanvas");

		var clipctx = clipcanvas.getContext("2d");

		clipcanvas.width = canvas.clientWidth;

		clipcanvas.height = canvas.clientHeight;

		var start = null;

		var clipArea = {}; //裁剪范围

		clipcanvas.onmousedown = function(e) {

			start = {

				x: e.offsetX,

				y: e.offsetY

			};

		}

		clipcanvas.onmousemove = function(e) {

			if (start) {

				fill(start.x, start.y, e.offsetX - start.x, e.offsetY - start.y)

			}

		}

		document.addEventListener("mouseup", function() {

			if (start) {

				start = null;

				exportImg(clipArea);

			}

		});

		//重新截图

		document.getElementById("reset").onclick = function(){

			clipctx.clearRect(0, 0, clipcanvas.width, clipcanvas.height);

		}

		//直接生成

		document.getElementById("create").onclick = function(){

		 	exportImg({

				x:0,

				y:0,

				w:canvas.clientWidth,

				h:canvas.clientHeight,

			})

		}

		function fill(x, y, w, h) {

			clipctx.clearRect(0, 0, clipcanvas.width, clipcanvas.height);

			clipctx.beginPath();

			clipctx.fillStyle = 'rgba(0,0,0,0.6)';

			clipctx.strokeStyle = "green";

			//遮罩层

			clipctx.globalCompositeOperation = "source-over";

			clipctx.fillRect(0, 0, clipcanvas.width, clipcanvas.height);

			//画框

			clipctx.globalCompositeOperation = 'destination-out';

			clipctx.fillRect(x, y, w, h);

			//描边

			clipctx.globalCompositeOperation = "source-over";

			clipctx.moveTo(x, y);

			clipctx.lineTo(x + w, y);

			clipctx.lineTo(x + w, y + h);

			clipctx.lineTo(x, y + h);

			clipctx.lineTo(x, y);

			clipctx.stroke();

			clipctx.closePath();

			clipArea = {

				x,

				y,

				w,

				h

			};

		}

		function startClip(area) {

			var canvas = document.createElement("canvas");

			canvas.width = area.w;

			canvas.height = area.h;

			var data = ctx.getImageData(area.x, area.y, area.w, area.h);

			var context = canvas.getContext("2d");

			context.putImageData(data, 0, 0);

			return canvas.toDataURL("image/png");

		}

		function exportImg(clipArea){

			var url = startClip(clipArea);

			document.getElementById("result").src = url;

			document.getElementById("down").href = url;

		}

	</script>

</html>
原生js 基于canvas写一个简单的前端 截图工具的更多相关文章
- 用node.js从零开始去写一个简单的爬虫
如果你不会Python语言,正好又是一个node.js小白,看完这篇文章之后,一定会觉得受益匪浅,感受到自己又新get到了一门技能,如何用node.js从零开始去写一个简单的爬虫,十分钟时间就能搞定, ...
- 用Canvas写一个简单的游戏--别踩白块儿
第一次写博客也不知怎么写,反正就按照我自己的想法来吧!怎么说呢?还是不要扯那些多余的话了,直接上正题吧! 第一次用canvas写游戏,所以挑个简单实现点的来干:别踩白块儿,其他那些怎么操作的那些就不用 ...
- 使用 js,自己写一个简单的滚动条
当我们给元素加上 overflow: auto; 的时候,就会出现滚动条,然而浏览的不同,滚动条的样式大不一样,有些甚至非常丑. 于是就想着自己写一个滚动条,大概需要弄清楚一下这几个点: 1.滚动条 ...
- 基于Blazor写一个简单的五子棋游戏
写这个五子棋游戏,其实主要目的是想尝试一下微软新作Blazor.Blazor对于那些搞.NET的程序员,又想做一些前端工作,真的挺友好,不用一句JS就可搞定前端交互,美哉.现在已经有很流行的前端框架, ...
- 第一个Three.js程序——动手写一个简单的场景
三维场景基本要素: 步骤: 代码: 源码: <!DOCTYPE html> <html lang="en"> <head> <meta c ...
- js eval函数写一个简单的计算器
<!DOCTYPE html><html lang="en"><head> <meta charset="UTF-8" ...
- 分享:计算机图形学期末作业!!利用WebGL的第三方库three.js写一个简单的网页版“我的世界小游戏”
这几天一直在忙着期末考试,所以一直没有更新我的博客,今天刚把我的期末作业完成了,心情澎湃,所以晚上不管怎么样,我也要写一篇博客纪念一下我上课都没有听,还是通过强大的度娘完成了我的作业的经历.(当然作业 ...
- Particles.js基于Canvas画布创建粒子原子颗粒效果
文章目录 使用方法 自定义参数 相关链接 Particles.js是一款基于HTML5 Canvas画布的轻量级粒子动画插件,可以设置粒子的形状.旋转.分布.颜色等属性,还可以动态添加粒子,效果非常炫 ...
- 原生js实现canvas气泡冒泡效果
说明: 本文章主要分为ES5和ES6两个版本 ES5版本是早期版本,后面用ES6重写优化的,建议使用ES6版本. 1, 原生js实现canvas气泡冒泡效果的插件,api丰富,使用简单2, 只需引入J ...
随机推荐
- main函数中System.exit()的作用
main()主函数再熟悉不过,了解java的人也都知道System.exit()方法是停止虚拟机运行.那这里为什么还要单独写一篇博客,都是源于朋友发的一张最近刚买的T恤照片,就是上面这张图.这是一个经 ...
- 【工具】idea工具 java代码 gbk转utf8
idea工具 https://github.com/downgoon/gbk2utf8 安装在目录下: /usr/local/gbk2utf8/bin 进入目录后直接执行 gbk2utf8 sourc ...
- ajax 函数回调
var initTaxPriod = function (taxNo) { intitSearch(); $("#taxPeriod").html(""); t ...
- flask狗书
Models.py #coding:utf8 fromflaskimportFlask fromflask_sqlalchemyimportSQLAlchemy app=Flask(__name__) ...
- 字符串函数之Strtok()函数
Strtok()函数详解: 该函数包含在"string.h"头文件中 函数原型: char* strtok (char* str,constchar* delimiters ) ...
- Physics Experiment 弹性碰撞 [POJ3684]
题意 有一个竖直的管子内有n个小球,小球的半径为r,最下面的小球距离地面h高度,让小球每隔一秒自由下落一个,小球与地面,小球与小球之间可视为弹性碰撞,让求T时间后这些小球的分布 Input The f ...
- php替换字符串函数strtr()和str_repalce()区别
php中替换函数主要有strtr(),str_repalce()这两个函数,但你们都知道他们这两个函数的区别和用法吗? 先来看看这个php字符串替换函数 strtr()的两种用法: strtr(str ...
- angular.isFunction()
<!DOCTYPE html> <html> <head> <meta charset="UTF-8"> <title> ...
- HTML入门8
今天开始接触HTML里面的多媒体和嵌入内容 前面只讲了文字,下面来讲能够让网页动起来,更加有趣的嵌入元素,包含多媒体,包含图像的不同方式,以及怎样嵌入视频. HTML中图片,下面将深入使用它,以及&l ...
- vue PC端项目中解决userinfo问题
在vue2 中用脚手架建立的项目,后端提供接口获取数据.在公司做第一个项目的时候不清楚公司里的对接流程,结果后续代码被一个接口整的乱七八糟,这个接口是获取用户信息的接口——'usre/info'. 如 ...