调用API修改Ocelot的配置文件
Ocelot是一个基于.net core的开源webapi服务网关开源项目,功能比较强大,Github项目地址为:https://github.com/ThreeMammals/Ocelot,关于Ocelot的学习资料可以看看张善友的网站:http://www.csharpkit.com/apigateway.html。
Ocelot的路由设置是基于配置文件的,同样在Ocelot中使用Consul做服务发现时,也是基于配置文件,当我们修改路由或者需要往Consul中添加ServiceName的时候,需要修改配置文件,网关服务也需要重启,这当然不是我们想要的。
在张善友的帮助下,得知可以通过调用api的方式来修改Ocelot的配置文件,官方文档:https://ocelot.readthedocs.io/en/latest/features/administration.html,本文以示例的方式来介绍怎样通过调用api的方式修改Ocelot的配置文件。
环境
- .net core:2.1.4
- Ocelot:6.0
- IdentityServer4:2.2.0
准备
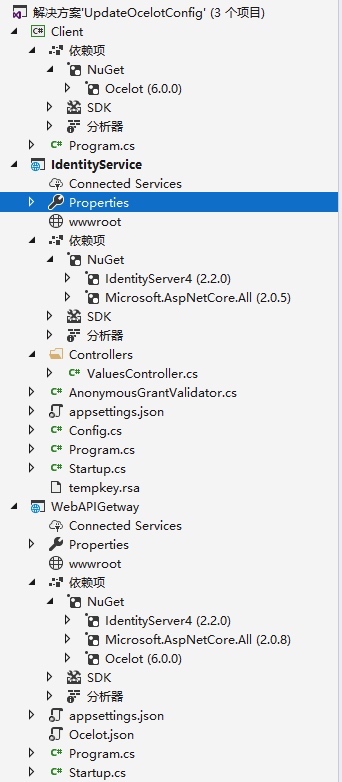
使用VS2017创建解决方案UpdateOcelotConfig,并添加三个项目:
Client
- 控制台项目
- 添加Ocelot包引用
IdentityService
- WebAPI项目
- 添加IdentityServer4包引用
WebAPIGetway
- WebAPI项目
- 添加IdentityServer4包引用
- 添加Ocelot包引用
项目创建完成后如下图:
IdentityService
该项目使用IdentityService4实现一个认证服务,因为在调用Ocelot的api接口时需要用到认证。
1、首先添加对IdentityService4的NuGet包引用;
2、添加Config.cs类,代码如下:
public class Config
{
public static IEnumerable<ApiResource> GetApiResources()
{
return new List<ApiResource>
{
new ApiResource("s2api", "My API")
};
}
public static IEnumerable<Client> GetClients()
{
return new List<Client>
{
new Client
{
ClientId = "client",
AllowedGrantTypes =GrantTypes.ClientCredentials,
ClientSecrets =
{
new Secret("secret".Sha256())
},
AllowedScopes = { "s2api" }
}
};
}
}
3、Startup类修改,代码如下:
public void ConfigureServices(IServiceCollection services)
{
services.AddIdentityServer()
.AddDeveloperSigningCredential()
.AddInMemoryApiResources(Config.GetApiResources())
.AddInMemoryClients(Config.GetClients());
}
public void Configure(IApplicationBuilder app, IHostingEnvironment env)
{
if (env.IsDevelopment())
{
app.UseDeveloperExceptionPage();
}
app.UseIdentityServer();
}
4、修改项目的启动端口为9500。
WebAPIGetWay
该项目是使用Ocelot的网关服务,具体实现步骤如下:
1、添加Ocelot和IdentityService4的NuGet包引用;
2、添加Ocelot.json配置文件,内容如下:
{
"ReRoutes": [
{
"DownstreamPathTemplate": "/api/values",
"DownstreamScheme": "http",
"DownstreamHostAndPorts": [
{
"Host": "localhost",
"Port": 10001
}
],
"UpstreamPathTemplate": "/a/api/values",
"UpstreamHttpMethod": [ "Get" ]
}
],
"GlobalConfiguration": {
"BaseUrl": "http://localhost:10000/"
}
}
3、修改Program.cs类,添加对Ocelot.json文件的引用
public static IWebHost BuildWebHost(string[] args) =>
WebHost.CreateDefaultBuilder(args)
//add ocelot json config file
.ConfigureAppConfiguration((hostingContext, builder) => {
builder
.SetBasePath(hostingContext.HostingEnvironment.ContentRootPath)
.AddJsonFile("Ocelot.json")
.AddEnvironmentVariables();
})
.UseStartup<Startup>()
.UseUrls("http://*:10000")
.Build();
4、Startup类修改,代码如下:
public void ConfigureServices(IServiceCollection services)
{
Action<IdentityServerAuthenticationOptions> options = o =>
{
//IdentityService认证服务的地址
o.Authority = "http://localhost:9500";
//IdentityService项目中Config类中定义的ApiName
o.ApiName = "s2api";
o.RequireHttpsMetadata = false;
o.SupportedTokens = SupportedTokens.Both;
//IdentityService项目中Config类中定义的Secret
o.ApiSecret = "secret";
};
services.AddOcelot()
.AddAdministration("/admin", options);
}
public void Configure(IApplicationBuilder app, IHostingEnvironment env)
{
if (env.IsDevelopment())
{
app.UseDeveloperExceptionPage();
}
app.UseOcelot().Wait();
}
5、修改项目的启动端口为10000.
使用Postman测试下WebAPIGetway和IdentityService
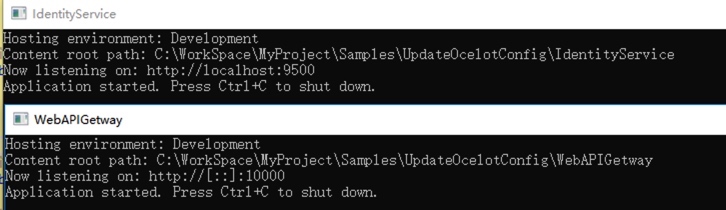
1、设置解决方案的属性,同时启动两个项目
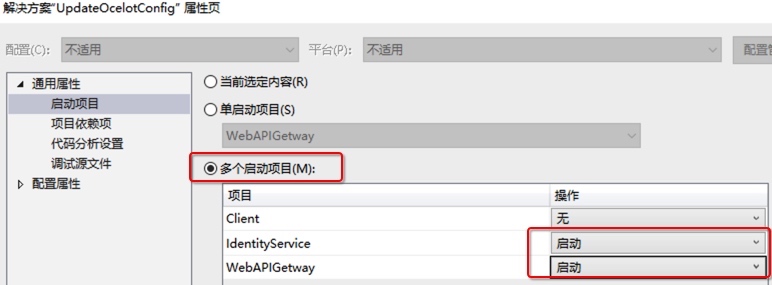
启动后如下图:
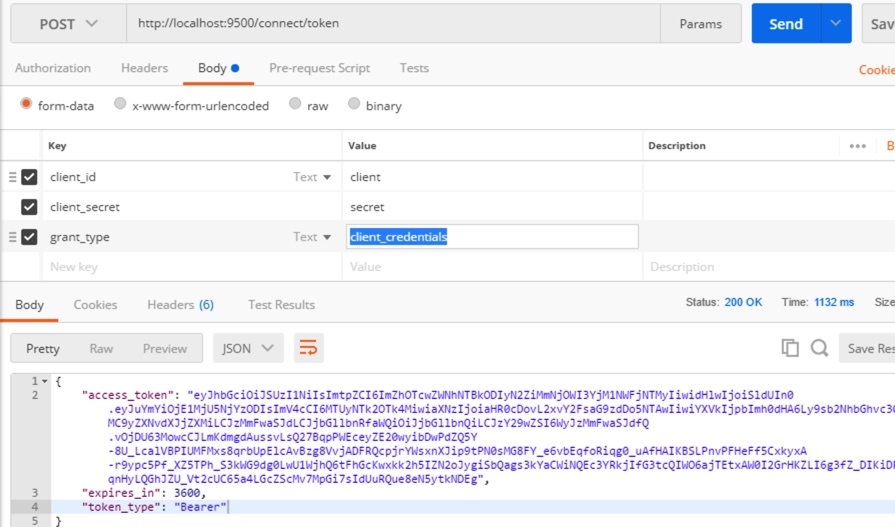
2、在Postman中调用 http://localhost:9500/connect/token,获取token,调用方式为Post,form-data传三个参数:
- client_id:client
- client_secret:secret
- grant_type:client_credentials
调用成功后如下图:
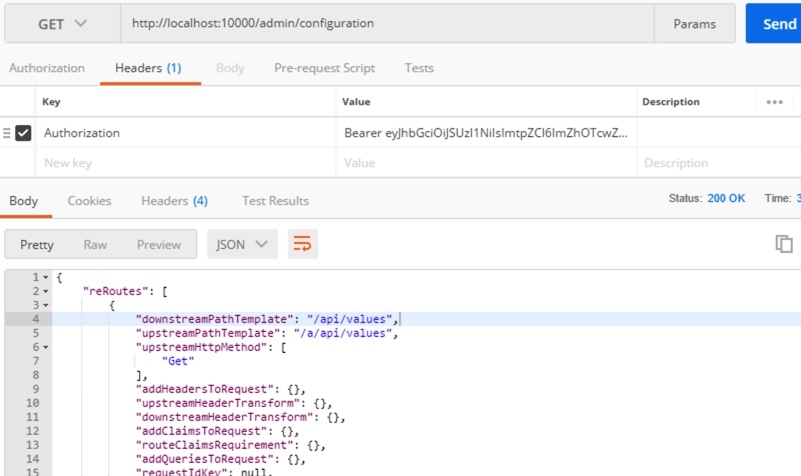
3、在Postman中调用接口 http://localhost:10000/admin/configuration 获取Ocelot的配置,接口路径中的admin是在WebAPIGetway项目中的Startup类中定义的
services.AddOcelot().AddAdministration("/admin", options);
|
该接口请求为Get请求,需要在Headers中设置上面获取的token,格式为:
Authorization:Bearer token |
请求成功如下图:
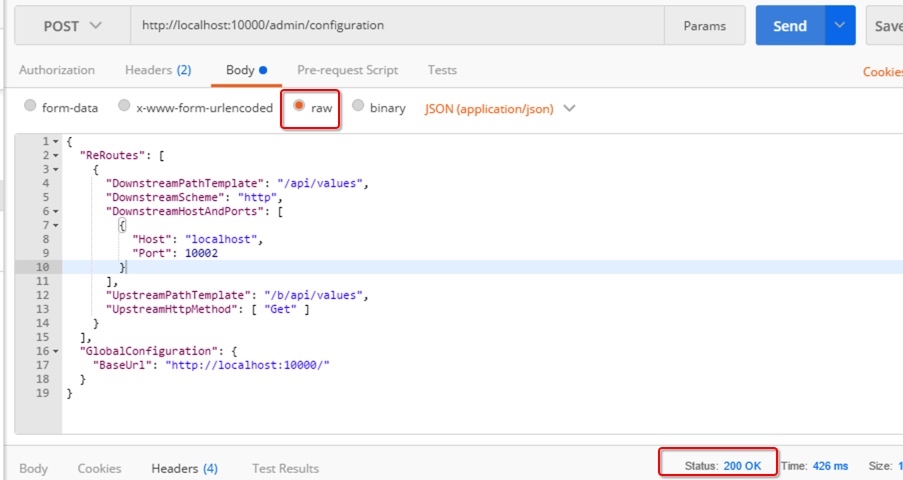
4、在Postman中通过接口 http://localhost:10000/admin/configuration 修改配置,修改和获取配置的接口地址一致,修改时请求为Post,同样在Headers中需要添加token,另外还需要设置Content-Type,格式如下:
Authorization:Bearer tokenContent-Type:application/json |
请求的body就是调整后的json数据,调用成功回返回200,如下图:
5、在WebAPIGetway项目的运行目录中打开Ocelot的配置文件,验证是否修改成功。
使用代码方式来修改配置文件
通过Postman来进行测试如果能够验证通过,说明WebAPIGetway和IdentityService都运行正常,下面在Client项目中用代码的方式来进行配置文件的修改。Client代码如下:
namespace Client
{
class Program
{
static void Main(string[] args) => MainAsync().GetAwaiter().GetResult();
private static async Task MainAsync()
{
//需要修改的配置
var configuration = new FileConfiguration
{
ReRoutes = new List<FileReRoute>
{
new FileReRoute
{
DownstreamPathTemplate = "/api/values",
DownstreamHostAndPorts = new List<FileHostAndPort>
{
new FileHostAndPort
{
Host ="localhost",
Port = 10001,
},
new FileHostAndPort
{
Host ="localhost",
Port = 10002,
}
},
DownstreamScheme = "http",
UpstreamPathTemplate = "/c/api/values",
UpstreamHttpMethod = new List<string> { "Get","Post" }
}
},
GlobalConfiguration = new FileGlobalConfiguration
{
BaseUrl = "http://localhost:10000/"
}
};
// 从元数据中发现客户端
var disco = await DiscoveryClient.GetAsync("http://localhost:9500");
// 请求令牌
var tokenClient = new TokenClient(disco.TokenEndpoint, "client", "secret");
var tokenResponse = await tokenClient.RequestClientCredentialsAsync("s2api");
if (tokenResponse.IsError)
{
Console.WriteLine(tokenResponse.Error);
return;
}
var client = new HttpClient();
client.SetBearerToken(tokenResponse.AccessToken);
HttpContent content = new StringContent(JsonConvert.SerializeObject(configuration));
content.Headers.ContentType = new MediaTypeHeaderValue("application/json");
var response = await client.PostAsync("http://localhost:10000/admin/configuration", content);
Console.ReadLine();
}
}
}
思考
1、Ocelot文档中介绍可以使用外部的IdentityService服务,也可以用内置的,各有什么优缺点?
2、上面例子中是直接将json数据去做更新,有没有什么弊端?是否应该先获取配置,做修改后再更新?
示例代码
本文的示例代码已经放到Github上:https://github.com/oec2003/StudySamples/tree/master/UpdateOcelotConfig
原文地址: http://fwhyy.com/2018/05/Call-API-to-modify-the-configuration-file-of-the-Ocelot/
调用API修改Ocelot的配置文件的更多相关文章
- WPF 调用API修改窗体风格实现真正的无边框窗体
原文:WPF 调用API修改窗体风格实现真正的无边框窗体 WPF中设置无边框窗体似乎是要将WindowStyle设置为None,AllowTransparency=true,这样才能达到WinForm ...
- 【转】【WPF】 WPF 调用API修改窗体风格实现真正的无边框窗体
WPF中设置无边框窗体似乎是要将WindowStyle设置为None,AllowTransparency=true,这样才能达到WinForm中无边框窗体的样式.但是AllowTransparency ...
- ambari rest api (修改集群配置文件)
1.找到你需要修改的配置的最新版本 curl -u admin:admin -H "X-Requested-By: ambari" -X GET http://AMBARI_SER ...
- .NET Core 微服务—API网关(Ocelot) 教程 [四]
前言: 上一篇 介绍了Ocelot网关和认证服务的结合使用,本篇继续介绍Ocelot相关请求聚合和Ocelot限流 一.请求聚合 Ocelot允许声明聚合路由,这样可以把多个正常的Routes打包并映 ...
- .NET Core 微服务—API网关(Ocelot) 教程 [二]
上篇文章(.NET Core 微服务—API网关(Ocelot) 教程 [一])介绍了Ocelot 的相关介绍. 接下来就一起来看如何使用,让它运行起来. 环境准备 为了验证Ocelot 网关效果,我 ...
- .NET Core 微服务—API网关(Ocelot) 教程 [三]
前言: 前一篇文章<.NET Core 微服务—API网关(Ocelot) 教程 [二]>已经让Ocelot和目录api(Api.Catalog).订单api(Api.Ordering)通 ...
- [Hei-Ocelot-Gateway ].Net Core Api网关Ocelot的开箱即用版本
写在前面 很多neter都有在用Ocelot做Api网关,但是Ocelot又不像kong或者其他网关一样,开箱即用.它需要你单独开一个web项目来部署,这样很多同学都在做重复的事了. 这里[Hei.O ...
- .NET5 API 网关Ocelot+Consul服务注册
1|0网关介绍 网关其实就是将我们写好的API全部放在一个统一的地址暴露在公网,提供访问的一个入口.在 .NET Core下可以使用Ocelot来帮助我们很方便的接入API 网关.与之类似的库还有Pr ...
- 32位汇编第四讲,干货分享,汇编注入的实现,以及快速定位调用API的数量(OD查看)
32位汇编第四讲,干货分享,汇编注入的实现,以及快速定位调用API的数量(OD查看) 昨天,大家可能都看了代码了,不知道昨天有没有在汇编代码的基础上,实现注入计算器. 如果没有,今天则会讲解,不过建议 ...
随机推荐
- chrome 調試 node 代碼
(1)node --inspect-brk debug/demo (2)通过 chrome 进行调试 (3) chrome://inspect 进入chrome调试界面 --inspect ...
- HTML 003 元素
HTML 元素 HTML 文档由 HTML 元素定义. HTML 元素 开始标签 * 元素内容 结束标签 * <p> 这是一个段落 </p> <a href=" ...
- 洛谷 P1309 瑞士轮 题解
每日一题 day4 打卡 Analysis 暴力+快排(其实是归并排序) 一开始天真的以为sort能过,结果光荣TLE,由于每次只更改相邻的元素,于是善于处理随机数的快排就会浪费很多时间.于是就想到归 ...
- MongoDB 基本操作 数据库、集合
一.数据库创建与删除 查看当前所有的数据库 show das/show databases 查看当前数据库 db 创建数据库 use hopedb db.dropDatabase() 删除当前数据库 ...
- 四十六.系统审计 服务安全 Linux安全之打补丁
192.168.4.51 1.部署audit监控文件 使用audit监控/etc/ssh/sshd_config 当该文件发生任何变化即记录日志 通过手动和ausearch工具查看日志内容 1 ...
- 三十六.MHA集群概述 、 部署MHA集群 测试配置
1.准备MHA集群环境 准备6台虚拟机,并按照本节规划配置好IP参数 在这些虚拟机之间实现SSH免密登录 在相应节点上安装好MHA相关的软件包 使用6台RHEL 7虚拟机,如图-1所示.准备集群环 ...
- 携程移动端案列(flex布局、背景图缩放,文字阴影)
效果图如下: <body> <div class="nav"> <div class="row"> <div clas ...
- [HNOI2004]L语言 字典树 记忆化搜索
[HNOI2004]L语言 字典树 记忆化搜索 给出\(n\)个字符串作为字典,询问\(m\)个字符串,求每个字符串最远能匹配(字典中的字符串)到的位置 容易想到使用字典树维护字典,然后又发现不能每步 ...
- linux系列(一):ls命令
ls命令是linux下最常用的命令.ls命令就是list的缩写,默认下ls用来打印出当前目录的清单,如果ls指定其他目录,那么就会显示指定目录里的文件及文件夹清单. 通过ls 命令不仅可以查看linu ...
- oop 编程是什么?
面向对象编程(Object Oriented Programming,OOP,面向对象程序设计)是一种计算机编程架构.OOP 的一条基本原则是计算机程序是由单个能够起到子程序作用的单元或对象组合而成.