【Tensorflow】tf.nn.depthwise_conv2d如何实现深度卷积?
实验环境:tensorflow版本1.2.0,python2.7
介绍
depthwise_conv2d来源于深度可分离卷积:
Xception: Deep Learning with Depthwise Separable Convolutions
tf.nn.depthwise_conv2d(input,filter,strides,padding,rate=None,name=None,data_format=None)- 1
除去name参数用以指定该操作的name,data_format指定数据格式,与方法有关的一共五个参数:
input:
指需要做卷积的输入图像,要求是一个4维Tensor,具有[batch, height, width, in_channels]这样的shape,具体含义是[训练时一个batch的图片数量, 图片高度, 图片宽度, 图像通道数]filter:
相当于CNN中的卷积核,要求是一个4维Tensor,具有[filter_height, filter_width, in_channels, channel_multiplier]这样的shape,具体含义是[卷积核的高度,卷积核的宽度,输入通道数,输出卷积乘子],同理这里第三维in_channels,就是参数value的第四维strides:
卷积的滑动步长。padding:
string类型的量,只能是”SAME”,”VALID”其中之一,这个值决定了不同边缘填充方式。rate:
这个参数的详细解释见【Tensorflow】tf.nn.atrous_conv2d如何实现空洞卷积?
结果返回一个Tensor,shape为[batch, out_height, out_width, in_channels * channel_multiplier],注意这里输出通道变成了in_channels * channel_multiplier
实验
为了形象的展示depthwise_conv2d,我们必须要建立自定义的输入图像和卷积核
img1 = tf.constant(value=[[[[1],[2],[3],[4]],[[1],[2],[3],[4]],[[1],[2],[3],[4]],[[1],[2],[3],[4]]]],dtype=tf.float32)

img2 = tf.constant(value=[[[[1],[1],[1],[1]],[[1],[1],[1],[1]],[[1],[1],[1],[1]],[[1],[1],[1],[1]]]],dtype=tf.float32)

img = tf.concat(values=[img1,img2],axis=3)
filter1 = tf.constant(value=0, shape=[3,3,1,1],dtype=tf.float32)
filter2 = tf.constant(value=1, shape=[3,3,1,1],dtype=tf.float32)
filter3 = tf.constant(value=2, shape=[3,3,1,1],dtype=tf.float32)
filter4 = tf.constant(value=3, shape=[3,3,1,1],dtype=tf.float32)
filter_out1 = tf.concat(values=[filter1,filter2],axis=2)
filter_out2 = tf.concat(values=[filter3,filter4],axis=2)
filter = tf.concat(values=[filter_out1,filter_out2],axis=3)建立好了img和filter,就可以做卷积了
out_img = tf.nn.conv2d(input=img, filter=filter, strides=[1,1,1,1], padding='VALID')- 1
好了,用一张图来详细展示这个过程 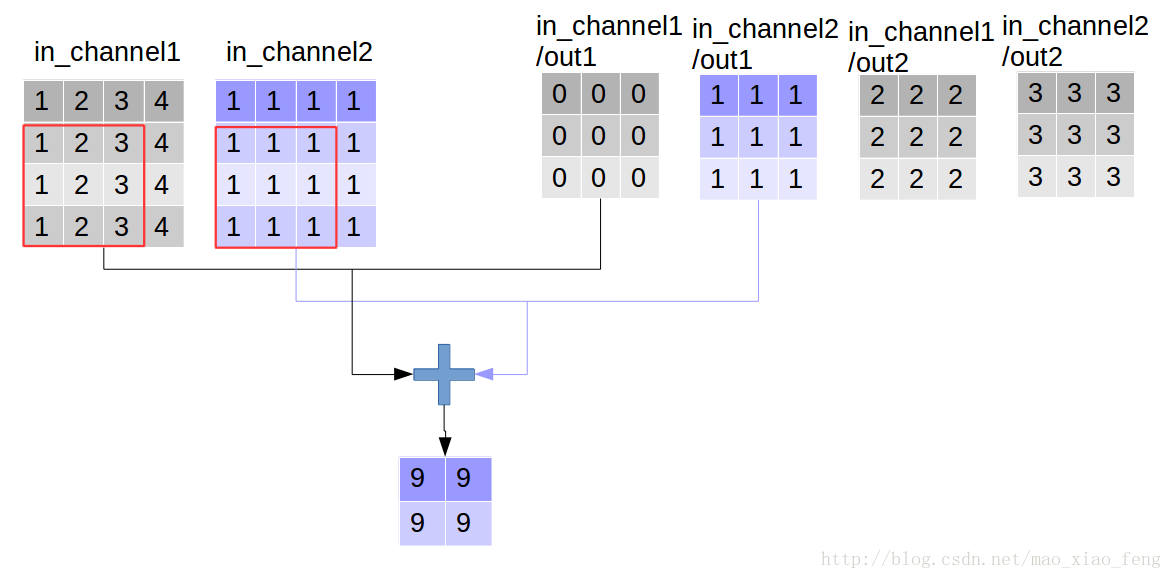
这是普通的卷积过程,我们再来看深度卷积。
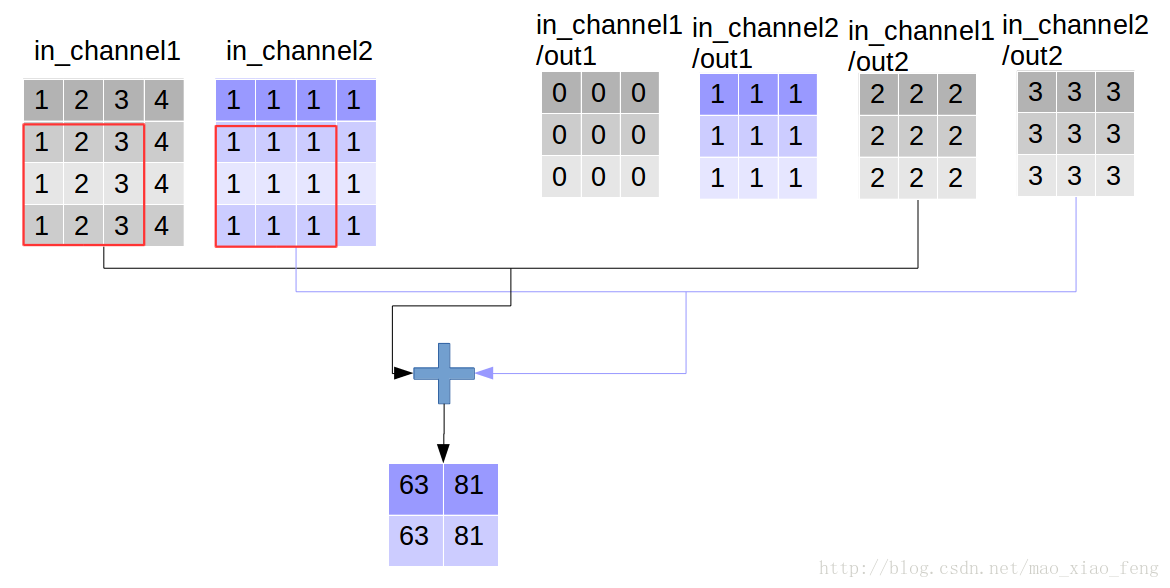
out_img = tf.nn.depthwise_conv2d(input=img, filter=filter, strides=[1,1,1,1], rate=[1,1], padding='VALID')- 1
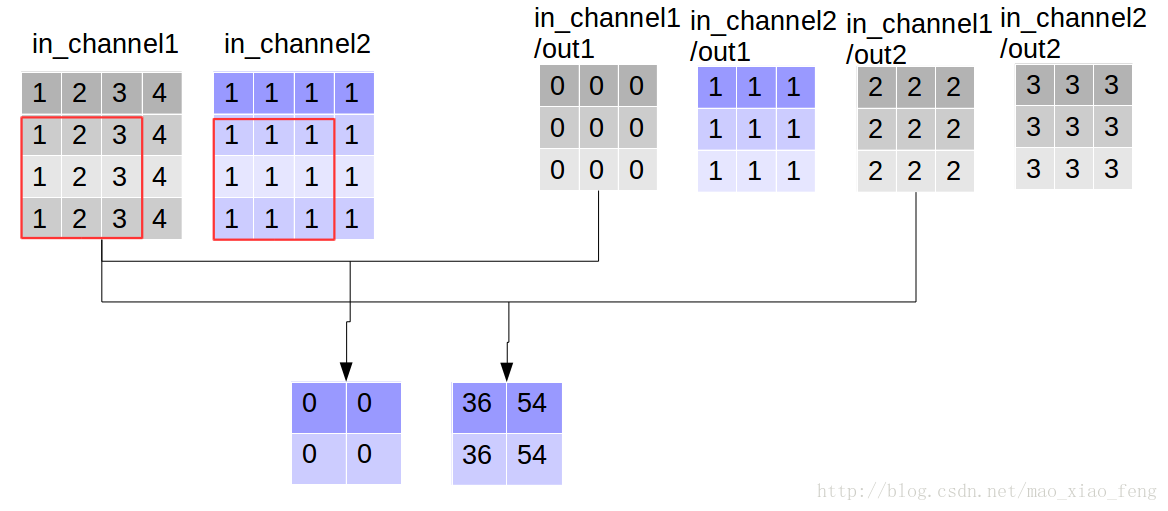
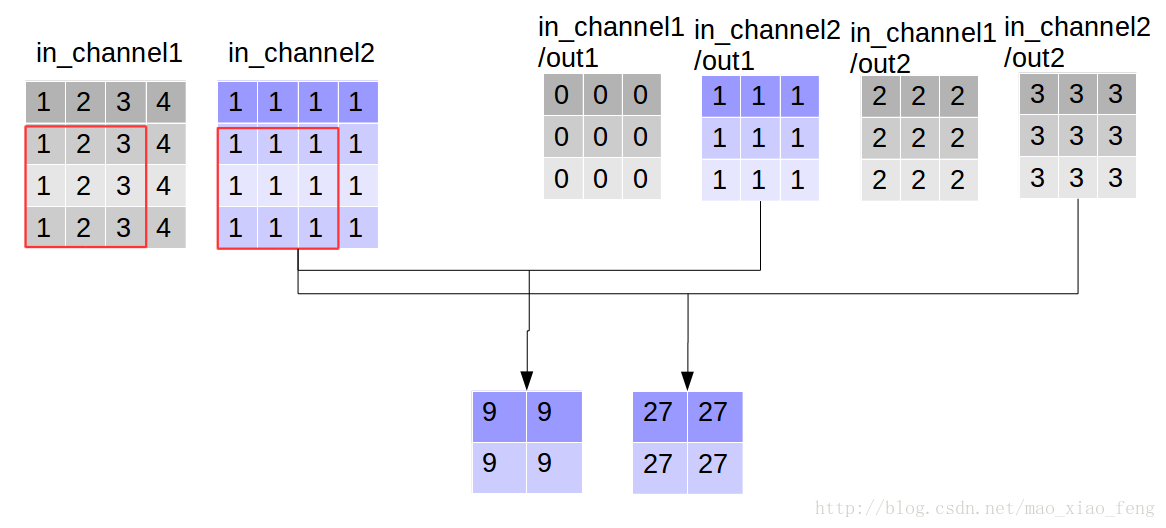
现在我们可以形象的解释一下depthwise_conv2d卷积了。看普通的卷积,我们对卷积核每一个out_channel的两个通道分别和输入的两个通道做卷积相加,得到feature map的一个channel,而depthwise_conv2d卷积,我们对每一个对应的in_channel,分别卷积生成两个out_channel,所以获得的feature map的通道数量可以用in_channel* channel_multiplier来表达,这个channel_multiplier,就可以理解为卷积核的第四维。
代码清单
import tensorflow as tf
img1 = tf.constant(value=[[[[1],[2],[3],[4]],[[1],[2],[3],[4]],[[1],[2],[3],[4]],[[1],[2],[3],[4]]]],dtype=tf.float32)
img2 = tf.constant(value=[[[[1],[1],[1],[1]],[[1],[1],[1],[1]],[[1],[1],[1],[1]],[[1],[1],[1],[1]]]],dtype=tf.float32)
img = tf.concat(values=[img1,img2],axis=3)
filter1 = tf.constant(value=0, shape=[3,3,1,1],dtype=tf.float32)

filter2 = tf.constant(value=1, shape=[3,3,1,1],dtype=tf.float32)

filter3 = tf.constant(value=2, shape=[3,3,1,1],dtype=tf.float32)

filter4 = tf.constant(value=3, shape=[3,3,1,1],dtype=tf.float32)

filter_out1 = tf.concat(values=[filter1,filter2],axis=2)

filter_out2 = tf.concat(values=[filter3,filter4],axis=2)

filter = tf.concat(values=[filter_out1,filter_out2],axis=3)
out_img = tf.nn.depthwise_conv2d(input=img, filter=filter, strides=[1,1,1,1], rate=[1,1], padding='VALID')输出:
rate=1, VALID mode result:

[[[[  0.  36.   9.  27.]

   [  0.  54.   9.  27.]]

  [[  0.  36.   9.  27.]

   [  0.  54.   9.  27.]]]]
【Tensorflow】tf.nn.depthwise_conv2d如何实现深度卷积?的更多相关文章
- tensorflow 之tf.nn.depthwise_conv2d and separable_conv2d实现及原理
Depthwise Separable Convolution 1.简介 Depthwise Separable Convolution 是谷歌公司于2017年的CVPR中在论文”Xception: ...
- tf.nn.depthwise_conv2d 卷积
tf.nn.depthwise_conv2d( input, filter, strides, padding, rate=None, name=None, data_format=None ) 参数 ...
- 【Tensorflow】tf.nn.atrous_conv2d如何实现空洞卷积?膨胀卷积
介绍关于空洞卷积的理论可以查看以下链接,这里我们不详细讲理论: 1.Long J, Shelhamer E, Darrell T, et al. Fully convolutional network ...
- 【TensorFlow】tf.nn.conv2d是怎样实现卷积的?
tf.nn.conv2d是TensorFlow里面实现卷积的函数,参考文档对它的介绍并不是很详细,实际上这是搭建卷积神经网络比较核心的一个方法,非常重要 tf.nn.conv2d(input, fil ...
- tf入门-tf.nn.conv2d是怎样实现卷积的?
转自:https://blog.csdn.net/mao_xiao_feng/article/details/78004522 实验环境:tensorflow版本1.2.0,python2.7 介绍 ...
- [TensorFlow] tf.nn.softmax_cross_entropy_with_logits的用法
在计算loss的时候,最常见的一句话就是tf.nn.softmax_cross_entropy_with_logits,那么它到底是怎么做的呢? 首先明确一点,loss是代价值,也就是我们要最小化的值 ...
- 深度学习原理与框架-图像补全(原理与代码) 1.tf.nn.moments(求平均值和标准差) 2.tf.control_dependencies(先执行内部操作) 3.tf.cond(判别执行前或后函数) 4.tf.nn.atrous_conv2d 5.tf.nn.conv2d_transpose(反卷积) 7.tf.train.get_checkpoint_state(判断sess是否存在
1. tf.nn.moments(x, axes=[0, 1, 2]) # 对前三个维度求平均值和标准差,结果为最后一个维度,即对每个feature_map求平均值和标准差 参数说明:x为输入的fe ...
- 第三节,TensorFlow 使用CNN实现手写数字识别(卷积函数tf.nn.convd介绍)
上一节,我们已经讲解了使用全连接网络实现手写数字识别,其正确率大概能达到98%,这一节我们使用卷积神经网络来实现手写数字识别, 其准确率可以超过99%,程序主要包括以下几块内容 [1]: 导入数据,即 ...
- 【TensorFlow】tf.nn.max_pool实现池化操作
max pooling是CNN当中的最大值池化操作,其实用法和卷积很类似 有些地方可以从卷积去参考[TensorFlow]tf.nn.conv2d是怎样实现卷积的? tf.nn.max_pool(va ...
随机推荐
- Java 之 Session 包含验证码登录案例
需求: 1. 访问带有验证码的登录页面login.jsp 2. 用户输入用户名,密码以及验证码. 如果用户名和密码输入有误,跳转登录页面,提示:用户名或密码错误 如果验证码输入有误,跳转登录页面, ...
- Kali软件库认识
对kali上的软件进行一个初步的认识 信息收集 dmitry -o 将输出保存到%host.txt或由-o文件指定的文件 -i 对主机的IP地址执行whois查找 -w 对主机的域名执行whois查找 ...
- 基于 K8S 集群安装部署 istio-1.2.4
使用云平台可以为组织提供丰富的好处.然而,不可否认的是,采用云可能会给 DevOps 团队带来压力.开发人员必须使用微服务以满足应用的可移植性,同时运营商管理了极其庞大的混合和多云部署.Istio 允 ...
- Linux命令——chattr、lsattr
简介 chattr用于设置文件隐藏属性,lsattr用于查看文件隐藏属性.隐藏属性对系统很有用,尤其是系统安全这一块.但是这两个命令只能在Ext2/Ext3上面有用,其他文件系统可能不支持. chat ...
- Guava Cache 工具类
maven依赖 <dependency> <groupId>com.google.guava</groupId> <artifactId>guava&l ...
- 瑞克和莫蒂|S3E03 Rick为什么要把自己变成一根腌黄瓜?
给尚未入坑Rick and Morty的小伙伴们为一点背景知识 S3E1在说什么? rick从监狱里回来,顺手搞垮了统治地球的银河联邦政府.Jerry因此丢了工作,非常不高兴.于是向Beth质问 ...
- CentOS7安装Chrome
1. 进入官网:https://www.google.cn/intl/zh-CN/chrome/2. 点击下载3. 直接安装:sudo yum localinstall google-chrome-s ...
- Kotlin调用Java程序重点分析
在上一次https://www.cnblogs.com/webor2006/p/11530801.html中学习了Kotlin调用Java的使用方式及一些注意点,这次继续其这个场景进一步学习. 数组( ...
- 一个Tomcat下部署多个项目异常:org.springframework.jmx.export.UnableToRegisterMBeanException: Unable to register MBean 的解决方法
内容简介 在测试服务器上Tomcat下部署两个Spring boot项目,总是一个能启动成功,另一个启动不成功.这两个war包单独部署均能正常启动. 查看日志:启动时报出 org.springfram ...
- Goexit
package main import ( "fmt" "runtime" ) func test() { defer fmt.Println("cc ...