Spring框架 aop操作的注解方法 基于aspectj的自动注解aop方法 抽取相同的value="execution(public void cn.itcast.f_aspect.CRUD.*())"
首先是在xml配置文件中配置好对象,然后开启aop的注解方法——即<aop:aspectj-autoproxy></aop:aspectj-autoproxy>
xml代码如下:
<?xml version="1.0" encoding="UTF-8"?>

<beans xmlns="http://www.springframework.org/schema/beans"

    xmlns:xsi="http://www.w3.org/2001/XMLSchema-instance" xmlns:context="http://www.springframework.org/schema/context"

    xmlns:aop="http://www.springframework.org/schema/aop"

    xsi:schemaLocation="

        http://www.springframework.org/schema/beans http://www.springframework.org/schema/beans/spring-beans.xsd

        http://www.springframework.org/schema/context http://www.springframework.org/schema/context/spring-context.xsd

         http://www.springframework.org/schema/aop http://www.springframework.org/schema/aop/spring-aop.xsd">

    <!-- 开启注解扫描——对象和属性 -->

    <context:component-scan base-package="com.swift"></context:component-scan>

    <bean id="book" class="com.swift.Book"></bean>

    <bean id="adviceBook" class="com.swift.AdviceBook"></bean>

    <!-- 开启aop注解方法 -->

    <aop:aspectj-autoproxy></aop:aspectj-autoproxy>

    <!-- 这是xml 配置文件中aop操作的方法留下对比
     <aop:config>

        <aop:pointcut expression="execution(* com.swift.Book.*())" id="pointcut1"/>

        <aop:aspect ref="adviceBook">

        <aop:before method="before" pointcut-ref="pointcut1"/>
        <aop:after-returning method="after" pointcut-ref="pointcut1"/>
        <aop:around method="around" pointcut-ref="pointcut1"/>

        </aop:aspect>
      </aop:config> -->

</beans>
上面有原来xml配置aop的方法,这时已经不用了,用作参考
被增强的类及方法,代码如下:
package com.swift;

public class Book {

    public String fun() {

        System.out.println("This is Book's fun()..............");

        return "This is Book's fun()..............";

    }

}
用于增强的类及方法,代码如下:
package com.swift;

import org.aspectj.lang.ProceedingJoinPoint;

import org.aspectj.lang.annotation.AfterReturning;

import org.aspectj.lang.annotation.Around;

import org.aspectj.lang.annotation.Aspect;

import org.aspectj.lang.annotation.Before;

@Aspect

public class AdviceBook {

    @Before(value="execution(* com.swift.Book.*(..))")

    public String before() {

        System.out.println("This is AdviceBook's before()...............");

        return "This is AdviceBook's before()...............";

    }

    @AfterReturning(value="execution(* com.swift.Book.*(..))")

    public String after() {

        System.out.println("This is AdviceBook's after()...............");

        return "This is AdviceBook's after()...............";

    }

    @Around(value="execution(* com.swift.Book.*(..))")

    public String around(ProceedingJoinPoint proceedingJoinPoint) throws Throwable {

        System.out.println("This is AdviceBook's front()...............");

        proceedingJoinPoint.proceed();

        System.out.println("This is AdviceBook's end()...............");

        return "This is AdviceBook's around()...............";

    }

}
类的上边用@Aspect表示切面
方法前用@Before(value="表达式") 其中表达式与之前配置方法相同
最后测试类,代码如下:
package com.swift;

import java.io.IOException;

import javax.servlet.ServletException;

import javax.servlet.annotation.WebServlet;

import javax.servlet.http.HttpServlet;

import javax.servlet.http.HttpServletRequest;

import javax.servlet.http.HttpServletResponse;

import org.springframework.context.ApplicationContext;

import org.springframework.context.support.ClassPathXmlApplicationContext;

import com.swift.Book;

@WebServlet("/test")

public class ServleTest extends HttpServlet {

    private static final long serialVersionUID = 1L;

    public ServleTest() {

        super();

    }

    protected void doGet(HttpServletRequest request, HttpServletResponse response) throws ServletException, IOException {

        response.getWriter().append("Served at: ").append(request.getContextPath());

        ApplicationContext context=new ClassPathXmlApplicationContext("aop.xml");

        Book book=(Book)context.getBean("book");

        //这个返回值,反复试验得出最后浏览上只输出This is AdviceBook's around().

        response.getWriter().append(book.fun());

    }

    protected void doPost(HttpServletRequest request, HttpServletResponse response) throws ServletException, IOException {

        doGet(request, response);

    }

}
其实就一句
response.getWriter().append(book.fun());
网页上返回值为around()中返回值,console控制台得到前后包围所有增强的输出。
如下图:

=============================================================================================
重新整理上边内容
package cn.itcast.f_aspect; import org.aspectj.lang.ProceedingJoinPoint;
import org.aspectj.lang.annotation.After;
import org.aspectj.lang.annotation.AfterReturning;
import org.aspectj.lang.annotation.AfterThrowing;
import org.aspectj.lang.annotation.Around;
import org.aspectj.lang.annotation.Aspect;
import org.aspectj.lang.annotation.Before; @Aspect
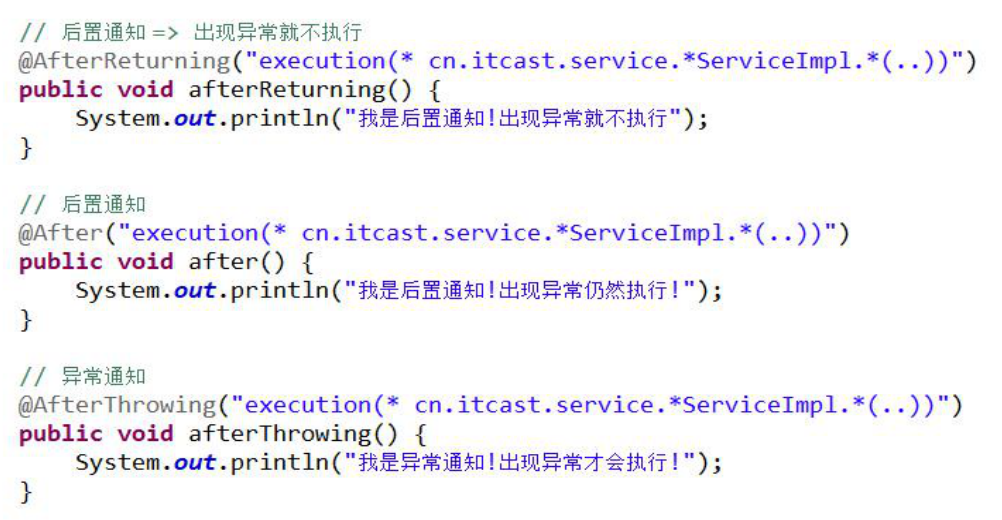
public class Myadvice { @Before(value="execution(public void cn.itcast.f_aspect.CRUD.*())")
public void before() {
System.out.println("之前-->开启事务");
}
@Around(value="execution(public void cn.itcast.f_aspect.CRUD.*())")
public void round(ProceedingJoinPoint proceedingJoinPoint) {
System.out.println("之前-->开启事务");
try {
proceedingJoinPoint.proceed();
System.out.println("没有异常,之后-->提交事务");
} catch (Throwable e) {
System.out.println("出现异常,之后--回滚事务");
}finally {
System.out.println("有无异常都执行,之后-->关闭事务");
} }
@AfterReturning(value="execution(public void cn.itcast.f_aspect.CRUD.*())")
public void afterReturning() {
System.out.println("没有异常,之后-->提交事务");
}
@After(value="execution(public void cn.itcast.f_aspect.CRUD.*())")
public void after() {
System.out.println("有无异常都执行,之后-->关闭事务");
}
@AfterThrowing(value="execution(public void cn.itcast.f_aspect.CRUD.*())")
public void afterThrowing() {
System.out.println("出现异常,之后--回滚事务");
}
}
发现每句中的内容一样,如何抽取 value="execution(public void cn.itcast.f_aspect.CRUD.*())"
Spring框架 aop操作的注解方法 基于aspectj的自动注解aop方法 抽取相同的value="execution(public void cn.itcast.f_aspect.CRUD.*())"的更多相关文章
- (spring-第19回【AOP基础篇】)基于AspectJ和Schema的AOP
基于AspectJ就是基于@AspectJ注解,基于Schema就是全部依靠配置文件.那么首先要了解Java注解. Java注解初探 在JDK5.0中,我们可以自定义标签,并通过Java语言的反射机制 ...
- IDEA02 利用Maven创建Web项目、为Web应用添加Spring框架支持、bean的创建于获取、利用注解配置Bean、自动装配Bean、MVC配置
1 环境版本说明 Jdk : 1.8 Maven : 3.5 IDEA : 专业版 2017.2 2 环境准备 2.1 Maven安装及其配置 2.2 Tomcat安装及其配置 3 详细步骤 3.1 ...
- 07 Spring框架 依赖注入(四)基于注解的依赖注入
前面几节我们都在使用xml进行依赖的注入,但是在实际的开发中我们往往偏爱于使用注解进行依赖注入,因为这样更符合我们人的思维,并且更加快捷,本节就来讲述Spring基于注解的依赖注入: 信息注入注解 @ ...
- 关于aop的两种方式-基于注解和基于aspectj
spring的aop确实好用,能够在不影响业务功能的情况下,实现一些低耦合的功能. 而aop又有两种常用的实现方式,一种是用aspectj表达式去匹配,实现全局的配置,表达式还可以使用与或非符号去连接 ...
- Spring @Bean注解 (基于java的容器注解)
基于java的容器注解,意思就是使用Java代码以及一些注解,就可以取代spring 的 xml配置文件. 1-@Configuration & @Bean的配合 @Configuration ...
- Spring框架零基础学习(一):IOC|DI、AOP
文章目录 一.IDEA创建Spring项目 二.Spring: IOC和DI 三.Spring: AOP 参考链接: HOW2J.CN:Spring idea创建一个spring项目 一.IDEA创建 ...
- Spring框架中的Quartz定时任务使用笔记(通过@Scheduled注解的方式实现)
1.修改spring的xml配置信息 applicationContext.xml 三个部分内容 1.xmlns添加:xmlns:task="http://www.springframewo ...
- Spring学习十一----------Bean的配置之基于Java的容器注解@Bean
© 版权声明:本文为博主原创文章,转载请注明出处 @Bean -@Bean标识一个用于配置和初始化一个由SpringIOC容器管理的新对象的方法,类似于XML配置文件的<bean/> -可 ...
- Spring课程 Spring入门篇 4-8 Spring bean装配之基于java的容器注解说明--基于泛型的自动装配
1 解析 1.1 什么是泛型? 1.2 泛型有什么作用? 1.3 泛型装配样式? 2 代码演练 2.1 泛型应用 1 解析 1.1 什么是泛型? Java泛型设计原则:只要在编译时期没有出现警告,那么 ...
随机推荐
- 在Emacs中使用ECB(转载)
转自:http://joerong666.iteye.com/blog/1813876 By: 潘云登 Date: 2009-7-9 Email: ...
- MFC类别概述
MFC 类别主要可分为下列数大群组: ■ General Purpose classes - 提供字符串类别.数据处理类别(如数组与串行),异 常情况处理类别.文件类别...等等. ■ Windows ...
- python __builtins__ license类 (41)
41.'license', 许可证,执照 class _Printer(builtins.object) | interactive prompt objects for printing the l ...
- spoj NSUBSTR - Substrings【SAM】
先求个SAM,然后再每个后缀的对应点上标记si[nw]=1,造好SAM之后用吧parent树建出来把si传上去,然后用si[u]更新f[max(u)],最后用j>i的[j]更新f[i] 因为每个 ...
- AspectCore的AOP操作
AOP实现缓存的一个例子 using AspectCore.DynamicProxy; using Microsoft.Extensions.Caching.Memory; [AttributeUsa ...
- PJzhang:Lucifer1993的struts-scan漏洞全量检测工具
猫宁!!! 参考链接: https://www.freebuf.com/sectool/149815.html 有关struts 2的漏洞测试工具,很多,不过有的已经很久没更新了,有的只是针对某一个s ...
- 一个关于国密SM4的故事
一个关于国密SM4的故事 我的名字叫SM4,我还有三位兄长,分别是大哥SM1, 二哥SM2, 和三哥SM3.说起我的名字,故事要回到2006年的时候,我出生的时候并不是叫SM4的,而是叫做SMS4.只 ...
- Hexo瞎折腾系列(3) - 添加GitHub彩带和GitHub Corner
页面右上角添加GitHub彩带 你可以在这里找到一共12种样式的GitHub彩带,复制其中的超链代码. 在themes\next\layout\_layout.swig目录下找到头部彩带相关的代码: ...
- android draw9patch工具使用
1.作用 将图片制作android .9图片xxx.9.png xxx.9.jpg xxx.9.gif 这些图片在android上拉伸时,边角不变形,不影响效果. 2.工具位置 Android的S ...
- HDU 2828 Lamp 二分图的最大匹配 模型题
http://acm.hdu.edu.cn/showproblem.php?pid=2828 给定n个灯,m个开关,使得每栈灯亮,前提是控制这栈灯的开关的状态是其中一个.(题目应该都看得懂) 其实我想 ...