OpenCV示例学习笔记(1)-contours2.cpp-通过findContours 函数实现轮廓提取
本文记录了对OpenCV示例contours2.cpp的分析。
资料地址:http://docs.opencv.org/3.0.0/d0/d2a/contours2_8cpp-example.html
1.findContours函数轮廓检测函数原型:void findContours(InputOutputArray image, OutputArrayOfArrays contours, OutputArray hierarchy, int mode, int method, Point offset=Point());
CHAIN_APPROX_NONE存储所有的轮廓点,相邻的两个点的像素位置差不超过1,即max(abs(x1-x2),abs(y2-y1))==1
CHAIN_APPROX_SIMPLE压缩水平方向,垂直方向,对角线方向的元素,只保留该方向的终点坐标,例如一个矩形轮廓只需4个点来保存轮廓信息
CHAIN_APPROX_TC89_L1,CV_CHAIN_APPROX_TC89_KCOS使用teh-Chinl chain 近似算法
offset:代表轮廓点的偏移量,可以设置为任意值。对ROI图像中找出的轮廓,并要在整个图像中进行分析时,这个参数还是很有用的。
函数原型:
参数说明:
InputArray curve:输入的点集
OutputArray approxCurve:输出的点集,当前点集是能最小包容指定点集的。draw出来即是一个多边形;
double epsilon:指定的精度,也即是原始曲线与近似曲线之间的最大距离。
bool closed:若为true,则说明近似曲线是闭合的,它的首位都是相连,反之,若为false,则断开。
drawContours(InputOutputArray image, InputArrayOfArrays contours, int contourIdx, const Scalar& color, int thickness=1, int lineType=8, InputArray hierarchy=noArray(), int maxLevel=INT_MAX, Point offset=Point() )
maxLevel=0,绘制与输入轮廓属于同一等级的所有轮廓即输入轮廓和与其相邻的轮廓
maxLevel=1, 绘制与输入轮廓同一等级的所有轮廓与其子节点。
maxLevel=2,绘制与输入轮廓同一等级的所有轮廓与其子节点以及子节点的子节点
PS:findContours()运行的时候,这个图像会被直接涂改,因此如果是将来还有用的图像,应该复制之后再传给findContours()。
以上描述摘至参考资料5
trackbarname:滑动空间的名称;
winname:滑动空间用于依附的图像窗口的名称;
value:初始化阈值;
count:滑动控件的刻度范围;
TrackbarCallback是回调函数。

取消approxPolyDP调用

Example分析
1.申明需要使用的变量
for( int i = ; i < ; i++ )

    {

        int dx = (i%)* - ;

        int dy = (i/)*;

        const Scalar white = Scalar();

        const Scalar black = Scalar();


        if( i ==  )

        {

            for( int j = ; j <= ; j++ )

            {

                double angle = (j+)*CV_PI/;

                line(img, Point(cvRound(dx++j*-*cos(angle)),

                    cvRound(dy+-*sin(angle))),

                    Point(cvRound(dx++j*-*cos(angle)),

                    cvRound(dy+-*sin(angle))), white, , , );

            }

        }


        ellipse( img, Point(dx+, dy+), Size(,), , , , white, -, ,  );

        ellipse( img, Point(dx+, dy+), Size(,), , , , black, -, ,  );

        ellipse( img, Point(dx+, dy+), Size(,), , , , black, -, ,  );

        ellipse( img, Point(dx+, dy+), Size(,), , , , white, -, ,  );

        ellipse( img, Point(dx+, dy+), Size(,), , , , white, -, ,  );

        ellipse( img, Point(dx+, dy+), Size(,), , , , black, -, ,  );

        ellipse( img, Point(dx+, dy+), Size(,), , , , black, -, ,  );

        ellipse( img, Point(dx+, dy+), Size(,), , , , black, -, ,  );

        ellipse( img, Point(dx+, dy+), Size(,), , , , black, -, ,  );

        ellipse( img, Point(dx+, dy+), Size(,), , , , white, -, ,  );

        ellipse( img, Point(dx+, dy+), Size(,), , , , white, -, ,  );

    }
2.3.创建显示源图像的窗口
#include "opencv2/imgproc/imgproc.hpp"
#include "opencv2/highgui/highgui.hpp"
#include <math.h>
#include <iostream> using namespace cv;
using namespace std; static void help()
{
cout
<< "\nThis program illustrates the use of findContours and drawContours\n"
<< "The original image is put up along with the image of drawn contours\n"
<< "Usage:\n"
<< "./contours2\n"
<< "\nA trackbar is put up which controls the contour level from -3 to 3\n"
<< endl;
} const int w = ;
int levels = ; vector<vector<Point> > contours;
vector<Vec4i> hierarchy; static void on_trackbar(int, void*)
{
Mat cnt_img = Mat::zeros(w, w, CV_8UC3);
int _levels = levels - ;
drawContours( cnt_img, contours, _levels <= ? : -, Scalar(,,),
, LINE_AA, hierarchy, std::abs(_levels) ); imshow("contours", cnt_img);
} int main( int argc, char**)
{
Mat img = Mat::zeros(w, w, CV_8UC1);
if(argc > )
{
help();
return -;
}
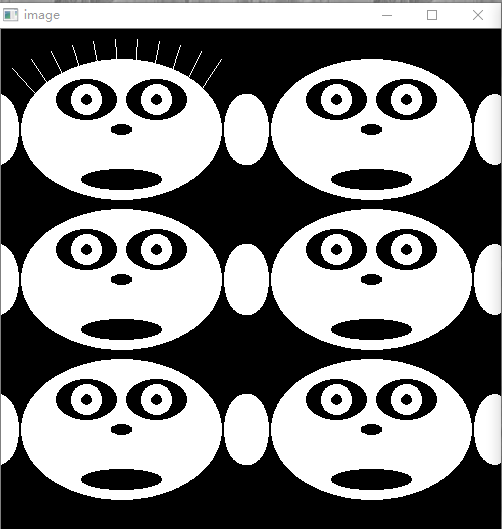
//Draw 6 faces
for( int i = ; i < ; i++ )
{
int dx = (i%)* - ;
int dy = (i/)*;
const Scalar white = Scalar();
const Scalar black = Scalar(); if( i == )
{
for( int j = ; j <= ; j++ )
{
double angle = (j+)*CV_PI/;
line(img, Point(cvRound(dx++j*-*cos(angle)),
cvRound(dy+-*sin(angle))),
Point(cvRound(dx++j*-*cos(angle)),
cvRound(dy+-*sin(angle))), white, , , );
}
} ellipse( img, Point(dx+, dy+), Size(,), , , , white, -, , );
ellipse( img, Point(dx+, dy+), Size(,), , , , black, -, , );
ellipse( img, Point(dx+, dy+), Size(,), , , , black, -, , );
ellipse( img, Point(dx+, dy+), Size(,), , , , white, -, , );
ellipse( img, Point(dx+, dy+), Size(,), , , , white, -, , );
ellipse( img, Point(dx+, dy+), Size(,), , , , black, -, , );
ellipse( img, Point(dx+, dy+), Size(,), , , , black, -, , );
ellipse( img, Point(dx+, dy+), Size(,), , , , black, -, , );
ellipse( img, Point(dx+, dy+), Size(,), , , , black, -, , );
ellipse( img, Point(dx+, dy+), Size(,), , , , white, -, , );
ellipse( img, Point(dx+, dy+), Size(,), , , , white, -, , );
}
//show the faces
namedWindow( "image", );
imshow( "image", img );
//Extract the contours so that
vector<vector<Point> > contours0;
findContours( img, contours0, hierarchy, RETR_TREE, CHAIN_APPROX_SIMPLE); contours.resize(contours0.size());
for( size_t k = ; k < contours0.size(); k++ )
approxPolyDP(Mat(contours0[k]), contours[k], , true); namedWindow( "contours", );
createTrackbar( "levels+3", "contours", &levels, , on_trackbar ); on_trackbar(,);
waitKey(); return ;
}
OpenCV示例学习笔记(1)-contours2.cpp-通过findContours 函数实现轮廓提取的更多相关文章
- Android NDK开发及OpenCV初步学习笔记
https://www.jianshu.com/p/c29bb20908da Android NDK开发及OpenCV初步学习笔记 Super_圣代 关注 2017.08.19 00:55* 字数 6 ...
- OpenCV入门学习笔记
OpenCV入门学习笔记 参照OpenCV中文论坛相关文档(http://www.opencv.org.cn/) 一.简介 OpenCV(Open Source Computer Vision),开源 ...
- OpenCV图像处理学习笔记-Day1
OpenCV图像处理学习笔记-Day1 目录 OpenCV图像处理学习笔记-Day1 第1课:图像读入.显示和保存 1. 读入图像 2. 显示图像 3. 保存图像 第2课:图像处理入门基础 1. 基本 ...
- OpenCV图像处理学习笔记-Day03
OpenCV图像处理学习笔记-Day03 目录 OpenCV图像处理学习笔记-Day03 第31课:Canny边缘检测原理 第32课:Canny函数及使用 第33课:图像金字塔-理论基础 第34课:p ...
- OpenCV图像处理学习笔记-Day4(完结)
OpenCV图像处理学习笔记-Day4(完结) 第41课:使用OpenCV统计直方图 第42课:绘制OpenCV统计直方图 pass 第43课:使用掩膜的直方图 第44课:掩膜原理及演示 第45课:直 ...
- MYSQL学习笔记三:日期和时间函数
MYSQL学习笔记三:日期和时间函数 1. 获取当前日期的函数和获取当前时间的函数 /*获取当前日期的函数和获取当前时间的函数.将日期以'YYYY-MM-DD'或者'YYYYMMDD'格式返回 */ ...
- 播放一个视频并用滚动条控制进度-OpenCV应用学习笔记二
今天我们来做个有趣的程序实现:利用OpenCV读取本地文件夹的视频文件,并且在窗口中创建拖动控制条来显示并且控制视频文件的读取进度. 此程序调试花费了笔者近一天时间,其实大体程序都已经很快写出,结果执 ...
- C++ Primer学习笔记(三) C++中函数是一种类型!!!
C++中函数是一种类型!C++中函数是一种类型!C++中函数是一种类型! 函数名就是变量!函数名就是变量!函数名就是变量! (---20160618最新消息,函数名不是变量名...囧) (---201 ...
- JavaScript学习笔记(十)——高阶函数之map,reduce,filter,sort
在学习廖雪峰前辈的JavaScript教程中,遇到了一些需要注意的点,因此作为学习笔记列出来,提醒自己注意! 如果大家有需要,欢迎访问前辈的博客https://www.liaoxuefeng.com/ ...
随机推荐
- windows 开机自动登录,或者说是开机后自动进入桌面
这篇文章,对于XP以及XP以上版本有效,包括Windows Server服务器操作系统. 1.原理 --Windows自动登录的原理是,开始后,自动输入登录所使用的账号的用户名和密码,并且自动进入桌面 ...
- [Node.js框架] 为什么要开发 Codekart 框架
两年前,在被php的$符号和字符串处理折磨得半夜骂娘之后,我义无反顾地决定:珍爱生命,远离php. 之后一直在寻找一门“完美的语言”,先后接触了Lisp.python.java.Ruby.Lisp几乎 ...
- Virtualbox之Ubuntu虚拟机网络访问设置
在本机(Win7)中 利用VirtualBox安装了一个Ubuntu虚拟机,由于使用桥接,所以本机和虚拟机处于同一个网络局域网下,,主机能访问虚拟机.可是在Ubuntu更新软件的时候才发现不能联网.首 ...
- 一行代码解决各种IE兼容问题,IE6,IE7,IE8,IE9,IE10(转载)
在网站开发中不免因为各种兼容问题苦恼,针对兼容问题,其实IE给出了解决方案Google也给出了解决方案百度也应用了这种方案去解决IE的兼容问题 百度源代码如下 <!Doctype html> ...
- windows2008 配置安装FTP服务器
windows2008 配置安装FTP服务器 今天在服务器上开了IIS7,但是要求把一个附件文件夹拷贝到根目录下面,这个附件文件夹有2G多大小,直接用远程桌面映射,一直都拷贝不成功,而且本地缓存越来越 ...
- Dev的GridView中如何自动生成行号
这里提供一个方法,使用简单,只需将GridView传入,即可自动生成行号 public static void SetRowNumberIndicator(GridView gridView) { g ...
- extjs 时间可选择时分
new Ext.form.DateTimeField({ id: 'SdDateField', width: 130, format: 'Y-m-d H:i', editable: false, va ...
- vim简单的实用总结
vim简单的实用总结 介绍vim常用的四种模式:一般模式,编辑模式,指令列命令模式与可视模式.一,一般模式 用vim filename打开文件后直接进入的就是一般模式,在这个模式下可以用hjkl移 ...
- url路径
/:表示根目录(最原始开头的那个目录): ~/:表示虚拟站点根目录: ../:表示上级目录(当前目录的上一级),相当于在当前目录按了一次后退键: ../../:表示上上级目录: ./:当前目录(当 ...
- Private和Protected方法
.NET中如何测试Private和Protected方法 TDD是1)写测试2)写通过这些测试的代码,3)然后重构的实践.在,NET社区中, 这个概念逐渐变得非常流行,这归功于它所增加的质量保证. ...