Windows Service 服务搭配FluentScheduler实现定时任务调度
Windows Service 服务
创建Windows Service 项目
- 创建一个
Windows Service项目,并将项目名称改为TaskWindowService - 在解决方案资源管理器内将
Service1.cs改为TaskService.cs - 在服务启动和结束时,记录日志
protected override void OnStart(string[] args)

{

    LogHelper.Log("服务启动!");

}

protected override void OnStop()

{

    LogHelper.Log("服务停止!");

}
- 打开
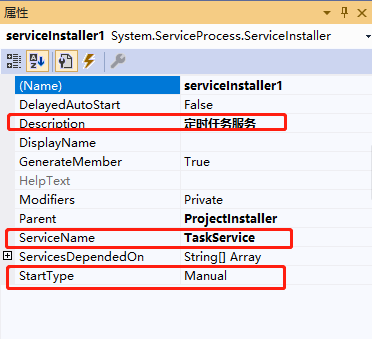
TaskService的设计界面,右键“添加安装程序” - 此时软件会生成两个组件,分别为
serviceInstaller1及serviceProcessInstaller1 - 点击
serviceInstaller1,在“属性”窗体将ServiceName改为TaskService,Description改为我的服务,StartType保持为Manual
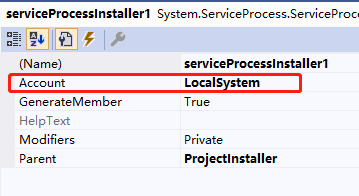
- 点击
serviceProcessInstaller1,在“属性”窗体将Account改为LocalSystem(服务属性系统级别)
- 鼠标右键点击项目
TaskWindowService,在弹出的上下文菜单中选择“生成”按钮,到此WindowService项目搭建完毕
创建安装、启动、停止、卸载服务的Windows窗体
- 新建一个
Windows Form项目,并命名为WindowsServiceClient - 添加引用将
TaskWindowService添加到WindowsServiceClient中,并将其设置为“启动项目” - 创建安装、启动、停止、卸载 按钮并创建点击事件
string serviceFilePath = $"{Application.StartupPath}\\TaskWindowsService.exe";

string serviceName = "TaskService";

//事件:安装服务

private void button1_Click(object sender, EventArgs e)

{

    if (this.IsServiceExisted(serviceName)) this.UninstallService(serviceName);

    this.InstallService(serviceFilePath);

}

//事件:启动服务

private void button2_Click(object sender, EventArgs e)

{

    if (this.IsServiceExisted(serviceName)) this.ServiceStart(serviceName);

}

//事件:停止服务

private void button4_Click(object sender, EventArgs e)

{

    if (this.IsServiceExisted(serviceName)) this.ServiceStop(serviceName);

}

//事件:卸载服务

private void button3_Click(object sender, EventArgs e)

{

    if (this.IsServiceExisted(serviceName))

    {

        this.ServiceStop(serviceName);

        this.UninstallService(serviceFilePath);

    }

}

//判断服务是否存在

private bool IsServiceExisted(string serviceName)

{

    ServiceController[] services = ServiceController.GetServices();

    foreach (ServiceController sc in services)

    {

        if (sc.ServiceName.ToLower() == serviceName.ToLower())

        {

            return true;

        }

    }

    return false;

}

//安装服务

private void InstallService(string serviceFilePath)

{

    using (AssemblyInstaller installer = new AssemblyInstaller())

    {

        installer.UseNewContext = true;

        installer.Path = serviceFilePath;

        IDictionary savedState = new Hashtable();

        installer.Install(savedState);

        installer.Commit(savedState);

        MessageBox.Show("服务安装成功!");

    }

}

//卸载服务

private void UninstallService(string serviceFilePath)

{

    using (AssemblyInstaller installer = new AssemblyInstaller())

    {

        installer.UseNewContext = true;

        installer.Path = serviceFilePath;

        installer.Uninstall(null);

        MessageBox.Show("服务卸载成功!");

    }

}

//启动服务

private void ServiceStart(string serviceName)

{

    using (ServiceController control = new ServiceController(serviceName))

    {

        if (control.Status == ServiceControllerStatus.Stopped)

        {

            control.Start();

            MessageBox.Show("服务启动成功!");

        }

    }

}

//停止服务

private void ServiceStop(string serviceName)

{

    using (ServiceController control = new ServiceController(serviceName))

    {

        if (control.Status == ServiceControllerStatus.Running)

        {

            control.Stop();

            MessageBox.Show("服务停止成功!");

        }

    }

}
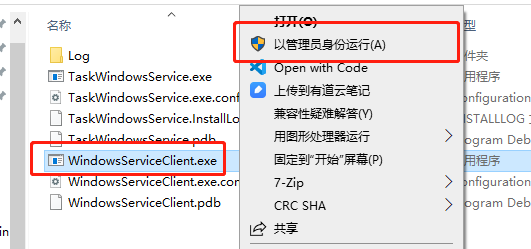
直接运行WindowsServiceClient项目,并点击“安装服务”会报错提示权限不足。
此时可以打开项目的Debug文件夹,找到WindowsServiceClient.exe文件,右键以管理员身份运行。
使用WIN+R的方式打开运行窗体,并在窗体内输入services.msc后打开服务,可以找到刚刚安装的TaskService。
若需要直接运行项目来打开窗体安装服务,则需要使用UAC中Administrator的权限。在WindowsServiceClient项目中添加“应用程序清单文件”。
打开该文件将asInvoker修改为requireAdministrator
<requestedExecutionLevel level="requireAdministrator" uiAccess="false" />
重启项目后就可以直接在VS中安装服务了。
以上内容主要转载自 https://www.cnblogs.com/cncc/p/7170951.html 然后做了一些小改动。
FluentScheduler 定时任务
关于FluentScheduler详细的介绍可以看下github的说明文档,介绍了所有的调用方式 https://github.com/fluentscheduler/FluentScheduler
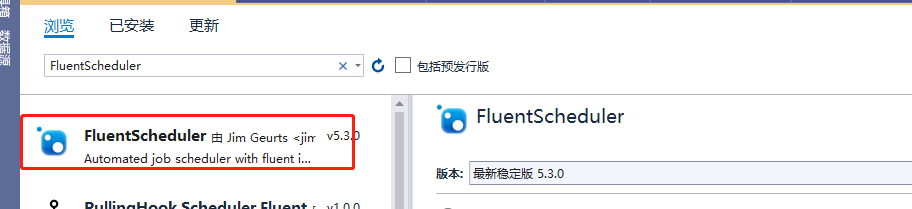
- 在
TaskWindowsService项目中通过nuget添加FluentScheduler包
- 在
TaskService中,服务启动的地方注册定时任务
protected override void OnStart(string[] args)

{

    LogHelper.Log("服务启动!");

    //每10秒执行一次任务

    var registry = new Registry();

    registry.Schedule(() =>

    {

        LogHelper.Log("服务运行中,执行定时任务!");

    }).ToRunEvery(10).Seconds();

    JobManager.Initialize(registry);

}
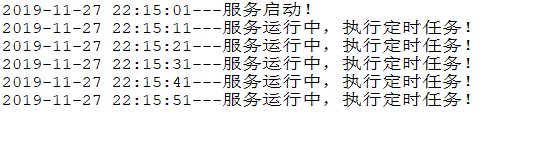
重新生成项目->运行->安装服务->运行服务,打开日志文件可以看到定时重新的任务的输出记录。
Windows Service 服务搭配FluentScheduler实现定时任务调度的更多相关文章
- quartz.net结合Topshelf实现windows service服务托管的作业调度框架
topshelf可以很简单方便的实现windows service服务,详见我的一篇博客的介绍 http://www.cnblogs.com/xiaopotian/articles/5428361.h ...
- C# Windows Service服务的创建和调试
前言 关于Windows服务创建和调试的文章在网络上的很多文章里面都有,直接拿过来贴在这里也不过仅仅是个记录,不会让人加深印象.所以本着能够更深刻了解服务项目的创建和调试过程及方法的目的,有了这篇记录 ...
- .Net Windows Service(服务) 调试安装及System.Timers.Timer 使用
Windows Service(服务) 是运行在后台的进程 1.VS建立 Windows 服务(.NET Framework) 2.添加Timer 双击Service1.cs可以拖控件(System ...
- 震惊!Windows Service服务和定时任务框架quartz之间原来是这种关系……
过场CG: 接到公司领导的文件指示,“小熊”需要在6月底去海外执行一个行动代号为[定时任务]的营救计划,这个计划关系到公司某个项目的生死(数据安全漏洞),作战部拟定两个作战方案: 方案一:使用务定 ...
- C#制作Windows service服务系列二:演示一个定期执行的windows服务及调试(windows service)
系列一: 制作一个可安装.可启动.可停止.可卸载的Windows service(downmoon原创) 系列二:演示一个定期执行的windows服务及调试(windows service)(down ...
- [开发笔记]-Windows Service服务相关注意事项
注意一:报错:“本地计算机上的 *** 服务启动后停止.某些服务在未由其他服务或程序使用时将自动停止.” 该问题主要的原因是 Service服务程序中有错误. 遇到这个问题时,无论是重新安装服务,还是 ...
- war包部署在tomcat下,使用windows service服务方式启动tomcat服务器,在包含调用dll的模块,报dll找不到问题的解决办法
问题描述: 开发了一个需要调用dll的java web程序,在idea开发环境下运行调试没问题,可以正常运行,在tomcat/bin下,运行批处理startup.bat,启动tomcat服务器,也可以 ...
- [开发笔记]-控制Windows Service服务运行
用代码实现动态控制Service服务运行状态. 效果图: 代码: #region 启动服务 /// <summary> /// 启动服务 /// </summary> /// ...
- 使用C#编程语言开发Windows Service服务
转载-https://www.cnblogs.com/yubao/p/8443455.html Create Windows Service project using Visual Studio C ...
随机推荐
- Java日期时间API系列1-----Jdk7及以前的日期时间类
先看一个简单的图: 主要的类有: Date类负责时间的表示,在计算机中,时间的表示是一个较大的概念,现有的系统基本都是利用从1970.1.1 00:00:00 到当前时间的毫秒数进行计时,这个时间称为 ...
- js绑定事件代理的坑
js通过事件代理的方式绑定跳转事件,我这里的逻辑是把click事件绑定在最外层container上面,如果e.target包含我已经写好的class,则执行跳转逻辑.但是这种方式好像只能是在点击的元素 ...
- 在vcs中编译及运行测试E203例子
E203的Makefile默认是调用 iverilog编译rtl,我们可以做如下修改,使其支持vcs编译. 1. 首先修改e200_opensource/tb/tb_top.v, 增加dump波形的两 ...
- Android之okhttp实现socket通讯(非原创)
文章大纲 一.okhttp基础介绍二.socket通讯代码实战三.项目源码下载四.参考文章 一.okhttp基础介绍 https://www.jianshu.com/p/e3291b7808e7 ...
- Mysql Join-连接查询(中)
Mysql Join-连接查询(中) 认识 就我平时的数据接触来看, 连接查询也没有很复杂,不够是非常需要耐心和逻辑的, 一点点将数据查出来, 拼接等. 没有什么技巧, 多练习就会了. 无非就是表之间 ...
- [Go] gocron源码阅读-go语言web框架Macaron
gocron源码中使用的是马卡龙框架,下面这个就是安装这个框架,和一般的MVC框架很像go get gopkg.in/macaron.v1git clone https://github.com/go ...
- easyui入门
什么是easyui! easyui=jquery+html4(用来做后台的管理界面) 1.通过layout布局 我们先把该导的包导下 然后就是JSP页面布局 2.通过tree加载菜单 先来一个实体类 ...
- SpringCloud学习笔记(六、SpringCloud Netflix Feign)
目录: feign简介 feign应用 feign简介: feign是一款Netflix开源的声明式.模板化的http客户端,它可以更加便捷.优雅的调用http api:SpringCloud对Net ...
- c# 第22节 c#四大方法 静态方法、实例方法、虚方法、重新方法
本节内容: 1:静态方法和实例方法什么 2:虚方法是什么 3:重写方法 4:禁止重写方法 1:静态方法和实例方法是什么 静态方法,一般是类的常用方法,允许在不创建类的实例的情况下,直接调用. 静态方法 ...
- 十一,专著研读(CART算法)
十一,专著研读(CART算法) CART称为分类回归树,既能用于分类也能用于回归.使用二元切分方法处理连续型变量,给定特定值,如果特征值大于给定值就走左子树,否则走右子树. CART算法步骤 决策树生 ...