CentOS操作系统部署zabbix agent服务
CentOS操作系统部署zabbix agent服务
作者:尹正杰
版权声明:原创作品,谢绝转载!否则将追究法律责任。
一.查看zabbix的官方手册
1>.点击下载

2>.查看Ubuntu操作系统的安装文档
  博主推荐阅读:

    https://www.zabbix.com/cn/download?zabbix=4.0&os_distribution=centos&os_version=7&db=mysql&ws=apache

    https://www.zabbix.com/documentation/4.0/zh/manual

二.基于yum方式安装zabbix agent
1>.安装zabbix官方的安装yum源
[root@node201.yinzhengjie.org.cn ~]# rpm -Uvh https://repo.zabbix.com/zabbix/4.0/rhel/7/x86_64/zabbix-release-4.0-2.el7.noarch.rpm

Retrieving https://repo.zabbix.com/zabbix/4.0/rhel/7/x86_64/zabbix-release-4.0-2.el7.noarch.rpm

warning: /var/tmp/rpm-tmp.rwZ29x: Header V4 RSA/SHA512 Signature, key ID a14fe591: NOKEY

Preparing...                          ################################# [%]

Updating / installing...

   :zabbix-release-4.0-.el7         ################################# [%]

[root@node201.yinzhengjie.org.cn ~]#
[root@node201.yinzhengjie.org.cn ~]# rpm -Uvh https://repo.zabbix.com/zabbix/4.0/rhel/7/x86_64/zabbix-release-4.0-2.el7.noarch.rpm
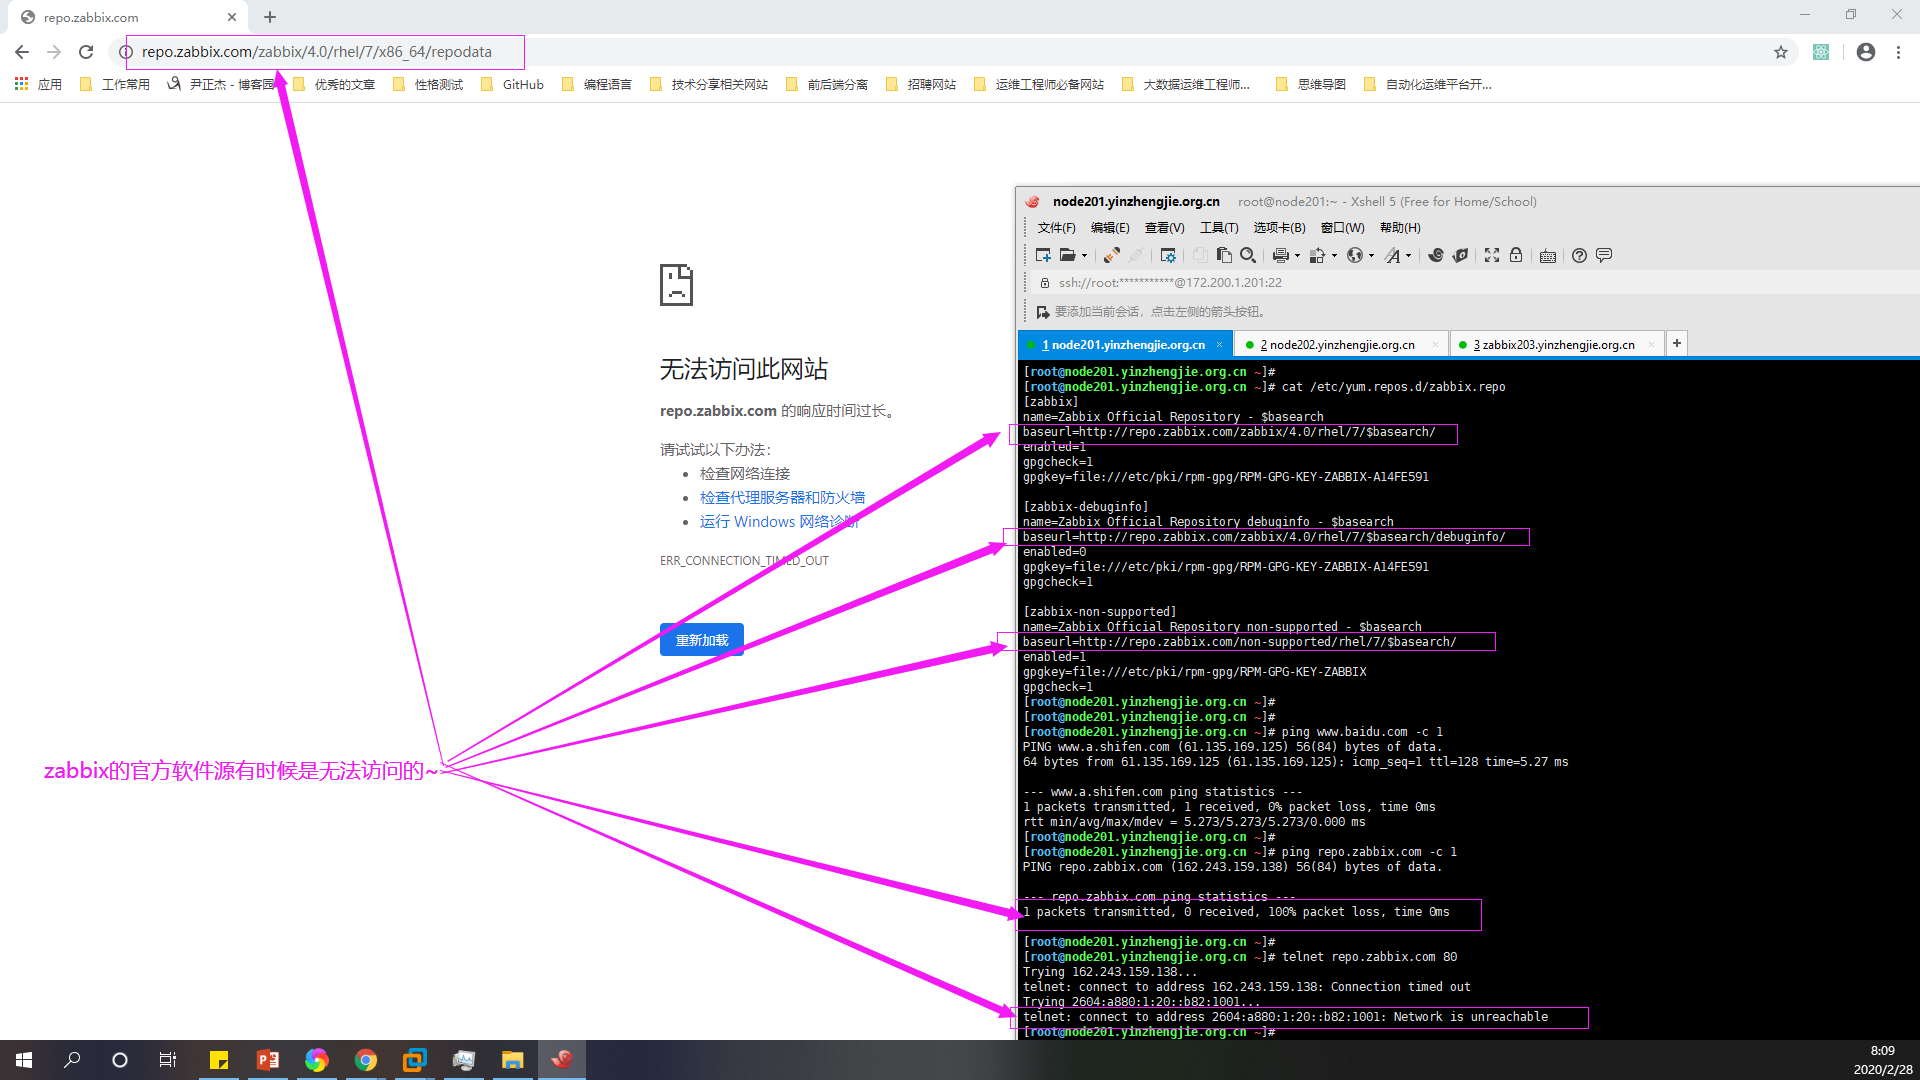
有时候zabbix官网的yum源并不太稳定比如"2020-02-28 08:00",有图有真相,如下图所示:
2>.使用阿里的软件源替换zabbix官网的软件源
[root@node201.yinzhengjie.org.cn ~]# cat /etc/yum.repos.d/zabbix.repo

[zabbix]

name=Zabbix Official Repository - $basearch

baseurl=http://repo.zabbix.com/zabbix/4.0/rhel/7/$basearch/

enabled=

gpgcheck=

gpgkey=file:///etc/pki/rpm-gpg/RPM-GPG-KEY-ZABBIX-A14FE591

[zabbix-debuginfo]

name=Zabbix Official Repository debuginfo - $basearch

baseurl=http://repo.zabbix.com/zabbix/4.0/rhel/7/$basearch/debuginfo/

enabled=

gpgkey=file:///etc/pki/rpm-gpg/RPM-GPG-KEY-ZABBIX-A14FE591

gpgcheck=

[zabbix-non-supported]

name=Zabbix Official Repository non-supported - $basearch

baseurl=http://repo.zabbix.com/non-supported/rhel/7/$basearch/

enabled=

gpgkey=file:///etc/pki/rpm-gpg/RPM-GPG-KEY-ZABBIX

gpgcheck=

[root@node201.yinzhengjie.org.cn ~]#

[root@node201.yinzhengjie.org.cn ~]# sed -i 's#http://repo.zabbix.com#https://mirrors.aliyun.com/zabbix#' /etc/yum.repos.d/zabbix.repo

[root@node201.yinzhengjie.org.cn ~]#

[root@node201.yinzhengjie.org.cn ~]# cat /etc/yum.repos.d/zabbix.repo

[zabbix]

name=Zabbix Official Repository - $basearch

baseurl=https://mirrors.aliyun.com/zabbix/zabbix/4.0/rhel/7/$basearch/

enabled=

gpgcheck=

gpgkey=file:///etc/pki/rpm-gpg/RPM-GPG-KEY-ZABBIX-A14FE591

[zabbix-debuginfo]

name=Zabbix Official Repository debuginfo - $basearch

baseurl=https://mirrors.aliyun.com/zabbix/zabbix/4.0/rhel/7/$basearch/debuginfo/

enabled=

gpgkey=file:///etc/pki/rpm-gpg/RPM-GPG-KEY-ZABBIX-A14FE591

gpgcheck=

[zabbix-non-supported]

name=Zabbix Official Repository non-supported - $basearch

baseurl=https://mirrors.aliyun.com/zabbix/non-supported/rhel/7/$basearch/

enabled=

gpgkey=file:///etc/pki/rpm-gpg/RPM-GPG-KEY-ZABBIX

gpgcheck=

[root@node201.yinzhengjie.org.cn ~]#

[root@node201.yinzhengjie.org.cn ~]#
[root@node201.yinzhengjie.org.cn ~]# sed -i 's#http://repo.zabbix.com#https://mirrors.aliyun.com/zabbix#' /etc/yum.repos.d/zabbix.repo

3>.安装zabbix agent
[root@node201.yinzhengjie.org.cn ~]# yum -y install  zabbix-agent

Loaded plugins: fastestmirror

Loading mirror speeds from cached hostfile

 * base: mirrors.huaweicloud.com

 * extras: mirrors.aliyun.com

 * updates: mirrors.tuna.tsinghua.edu.cn

base                                                                                                                                                                              | 3.6 kB  ::

docker-ce-stable                                                                                                                                                                  | 3.5 kB  ::

extras                                                                                                                                                                            | 2.9 kB  ::

kubernetes                                                                                                                                                                        | 1.4 kB  ::

updates                                                                                                                                                                           | 2.9 kB  ::

zabbix                                                                                                                                                                            | 2.9 kB  ::

zabbix-non-supported                                                                                                                                                              |   B  ::

(/): base//x86_64/group_gz                                                                                                                                                     |  kB  ::

(/): extras//x86_64/primary_db                                                                                                                                                 |  kB  ::

(/): docker-ce-stable/x86_64/updateinfo                                                                                                                                         |    B  ::

(/): docker-ce-stable/x86_64/primary_db                                                                                                                                         |   kB  ::

(/): kubernetes/primary                                                                                                                                                         |   kB  ::

(/): zabbix/x86_64/primary_db                                                                                                                                                   |  kB  ::

(/): base//x86_64/primary_db                                                                                                                                                   | 6.0 MB  ::

(/): updates//x86_64/primary_db                                                                                                                                                                                                                     | 6.7 MB  ::

zabbix-non-supported/x86_64/primary                                                                                                                                                                                                                    | 1.6 kB  ::

kubernetes                                                                                                                                                                                                                                                            /

zabbix-non-supported                                                                                                                                                                                                                                                      /

Resolving Dependencies

--> Running transaction check

---> Package zabbix-agent.x86_64 :4.0.-.el7 will be installed

--> Finished Dependency Resolution

Dependencies Resolved

==============================================================================================================================================================================================================================================================================

 Package                                                             Arch                                                          Version                                                                Repository                                                     Size

==============================================================================================================================================================================================================================================================================

Installing:

 zabbix-agent                                                        x86_64                                                        4.0.-.el7                                                           zabbix                                                         k

Transaction Summary

==============================================================================================================================================================================================================================================================================

Install   Package

Total download size:  k

Installed size: 1.6 M

Downloading packages:

warning: /var/cache/yum/x86_64//zabbix/packages/zabbix-agent-4.0.-.el7.x86_64.rpm: Header V4 RSA/SHA512 Signature, key ID a14fe591: NOKEY

Public key for zabbix-agent-4.0.-.el7.x86_64.rpm is not installed

zabbix-agent-4.0.-.el7.x86_64.rpm                                                                                                                                                                                                                   |  kB  ::

Retrieving key from file:///etc/pki/rpm-gpg/RPM-GPG-KEY-ZABBIX-A14FE591

Importing GPG key 0xA14FE591:

 Userid     : "Zabbix LLC <packager@zabbix.com>"

 Fingerprint: a184 8f53 52d0 22b9 471d 83d0 082a b56b a14f e591

 Package    : zabbix-release-4.0-.el7.noarch (installed)

 From       : /etc/pki/rpm-gpg/RPM-GPG-KEY-ZABBIX-A14FE591

Running transaction check

Running transaction test

Transaction test succeeded

Running transaction

Warning: RPMDB altered outside of yum.

  Installing : zabbix-agent-4.0.-.el7.x86_64                                                                                                                                                                                                                           /

  Verifying  : zabbix-agent-4.0.-.el7.x86_64                                                                                                                                                                                                                           /

Installed:

  zabbix-agent.x86_64 :4.0.-.el7

Complete!

[root@node201.yinzhengjie.org.cn ~]#
[root@node201.yinzhengjie.org.cn ~]# yum -y install zabbix-agent
4>.修改zabbix agent的配置文件
[root@node201.yinzhengjie.org.cn ~]# grep ^Server= /etc/zabbix/zabbix_agentd.conf

Server=127.0.0.1

[root@node201.yinzhengjie.org.cn ~]#

[root@node201.yinzhengjie.org.cn ~]# sed -r -i 's#(Server=)127.0.0.1#\1172.200.5.203,172.200.3.205#' /etc/zabbix/zabbix_agentd.conf

[root@node201.yinzhengjie.org.cn ~]#

[root@node201.yinzhengjie.org.cn ~]# grep ^Server= /etc/zabbix/zabbix_agentd.conf

Server=172.200.5.203,172.200.3.205

[root@node201.yinzhengjie.org.cn ~]#

[root@node201.yinzhengjie.org.cn ~]#
[root@node201.yinzhengjie.org.cn ~]# sed -r -i 's#(Server=)127.0.0.1#\1172.200.5.203,172.200.3.205#' /etc/zabbix/zabbix_agentd.conf #指定zabbix agent被动工作模式的zabbix server
[root@node201.yinzhengjie.org.cn ~]# grep ^ServerActive= /etc/zabbix/zabbix_agentd.conf

ServerActive=127.0.0.1

[root@node201.yinzhengjie.org.cn ~]#

[root@node201.yinzhengjie.org.cn ~]# sed -r -i 's#(ServerActive=)127.0.0.1#\1172.200.3.205#' /etc/zabbix/zabbix_agentd.conf

[root@node201.yinzhengjie.org.cn ~]#

[root@node201.yinzhengjie.org.cn ~]# grep ^ServerActive= /etc/zabbix/zabbix_agentd.conf

ServerActive=172.200.3.205

[root@node201.yinzhengjie.org.cn ~]#

[root@node201.yinzhengjie.org.cn ~]#
[root@node201.yinzhengjie.org.cn ~]# sed -r -i 's#(ServerActive=)127.0.0.1#\1172.200.3.205#' /etc/zabbix/zabbix_agentd.conf #指定zabbix agent主动工作模式的zabbix proxy
[root@node201.yinzhengjie.org.cn ~]# grep ^Hostname= /etc/zabbix/zabbix_agentd.conf

Hostname=Zabbix server

[root@node201.yinzhengjie.org.cn ~]#

[root@node201.yinzhengjie.org.cn ~]# sed -r -i 's#(Hostname=)Zabbix server#\1node201.yinzhengjie.org.cn#' /etc/zabbix/zabbix_agentd.conf

[root@node201.yinzhengjie.org.cn ~]#

[root@node201.yinzhengjie.org.cn ~]# grep ^Hostname= /etc/zabbix/zabbix_agentd.conf

Hostname=node201.yinzhengjie.org.cn

[root@node201.yinzhengjie.org.cn ~]#

[root@node201.yinzhengjie.org.cn ~]#
[root@node201.yinzhengjie.org.cn ~]# sed -r -i 's#(Hostname=)Zabbix server#\1node201.yinzhengjie.org.cn#' /etc/zabbix/zabbix_agentd.conf #指定zabbix agent的主机名名称
5>.启动zabbix agent并设置为开机自启动
[root@node201.yinzhengjie.org.cn ~]# ss -ntl

State      Recv-Q Send-Q                                                                                          Local Address:Port                                                                                                         Peer Address:Port

LISTEN                                                                                                          127.0.0.1:                                                                                                                   *:*

LISTEN                                                                                                          127.0.0.1:                                                                                                                   *:*

LISTEN                                                                                                                    *:                                                                                                                      *:*

LISTEN                                                                                                                 :::                                                                                                                  :::*

LISTEN                                                                                                                   :::                                                                                                                     :::*

[root@node201.yinzhengjie.org.cn ~]#

[root@node201.yinzhengjie.org.cn ~]# systemctl start zabbix-agent.service

[root@node201.yinzhengjie.org.cn ~]#

[root@node201.yinzhengjie.org.cn ~]# ss -ntl

State      Recv-Q Send-Q                                                                                          Local Address:Port                                                                                                         Peer Address:Port

LISTEN                                                                                                          127.0.0.1:                                                                                                                   *:*

LISTEN                                                                                                          127.0.0.1:                                                                                                                   *:*

LISTEN                                                                                                                    *:                                                                                                                      *:*

LISTEN                                                                                                                    *:                                                                                                                   *:*

LISTEN                                                                                                                 :::                                                                                                                  :::*

LISTEN                                                                                                                   :::                                                                                                                     :::*

LISTEN                                                                                                                   :::                                                                                                                  :::*

[root@node201.yinzhengjie.org.cn ~]#

[root@node201.yinzhengjie.org.cn ~]#

[root@node201.yinzhengjie.org.cn ~]# systemctl list-unit-files | grep zabbix-agent.service

zabbix-agent.service                          disabled

[root@node201.yinzhengjie.org.cn ~]#

[root@node201.yinzhengjie.org.cn ~]#

[root@node201.yinzhengjie.org.cn ~]# systemctl enable zabbix-agent.service

Created symlink from /etc/systemd/system/multi-user.target.wants/zabbix-agent.service to /usr/lib/systemd/system/zabbix-agent.service.

[root@node201.yinzhengjie.org.cn ~]#

[root@node201.yinzhengjie.org.cn ~]#

[root@node201.yinzhengjie.org.cn ~]# systemctl list-unit-files | grep zabbix-agent.service

zabbix-agent.service                          enabled

[root@node201.yinzhengjie.org.cn ~]#

[root@node201.yinzhengjie.org.cn ~]#

[root@node201.yinzhengjie.org.cn ~]# systemctl status zabbix-agent.service

● zabbix-agent.service - Zabbix Agent

   Loaded: loaded (/usr/lib/systemd/system/zabbix-agent.service; enabled; vendor preset: disabled)

   Active: active (running) since Thu -- :: CST; 38s ago

 Main PID:  (zabbix_agentd)

   CGroup: /system.slice/zabbix-agent.service

           ├─ /usr/sbin/zabbix_agentd -c /etc/zabbix/zabbix_agentd.conf

           ├─ /usr/sbin/zabbix_agentd: collector [idle  sec]

           ├─ /usr/sbin/zabbix_agentd: listener # [waiting for connection]

           ├─ /usr/sbin/zabbix_agentd: listener # [waiting for connection]

           ├─ /usr/sbin/zabbix_agentd: listener # [waiting for connection]

           └─ /usr/sbin/zabbix_agentd: active checks # [idle  sec]

Feb  :: node201.yinzhengjie.org.cn systemd[]: Starting Zabbix Agent...

Feb  :: node201.yinzhengjie.org.cn systemd[]: Can't open PID file /run/zabbix/zabbix_agentd.pid (yet?) after start: No such file or directory

Feb  :: node201.yinzhengjie.org.cn systemd[]: Started Zabbix Agent.

[root@node201.yinzhengjie.org.cn ~]#

[root@node201.yinzhengjie.org.cn ~]#
[root@node201.yinzhengjie.org.cn ~]# systemctl start zabbix-agent.service

CentOS操作系统部署zabbix agent服务的更多相关文章
- Ubuntu操作系统部署zabbix agent服务
Ubuntu操作系统部署zabbix agent服务 作者:尹正杰 版权声明:原创作品,谢绝转载!否则将追究法律责任. 一.下载zabbix软件包 博主推荐阅读: https://www.cnblog ...
- 运维监控-基于yum的方式部署 Zabbix Agent 4.0 版本
运维监控-基于yum的方式部署 Zabbix Agent 4.0 版本 作者:尹正杰 版权声明:原创作品,谢绝转载!否则将追究法律责任. 上一篇博客我们分享了如何基于yum的方式部署zabbix 4. ...
- CENTOS安装部署zabbix
果学网 -专注IT在线www.prismcollege.com 參考原文:http://www.showerlee.com/archives/13 RHCE过的EMAIL已经下来.所以近期闲了就准备把 ...
- CentOS 7 实现zabbix agent 自动添加,并链接到指定的模版
如果添加的agent端数量较少时 , 手动添加还是可以的 , 如果数量较多 , 那么zabbix-server 的Discovery自动发现功能便派上了用场 首先所需要加入的服务器zabbix-age ...
- centos6.5安装部署zabbix监控服务端和客户端
部署zabbix服务端需要LNMP环境(nginx,mysql,php),其它数据库也可以,我这里使用mysql,关于LNMP环境部署,可以参考我的另一遍文章:http://www.cnblogs.c ...
- Centos/Rhel7部署Zabbix监控(部署篇之服务器篇)
Zabbix是一个基于WEB界面的提供分布式系统监视以及网络监视功能的企业级的开源解决方案. Zabbix能监视各种网络参数,保证服务器系统的安全运营:并提供灵活的通知机制以让系统管理员快速定位/解决 ...
- centos 安装部署zabbix
Zabbix_server初始安装部署 各模块要安装的模块 Server:server+nginx+mysql+php Agentd:agentd Proxy:proxy+mysql 1.准备环境: ...
- 【docker部署】基于linux的centos操作系统部署安装docker容器
一.docker介绍 容器是轻量级的,包含应用运行所需所有东西(代码.库.运行时环境.系统设置,以及依赖关系)的独立的包.每个容器都部署于它自己的 CPU.内存.块 I/O,以及网络资源上,所有这些都 ...
- 通过ansible自动化部署zabbix应用
zabbix在实际的应用中,可能需要监控的主机非常多,而每个主机的操作系统类型.版本也都不尽相同,在这种环境下,通过手动安装zabbix的agent端已经不现实了,此时就需要借助自动化工具完成zabb ...
随机推荐
- 两个list 集合比较属性不同的值
for(Stall stall : stallList){ boolean flag = false; for(DeliveryStallCommission deliveryStallCommiss ...
- 「CF1301C Ayoub's function」
本题结论题,所以就不放前置芝士了. 具体做法 先将最终的答案分为两部分,区间(开始于结束为止不同)和点,点的个数非常显然就是M,于是要计算区间的个数,可以发现如果直接计算有多少合法区间很麻烦,所以用总 ...
- oracle的concat、convert、listagg函数(字符串拼接和类型转换)
ORACLE几种常用的方法(2) 1.concat常见的用法 : 格式:concat(String1,String2) 说明:concat函数用于将两个字符串连接起来,形成一个单一的字符串 实例: s ...
- springboot devtool热部署的一个大坑
spring.devtools.restart.poll-interval=3000ms spring.devtools.restart.quiet-period=2999ms 别问我为什么,问就是一 ...
- 深入理解 ajax系列第一篇(XHR 对象)
1999年,微软公司发布了IE5, 第一次引入新功能:允许javascript 脚本向服务器发起 hffp 请求.这个功能方式并没有被引起注意,知道2004年 Gmail 发布和 Google Map ...
- 02-08Android学习进度报告八
今天主要学习了昨天还没有学习完的Date & Time组件的知识. 首先是DatePicker(日期选择器) android:calendarTextColor : 日历列表的文本的颜色 an ...
- HDU 5564:Clarke and digits 收获颇多的矩阵快速幂 + 前缀和
Clarke and digits Accepts: 16 Submissions: 29 Time Limit: 5000/3000 MS (Java/Others) Memory Limi ...
- R语言 which() 、 which.min() 、 which.max() 函数
函数 which() 可以用来找到满足条件的下标,如 x <- c(3, 4, 3, 5, 7, 5, 9) which(x > 5) 5 7 seq(along=x)[x > 5] ...
- 手搓SSM
相关资料,网上的资料很多,但是文章看不懂,看别人写好的代码比较好理解 ssm-example mysssm 整个流程和原理 一个入口类,入口类需要在tomcat启动的时候执行 通过扫描文件加把文件取出 ...
- 虚拟对抗训练(VAT):一种用于监督学习和半监督学习的正则化方法
正则化 虚拟对抗训练是一种正则化方法,正则化在深度学习中是防止过拟合的一种方法.通常训练样本是有限的,而对于深度学习来说,搭设的深度网络是可以最大限度地拟合训练样本的分布的,从而导致模型与训练样本分布 ...