Java8集合框架——LinkedList源码分析
java.util.LinkedList
本文的主要目录结构:
- 一、LinkedList的特点及与ArrayList的比较
- 二、LinkedList的内部实现
- 三、LinkedList添加元素
- 四、LinkedList查找元素
- 五、LinkedList删除元素
- 六、LinkedList修改元素
一、LinkedList的特点及与ArrayList的比较
对比上一篇的ArrayList介绍【传送门:Java8集合框架——ArrayList源码分析】,LinkedList因内部实现不同,其元素的内部访问方式也不一样。LinkedList的特点大致和ArrayList的比较如下:
| 关注的问题点 | ArrayList相关结论 | LinkedList相关结论 |
|
是否允许空的元素 |
是 | 是 |
| 是否允许重复的元素 | 是 | 是 |
|
元素有序:读取数据和存放数据的顺序一致 |
是 | 是 |
| 是否线程安全 | 否 | 否 |
| 随机访问的效率 | 随机访问指定索引(数组的索引)的元素快 | 因需要进行遍历,随机访问指定索引的元素较慢,而利用双向链表的特性,可以从两端进行访问,会使得平均访问的元素减少一半 |
| 顺序添加元素的效率 |
在不涉及扩容时,顺序添加元素速度快; 当需要扩容时,涉及到元素的复制,相对较慢 |
顺序添加元素速度快,只是新建一个结点,然后添加结点链接; |
| 删除和插入元素的效率 |
因涉及到复制和移动后续的元素,相对较慢 |
删除和插入涉及到遍历找到相关结点,因此会慢点,但是找到结点后的相关操作会比较快,因不涉及到元素的移动 |
二、LinkedList的内部实现
1、内部重要属性说明
LinkedList是以双向链表为基础实现列表的集合,内部实现结点中,有指向上一个结点 prev 和下一个结点next 的引用,即双向链表,而 E item 即为实际的存储元素,实现源码如下:
    private static class Node<E> {

        E item;          // 实际存储的元素

        Node<E> next;    // 下一个元素的引用

        Node<E> prev;    // 上一个元素的引用

        Node(Node<E> prev, E element, Node<E> next) {

            this.item = element;

            this.next = next;

            this.prev = prev;

        }

    }
LinkedList内部有几个重要属性,比如说保存了元素个数、首结点引用和尾结点引用等,因此要获得LinkedList的首元素和尾元素元素也比较直接。
    // 实际存储的元素个数

    transient int size = 0;

    /**

     * Pointer to first node.

     * 第一个节点元素的引用

     * Invariant: (first == null && last == null) ||

     *            (first.prev == null && first.item != null)

     */

    transient Node<E> first;

    /**

     * Pointer to last node.

     * 最后一个节点元素的引用

     * Invariant: (first == null && last == null) ||

     *            (last.next == null && last.item != null)

     */

    transient Node<E> last;
2、构造函数说明
1、空构造函数
    /**

     * Constructs an empty list.

     */

    public LinkedList() {

    }
2、带参构造函数:通过指定集合构建
    /**

     * Constructs a list containing the elements of the specified

     * collection, in the order they are returned by the collection's

     * iterator.

     *

     * @param  c the collection whose elements are to be placed into this list

     * @throws NullPointerException if the specified collection is null

     * 如果指定集合为空,会抛出NPE

     */

    public LinkedList(Collection<? extends E> c) {

        this();

        addAll(c);

    }
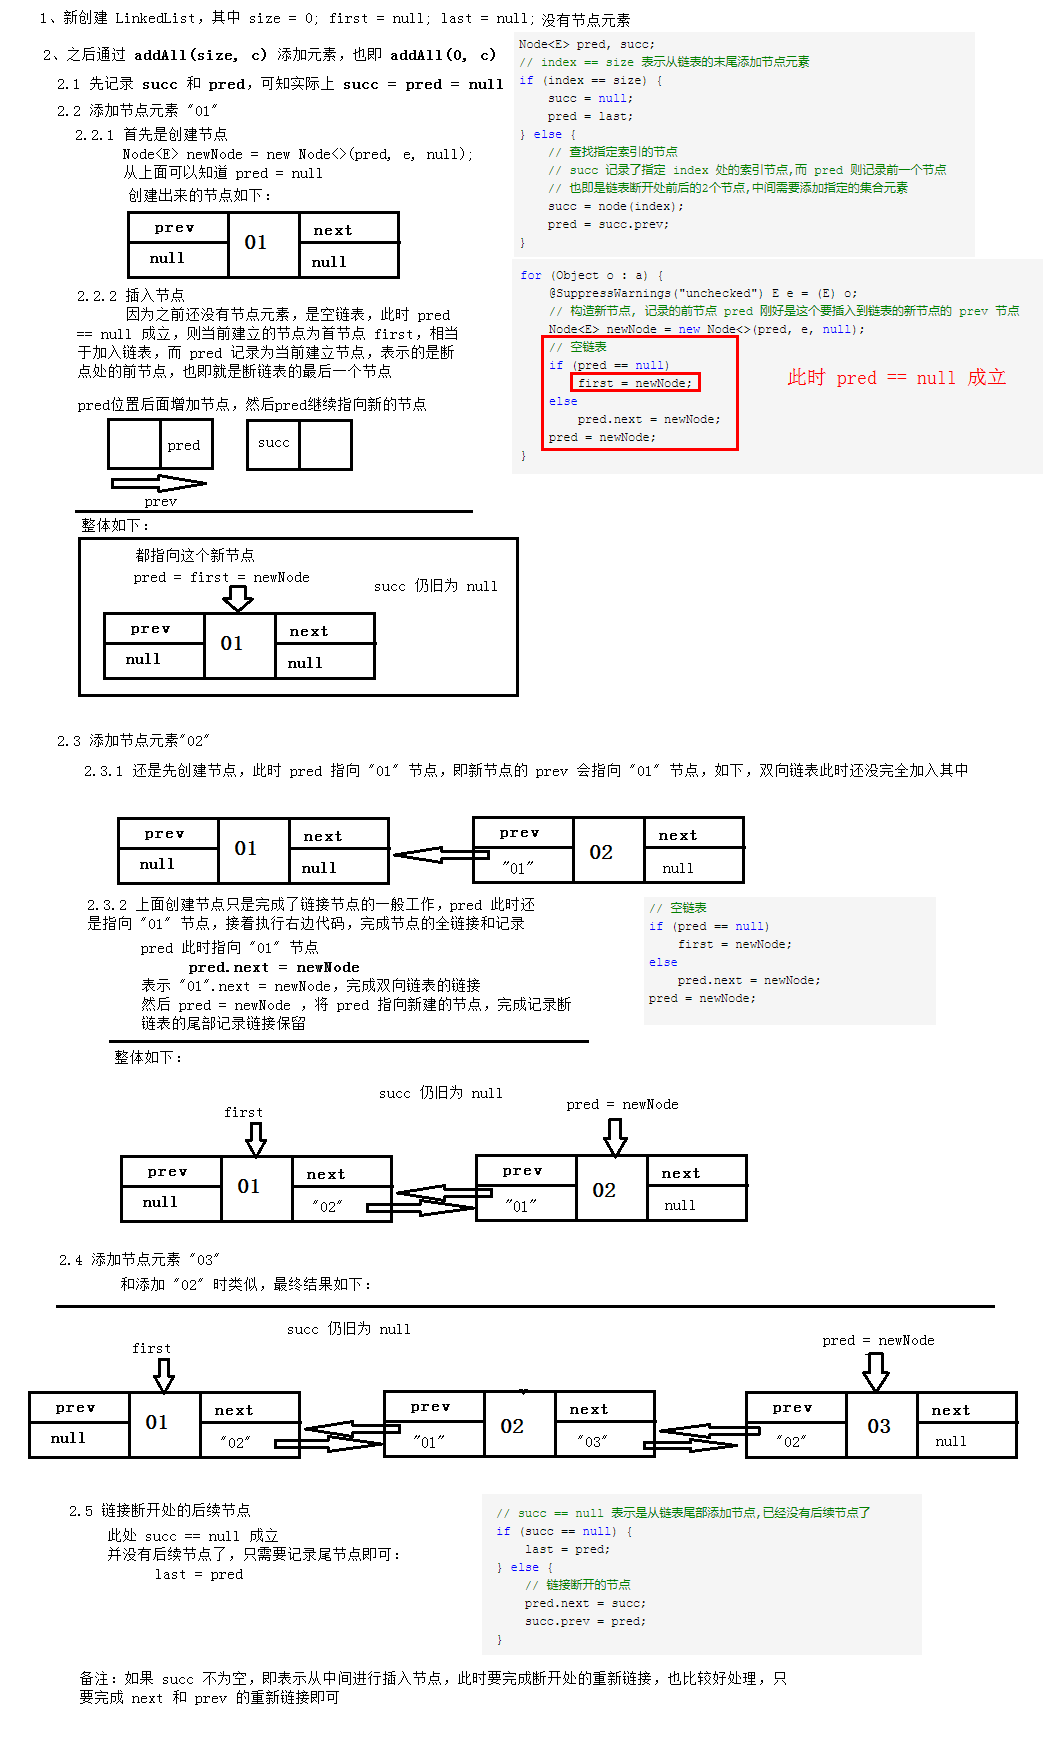
这个带参的构造函数其实比较好理解,通过指定集合构建的LinkedList,其实就是创建一个空的 LinkedList,然后把集合里面的所有元素添加进去。而添加集合元素调用的 addAll(c) ,实际上只是从指定索引处(这里是从末尾,即 size 处)添加所有的集合元素:addAll(size, c) 。
    /**

     * Appends all of the elements in the specified collection to the end of

     * this list, in the order that they are returned by the specified

     * collection's iterator.  The behavior of this operation is undefined if

     * the specified collection is modified while the operation is in

     * progress.  (Note that this will occur if the specified collection is

     * this list, and it's nonempty.)

     *

     * 往LinkedList中添加指定集合的所有元素

     *

     * @param c collection containing elements to be added to this list

     * @return {@code true} if this list changed as a result of the call

     * @throws NullPointerException if the specified collection is null

     */

    public boolean addAll(Collection<? extends E> c) {

        // 从索引 size 处添加索引,即从末尾添加节点

        return addAll(size, c);

    }
再来看看 addAll(size, c) 的具体实现:
    /**

     * Inserts all of the elements in the specified collection into this

     * list, starting at the specified position.  Shifts the element

     * currently at that position (if any) and any subsequent elements to

     * the right (increases their indices).  The new elements will appear

     * in the list in the order that they are returned by the

     * specified collection's iterator.

     *

     * 往LinkedList的指定索引处添加指定集合的所有元素

     *

     * @param index index at which to insert the first element

     *              from the specified collection

     * @param c collection containing elements to be added to this list

     * @return {@code true} if this list changed as a result of the call

     * @throws IndexOutOfBoundsException {@inheritDoc}

     * @throws NullPointerException if the specified collection is null

     */

    public boolean addAll(int index, Collection<? extends E> c) {

        // index 的边界检查

        checkPositionIndex(index);

        Object[] a = c.toArray();

        int numNew = a.length;

        if (numNew == 0)

            return false;

        Node<E> pred, succ;

        // index == size 表示从链表的末尾添加节点元素

        if (index == size) {

            succ = null;

            pred = last;

        } else {

            // 查找指定索引的节点

            // succ 记录了指定 index 处的索引节点,而 pred 则记录前一个节点

            // 也即是链表断开处前后的2个节点,中间需要添加指定的集合元素

            succ = node(index);

            pred = succ.prev;

        }

        for (Object o : a) {

            @SuppressWarnings("unchecked") E e = (E) o;

            // 构造新节点, 记录的前节点 pred 刚好是这个要插入到链表的新节点的 prev 节点

            Node<E> newNode = new Node<>(pred, e, null);

            // 空链表

            if (pred == null)

                first = newNode;

            else

                pred.next = newNode;

            pred = newNode;

        }

        // succ == null 表示是从链表尾部添加节点,已经没有后续节点了

        if (succ == null) {

            last = pred;

        } else {

            // 链接断开的节点

            pred.next = succ;

            succ.prev = pred;

        }

        // 记录实际元素个数 size 和已修改次数 modCount

        size += numNew;

        modCount++;

        return true;

    }

    // 对下表索引进行边界检查

    private void checkPositionIndex(int index) {

        if (!isPositionIndex(index))

            throw new IndexOutOfBoundsException(outOfBoundsMsg(index));

    }

    /**

     * Tells if the argument is the index of a valid position for an

     * iterator or an add operation.

     * 实际上就是直接与内部属性 size 的比较, 即必须落在 0 ~ size 之间,因为这是链表的实际位置

     */

    private boolean isPositionIndex(int index) {

        return index >= 0 && index <= size;

    }

    /**

     * Returns the (non-null) Node at the specified element index.

     * 查找指定索引的节点

     */

    Node<E> node(int index) {

        // assert isElementIndex(index);

        // 利用双向链表的特性,看要查找的索引是落在前半部分还是后半部分,然后顺着查或者逆着查,可节省遍历的时间

        if (index < (size >> 1)) {

            Node<E> x = first;

            for (int i = 0; i < index; i++)

                x = x.next;

            return x;

        } else {

            Node<E> x = last;

            for (int i = size - 1; i > index; i--)

                x = x.prev;

            return x;

        }

    }
下面通过图示和文字进行具体的说明:
    List<String> arrayList = new ArrayList<>();

    arrayList.add("01");

    arrayList.add("02");

    arrayList.add("03");

    List<String> linkedList = new LinkedList<>(arrayList);
大致图示如上。
三、 LinkedList添加元素
1、顺序添加元素
直接上源码:
    /**

     * Appends the specified element to the end of this list.

     *

     * <p>This method is equivalent to {@link #addLast}.

     *

     * @param e element to be appended to this list

     * @return {@code true} (as specified by {@link Collection#add})

     */

    public boolean add(E e) {

        linkLast(e);    // 顺序添加新元素,其实是从链表最后添加1个节点

        return true;

    }

    /**

     * Links e as last element.

     */

    void linkLast(E e) {

        final Node<E> l = last;

        final Node<E> newNode = new Node<>(l, e, null);    // 新建节点: prev 为之前的尾节点 last,单链接完成

        last = newNode;    // 新节点即为尾节点

        if (l == null)

            first = newNode;    // 原来的尾节点为 null,说明是空链表,需要记录首节点

        else

            l.next = newNode;    // 记录原尾节点的 next指向,完成双向链接

        size++;        // 记录实际元素个数 size 和已修改次数 modCount

        modCount++;

    }
这段源码其实挺好理解的,大意就是
- 创建引用 l,指向原尾元素 last
- 创建新结点 newNode,该节点的 prev 指向保存的原尾节点引用 l,完成链表的单向链接
- 尾节点引用 last 指向新结点 newNode,作为新的尾节点
- 若原尾节点引用 l 为空,说明此时刚刚添加第一个元素,之前都没有元素,是个空链表,first 和 last 都为空,则首节点引用 first 指向新建节点 newNode,此时,first、last都指向同一个节点 newNode;否则,原尾节点的 next 指向 newNode,完成链表的双向链接
- 记录实际元素个数 size 和已修改次数 modCount
2、指定索引插入元素
- 判断是否越界
- 若没有越界,则再判断是否是尾节点添加,若是,直接顺序添加
- 若不是,则先找到指定索引的元素结点(参考下一小节),然后执行结点变更操作,和前面的 addAll 中的做法类似,这里就不细讲。
    /**

     * Inserts the specified element at the specified position in this list.

     * Shifts the element currently at that position (if any) and any

     * subsequent elements to the right (adds one to their indices).

     *

     * @param index index at which the specified element is to be inserted

     * @param element element to be inserted

     * @throws IndexOutOfBoundsException {@inheritDoc}

     */

    public void add(int index, E element) {

        // index 的边界检查

        checkPositionIndex(index);

        // index == size ,则相当于从最后添加元素

        if (index == size)

            linkLast(element);

        else

            linkBefore(element, node(index));

    }

    /**

     * Inserts element e before non-null Node succ.

     * 在指定节点前添加元素

     */

    void linkBefore(E e, Node<E> succ) {

        // assert succ != null;

        final Node<E> pred = succ.prev;

        final Node<E> newNode = new Node<>(pred, e, succ);

        succ.prev = newNode;

        if (pred == null)

            first = newNode;    // 说明从首节点处插入节点, index = 0

        else

            pred.next = newNode;

        size++;

        modCount++;

    }
四、LinkedList查找元素
根据指定索引查找元素。这里使用了双向链表的特性,可以向前或者向后顺序查找,即判断索引落在前半部分(index < (size >> 1)),向后索引,落在后半部分,向前索引,这就能保证最多只要遍历一半,提高效率。
    /**

     * Returns the element at the specified position in this list.

     *

     * @param index index of the element to return

     * @return the element at the specified position in this list

     * @throws IndexOutOfBoundsException {@inheritDoc}

     */

    public E get(int index) {

        checkElementIndex(index);    // index 的边界检查

        return node(index).item;

    }

    /**

     * Returns the (non-null) Node at the specified element index.

     */

    Node<E> node(int index) {

        // assert isElementIndex(index);

        // 利用双向链表的特性,看要查找的索引是落在前半部分还是后半部分,然后顺着查或者逆着查,可节省遍历的时间

        if (index < (size >> 1)) {

            Node<E> x = first;

            for (int i = 0; i < index; i++)

                x = x.next;

            return x;

        } else {

            Node<E> x = last;

            for (int i = size - 1; i > index; i--)

                x = x.prev;

            return x;

        }

    }
五、LinkedList删除元素
和ArrayList类似,删除元素也有2种
- 指定索引删除
- 指定元素删除
指定元素删除,是根据元素顺序进行判断直到找到相应的元素的,因此效率不高,从这里也可以看到,元素可以为null,因为null(使用==)和实际元素(使用equals)的对等判断是不一样的方法;指定索引也是需要先找到索引所对应的元素,然后再删除元素。
/**
* Removes the first occurrence of the specified element from this list,
* if it is present. If this list does not contain the element, it is
* unchanged. More formally, removes the element with the lowest index
* {@code i} such that
* <tt>(o==null ? get(i)==null : o.equals(get(i)))</tt>
* (if such an element exists). Returns {@code true} if this list
* contained the specified element (or equivalently, if this list
* changed as a result of the call).
* 移除指定元素
*
* @param o element to be removed from this list, if present
* @return {@code true} if this list contained the specified element
*/
public boolean remove(Object o) {
if (o == null) {
for (Node<E> x = first; x != null; x = x.next) {
if (x.item == null) {
unlink(x);
return true;
}
}
} else {
for (Node<E> x = first; x != null; x = x.next) {
if (o.equals(x.item)) {
unlink(x);
return true;
}
}
}
return false;
}
/**
* Removes the element at the specified position in this list. Shifts any
* subsequent elements to the left (subtracts one from their indices).
* Returns the element that was removed from the list.
* 移除指定索引的元素
*
* @param index the index of the element to be removed
* @return the element previously at the specified position
* @throws IndexOutOfBoundsException {@inheritDoc}
*/
public E remove(int index) {
checkElementIndex(index);
return unlink(node(index));
}
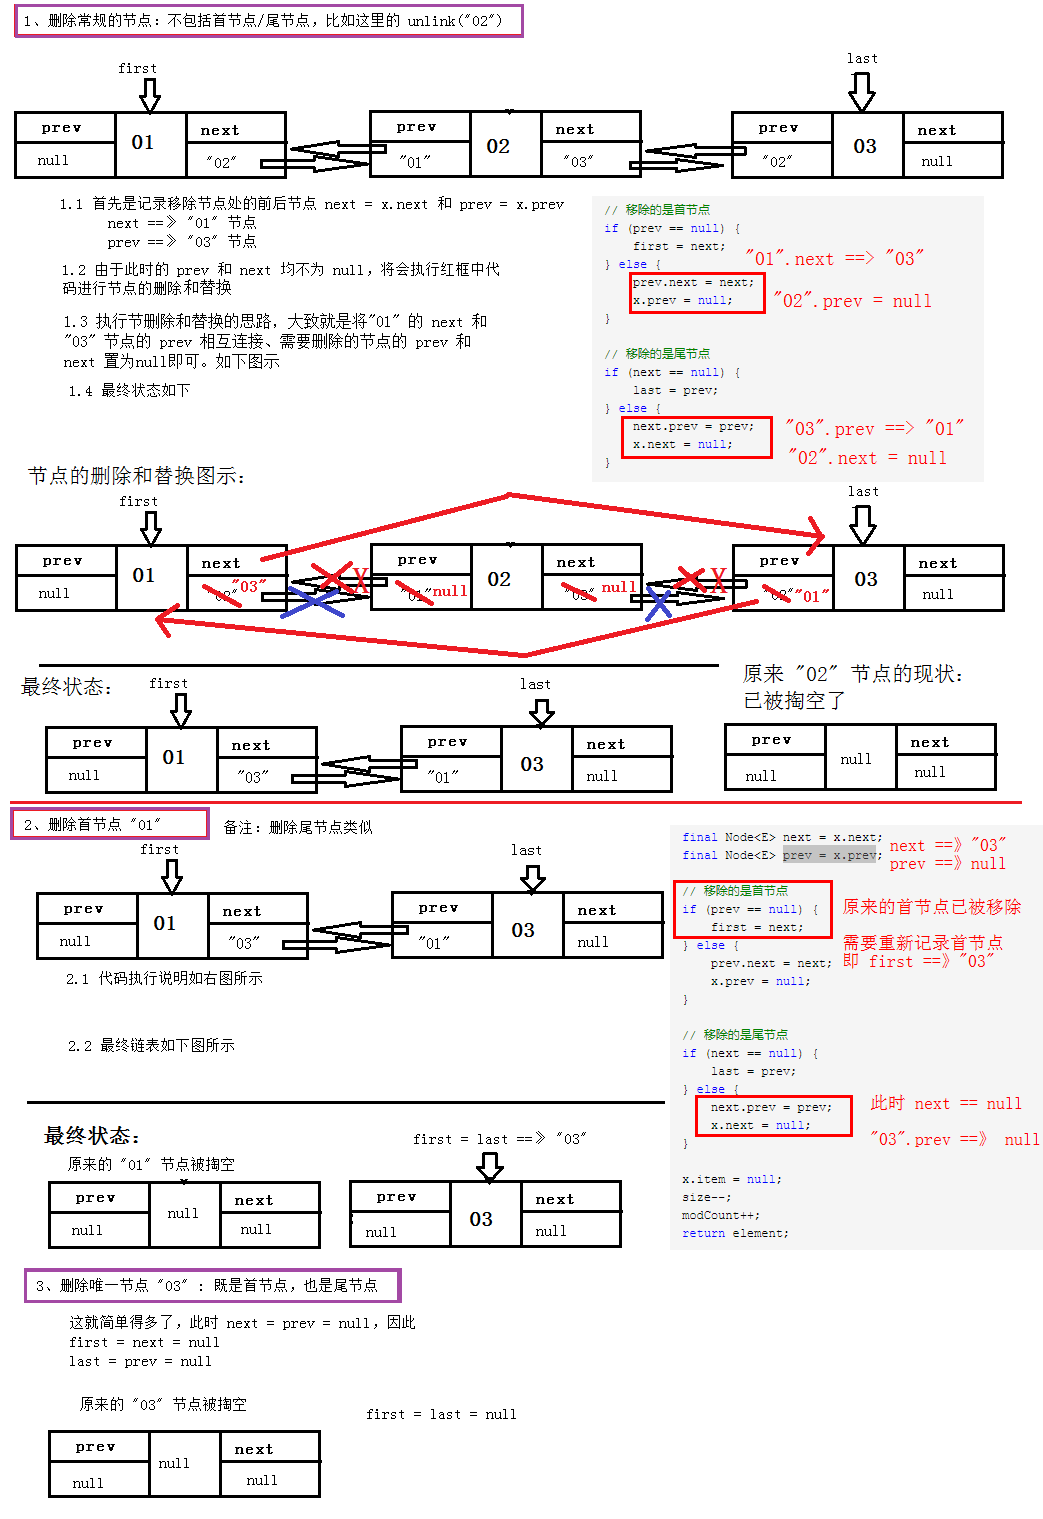
从实现来看,最后删除元素都是直接调用了unlink(Node n)。
    /**

     * Unlinks non-null node x.

     * 移除一个非空节点

     */

    E unlink(Node<E> x) {

        // assert x != null;

        final E element = x.item;

        final Node<E> next = x.next;

        final Node<E> prev = x.prev;

        // 移除的是首节点

        if (prev == null) {

            first = next;

        } else {

            prev.next = next;

            x.prev = null;

        }

        // 移除的是尾节点

        if (next == null) {

            last = prev;

        } else {

            next.prev = prev;

            x.next = null;

        }

        x.item = null;

        size--;

        modCount++;

        return element;

    }
这里大致讲一下。说白了,就是结点引用的变更,一个图就可以说明,如下。
- prev.next = next; 表示上一个元素的 next 指向本结点的 next 实际元素,即跳过本结点链接到下一个结点,如左边的红箭头
- next.prev = prev; 表示下一个元素的 prev 指向本结点的 prev 实际元素,即跳过本结点链接到上一个结点,如右边的红箭头。
这样便完成了链接的变更。当然这里还考虑了该元素是否是首元素(首元素 first 下移一格为 next)、是否是尾元素(尾元素 last 上移一格为 prev)。如下3种场景(删除普通节点、删除首节点或者尾节点、删除唯一节点)图示:
六、LinkedList修改元素
可以到,这里也是引用了 node(index),要顺序找到相应的元素,所以比较慢,但是一旦找到元素,就只会变更相关结点信息,这部分操作还是比较快的。
     /**

      * Replaces the element at the specified position in this list with the

      * specified element.

      *

      * @param index index of the element to replace

      * @param element element to be stored at the specified position

      * @return the element previously at the specified position

      * @throws IndexOutOfBoundsException {@inheritDoc}

      */

     public E set(int index, E element) {

         checkElementIndex(index);

         Node<E> x = node(index);

         E oldVal = x.item;

         x.item = element;

         return oldVal;

     }
作为 List 的基本功能大致说明如上 。
Java8集合框架——LinkedList源码分析的更多相关文章
- Java8集合框架——ArrayList源码分析
java.util.ArrayList 以下为主要介绍要点,从 Java 8 出发: 一.ArrayList的特点概述 二.ArrayList的内部实现:从内部属性和构造函数说起 三.ArrayLis ...
- Java8集合框架——LinkedHashMap源码分析
本文的结构如下: 一.LinkedHashMap 的 Javadoc 文档注释和简要说明 二.LinkedHashMap 的内部实现:一些扩展属性和构造函数 三.LinkedHashMap 的 put ...
- Java8集合框架——HashMap源码分析
java.util.HashMap 本文目录: 一.HashMap 的特点概述和说明 二.HashMap 的内部实现:从内部属性和构造函数说起 三.HashMap 的 put 操作 四.HashMap ...
- Java8集合框架——LinkedHashSet源码分析
本文的目录结构如下: 一.LinkedHashSet 的 Javadoc 文档注释和简要说明 二.LinkedHashSet 的内部实现:构造函数 三.LinkedHashSet 的 add 操作和 ...
- Java8集合框架——HashSet源码分析
本文的目录结构: 一.HashSet 的 Javadoc 文档注释和简要说明 二.HashSet 的内部实现:内部属性和构造函数 三.HashSet 的 add 操作和扩容 四.HashSet 的 r ...
- Java集合之LinkedList源码分析
概述 LinkedLIst和ArrayLIst一样, 都实现了List接口, 但其内部的数据结构不同, LinkedList是基于链表实现的(从名字也能看出来), 随机访问效率要比ArrayList差 ...
- 死磕 java集合之LinkedList源码分析
问题 (1)LinkedList只是一个List吗? (2)LinkedList还有其它什么特性吗? (3)LinkedList为啥经常拿出来跟ArrayList比较? (4)我为什么把LinkedL ...
- 集合之LinkedList源码分析
转载请注明出处:http://www.cnblogs.com/qm-article/p/8903893.html 一.介绍 在介绍该源码之前,先来了解一下链表,接触过数据结构的都知道,有种结构叫链表, ...
- Java基础-集合框架-ArrayList源码分析
一.JDK中ArrayList是如何实现的 1.先看下ArrayList从上而下的层次图: 说明: 从图中可以看出,ArrayList只是最下层的实现类,集合的规则和扩展都是AbstractList. ...
随机推荐
- 洛谷 P5509 派遣
题目传送门 心路历程: 每想到一种思路,就有一种要做出来的感觉.但一接着想就会发现这种方法有一些极小的问题,但是我没法解决... 于是就再换思路... 最后在请教了出题人神仙zcq之后,终于做出来了 ...
- Redis详解(八)——企业级解决方案
Redis详解(八)--企业级解决方案 缓存预热 缓存预热就是系统上线后,提前将相关的缓存数据直接加载到缓存系统.避免在用户请求的时候,先查询数据库,然后再将数据缓存的问题!用户直接查询事先被预热的缓 ...
- face_recognition实时人脸识别
具体安装移步:https://www.cnblogs.com/ckAng/p/10981025.html 更多操作移步:https://github.com/ageitgey/face_recogni ...
- B. Sport Mafia 二分
B. Sport Mafia time limit per test 2 seconds memory limit per test 256 megabytes input standard inpu ...
- node重点 模块
node模块 1.全局模块(对象)(像js中的window document) 定义:何时何地都可以访问,不需要引用 1.process.env 环境变量 计算机属性 高级系统设置 高级 环境变量 作 ...
- SpringBoot启动流程分析
前景提示 @ComponentScan 的处理都放在org.springframework.context.annotation.ConfigurationClassParser#doProcess ...
- gerrit 版本下载
链接:https://gerrit-releases.storage.googleapis.com 如下载gerrit-2.12.2.war https://gerrit-releases.stora ...
- 会话控制——Cookie和Session
Cookie简介 l HTTP是无状态协议,服务器不能记录浏览器的访问状态,也就是说服务器不能区分中两次请求是否由一个客户端发出.这样的设计严重阻碍的Web程序的设计.如:在我们进行网购时,买了一条 ...
- GDI+应用2
在上一篇里已经向大家介绍了如何使用GDI+绘制简单的图像,这一片继续向大家介绍其它一些绘图知识.1.首先我们来看下上一片中我们使用过的Pen.Pen的属性主要有: Color(颜色),DashCap( ...
- 吴裕雄--天生自然C++语言学习笔记:C++ 多线程
多线程是多任务处理的一种特殊形式,多任务处理允许让电脑同时运行两个或两个以上的程序.一般情况下,两种类型的多任务处理:基于进程和基于线程. 基于进程的多任务处理是程序的并发执行. 基于线程的多任务处理 ...