(转载)spring RestTemplate用法详解
前面介绍过spring的MVC结合不同的view显示不同的数据,如:结合json的view显示json、结合xml的view显示xml文档。那么这些数据除了在WebBrowser中用JavaScript来调用以外,还可以用远程服务器的Java程序、C#程序来调用。也就是说现在的程序不仅在BS中能调用,在CS中同样也能调用,不过你需要借助RestTemplate这个类来完成。RestTemplate有点类似于一个WebService客户端请求的模版,可以调用http请求的WebService,并将结果转换成相应的对象类型。至少你可以这样理解!
Blog:http://blog.csdn.net/IBM_hoojo
一、准备工作
1、 下载jar包
spring各版本jar下载地址:http://ebr.springsource.com/repository/app/library/detail?name=org.springframework.spring
相关的依赖包也可以在这里找到:http://ebr.springsource.com/repository/app/library
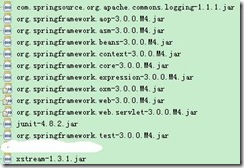
2、 需要jar包如下
3、 当前工程的web.xml配置
xml version="1.0" encoding="UTF-8"?>
<web-app version="2.4"
xmlns="http://java.sun.com/xml/ns/j2ee"
xmlns:xsi="http://www.w3.org/2001/XMLSchema-instance"
xsi:schemaLocation="http://java.sun.com/xml/ns/j2ee
http://java.sun.com/xml/ns/j2ee/web-app_2_4.xsd">
<servlet>
<servlet-name>dispatcherservlet-name>
<servlet-class>org.springframework.web.servlet.DispatcherServletservlet-class>
<init-param>
<param-name>contextConfigLocationparam-name>
<param-value>/WEB-INF/dispatcher.xmlparam-value>
init-param>
<load-on-startup>1load-on-startup>
servlet>
<servlet-mapping>
<servlet-name>dispatcherservlet-name>
<url-pattern>*.dourl-pattern>
servlet-mapping>
<welcome-file-list>
<welcome-file>index.jspwelcome-file>
welcome-file-list>
web-app>
4、 WEB-INF中的dispatcher.xml配置
xml version="1.0" encoding="UTF-8"?>
<beans xmlns="http://www.springframework.org/schema/beans"
xmlns:mvc="http://www.springframework.org/schema/mvc"
xmlns:context="http://www.springframework.org/schema/context"
xmlns:util="http://www.springframework.org/schema/util"
xmlns:xsi="http://www.w3.org/2001/XMLSchema-instance"
xsi:schemaLocation="http://www.springframework.org/schema/beans
http://www.springframework.org/schema/beans/spring-beans-3.0.xsd
http://www.springframework.org/schema/mvc
http://www.springframework.org/schema/mvc/spring-mvc-3.0.xsd
http://www.springframework.org/schema/context
http://www.springframework.org/schema/context/spring-context-3.0.xsd
http://www.springframework.org/schema/util
http://www.springframework.org/schema/util/spring-util-3.0.xsd">
<context:component-scan base-package="com.hoo.*">
<context:exclude-filter type="assignable" expression="com.hoo.client.RESTClient"/>
context:component-scan>
<bean id="handlerAdapter" class="org.springframework.web.servlet.mvc.annotation.AnnotationMethodHandlerAdapter"/>
<bean name="xStreamMarshallingView" class="org.springframework.web.servlet.view.xml.MarshallingView">
<property name="marshaller">
<bean class="org.springframework.oxm.xstream.XStreamMarshaller">
<property name="autodetectAnnotations" value="true"/>
bean>
property>
bean>
<bean class="org.springframework.web.servlet.view.BeanNameViewResolver">
<property name="order" value="3"/>
bean>
<bean id="handlerMapping" class="org.springframework.web.servlet.mvc.annotation.DefaultAnnotationHandlerMapping">
<property name="order" value="1" />
bean>
beans>
5、 启动后,可以看到index.jsp 没有出现异常或错误。那么当前SpringMVC的配置就成功了。
二、REST控制器实现
REST控制器主要完成CRUD操作,也就是对于http中的post、get、put、delete。
还有其他的操作,如head、options、trace。
具体代码:
package com.hoo.controller;
import org.springframework.stereotype.Controller;
import org.springframework.web.bind.annotation.PathVariable;
import org.springframework.web.bind.annotation.RequestMapping;
import org.springframework.web.bind.annotation.RequestMethod;
import org.springframework.web.servlet.ModelAndView;
/**
* function:SpringMVC REST示例
* @author hoojo
* @createDate 2011-6-9 上午11:34:08
* @file RESTController.java
* @package com.hoo.controller
* @project SpringRestWS
* @blog http://blog.csdn.net/IBM_hoojo
* @email hoojo_@126.com
* @version 1.0
*/
@RequestMapping("/restful")
@Controller
public class RESTController {
@RequestMapping(value = "/show", method = RequestMethod.GET)
public ModelAndView show() {
System.out.println("show");
ModelAndView model = new ModelAndView("xStreamMarshallingView");
model.addObject("show method");
return model;
}
@RequestMapping(value = "/get/{id}", method = RequestMethod.GET)
public ModelAndView getUserById(@PathVariable String id) {
System.out.println("getUserById-" + id);
ModelAndView model = new ModelAndView("xStreamMarshallingView");
model.addObject("getUserById method -" + id);
return model;
}
@RequestMapping(value = "/add", method = RequestMethod.POST)
public ModelAndView addUser(String user) {
System.out.println("addUser-" + user);
ModelAndView model = new ModelAndView("xStreamMarshallingView");
model.addObject("addUser method -" + user);
return model;
}
@RequestMapping(value = "/edit", method = RequestMethod.PUT)
public ModelAndView editUser(String user) {
System.out.println("editUser-" + user);
ModelAndView model = new ModelAndView("xStreamMarshallingView");
model.addObject("editUser method -" + user);
return model;
}
@RequestMapping(value = "/remove/{id}", method = RequestMethod.DELETE)
public ModelAndView removeUser(@PathVariable String id) {
System.out.println("removeUser-" + id);
ModelAndView model = new ModelAndView("xStreamMarshallingView");
model.addObject("removeUser method -" + id);
return model;
}
}
上面的方法对应的http操作:
/show -> get 查询
/get/id -> get 查询
/add -> post 添加
/edit -> put 修改
/remove/id -> delete 删除
在这个方法中,就可以看到RESTful风格的url资源标识
@RequestMapping(value = "/get/{id}", method = RequestMethod.GET)
public ModelAndView getUserById(@PathVariable String id) {
System.out.println("getUserById-" + id);
ModelAndView model = new ModelAndView("xStreamMarshallingView");
model.addObject("getUserById method -" + id);
return model;
}
value=”/get/{id}”就是url中包含get,并且带有id参数的get请求,就会执行这个方法。这个url在请求的时候,会通过Annotation的@PathVariable来将url中的id值设置到getUserById的参数中去。 ModelAndView返回的视图是xStreamMarshallingView是一个xml视图,执行当前请求后,会显示一篇xml文档。文档的内容是添加到model中的值。
三、利用RestTemplate调用REST资源
代码如下:
package com.hoo.client;
import org.springframework.beans.factory.annotation.Autowired;
import org.springframework.stereotype.Component;
import org.springframework.web.client.RestTemplate;
/**
* function:RestTemplate调用REST资源
* @author hoojo
* @createDate 2011-6-9 上午11:56:16
* @file RESTClient.java
* @package com.hoo.client
* @project SpringRestWS
* @blog http://blog.csdn.net/IBM_hoojo
* @email hoojo_@126.com
* @version 1.0
*/
@Component
public class RESTClient {
@Autowired
private RestTemplate template;
private final static String url = "http://localhost:8080/SpringRestWS/restful/";
public String show() {
return template.getForObject(url + "show.do", String.class, new String[]{});
}
public String getUserById(String id) {
return template.getForObject(url + "get/{id}.do", String.class, id);
}
public String addUser(String user) {
return template.postForObject(url + "add.do?user={user}", null, String.class, user);
}
public String editUser(String user) {
template.put(url + "edit.do?user={user}", null, user);
return user;
}
public String removeUser(String id) {
template.delete(url + "/remove/{id}.do", id);
return id;
}
}
RestTemplate的getForObject完成get请求、postForObject完成post请求、put对应的完成put请求、delete完成delete请求;还有execute可以执行任何请求的方法,需要你设置RequestMethod来指定当前请求类型。
RestTemplate.getForObject(String url, Class responseType, String... urlVariables)
参数url是http请求的地址,参数Class是请求响应返回后的数据的类型,最后一个参数是请求中需要设置的参数。
template.getForObject(url + "get/{id}.do", String.class, id);
如上面的参数是{id},返回的是一个string类型,设置的参数是id。最后执行该方法会返回一个String类型的结果。
下面建立一个测试类,完成对RESTClient的测试。代码如下:
package com.hoo.client;
import org.springframework.beans.factory.annotation.Autowired;
import org.springframework.test.context.ContextConfiguration;
import org.springframework.test.context.junit38.AbstractJUnit38SpringContextTests;
/**
* function:RESTClient TEST
* @author hoojo
* @createDate 2011-6-9 下午03:50:21
* @file RESTClientTest.java
* @package com.hoo.client
* @project SpringRestWS
* @blog http://blog.csdn.net/IBM_hoojo
* @email hoojo_@126.com
* @version 1.0
*/
@ContextConfiguration("classpath:applicationContext-*.xml")
public class RESTClientTest extends AbstractJUnit38SpringContextTests {
@Autowired
private RESTClient client;
public void testShow() {
System.out.println(client.show());
}
public void testGetUserById() {
System.out.println(client.getUserById("abc"));
}
public void testAddUser() {
System.out.println(client.addUser("jack"));
}
public void testEditUser() {
System.out.println(client.editUser("tom"));
}
public void testRemoveUser() {
System.out.println(client.removeUser("aabb"));
}
}
我们需要在src目录下添加applicationContext-beans.xml完成对restTemplate的配置。restTemplate需要配置MessageConvert将返回的xml文档进行转换,解析成JavaObject。
xml version="1.0" encoding="UTF-8"?>
<beans xmlns="http://www.springframework.org/schema/beans"
xmlns:context="http://www.springframework.org/schema/context"
xmlns:xsi="http://www.w3.org/2001/XMLSchema-instance"
xsi:schemaLocation="http://www.springframework.org/schema/beans
http://www.springframework.org/schema/beans/spring-beans-3.0.xsd
http://www.springframework.org/schema/context
http://www.springframework.org/schema/context/spring-context-3.0.xsd">
<context:component-scan base-package="com.hoo.*"/>
<bean id="restTemplate" class="org.springframework.web.client.RestTemplate">
<property name="messageConverters">
<list>
<bean class="org.springframework.http.converter.xml.MarshallingHttpMessageConverter">
<property name="marshaller" ref="xStreamMarshaller"/>
<property name="unmarshaller" ref="xStreamMarshaller"/>
bean>
list>
property>
bean>
<bean id="xStreamMarshaller" class="org.springframework.oxm.xstream.XStreamMarshaller">
<property name="annotatedClasses">
<array>
array>
property>
bean>
beans>
上面配置了xStreamMarshaller是和RESTController中的ModelAndView的view对应的。因为那边是用xStreamMarshaller进行编组的,所以RestTemplate这边也需要用它来解组。RestTemplate还指出其他的MarshallingHttpMessageConverter;
(转载)spring RestTemplate用法详解的更多相关文章
- spring RestTemplate用法详解
spring RestTemplate用法详解 spring 3.2.3 框架参考有说明 21.9 Accessing RESTful services on the Client
- [转载] C++ typedef 用法详解
typedef的语法描述 在现实生活中,信息的概念可能是长度,数量和面积等.在C语言中,信息被抽象为int.float和 double等基本数据类型.从基本数据类型名称上,不能够看出其所代表的物理属性 ...
- (转载)spring mvc DispatcherServlet详解之一---处理请求深入解析
要深入理解spring mvc的工作流程,就需要先了解spring mvc的架构: 从上图可以看到 前端控制器DispatcherServlet在其中起着主导作用,理解了DispatcherServl ...
- [转载]C# ListView用法详解
一.ListView类 1.常用的基本属性: (1)FullRowSelect:设置是否行选择模式.(默认为false) 提示:只有在Details视图该属性才有意义. (2) GridLines:设 ...
- [转载]ssget 用法详解 by yxp
总结得很好的ssget用法.....如此好文,必须转载. 原文地址: http://blog.csdn.net/yxp_xa/article/details/72229202 ssget 用法详解 b ...
- 转载 LayoutInflater的inflate函数用法详解
http://www.open-open.com/lib/view/open1328837587484.html LayoutInflater的inflate函数用法详解 LayoutInflater ...
- [转帖]@RequestMapping 用法详解之地址映射(转)
@RequestMapping 用法详解之地址映射(转) https://www.cnblogs.com/qq78292959/p/3760560.html 从csdn 发现的文章 然后csdn指向c ...
- @RequestMapping 用法详解之地址映射
@RequestMapping 用法详解之地址映射 引言: 前段时间项目中用到了RESTful模式来开发程序,但是当用POST.PUT模式提交数据时,发现服务器端接受不到提交的数据(服务器端参数绑定没 ...
- Java 5 的新标准语法和用法详解集锦
Java 5 的新标准语法和用法详解集锦 Java 5 的新标准语法和用法详解集锦 (需要在首选项-java-complier-compiler compliance level中设置为java5.0 ...
随机推荐
- API(三)之Class-based Views
使用基于类的视图重写API 我们首先将根视图重写为基于类的视图.所有这一切都涉及到重构views.py. from snippets.models import Snippet from snippe ...
- java基础解析系列(二)---Integer
java基础解析系列(二)---Integer 前言:本系列的主题是平时容易疏忽的知识点,只有基础扎实,在编码的时候才能更注重规范和性能,在出现bug的时候,才能处理更加从容. 目录 java基础解析 ...
- 用CSS画基本图形
用CSS画基本图形 1.正方形 代码如下: #square { width: 100px; height: 100px; background: red; } 2.长方形 代码如下: #recta ...
- C和C指针小记(五)-指针类型
1.指针常量(pointer constant) 一般是没有这个概念的,指针类型的常量理解起来可以看着指针类型的常量,常用 0xff123456 表示,我们一般不会这么做.因为程序员一般无法事先知道计 ...
- Dom4j中getStringValue()和getText()用法的区别
这两个方法都是获取文本的,区别是: getText()-----获取当前节点的文本内容,如果当前节点下是一个element元素,那返回的就是null. getStringValue------获取当前 ...
- Eclipse + ndk+ cocos2dx 调试Cocos2dx 程序
本文是我自己尝试通过eclipse来在windows平台下搭建cocos2dx的过程,期间遇到了一些问题,都是通过网上借鉴别人的博文来解决的,下面也列出来这些参考文献.写下来的目的主要是自己以后要用的 ...
- MySQL5.7免安装版配置详细教程
MySQL5.7免安装版配置详细教程 一. 软件下载 Mysql是一个比较流行且很好用的一款数据库软件,如下记录了我学习总结的mysql免安装版的配置经验,要安装的朋友可以当做参考哦 mysql5.7 ...
- 转:el表达式获取map对象的内容 & js中使用el表达式 & js 中使用jstl 实现 session.removeattribute
原文链接: ①EL表达式取Map,List值的总结 ②在jsp中使用el表达式通过键获得后台的一个map<Long,String>的值 ③在javascript中使用el表达式(有图有真相 ...
- js中的事件轮询(event loop)机制
异步任务指的是,不进入主线程.而进入"任务队列"(task queue)的任务,只有"任务队列"通知主线程,某个异步任务可以执行了,该任务才会进入主线程执行. ...
- Eclipse实用小插件
MyBatipse插件 描述 用于mybatis的Dao层或者mapper层的方法直接跳到对应的xml文件对应的方法 安装 进入IDE(eclipse)的Help——>Install New S ...