深入理解UITableView
基本介绍
UITableView有两种风格:UITableViewStylePlain和UITableViewStyleGrouped。这两者操作起来其实并没有本质区别,只是后者按分组样式显示前者按照普通样式显示而已。大家先看一下两者的应用:
1>分组样式
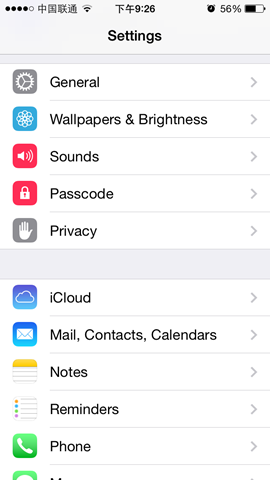

2>不分组样式

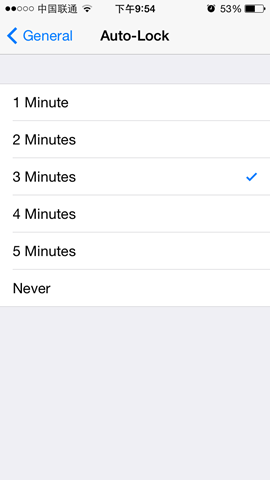
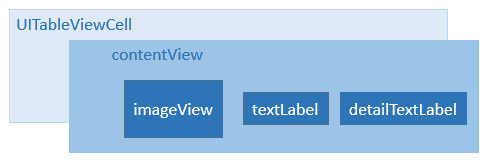
大家可以看到在UITableView中数据只有行的概念,并没有列的概念,因为在手机操作系统中显示多列是不利于操作的。UITableView中每行数据都是一个UITableViewCell,在这个控件中为了显示更多的信息,iOS已经在其内部设置好了多个子控件以供开发者使用。如果我们查看UITableViewCell的声明文件可以发现在内部有一个UIView控件(contentView,作为其他元素的父控件)、两个UILable控件(textLabel、detailTextLabel)、一个UIImage控件(imageView),分别用于容器、显示内容、详情和图片。使用效果类似于微信、QQ信息列表:
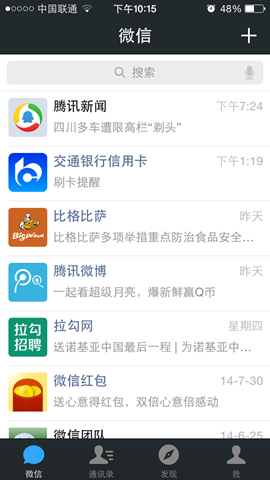

当然,这些子控件并不一定要全部使用,具体操作时可以通过UITableViewCellStyle进行设置,具体每个枚举表示的意思已经在代码中进行了注释:
typedef NS_ENUM(NSInteger, UITableViewCellStyle) {

    UITableViewCellStyleDefault,    // 左侧显示textLabel(不显示detailTextLabel),imageView可选(显示在最左边)

    UITableViewCellStyleValue1,        // 左侧显示textLabel、右侧显示detailTextLabel(默认蓝色),imageView可选(显示在最左边)

    UITableViewCellStyleValue2,        // 左侧依次显示textLabel(默认蓝色)和detailTextLabel,imageView可选(显示在最左边)

    UITableViewCellStyleSubtitle    // 左上方显示textLabel,左下方显示detailTextLabel(默认灰色),imageView可选(显示在最左边)

};
数据源
由于iOS是遵循MVC模式设计的,很多操作都是通过代理和外界沟通的,但对于数据源控件除了代理还有一个数据源属性,通过它和外界进行数据交互。 对于UITableView设置完dataSource后需要实现UITableViewDataSource协议,在这个协议中定义了多种 数据操作方法,下面通过创建一个简单的联系人管理进行演示:
首先我们需要创建一个联系人模型KCContact
KCContact.h
//

//  Contact.h

//  UITableView

//

//  Created by Kenshin Cui on 14-3-1.

//  Copyright (c) 2014年 Kenshin Cui. All rights reserved.

//

#import <Foundation/Foundation.h>

@interface KCContact : NSObject

#pragma mark 姓

@property (nonatomic,copy) NSString *firstName;

#pragma mark 名

@property (nonatomic,copy) NSString *lastName;

#pragma mark 手机号码

@property (nonatomic,copy) NSString *phoneNumber;

#pragma mark 带参数的构造函数

-(KCContact *)initWithFirstName:(NSString *)firstName andLastName:(NSString *)lastName andPhoneNumber:(NSString *)phoneNumber;

#pragma mark 取得姓名

-(NSString *)getName;

#pragma mark 带参数的静态对象初始化方法

+(KCContact *)initWithFirstName:(NSString *)firstName andLastName:(NSString *)lastName andPhoneNumber:(NSString *)phoneNumber;

@end
KCContact.m
//

//  Contact.m

//  UITableView

//

//  Created by Kenshin Cui on 14-3-1.

//  Copyright (c) 2014年 Kenshin Cui. All rights reserved.

//

#import "KCContact.h"

@implementation KCContact

-(KCContact *)initWithFirstName:(NSString *)firstName andLastName:(NSString *)lastName andPhoneNumber:(NSString *)phoneNumber{

    if(self=[super init]){

        self.firstName=firstName;

        self.lastName=lastName;

        self.phoneNumber=phoneNumber;

    }

    return self;

}

-(NSString *)getName{

    return [NSString stringWithFormat:@"%@ %@",_lastName,_firstName];

}

+(KCContact *)initWithFirstName:(NSString *)firstName andLastName:(NSString *)lastName andPhoneNumber:(NSString *)phoneNumber{

    KCContact *contact1=[[KCContact alloc]initWithFirstName:firstName andLastName:lastName andPhoneNumber:phoneNumber];

    return contact1;

}

@end
为了演示分组显示我们不妨将一组数据也抽象成模型KCContactGroup
KCContactGroup.h
//

//  KCContactGroup.h

//  UITableView

//

//  Created by Kenshin Cui on 14-3-1.

//  Copyright (c) 2014年 Kenshin Cui. All rights reserved.

//

#import <Foundation/Foundation.h>

#import "KCContact.h"

@interface KCContactGroup : NSObject

#pragma mark 组名

@property (nonatomic,copy) NSString *name;

#pragma mark 分组描述

@property (nonatomic,copy) NSString *detail;

#pragma mark 联系人

@property (nonatomic,strong) NSMutableArray *contacts;

#pragma mark 带参数个构造函数

-(KCContactGroup *)initWithName:(NSString *)name andDetail:(NSString *)detail andContacts:(NSMutableArray *)contacts;

#pragma mark 静态初始化方法

+(KCContactGroup *)initWithName:(NSString *)name andDetail:(NSString *)detail andContacts:(NSMutableArray *)contacts;

@end
KCContactGroup.m
//

//  KCContactGroup.m

//  UITableView

//

//  Created by Kenshin Cui on 14-3-1.

//  Copyright (c) 2014年 Kenshin Cui. All rights reserved.

//

#import "KCContactGroup.h"

@implementation KCContactGroup

-(KCContactGroup *)initWithName:(NSString *)name andDetail:(NSString *)detail andContacts:(NSMutableArray *)contacts{

    if (self=[super init]) {

        self.name=name;

        self.detail=detail;

        self.contacts=contacts;

    }

    return self;

}

+(KCContactGroup *)initWithName:(NSString *)name andDetail:(NSString *)detail andContacts:(NSMutableArray *)contacts{

    KCContactGroup *group1=[[KCContactGroup alloc]initWithName:name andDetail:detail andContacts:contacts];

    return group1;

}

@end
然后在viewDidLoad方法中创建一些模拟数据同时实现数据源协议方法:
KCMainViewController.m
//

//  KCMainViewController.m

//  UITableView

//

//  Created by Kenshin Cui on 14-3-1.

//  Copyright (c) 2014年 Kenshin Cui. All rights reserved.

//

#import "KCMainViewController.h"

#import "KCContact.h"

#import "KCContactGroup.h"

@interface KCMainViewController ()<UITableViewDataSource>{

    UITableView *_tableView;

    NSMutableArray *_contacts;//联系人模型

}

@end

@implementation KCMainViewController

- (void)viewDidLoad {

    [super viewDidLoad];

    //初始化数据

    [self initData];

    //创建一个分组样式的UITableView

    _tableView=[[UITableView alloc]initWithFrame:self.view.bounds style:UITableViewStyleGrouped];

    //设置数据源,注意必须实现对应的UITableViewDataSource协议

    _tableView.dataSource=self;

    [self.view addSubview:_tableView];

}

#pragma mark 加载数据

-(void)initData{

    _contacts=[[NSMutableArray alloc]init];

    KCContact *contact1=[KCContact initWithFirstName:@"Cui" andLastName:@"Kenshin" andPhoneNumber:@"18500131234"];

    KCContact *contact2=[KCContact initWithFirstName:@"Cui" andLastName:@"Tom" andPhoneNumber:@"18500131237"];

    KCContactGroup *group1=[KCContactGroup initWithName:@"C" andDetail:@"With names beginning with C" andContacts:[NSMutableArray arrayWithObjects:contact1,contact2, nil]];

    [_contacts addObject:group1];

    KCContact *contact3=[KCContact initWithFirstName:@"Lee" andLastName:@"Terry" andPhoneNumber:@"18500131238"];

    KCContact *contact4=[KCContact initWithFirstName:@"Lee" andLastName:@"Jack" andPhoneNumber:@"18500131239"];

    KCContact *contact5=[KCContact initWithFirstName:@"Lee" andLastName:@"Rose" andPhoneNumber:@"18500131240"];

    KCContactGroup *group2=[KCContactGroup initWithName:@"L" andDetail:@"With names beginning with L" andContacts:[NSMutableArray arrayWithObjects:contact3,contact4,contact5, nil]];

    [_contacts addObject:group2];

    KCContact *contact6=[KCContact initWithFirstName:@"Sun" andLastName:@"Kaoru" andPhoneNumber:@"18500131235"];

    KCContact *contact7=[KCContact initWithFirstName:@"Sun" andLastName:@"Rosa" andPhoneNumber:@"18500131236"];

    KCContactGroup *group3=[KCContactGroup initWithName:@"S" andDetail:@"With names beginning with S" andContacts:[NSMutableArray arrayWithObjects:contact6,contact7, nil]];

    [_contacts addObject:group3];

    KCContact *contact8=[KCContact initWithFirstName:@"Wang" andLastName:@"Stephone" andPhoneNumber:@"18500131241"];

    KCContact *contact9=[KCContact initWithFirstName:@"Wang" andLastName:@"Lucy" andPhoneNumber:@"18500131242"];

    KCContact *contact10=[KCContact initWithFirstName:@"Wang" andLastName:@"Lily" andPhoneNumber:@"18500131243"];

    KCContact *contact11=[KCContact initWithFirstName:@"Wang" andLastName:@"Emily" andPhoneNumber:@"18500131244"];

    KCContact *contact12=[KCContact initWithFirstName:@"Wang" andLastName:@"Andy" andPhoneNumber:@"18500131245"];

    KCContactGroup *group4=[KCContactGroup initWithName:@"W" andDetail:@"With names beginning with W" andContacts:[NSMutableArray arrayWithObjects:contact8,contact9,contact10,contact11,contact12, nil]];

    [_contacts addObject:group4];

    KCContact *contact13=[KCContact initWithFirstName:@"Zhang" andLastName:@"Joy" andPhoneNumber:@"18500131246"];

    KCContact *contact14=[KCContact initWithFirstName:@"Zhang" andLastName:@"Vivan" andPhoneNumber:@"18500131247"];

    KCContact *contact15=[KCContact initWithFirstName:@"Zhang" andLastName:@"Joyse" andPhoneNumber:@"18500131248"];

    KCContactGroup *group5=[KCContactGroup initWithName:@"Z" andDetail:@"With names beginning with Z" andContacts:[NSMutableArray arrayWithObjects:contact13,contact14,contact15, nil]];

    [_contacts addObject:group5];

}

#pragma mark - 数据源方法

#pragma mark 返回分组数

-(NSInteger)numberOfSectionsInTableView:(UITableView *)tableView{

    NSLog(@"计算分组数");

    return _contacts.count;

}

#pragma mark 返回每组行数

-(NSInteger)tableView:(UITableView *)tableView numberOfRowsInSection:(NSInteger)section{

    NSLog(@"计算每组(组%i)行数",section);

    KCContactGroup *group1=_contacts[section];

    return group1.contacts.count;

}

#pragma mark返回每行的单元格

-(UITableViewCell *)tableView:(UITableView *)tableView cellForRowAtIndexPath:(NSIndexPath *)indexPath{

    //NSIndexPath是一个结构体,记录了组和行信息

    NSLog(@"生成单元格(组:%i,行%i)",indexPath.section,indexPath.row);

    KCContactGroup *group=_contacts[indexPath.section];

    KCContact *contact=group.contacts[indexPath.row];

    UITableViewCell *cell=[[UITableViewCell alloc]initWithStyle:UITableViewCellStyleDefault reuseIdentifier:nil];

    cell.textLabel.text=[contact getName];

    cell.detailTextLabel.text=contact.phoneNumber;

    return cell;

}

#pragma mark 返回每组头标题名称

-(NSString *)tableView:(UITableView *)tableView titleForHeaderInSection:(NSInteger)section{

    NSLog(@"生成组(组%i)名称",section);

    KCContactGroup *group=_contacts[section];

    return group.name;

}

#pragma mark 返回每组尾部说明

-(NSString *)tableView:(UITableView *)tableView titleForFooterInSection:(NSInteger)section{

    NSLog(@"生成尾部(组%i)详情",section);

    KCContactGroup *group=_contacts[section];

    return group.detail;

}

@end
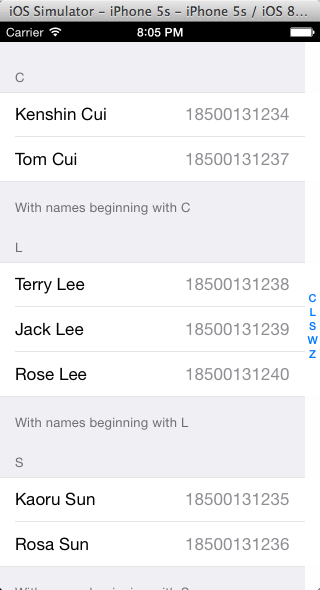
运行可以看到如下效果:
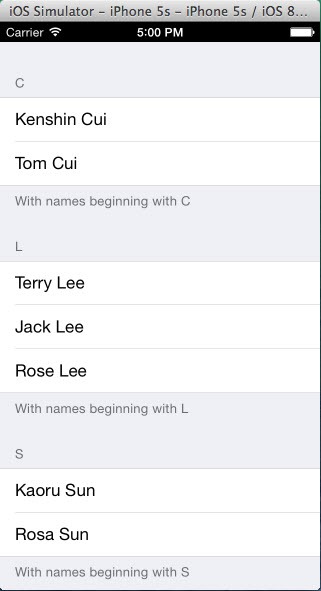
大家在使用iPhone通讯录时会发现右侧可以按字母检索,使用起来很方便,其实这个功能使用UITableView实现很简单,只要实现数据源协议的一个方法,构建一个分组标题的数组即可实现。数组元素的内容和组标题内容未必完全一致,UITableView是按照数组元素的索引和每组数据索引顺序来定位的而不是按内容查找。
#pragma mark 返回每组标题索引

-(NSArray *)sectionIndexTitlesForTableView:(UITableView *)tableView{

    NSLog(@"生成组索引");

    NSMutableArray *indexs=[[NSMutableArray alloc]init];

    for(KCContactGroup *group in _contacts){

        [indexs addObject:group.name];

    }

    return indexs;

}
效果如下:
需要注意的是上面几个重点方法的执行顺序,请看下图:

值得指出的是生成单元格的方法并不是一次全部调用,而是只会生产当前显示在界面上的单元格,当用户滚动操作时再显示其他单元格。
注意:随着我们的应用越来越复杂,可能经常需要调试程序,在iOS中默认情况下不能定位到错误代码行,我们可以通过如下设置让程序定位到出错代码行:Show the Breakpoint navigator—Add Exception breakpoint。
代理
上面我们已经看到通讯录的简单实现,但是我们发现单元格高度、分组标题高度以及尾部说明的高度都需要调整,此时就需要使用代理方法。UITableView代理方法有很多,例如监听单元格显示周期、监听单元格选择编辑操作、设置是否高亮显示单元格、设置行高等。
1.设置行高
#pragma mark - 代理方法

#pragma mark 设置分组标题内容高度

-(CGFloat)tableView:(UITableView *)tableView heightForHeaderInSection:(NSInteger)section{

    if(section==0){

        return 50;

    }

    return 40;

}

#pragma mark 设置每行高度(每行高度可以不一样)

-(CGFloat)tableView:(UITableView *)tableView heightForRowAtIndexPath:(NSIndexPath *)indexPath{

    return 45;

}

#pragma mark 设置尾部说明内容高度

-(CGFloat)tableView:(UITableView *)tableView heightForFooterInSection:(NSInteger)section{

    return 40;

}
2.监听点击
在iOS中点击某联系个人就可以呼叫这个联系人,这时就需要监听点击操作,这里就不演示呼叫联系人操作了,我们演示一下修改人员信息的操作。
KCMainViewContrller.m
//

//  KCMainViewController.m

//  UITableView

//

//  Created by Kenshin Cui on 14-3-1.

//  Copyright (c) 2014年 Kenshin Cui. All rights reserved.

//

#import "KCMainViewController.h"

#import "KCContact.h"

#import "KCContactGroup.h"

@interface KCMainViewController ()<UITableViewDataSource,UITableViewDelegate,UIAlertViewDelegate>{

    UITableView *_tableView;

    NSMutableArray *_contacts;//联系人模型

    NSIndexPath *_selectedIndexPath;//当前选中的组和行

}

@end

@implementation KCMainViewController

- (void)viewDidLoad {

    [super viewDidLoad];

    //初始化数据

    [self initData];

    //创建一个分组样式的UITableView

    _tableView=[[UITableView alloc]initWithFrame:self.view.bounds style:UITableViewStyleGrouped];

    //设置数据源,注意必须实现对应的UITableViewDataSource协议

    _tableView.dataSource=self;

    //设置代理

    _tableView.delegate=self;

    [self.view addSubview:_tableView];

}

#pragma mark 加载数据

-(void)initData{

    _contacts=[[NSMutableArray alloc]init];

    KCContact *contact1=[KCContact initWithFirstName:@"Cui" andLastName:@"Kenshin" andPhoneNumber:@"18500131234"];

    KCContact *contact2=[KCContact initWithFirstName:@"Cui" andLastName:@"Tom" andPhoneNumber:@"18500131237"];

    KCContactGroup *group1=[KCContactGroup initWithName:@"C" andDetail:@"With names beginning with C" andContacts:[NSMutableArray arrayWithObjects:contact1,contact2, nil]];

    [_contacts addObject:group1];

    KCContact *contact3=[KCContact initWithFirstName:@"Lee" andLastName:@"Terry" andPhoneNumber:@"18500131238"];

    KCContact *contact4=[KCContact initWithFirstName:@"Lee" andLastName:@"Jack" andPhoneNumber:@"18500131239"];

    KCContact *contact5=[KCContact initWithFirstName:@"Lee" andLastName:@"Rose" andPhoneNumber:@"18500131240"];

    KCContactGroup *group2=[KCContactGroup initWithName:@"L" andDetail:@"With names beginning with L" andContacts:[NSMutableArray arrayWithObjects:contact3,contact4,contact5, nil]];

    [_contacts addObject:group2];

    KCContact *contact6=[KCContact initWithFirstName:@"Sun" andLastName:@"Kaoru" andPhoneNumber:@"18500131235"];

    KCContact *contact7=[KCContact initWithFirstName:@"Sun" andLastName:@"Rosa" andPhoneNumber:@"18500131236"];

    KCContactGroup *group3=[KCContactGroup initWithName:@"S" andDetail:@"With names beginning with S" andContacts:[NSMutableArray arrayWithObjects:contact6,contact7, nil]];

    [_contacts addObject:group3];

    KCContact *contact8=[KCContact initWithFirstName:@"Wang" andLastName:@"Stephone" andPhoneNumber:@"18500131241"];

    KCContact *contact9=[KCContact initWithFirstName:@"Wang" andLastName:@"Lucy" andPhoneNumber:@"18500131242"];

    KCContact *contact10=[KCContact initWithFirstName:@"Wang" andLastName:@"Lily" andPhoneNumber:@"18500131243"];

    KCContact *contact11=[KCContact initWithFirstName:@"Wang" andLastName:@"Emily" andPhoneNumber:@"18500131244"];

    KCContact *contact12=[KCContact initWithFirstName:@"Wang" andLastName:@"Andy" andPhoneNumber:@"18500131245"];

    KCContactGroup *group4=[KCContactGroup initWithName:@"W" andDetail:@"With names beginning with W" andContacts:[NSMutableArray arrayWithObjects:contact8,contact9,contact10,contact11,contact12, nil]];

    [_contacts addObject:group4];

    KCContact *contact13=[KCContact initWithFirstName:@"Zhang" andLastName:@"Joy" andPhoneNumber:@"18500131246"];

    KCContact *contact14=[KCContact initWithFirstName:@"Zhang" andLastName:@"Vivan" andPhoneNumber:@"18500131247"];

    KCContact *contact15=[KCContact initWithFirstName:@"Zhang" andLastName:@"Joyse" andPhoneNumber:@"18500131248"];

    KCContactGroup *group5=[KCContactGroup initWithName:@"Z" andDetail:@"With names beginning with Z" andContacts:[NSMutableArray arrayWithObjects:contact13,contact14,contact15, nil]];

    [_contacts addObject:group5];

}

#pragma mark - 数据源方法

#pragma mark 返回分组数

-(NSInteger)numberOfSectionsInTableView:(UITableView *)tableView{

    NSLog(@"计算分组数");

    return _contacts.count;

}

#pragma mark 返回每组行数

-(NSInteger)tableView:(UITableView *)tableView numberOfRowsInSection:(NSInteger)section{

    NSLog(@"计算每组(组%i)行数",section);

    KCContactGroup *group1=_contacts[section];

    return group1.contacts.count;

}

#pragma mark返回每行的单元格

-(UITableViewCell *)tableView:(UITableView *)tableView cellForRowAtIndexPath:(NSIndexPath *)indexPath{

    //NSIndexPath是一个对象,记录了组和行信息

    NSLog(@"生成单元格(组:%i,行%i)",indexPath.section,indexPath.row);

    KCContactGroup *group=_contacts[indexPath.section];

    KCContact *contact=group.contacts[indexPath.row];

    UITableViewCell *cell=[[UITableViewCell alloc]initWithStyle:UITableViewCellStyleValue1 reuseIdentifier:nil];

    cell.textLabel.text=[contact getName];

    cell.detailTextLabel.text=contact.phoneNumber;

    return cell;

}

#pragma mark 返回每组头标题名称

-(NSString *)tableView:(UITableView *)tableView titleForHeaderInSection:(NSInteger)section{

    NSLog(@"生成组(组%i)名称",section);

    KCContactGroup *group=_contacts[section];

    return group.name;

}

#pragma mark 返回每组尾部说明

-(NSString *)tableView:(UITableView *)tableView titleForFooterInSection:(NSInteger)section{

    NSLog(@"生成尾部(组%i)详情",section);

    KCContactGroup *group=_contacts[section];

    return group.detail;

}

#pragma mark 返回每组标题索引

-(NSArray *)sectionIndexTitlesForTableView:(UITableView *)tableView{

    NSLog(@"生成组索引");

    NSMutableArray *indexs=[[NSMutableArray alloc]init];

    for(KCContactGroup *group in _contacts){

        [indexs addObject:group.name];

    }

    return indexs;

}

#pragma mark - 代理方法

#pragma mark 设置分组标题内容高度

-(CGFloat)tableView:(UITableView *)tableView heightForHeaderInSection:(NSInteger)section{

    if(section==0){

        return 50;

    }

    return 40;

}

#pragma mark 设置每行高度(每行高度可以不一样)

-(CGFloat)tableView:(UITableView *)tableView heightForRowAtIndexPath:(NSIndexPath *)indexPath{

    return 45;

}

#pragma mark 设置尾部说明内容高度

-(CGFloat)tableView:(UITableView *)tableView heightForFooterInSection:(NSInteger)section{

    return 40;

}

#pragma mark 点击行

-(void)tableView:(UITableView *)tableView didSelectRowAtIndexPath:(NSIndexPath *)indexPath{

    _selectedIndexPath=indexPath;

    KCContactGroup *group=_contacts[indexPath.section];

    KCContact *contact=group.contacts[indexPath.row];

    //创建弹出窗口

    UIAlertView *alert=[[UIAlertView alloc]initWithTitle:@"System Info" message:[contact getName] delegate:self cancelButtonTitle:@"Cancel" otherButtonTitles:@"OK", nil];

    alert.alertViewStyle=UIAlertViewStylePlainTextInput; //设置窗口内容样式

    UITextField *textField= [alert textFieldAtIndex:0]; //取得文本框

    textField.text=contact.phoneNumber; //设置文本框内容

    [alert show]; //显示窗口

}

#pragma mark 窗口的代理方法,用户保存数据

-(void)alertView:(UIAlertView *)alertView clickedButtonAtIndex:(NSInteger)buttonIndex{

    //当点击了第二个按钮(OK)

    if (buttonIndex==1) {

        UITextField *textField= [alertView textFieldAtIndex:0];

        //修改模型数据

        KCContactGroup *group=_contacts[_selectedIndexPath.section];

        KCContact *contact=group.contacts[_selectedIndexPath.row];

        contact.phoneNumber=textField.text;

        //刷新表格

        [_tableView reloadData];

    }

}

#pragma mark 重写状态样式方法

-(UIStatusBarStyle)preferredStatusBarStyle{

    return UIStatusBarStyleLightContent;

}

@end
在上面的代码中我们通过修改模型来改变UI显示,这种方式是经典的MVC应用,在后面的代码中会经常看到。当然UI的刷新使用了UITableView的reloadData方法,该方法会重新调用数据源方法,包括计算分组、计算每个分组的行数,生成单元格等刷新整个UITableView。当然这种方式在实际开发中是不可取的,我们不可能因为修改了一个人的信息就刷新整个UITableViewView,此时我们需要采用局部刷新。局部刷新使用起来很简单,只需要调用UITableView的另外一个方法:
#pragma mark 窗口的代理方法,用户保存数据

-(void)alertView:(UIAlertView *)alertView clickedButtonAtIndex:(NSInteger)buttonIndex{

    //当点击了第二个按钮(OK)

    if (buttonIndex==1) {

        UITextField *textField= [alertView textFieldAtIndex:0];

        //修改模型数据

        KCContactGroup *group=_contacts[_selectedIndexPath.section];

        KCContact *contact=group.contacts[_selectedIndexPath.row];

        contact.phoneNumber=textField.text;

        //刷新表格

        NSArray *indexPaths=@[_selectedIndexPath];//需要局部刷新的单元格的组、行

        [_tableView reloadRowsAtIndexPaths:indexPaths withRowAnimation:UITableViewRowAnimationLeft];//后面的参数代表更新时的动画

    }

}
性能优化
前面已经说过UITableView中的单元格cell是在显示到用户可视区域后创建的,那么如果用户往下滚动就会继续创建显示在屏幕上的单元格,如果用户向上滚动返回到查看过的内容时同样会重新创建之前已经创建过的单元格。如此一来即使UITableView的内容不是太多,如果用户反复的上下滚动,内存也会瞬间飙升,更何况很多时候UITableView的内容是很多的(例如微博展示列表,基本向下滚动是没有底限的)。
前面一节中我们曾经提到过如何优化UIScrollView,当时就是利用有限的UIImageView动态切换其内容来尽可能减少资源占用。同样的,在UITableView中也可以采用类似的方式,只是这时我们不是在滚动到指定位置后更改滚动的位置而是要将当前没有显示的Cell重新显示在将要显示的Cell的位置然后更新其内容。原因就是UITableView中的Cell结构布局可能是不同的,通过重新定位是不可取的,而是需要重用已经不再界面显示的已创建过的Cell。
当然,听起来这么做比较复杂,其实实现起来很简单,因为UITableView已经为我们实现了这种机制。在UITableView内部有一个缓存池,初始化时使用initWithStyle:(UITableViewCellStyle) reuseIdentifier:(NSString *)方法指定一个可重用标识,就可以将这个cell放到缓存池。然后在使用时使用指定的标识去缓存池中取得对应的cell然后修改cell内容即可。
#pragma mark返回每行的单元格

-(UITableViewCell *)tableView:(UITableView *)tableView cellForRowAtIndexPath:(NSIndexPath *)indexPath{

    //NSIndexPath是一个对象,记录了组和行信息

    NSLog(@"生成单元格(组:%i,行%i)",indexPath.section,indexPath.row);

    KCContactGroup *group=_contacts[indexPath.section];

    KCContact *contact=group.contacts[indexPath.row];

    //由于此方法调用十分频繁,cell的标示声明成静态变量有利于性能优化

    static NSString *cellIdentifier=@"UITableViewCellIdentifierKey1";

    //首先根据标识去缓存池取

    UITableViewCell *cell=[tableView dequeueReusableCellWithIdentifier:cellIdentifier];

    //如果缓存池没有到则重新创建并放到缓存池中

    if(!cell){

        cell=[[UITableViewCell alloc]initWithStyle:UITableViewCellStyleValue1 reuseIdentifier:cellIdentifier];

    }

    cell.textLabel.text=[contact getName];

    cell.detailTextLabel.text=contact.phoneNumber;

    NSLog(@"cell:%@",cell);

    return cell;

}
上面的代码中已经打印了cell的地址,如果大家运行测试上下滚动UITableView会发现滚动时创建的cell地址是初始化时已经创建的。
这里再次给大家强调两点:
- -(UITableViewCell *)tableView:(UITableView *)tableView cellForRowAtIndexPath:(NSIndexPath *)方法调用很频繁,无论是初始化、上下滚动、刷新都会调用此方法,所有在这里执行的操作一定要注意性能;
- 可重用标识可以有多个,如果在UITableView中有多类结构不同的Cell,可以通过这个标识进行缓存和重新;
UITableViewCell
1.自带的UITableViewCell
UITableViewCell是构建一个UITableView的基础,在UITableViewCell内部有一个UIView控件作为其他内容的容器,它上面有一个UIImageView和两个UILabel,通过UITableViewCellStyle属性可以对其样式进行控制。其结构如下:
有时候我们会发现很多UITableViewCell右侧可以显示不同的图标,在iOS中称之为访问器,点击可以触发不同的事件,例如设置功能:
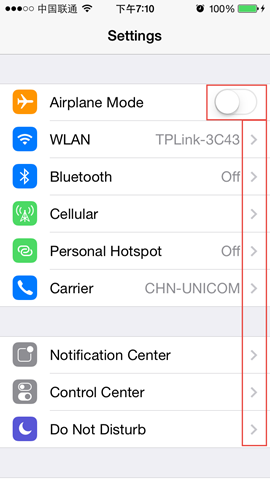
要设置这些图标只需要设置UITableViewCell的accesoryType属性,这是一个枚举类型具体含义如下:
typedef NS_ENUM(NSInteger, UITableViewCellAccessoryType) {

    UITableViewCellAccessoryNone,                   // 不显示任何图标

    UITableViewCellAccessoryDisclosureIndicator,    // 跳转指示图标

    UITableViewCellAccessoryDetailDisclosureButton, // 内容详情图标和跳转指示图标

    UITableViewCellAccessoryCheckmark,              // 勾选图标

    UITableViewCellAccessoryDetailButton NS_ENUM_AVAILABLE_IOS(7_0) // 内容详情图标

};
例如在最近通话中我们通常设置为详情图标,点击可以查看联系人详情:

很明显iOS设置中第一个accessoryType不在枚举之列,右侧的访问器类型是UISwitch控件,那么如何显示自定义的访问器呢?其实只要设置UITableViewCell的accessoryView即可,它支持任何UIView控件。假设我们在通讯录每组第一行放一个UISwitch,同时切换时可以输出对应信息:
//

//  KCMainViewController.m

//  UITableView

//

//  Created by Kenshin Cui on 14-3-1.

//  Copyright (c) 2014年 Kenshin Cui. All rights reserved.

//

#import "KCMainViewController.h"

#import "KCContact.h"

#import "KCContactGroup.h"

@interface KCMainViewController ()<UITableViewDataSource,UITableViewDelegate,UIAlertViewDelegate>{

    UITableView *_tableView;

    NSMutableArray *_contacts;//联系人模型

    NSIndexPath *_selectedIndexPath;//当前选中的组和行

}

@end

@implementation KCMainViewController

- (void)viewDidLoad {

    [super viewDidLoad];

    //初始化数据

    [self initData];

    //创建一个分组样式的UITableView

    _tableView=[[UITableView alloc]initWithFrame:self.view.bounds style:UITableViewStyleGrouped];

    //设置数据源,注意必须实现对应的UITableViewDataSource协议

    _tableView.dataSource=self;

    //设置代理

    _tableView.delegate=self;

    [self.view addSubview:_tableView];

}

#pragma mark 加载数据

-(void)initData{

    _contacts=[[NSMutableArray alloc]init];

    KCContact *contact1=[KCContact initWithFirstName:@"Cui" andLastName:@"Kenshin" andPhoneNumber:@"18500131234"];

    KCContact *contact2=[KCContact initWithFirstName:@"Cui" andLastName:@"Tom" andPhoneNumber:@"18500131237"];

    KCContactGroup *group1=[KCContactGroup initWithName:@"C" andDetail:@"With names beginning with C" andContacts:[NSMutableArray arrayWithObjects:contact1,contact2, nil]];

    [_contacts addObject:group1];

    KCContact *contact3=[KCContact initWithFirstName:@"Lee" andLastName:@"Terry" andPhoneNumber:@"18500131238"];

    KCContact *contact4=[KCContact initWithFirstName:@"Lee" andLastName:@"Jack" andPhoneNumber:@"18500131239"];

    KCContact *contact5=[KCContact initWithFirstName:@"Lee" andLastName:@"Rose" andPhoneNumber:@"18500131240"];

    KCContactGroup *group2=[KCContactGroup initWithName:@"L" andDetail:@"With names beginning with L" andContacts:[NSMutableArray arrayWithObjects:contact3,contact4,contact5, nil]];

    [_contacts addObject:group2];

    KCContact *contact6=[KCContact initWithFirstName:@"Sun" andLastName:@"Kaoru" andPhoneNumber:@"18500131235"];

    KCContact *contact7=[KCContact initWithFirstName:@"Sun" andLastName:@"Rosa" andPhoneNumber:@"18500131236"];

    KCContactGroup *group3=[KCContactGroup initWithName:@"S" andDetail:@"With names beginning with S" andContacts:[NSMutableArray arrayWithObjects:contact6,contact7, nil]];

    [_contacts addObject:group3];

    KCContact *contact8=[KCContact initWithFirstName:@"Wang" andLastName:@"Stephone" andPhoneNumber:@"18500131241"];

    KCContact *contact9=[KCContact initWithFirstName:@"Wang" andLastName:@"Lucy" andPhoneNumber:@"18500131242"];

    KCContact *contact10=[KCContact initWithFirstName:@"Wang" andLastName:@"Lily" andPhoneNumber:@"18500131243"];

    KCContact *contact11=[KCContact initWithFirstName:@"Wang" andLastName:@"Emily" andPhoneNumber:@"18500131244"];

    KCContact *contact12=[KCContact initWithFirstName:@"Wang" andLastName:@"Andy" andPhoneNumber:@"18500131245"];

    KCContactGroup *group4=[KCContactGroup initWithName:@"W" andDetail:@"With names beginning with W" andContacts:[NSMutableArray arrayWithObjects:contact8,contact9,contact10,contact11,contact12, nil]];

    [_contacts addObject:group4];

    KCContact *contact13=[KCContact initWithFirstName:@"Zhang" andLastName:@"Joy" andPhoneNumber:@"18500131246"];

    KCContact *contact14=[KCContact initWithFirstName:@"Zhang" andLastName:@"Vivan" andPhoneNumber:@"18500131247"];

    KCContact *contact15=[KCContact initWithFirstName:@"Zhang" andLastName:@"Joyse" andPhoneNumber:@"18500131248"];

    KCContactGroup *group5=[KCContactGroup initWithName:@"Z" andDetail:@"With names beginning with Z" andContacts:[NSMutableArray arrayWithObjects:contact13,contact14,contact15, nil]];

    [_contacts addObject:group5];

}

#pragma mark - 数据源方法

#pragma mark 返回分组数

-(NSInteger)numberOfSectionsInTableView:(UITableView *)tableView{

    NSLog(@"计算分组数");

    return _contacts.count;

}

#pragma mark 返回每组行数

-(NSInteger)tableView:(UITableView *)tableView numberOfRowsInSection:(NSInteger)section{

    NSLog(@"计算每组(组%i)行数",section);

    KCContactGroup *group1=_contacts[section];

    return group1.contacts.count;

}

#pragma mark返回每行的单元格

-(UITableViewCell *)tableView:(UITableView *)tableView cellForRowAtIndexPath:(NSIndexPath *)indexPath{

    //NSIndexPath是一个对象,记录了组和行信息

    NSLog(@"生成单元格(组:%i,行%i)",indexPath.section,indexPath.row);

    KCContactGroup *group=_contacts[indexPath.section];

    KCContact *contact=group.contacts[indexPath.row];

    //由于此方法调用十分频繁,cell的标示声明成静态变量有利于性能优化

    static NSString *cellIdentifier=@"UITableViewCellIdentifierKey1";

    static NSString *cellIdentifierForFirstRow=@"UITableViewCellIdentifierKeyWithSwitch";

    //首先根据标示去缓存池取

    UITableViewCell *cell;

    if (indexPath.row==0) {

        cell=[tableView dequeueReusableCellWithIdentifier:cellIdentifierForFirstRow];

    }else{

        cell=[tableView dequeueReusableCellWithIdentifier:cellIdentifier];

    }

    //如果缓存池没有取到则重新创建并放到缓存池中

    if(!cell){

        if (indexPath.row==0) {

            cell=[[UITableViewCell alloc]initWithStyle:UITableViewCellStyleValue1 reuseIdentifier:cellIdentifierForFirstRow];

            UISwitch *sw=[[UISwitch alloc]init];

            [sw addTarget:self action:@selector(switchValueChange:) forControlEvents:UIControlEventValueChanged];

            cell.accessoryView=sw;

        }else{

            cell=[[UITableViewCell alloc]initWithStyle:UITableViewCellStyleValue1 reuseIdentifier:cellIdentifier];

            cell.accessoryType=UITableViewCellAccessoryDetailButton;

        }

    }

    if(indexPath.row==0){

        ((UISwitch *)cell.accessoryView).tag=indexPath.section;

    }

    cell.textLabel.text=[contact getName];

    cell.detailTextLabel.text=contact.phoneNumber;

    NSLog(@"cell:%@",cell);

    return cell;

}

#pragma mark 返回每组头标题名称

-(NSString *)tableView:(UITableView *)tableView titleForHeaderInSection:(NSInteger)section{

    NSLog(@"生成组(组%i)名称",section);

    KCContactGroup *group=_contacts[section];

    return group.name;

}

#pragma mark 返回每组尾部说明

-(NSString *)tableView:(UITableView *)tableView titleForFooterInSection:(NSInteger)section{

    NSLog(@"生成尾部(组%i)详情",section);

    KCContactGroup *group=_contacts[section];

    return group.detail;

}

#pragma mark 返回每组标题索引

-(NSArray *)sectionIndexTitlesForTableView:(UITableView *)tableView{

    NSLog(@"生成组索引");

    NSMutableArray *indexs=[[NSMutableArray alloc]init];

    for(KCContactGroup *group in _contacts){

        [indexs addObject:group.name];

    }

    return indexs;

}

#pragma mark - 代理方法

#pragma mark 设置分组标题内容高度

-(CGFloat)tableView:(UITableView *)tableView heightForHeaderInSection:(NSInteger)section{

    if(section==0){

        return 50;

    }

    return 40;

}

#pragma mark 设置每行高度(每行高度可以不一样)

-(CGFloat)tableView:(UITableView *)tableView heightForRowAtIndexPath:(NSIndexPath *)indexPath{

    return 45;

}

#pragma mark 设置尾部说明内容高度

-(CGFloat)tableView:(UITableView *)tableView heightForFooterInSection:(NSInteger)section{

    return 40;

}

#pragma mark 点击行

-(void)tableView:(UITableView *)tableView didSelectRowAtIndexPath:(NSIndexPath *)indexPath{

    _selectedIndexPath=indexPath;

    KCContactGroup *group=_contacts[indexPath.section];

    KCContact *contact=group.contacts[indexPath.row];

    //创建弹出窗口

    UIAlertView *alert=[[UIAlertView alloc]initWithTitle:@"System Info" message:[contact getName] delegate:self cancelButtonTitle:@"Cancel" otherButtonTitles:@"OK", nil];

    alert.alertViewStyle=UIAlertViewStylePlainTextInput; //设置窗口内容样式

    UITextField *textField= [alert textFieldAtIndex:0]; //取得文本框

    textField.text=contact.phoneNumber; //设置文本框内容

    [alert show]; //显示窗口

}

#pragma mark 窗口的代理方法,用户保存数据

-(void)alertView:(UIAlertView *)alertView clickedButtonAtIndex:(NSInteger)buttonIndex{

    //当点击了第二个按钮(OK)

    if (buttonIndex==1) {

        UITextField *textField= [alertView textFieldAtIndex:0];

        //修改模型数据

        KCContactGroup *group=_contacts[_selectedIndexPath.section];

        KCContact *contact=group.contacts[_selectedIndexPath.row];

        contact.phoneNumber=textField.text;

        //刷新表格

        NSArray *indexPaths=@[_selectedIndexPath];//需要局部刷新的单元格的组、行

        [_tableView reloadRowsAtIndexPaths:indexPaths withRowAnimation:UITableViewRowAnimationLeft];//后面的参数代码更新时的动画

    }

}

#pragma mark 重写状态样式方法

-(UIStatusBarStyle)preferredStatusBarStyle{

    return UIStatusBarStyleLightContent;

}

#pragma mark 切换开关转化事件

-(void)switchValueChange:(UISwitch *)sw{

    NSLog(@"section:%i,switch:%i",sw.tag, sw.on);

}

@end
最终运行效果:

注意:
- 由于此时我们需要两种UITableViewCell样式,考虑到性能我们需要在缓存池缓存两种Cell。
- UISwitch继承于UIControl而不是UIView(当然UIControl最终也是继承于UIView),继承于UIControl的控件使用addTarget添加对应事件而不是代理,同时有“是否可用”、“是否高亮”、“是否选中”等属性;
- 上面代码中如果有些UITableViewCell的UISwitch设置为on当其他控件重用时状态也是on,解决这个问题可以在模型中设置对应的属性记录其状态,在生成cell时设置当前状态(为了尽可能简化上面的代码这里就不再修复这个问题);
2.自定义UITableViewCell
虽然系统自带的UITableViewCell已经够强大了,但是很多时候这并不能满足我们的需求。例如新浪微博的Cell就没有那么简单:
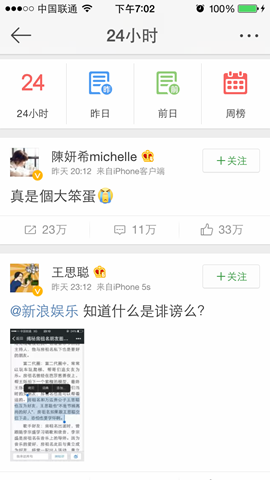
没错,这个界面布局也是UITableView实现的,其中的内容就是UITableViewCell,只是这个UITableViewCell是用户自定义实现的。当然要实现上面的UITableViewCell三言两语我们是说不完的,这里我们实现一个简化版本,界面原型如下:

我们对具体控件进行拆分:
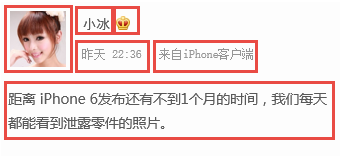
在这个界面中有2个UIImageView控件和4个UILabel,整个界面显示效果类似于新浪微博的消息内容界面,但是又在新浪微博基础上进行了精简以至于利用现有知识能够顺利开发出来。
在前面的内容中我们的数据都是手动构建的,在实际开发中自然不会这么做,这里我们不妨将微博数据存储到plist文件中然后从plist文件读取数据构建模型对象(实际开发微博当然需要进行网络数据请求,这里只是进行模拟就不再演示网络请求的内容)。假设plist文件内容如下:
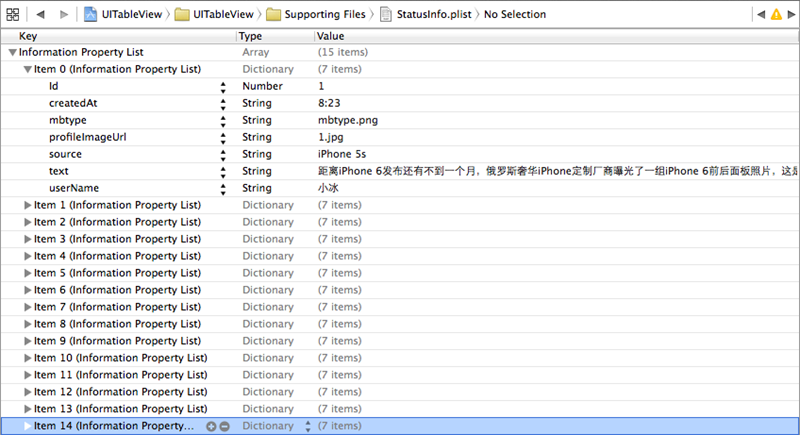
接下来就定义一个KCStatusTableViewCell实现UITableViewCell,一般实现自定义UITableViewCell需要分为两步:第一初始化控件;第二设置数据,重新设置控件frame。原因就是自定义Cell一般无法固定高度,很多时候高度需要随着内容改变。此外由于在单元格内部是无法控制单元格高度的,因此一般会定义一个高度属性用于在UITableView的代理事件中设置每个单元格高度。
1.首先看一下微博模型KCStatus,这个模型主要的方法就是根据plist字典内容生成微博对象:
KCStatus.h
//

//  KCStatus.h

//  UITableView

//

//  Created by Kenshin Cui on 14-3-1.

//  Copyright (c) 2014年 Kenshin Cui. All rights reserved.

//

#import <Foundation/Foundation.h>

@interface KCStatus : NSObject

#pragma mark - 属性

@property (nonatomic,assign) long long Id;//微博id

@property (nonatomic,copy) NSString *profileImageUrl;//头像

@property (nonatomic,copy) NSString *userName;//发送用户

@property (nonatomic,copy) NSString *mbtype;//会员类型

@property (nonatomic,copy) NSString *createdAt;//创建时间

@property (nonatomic,copy) NSString *source;//设备来源

@property (nonatomic,copy) NSString *text;//微博内容

#pragma mark - 方法

#pragma mark 根据字典初始化微博对象

-(KCStatus *)initWithDictionary:(NSDictionary *)dic;

#pragma mark 初始化微博对象(静态方法)

+(KCStatus *)statusWithDictionary:(NSDictionary *)dic;

@end
KCStatus.m
//

//  KCStatus.m

//  UITableView

//

//  Created by Kenshin Cui on 14-3-1.

//  Copyright (c) 2014年 Kenshin Cui. All rights reserved.

//

#import "KCStatus.h"

@implementation KCStatus

#pragma mark 根据字典初始化微博对象

-(KCStatus *)initWithDictionary:(NSDictionary *)dic{

    if(self=[super init]){

        self.Id=[dic[@"Id"] longLongValue];

        self.profileImageUrl=dic[@"profileImageUrl"];

        self.userName=dic[@"userName"];

        self.mbtype=dic[@"mbtype"];

        self.createdAt=dic[@"createdAt"];

        self.source=dic[@"source"];

        self.text=dic[@"text"];

    }

    return self;

}

#pragma mark 初始化微博对象(静态方法)

+(KCStatus *)statusWithDictionary:(NSDictionary *)dic{

    KCStatus *status=[[KCStatus alloc]initWithDictionary:dic];

    return status;

}

-(NSString *)source{

    return [NSString stringWithFormat:@"来自 %@",_source];

}

@end
2.然后看一下自定义的Cell
KCStatusTableViewCell.h
//

//  KCStatusTableViewCell.h

//  UITableView

//

//  Created by Kenshin Cui on 14-3-1.

//  Copyright (c) 2014年 Kenshin Cui. All rights reserved.

//

#import <UIKit/UIKit.h>

@class KCStatus;

@interface KCStatusTableViewCell : UITableViewCell

#pragma mark 微博对象

@property (nonatomic,strong) KCStatus *status;

#pragma mark 单元格高度

@property (assign,nonatomic) CGFloat height;

@end
KCStatusTableViewCell.m
//

//  KCStatusTableViewCell.m

//  UITableView

//

//  Created by Kenshin Cui on 14-3-1.

//  Copyright (c) 2014年 Kenshin Cui. All rights reserved.

//

#import "KCStatusTableViewCell.h"

#import "KCStatus.h"

#define KCColor(r,g,b) [UIColor colorWithHue:r/255.0 saturation:g/255.0 brightness:b/255.0 alpha:1] //颜色宏定义

#define kStatusTableViewCellControlSpacing 10 //控件间距

#define kStatusTableViewCellBackgroundColor KCColor(251,251,251)

#define kStatusGrayColor KCColor(50,50,50)

#define kStatusLightGrayColor KCColor(120,120,120)

#define kStatusTableViewCellAvatarWidth 40 //头像宽度

#define kStatusTableViewCellAvatarHeight kStatusTableViewCellAvatarWidth

#define kStatusTableViewCellUserNameFontSize 14

#define kStatusTableViewCellMbTypeWidth 13 //会员图标宽度

#define kStatusTableViewCellMbTypeHeight kStatusTableViewCellMbTypeWidth

#define kStatusTableViewCellCreateAtFontSize 12

#define kStatusTableViewCellSourceFontSize 12

#define kStatusTableViewCellTextFontSize 14

@interface KCStatusTableViewCell(){

    UIImageView *_avatar;//头像

    UIImageView *_mbType;//会员类型

    UILabel *_userName;

    UILabel *_createAt;

    UILabel *_source;

    UILabel *_text;

}

@end

@implementation KCStatusTableViewCell

- (instancetype)initWithStyle:(UITableViewCellStyle)style reuseIdentifier:(NSString *)reuseIdentifier {

    self = [super initWithStyle:style reuseIdentifier:reuseIdentifier];

    if (self) {

        [self initSubView];

    }

    return self;

}

#pragma mark 初始化视图

-(void)initSubView{

    //头像控件

    _avatar=[[UIImageView alloc]init];

    [self.contentView addSubview:_avatar];

    //用户名

    _userName=[[UILabel alloc]init];

    _userName.textColor=kStatusGrayColor;

    _userName.font=[UIFont systemFontOfSize:kStatusTableViewCellUserNameFontSize];

    [self.contentView addSubview:_userName];

    //会员类型

    _mbType=[[UIImageView alloc]init];

    [self.contentView addSubview:_mbType];

    //日期

    _createAt=[[UILabel alloc]init];

    _createAt.textColor=kStatusLightGrayColor;

    _createAt.font=[UIFont systemFontOfSize:kStatusTableViewCellCreateAtFontSize];

    [self.contentView addSubview:_createAt];

    //设备

    _source=[[UILabel alloc]init];

    _source.textColor=kStatusLightGrayColor;

    _source.font=[UIFont systemFontOfSize:kStatusTableViewCellSourceFontSize];

    [self.contentView addSubview:_source];

    //内容

    _text=[[UILabel alloc]init];

    _text.textColor=kStatusGrayColor;

    _text.font=[UIFont systemFontOfSize:kStatusTableViewCellTextFontSize];

    _text.numberOfLines=0;

//    _text.lineBreakMode=NSLineBreakByWordWrapping;

    [self.contentView addSubview:_text];

}

#pragma mark 设置微博

-(void)setStatus:(KCStatus *)status{

    //设置头像大小和位置

    CGFloat avatarX=10,avatarY=10;

    CGRect avatarRect=CGRectMake(avatarX, avatarY, kStatusTableViewCellAvatarWidth, kStatusTableViewCellAvatarHeight);

    _avatar.image=[UIImage imageNamed:status.profileImageUrl];

    _avatar.frame=avatarRect;

    //设置会员图标大小和位置

    CGFloat userNameX= CGRectGetMaxX(_avatar.frame)+kStatusTableViewCellControlSpacing ;

    CGFloat userNameY=avatarY;

    //根据文本内容取得文本占用空间大小

    CGSize userNameSize=[status.userName sizeWithAttributes:@{NSFontAttributeName: [UIFont systemFontOfSize:kStatusTableViewCellUserNameFontSize]}];

    CGRect userNameRect=CGRectMake(userNameX, userNameY, userNameSize.width,userNameSize.height);

    _userName.text=status.userName;

    _userName.frame=userNameRect;

    //设置会员图标大小和位置

    CGFloat mbTypeX=CGRectGetMaxX(_userName.frame)+kStatusTableViewCellControlSpacing;

    CGFloat mbTypeY=avatarY;

    CGRect mbTypeRect=CGRectMake(mbTypeX, mbTypeY, kStatusTableViewCellMbTypeWidth, kStatusTableViewCellMbTypeHeight);

    _mbType.image=[UIImage imageNamed:status.mbtype];

    _mbType.frame=mbTypeRect;

    //设置发布日期大小和位置

    CGSize createAtSize=[status.createdAt sizeWithAttributes:@{NSFontAttributeName:[UIFont systemFontOfSize:kStatusTableViewCellCreateAtFontSize]}];

    CGFloat createAtX=userNameX;

    CGFloat createAtY=CGRectGetMaxY(_avatar.frame)-createAtSize.height;

    CGRect createAtRect=CGRectMake(createAtX, createAtY, createAtSize.width, createAtSize.height);

    _createAt.text=status.createdAt;

    _createAt.frame=createAtRect;

    //设置设备信息大小和位置

    CGSize sourceSize=[status.source sizeWithAttributes:@{NSFontAttributeName:[UIFont systemFontOfSize:kStatusTableViewCellSourceFontSize]}];

    CGFloat sourceX=CGRectGetMaxX(_createAt.frame)+kStatusTableViewCellControlSpacing;

    CGFloat sourceY=createAtY;

    CGRect sourceRect=CGRectMake(sourceX, sourceY, sourceSize.width,sourceSize.height);

    _source.text=status.source;

    _source.frame=sourceRect;

    //设置微博内容大小和位置

    CGFloat textX=avatarX;

    CGFloat textY=CGRectGetMaxY(_avatar.frame)+kStatusTableViewCellControlSpacing;

    CGFloat textWidth=self.frame.size.width-kStatusTableViewCellControlSpacing*2;

    CGSize textSize=[status.text boundingRectWithSize:CGSizeMake(textWidth, MAXFLOAT) options:NSStringDrawingUsesLineFragmentOrigin attributes:@{NSFontAttributeName: [UIFont systemFontOfSize:kStatusTableViewCellTextFontSize]} context:nil].size;

    CGRect textRect=CGRectMake(textX, textY, textSize.width, textSize.height);

    _text.text=status.text;

    _text.frame=textRect;

    _height=CGRectGetMaxY(_text.frame)+kStatusTableViewCellControlSpacing;

}

#pragma mark 重写选择事件,取消选中

-(void)setSelected:(BOOL)selected animated:(BOOL)animated{

}

@end
这是我们自定义Cell这个例子的核心,自定义Cell分为两个步骤:首先要进行各种控件的初始化工作,这个过程中只要将控件放到Cell的View中同时设置控件显示内容的格式(字体大小、颜色等)即可;然后在数据对象设置方法中进行各个控件的布局(大小、位置)。在代码中有几点需要重点提示大家:
- 对于单行文本数据的显示调用- (CGSize)sizeWithAttributes:(NSDictionary *)attrs;方法来得到文本宽度和高度。
- 对于多行文本数据的显示调用- (CGRect)boundingRectWithSize:(CGSize)size options:(NSStringDrawingOptions)options attributes:(NSDictionary *)attributes context:(NSStringDrawingContext *)context ;方法来得到文本宽度和高度;同时注意在此之前需要设置文本控件的numberOfLines属性为0。
- 通常我们会在自定义Cell中设置一个高度属性,用于外界方法调用,因为Cell内部设置Cell的高度是没有用的,UITableViewCell在初始化时会重新设置高度。
3.最后我们看一下自定义Cell的使用过程:
KCStatusViewController.m
//

//  KCCutomCellViewController.m

//  UITableView

//

//  Created by Kenshin Cui on 14-3-1.

//  Copyright (c) 2014年 Kenshin Cui. All rights reserved.

//

#import "KCStatusCellViewController.h"

#import "KCStatus.h"

#import "KCStatusTableViewCell.h"

@interface KCStatusCellViewController ()<UITableViewDataSource,UITableViewDelegate,UIAlertViewDelegate>{

    UITableView *_tableView;

    NSMutableArray *_status;

    NSMutableArray *_statusCells;//存储cell,用于计算高度

}

@end

@implementation KCStatusCellViewController

- (void)viewDidLoad {

    [super viewDidLoad];

    //初始化数据

    [self initData];

    //创建一个分组样式的UITableView

    _tableView=[[UITableView alloc]initWithFrame:self.view.bounds style:UITableViewStyleGrouped];

    //设置数据源,注意必须实现对应的UITableViewDataSource协议

    _tableView.dataSource=self;

    //设置代理

    _tableView.delegate=self;

    [self.view addSubview:_tableView];

}

#pragma mark 加载数据

-(void)initData{

    NSString *path=[[NSBundle mainBundle] pathForResource:@"StatusInfo" ofType:@"plist"];

    NSArray *array=[NSArray arrayWithContentsOfFile:path];

    _status=[[NSMutableArray alloc]init];

    _statusCells=[[NSMutableArray alloc]init];

    [array enumerateObjectsUsingBlock:^(id obj, NSUInteger idx, BOOL *stop) {

        [_status addObject:[KCStatus statusWithDictionary:obj]];

        KCStatusTableViewCell *cell=[[KCStatusTableViewCell alloc]init];

        [_statusCells addObject:cell];

    }];

}

#pragma mark - 数据源方法

#pragma mark 返回分组数

-(NSInteger)numberOfSectionsInTableView:(UITableView *)tableView{

    return 1;

}

#pragma mark 返回每组行数

-(NSInteger)tableView:(UITableView *)tableView numberOfRowsInSection:(NSInteger)section{

    return _status.count;

}

#pragma mark返回每行的单元格

-(UITableViewCell *)tableView:(UITableView *)tableView cellForRowAtIndexPath:(NSIndexPath *)indexPath{

    static NSString *cellIdentifier=@"UITableViewCellIdentifierKey1";

    KCStatusTableViewCell *cell;

    cell=[tableView dequeueReusableCellWithIdentifier:cellIdentifier];

    if(!cell){

        cell=[[KCStatusTableViewCell alloc]initWithStyle:UITableViewCellStyleDefault reuseIdentifier:cellIdentifier];

    }

    //在此设置微博,以便重新布局

    KCStatus *status=_status[indexPath.row];

    cell.status=status;

    return cell;

}

#pragma mark - 代理方法

#pragma mark 重新设置单元格高度

-(CGFloat)tableView:(UITableView *)tableView heightForRowAtIndexPath:(NSIndexPath *)indexPath{

    //KCStatusTableViewCell *cell=[tableView cellForRowAtIndexPath:indexPath];

    KCStatusTableViewCell *cell= _statusCells[indexPath.row];

    cell.status=_status[indexPath.row];

    return cell.height;

}

#pragma mark 重写状态样式方法

-(UIStatusBarStyle)preferredStatusBarStyle{

    return UIStatusBarStyleLightContent;

}

@end
这个类中需要重点强调一下:Cell的高度需要重新设置(前面说过无论Cell内部设置多高都没有用,需要重新设置),这里采用的方法是首先创建对应的Cell,然后在- (CGFloat)tableView:(UITableView *)tableView heightForRowAtIndexPath:(NSIndexPath *)indexPath;方法中设置微博数据计算高度通知UITableView。
最后我们看一下运行的效果:
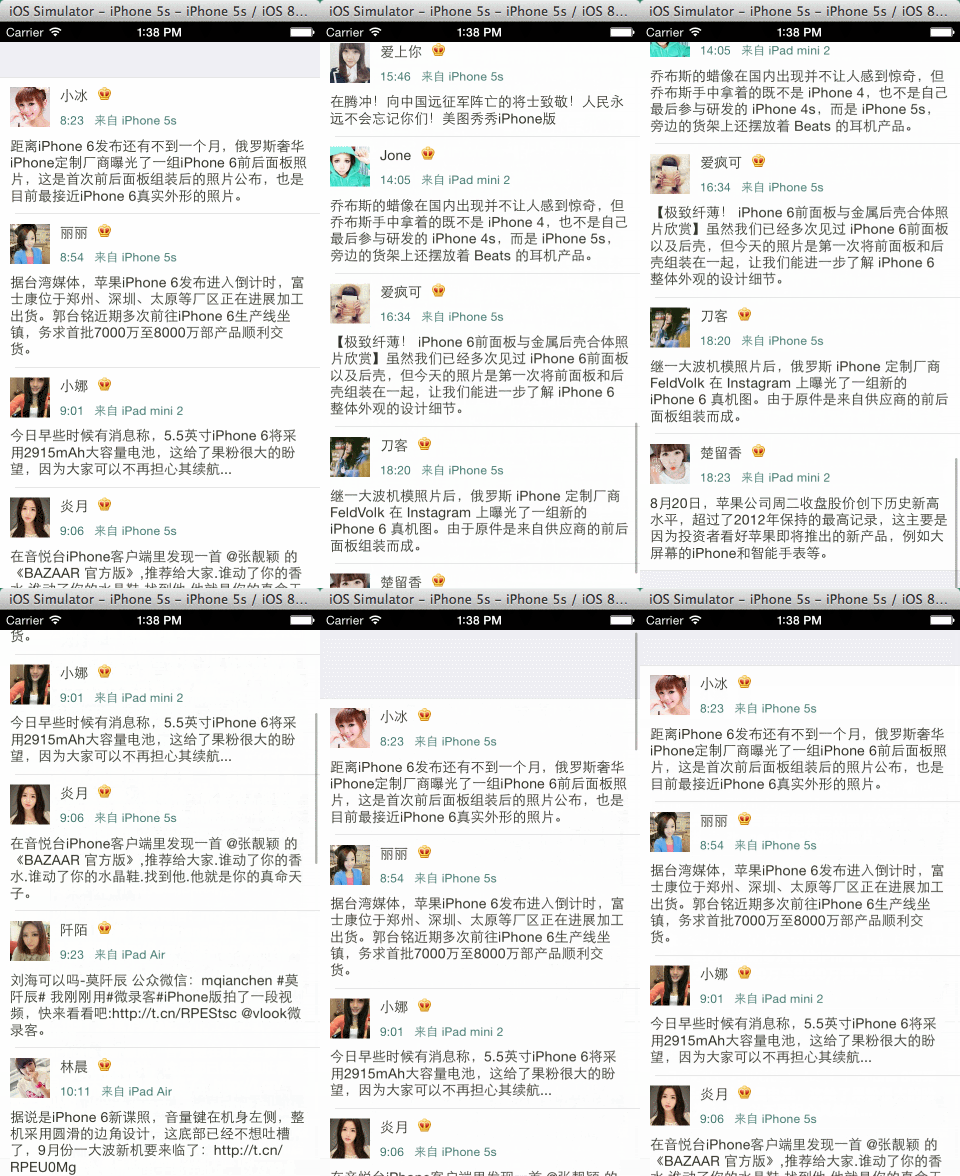
常用操作
UITableView和UITableViewCell提供了强大的操作功能,这一节中会重点讨论删除、增加、排序等操作。为了方便演示我们还是在之前的通讯录的基础上演示,在此之前先来给视图控制器添加一个工具条,在工具条左侧放一个删除按钮,右侧放一个添加按钮:
#pragma mark 添加工具栏

-(void)addToolbar{

    CGRect frame=self.view.frame;

    _toolbar=[[UIToolbar alloc]initWithFrame:CGRectMake(0, 0, frame.size.width, kContactToolbarHeight)];

    //    _toolbar.backgroundColor=[UIColor colorWithHue:246/255.0 saturation:246/255.0 brightness:246/255.0 alpha:1];

    [self.view addSubview:_toolbar];

    UIBarButtonItem *removeButton=[[UIBarButtonItem alloc]initWithBarButtonSystemItem:UIBarButtonSystemItemTrash target:self action:@selector(remove)];

    UIBarButtonItem *flexibleButton=[[UIBarButtonItem alloc]initWithBarButtonSystemItem:UIBarButtonSystemItemFlexibleSpace target:nil action:nil];

    UIBarButtonItem *addButton=[[UIBarButtonItem alloc]initWithBarButtonSystemItem:UIBarButtonSystemItemAdd target:self action:@selector(add)];

    NSArray *buttonArray=[NSArray arrayWithObjects:removeButton,flexibleButton,addButton, nil];

    _toolbar.items=buttonArray;

}
1.删除
在UITableView中无论是删除操作还是添加操作都是通过修改UITableView的编辑状态来改变的(除非你不用UITableView自带的删除功能)。在删除按钮中我们设置UITableView的编辑状态:
#pragma mark 删除

-(void)remove{

    //直接通过下面的方法设置编辑状态没有动画

    //_tableView.editing=!_tableView.isEditing;

    [_tableView setEditing:!_tableView.isEditing animated:true];

}
点击删除按钮会在Cell的左侧显示删除按钮:

此时点击左侧删除图标右侧出现删除:
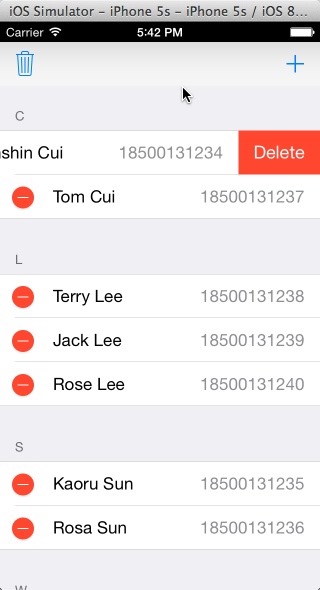
用过iOS的朋友都知道,一般这种Cell如果向左滑动右侧就会出现删除按钮直接删除就可以了。其实实现这个功能只要实现代理-(void)tableView:(UITableView *)tableView commitEditingStyle:(UITableViewCellEditingStyle)editingStyle forRowAtIndexPath:(NSIndexPath *)indexPath;方法,只要实现了此方法向左滑动就会显示删除按钮。只要点击删除按钮这个方法就会调用,但是需要注意的是无论是删除还是添加都是执行这个方法,只是第二个参数类型不同。下面看一下具体的删除实现:
#pragma mark 删除操作

//实现了此方法向左滑动就会显示删除按钮

-(void)tableView:(UITableView *)tableView commitEditingStyle:(UITableViewCellEditingStyle)editingStyle forRowAtIndexPath:(NSIndexPath *)indexPath{

    KCContactGroup *group =_contacts[indexPath.section];

    KCContact *contact=group.contacts[indexPath.row];

    if (editingStyle==UITableViewCellEditingStyleDelete) {

        [group.contacts removeObject:contact];

        //考虑到性能这里不建议使用reloadData

        //[tableView reloadData];

        //使用下面的方法既可以局部刷新又有动画效果

        [tableView deleteRowsAtIndexPaths:@[indexPath] withRowAnimation:UITableViewRowAnimationBottom];

        //如果当前组中没有数据则移除组刷新整个表格

        if (group.contacts.count==0) {

            [_contacts removeObject:group];

            [tableView reloadData];

        }

    }

}
从这段代码我们再次看到了MVC的思想,要修改UI先修改数据。而且我们看到了另一个刷新表格的方法- (void)deleteRowsAtIndexPaths:(NSArray *)indexPaths withRowAnimation:(UITableViewRowAnimation)animation;,使用这个方法可以再删除之后刷新对应的单元格。效果如下:

2.添加
添加和删除操作都是设置UITableView的编辑状态,具体是添加还是删除需要根据代理方法-(UITableViewCellEditingStyle)tableView:(UITableView *)tableView editingStyleForRowAtIndexPath:(NSIndexPath *)indexPath;的返回值来确定。因此这里我们定义一个变量来记录点击了哪个按钮,根据点击按钮的不同在这个方法中返回不同的值。
#pragma mark 取得当前操作状态,根据不同的状态左侧出现不同的操作按钮

-(UITableViewCellEditingStyle)tableView:(UITableView *)tableView editingStyleForRowAtIndexPath:(NSIndexPath *)indexPath{

    if (_isInsert) {

        return UITableViewCellEditingStyleInsert;

    }

    return UITableViewCellEditingStyleDelete;

}
#pragma mark 编辑操作(删除或添加)

//实现了此方法向左滑动就会显示删除(或添加)图标

-(void)tableView:(UITableView *)tableView commitEditingStyle:(UITableViewCellEditingStyle)editingStyle forRowAtIndexPath:(NSIndexPath *)indexPath{

    KCContactGroup *group =_contacts[indexPath.section];

    KCContact *contact=group.contacts[indexPath.row];

    if (editingStyle==UITableViewCellEditingStyleDelete) {

        [group.contacts removeObject:contact];

        //考虑到性能这里不建议使用reloadData

        //[tableView reloadData];

        //使用下面的方法既可以局部刷新又有动画效果

        [tableView deleteRowsAtIndexPaths:@[indexPath] withRowAnimation:UITableViewRowAnimationBottom];

        //如果当前组中没有数据则移除组刷新整个表格

        if (group.contacts.count==0) {

            [_contacts removeObject:group];

            [tableView reloadData];

        }

    }else if(editingStyle==UITableViewCellEditingStyleInsert){

        KCContact *newContact=[[KCContact alloc]init];

        newContact.firstName=@"first";

        newContact.lastName=@"last";

        newContact.phoneNumber=@"12345678901";

        [group.contacts insertObject:newContact atIndex:indexPath.row];

        [tableView insertRowsAtIndexPaths:@[indexPath] withRowAnimation:UITableViewRowAnimationBottom];//注意这里没有使用reladData刷新

    }

}
运行效果:
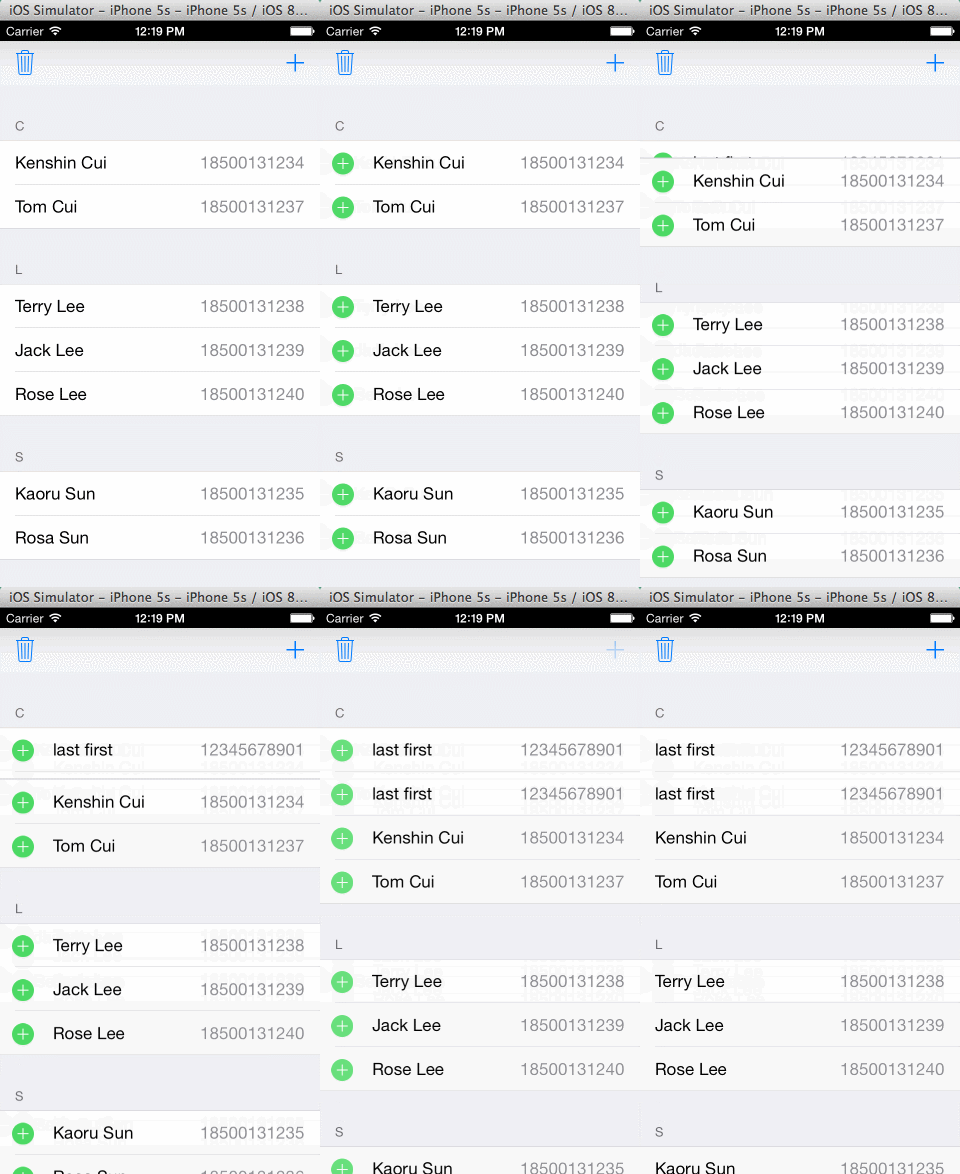
3.排序
只要实现-(void)tableView:(UITableView *)tableView moveRowAtIndexPath:(NSIndexPath *)sourceIndexPath toIndexPath:(NSIndexPath *)destinationIndexPath;代理方法当UITableView处于编辑状态时就可以排序。
#pragma mark 排序

//只要实现这个方法在编辑状态右侧就有排序图标

-(void)tableView:(UITableView *)tableView moveRowAtIndexPath:(NSIndexPath *)sourceIndexPath toIndexPath:(NSIndexPath *)destinationIndexPath{

    KCContactGroup *sourceGroup =_contacts[sourceIndexPath.section];

    KCContact *sourceContact=sourceGroup.contacts[sourceIndexPath.row];

    KCContactGroup *destinationGroup =_contacts[destinationIndexPath.section];

    [sourceGroup.contacts removeObject:sourceContact];

    if(sourceGroup.contacts.count==0){

        [_contacts removeObject:sourceGroup];

        [tableView reloadData];

    }

    [destinationGroup.contacts insertObject:sourceContact atIndex:destinationIndexPath.row];

}
运行效果:

最后给大家附上上面几种操作的完整代码:
//

//  KCContactViewController.m

//  UITableView

//

//  Created by Kenshin Cui on 14-3-1.

//  Copyright (c) 2014年 Kenshin Cui. All rights reserved.

//

#import "KCContactViewController.h"

#import "KCContact.h"

#import "KCContactGroup.h"

#define kContactToolbarHeight 44

@interface KCContactViewController ()<UITableViewDataSource,UITableViewDelegate,UIAlertViewDelegate>{

    UITableView *_tableView;

    UIToolbar *_toolbar;

    NSMutableArray *_contacts;//联系人模型

    NSIndexPath *_selectedIndexPath;//当前选中的组和行

    BOOL _isInsert;//记录是点击了插入还是删除按钮

}

@end

@implementation KCContactViewController

- (void)viewDidLoad {

    [super viewDidLoad];

    //初始化数据

    [self initData];

    //创建一个分组样式的UITableView

    _tableView=[[UITableView alloc]initWithFrame:self.view.bounds style:UITableViewStyleGrouped];

    _tableView.contentInset=UIEdgeInsetsMake(kContactToolbarHeight, 0, 0, 0);

    [self.view addSubview:_tableView];

    //添加工具栏

    [self addToolbar];

    //设置数据源,注意必须实现对应的UITableViewDataSource协议

    _tableView.dataSource=self;

    //设置代理

    _tableView.delegate=self;

}

#pragma mark 加载数据

-(void)initData{

    _contacts=[[NSMutableArray alloc]init];

    KCContact *contact1=[KCContact initWithFirstName:@"Cui" andLastName:@"Kenshin" andPhoneNumber:@"18500131234"];

    KCContact *contact2=[KCContact initWithFirstName:@"Cui" andLastName:@"Tom" andPhoneNumber:@"18500131237"];

    KCContactGroup *group1=[KCContactGroup initWithName:@"C" andDetail:@"With names beginning with C" andContacts:[NSMutableArray arrayWithObjects:contact1,contact2, nil]];

    [_contacts addObject:group1];

    KCContact *contact3=[KCContact initWithFirstName:@"Lee" andLastName:@"Terry" andPhoneNumber:@"18500131238"];

    KCContact *contact4=[KCContact initWithFirstName:@"Lee" andLastName:@"Jack" andPhoneNumber:@"18500131239"];

    KCContact *contact5=[KCContact initWithFirstName:@"Lee" andLastName:@"Rose" andPhoneNumber:@"18500131240"];

    KCContactGroup *group2=[KCContactGroup initWithName:@"L" andDetail:@"With names beginning with L" andContacts:[NSMutableArray arrayWithObjects:contact3,contact4,contact5, nil]];

    [_contacts addObject:group2];

    KCContact *contact6=[KCContact initWithFirstName:@"Sun" andLastName:@"Kaoru" andPhoneNumber:@"18500131235"];

    KCContact *contact7=[KCContact initWithFirstName:@"Sun" andLastName:@"Rosa" andPhoneNumber:@"18500131236"];

    KCContactGroup *group3=[KCContactGroup initWithName:@"S" andDetail:@"With names beginning with S" andContacts:[NSMutableArray arrayWithObjects:contact6,contact7, nil]];

    [_contacts addObject:group3];

    KCContact *contact8=[KCContact initWithFirstName:@"Wang" andLastName:@"Stephone" andPhoneNumber:@"18500131241"];

    KCContact *contact9=[KCContact initWithFirstName:@"Wang" andLastName:@"Lucy" andPhoneNumber:@"18500131242"];

    KCContact *contact10=[KCContact initWithFirstName:@"Wang" andLastName:@"Lily" andPhoneNumber:@"18500131243"];

    KCContact *contact11=[KCContact initWithFirstName:@"Wang" andLastName:@"Emily" andPhoneNumber:@"18500131244"];

    KCContact *contact12=[KCContact initWithFirstName:@"Wang" andLastName:@"Andy" andPhoneNumber:@"18500131245"];

    KCContactGroup *group4=[KCContactGroup initWithName:@"W" andDetail:@"With names beginning with W" andContacts:[NSMutableArray arrayWithObjects:contact8,contact9,contact10,contact11,contact12, nil]];

    [_contacts addObject:group4];

    KCContact *contact13=[KCContact initWithFirstName:@"Zhang" andLastName:@"Joy" andPhoneNumber:@"18500131246"];

    KCContact *contact14=[KCContact initWithFirstName:@"Zhang" andLastName:@"Vivan" andPhoneNumber:@"18500131247"];

    KCContact *contact15=[KCContact initWithFirstName:@"Zhang" andLastName:@"Joyse" andPhoneNumber:@"18500131248"];

    KCContactGroup *group5=[KCContactGroup initWithName:@"Z" andDetail:@"With names beginning with Z" andContacts:[NSMutableArray arrayWithObjects:contact13,contact14,contact15, nil]];

    [_contacts addObject:group5];

}

#pragma mark 添加工具栏

-(void)addToolbar{

    CGRect frame=self.view.frame;

    _toolbar=[[UIToolbar alloc]initWithFrame:CGRectMake(0, 0, frame.size.width, kContactToolbarHeight)];

    //    _toolbar.backgroundColor=[UIColor colorWithHue:246/255.0 saturation:246/255.0 brightness:246/255.0 alpha:1];

    [self.view addSubview:_toolbar];

    UIBarButtonItem *removeButton=[[UIBarButtonItem alloc]initWithBarButtonSystemItem:UIBarButtonSystemItemTrash target:self action:@selector(remove)];

    UIBarButtonItem *flexibleButton=[[UIBarButtonItem alloc]initWithBarButtonSystemItem:UIBarButtonSystemItemFlexibleSpace target:nil action:nil];

    UIBarButtonItem *addButton=[[UIBarButtonItem alloc]initWithBarButtonSystemItem:UIBarButtonSystemItemAdd target:self action:@selector(add)];

    NSArray *buttonArray=[NSArray arrayWithObjects:removeButton,flexibleButton,addButton, nil];

    _toolbar.items=buttonArray;

}

#pragma mark 删除

-(void)remove{

    //直接通过下面的方法设置编辑状态没有动画

    //_tableView.editing=!_tableView.isEditing;

    _isInsert=false;

    [_tableView setEditing:!_tableView.isEditing animated:true];

}

#pragma mark 添加

-(void)add{

    _isInsert=true;

    [_tableView setEditing:!_tableView.isEditing animated:true];

}

#pragma mark - 数据源方法

#pragma mark 返回分组数

-(NSInteger)numberOfSectionsInTableView:(UITableView *)tableView{

    return _contacts.count;

}

#pragma mark 返回每组行数

-(NSInteger)tableView:(UITableView *)tableView numberOfRowsInSection:(NSInteger)section{

    KCContactGroup *group1=_contacts[section];

    return group1.contacts.count;

}

#pragma mark返回每行的单元格

-(UITableViewCell *)tableView:(UITableView *)tableView cellForRowAtIndexPath:(NSIndexPath *)indexPath{

    //NSIndexPath是一个对象,记录了组和行信息

    KCContactGroup *group=_contacts[indexPath.section];

    KCContact *contact=group.contacts[indexPath.row];

    static NSString *cellIdentifier=@"UITableViewCellIdentifierKey1";

    //首先根据标识去缓存池取

    UITableViewCell *cell=[tableView dequeueReusableCellWithIdentifier:cellIdentifier];

    //如果缓存池没有取到则重新创建并放到缓存池中

    if(!cell){

        cell=[[UITableViewCell alloc]initWithStyle:UITableViewCellStyleValue1 reuseIdentifier:cellIdentifier];

    }

    cell.textLabel.text=[contact getName];

    cell.detailTextLabel.text=contact.phoneNumber;

    return cell;

}

#pragma mark - 代理方法

#pragma mark 设置分组标题

-(NSString *)tableView:(UITableView *)tableView titleForHeaderInSection:(NSInteger)section{

    KCContactGroup *group=_contacts[section];

    return group.name;

}

#pragma mark 编辑操作(删除或添加)

//实现了此方法向左滑动就会显示删除(或添加)图标

-(void)tableView:(UITableView *)tableView commitEditingStyle:(UITableViewCellEditingStyle)editingStyle forRowAtIndexPath:(NSIndexPath *)indexPath{

    KCContactGroup *group =_contacts[indexPath.section];

    KCContact *contact=group.contacts[indexPath.row];

    if (editingStyle==UITableViewCellEditingStyleDelete) {

        [group.contacts removeObject:contact];

        //考虑到性能这里不建议使用reloadData

        //[tableView reloadData];

        //使用下面的方法既可以局部刷新又有动画效果

        [tableView deleteRowsAtIndexPaths:@[indexPath] withRowAnimation:UITableViewRowAnimationBottom];

        //如果当前组中没有数据则移除组刷新整个表格

        if (group.contacts.count==0) {

            [_contacts removeObject:group];

            [tableView reloadData];

        }

    }else if(editingStyle==UITableViewCellEditingStyleInsert){

        KCContact *newContact=[[KCContact alloc]init];

        newContact.firstName=@"first";

        newContact.lastName=@"last";

        newContact.phoneNumber=@"12345678901";

        [group.contacts insertObject:newContact atIndex:indexPath.row];

        [tableView insertRowsAtIndexPaths:@[indexPath] withRowAnimation:UITableViewRowAnimationBottom];//注意这里没有使用reladData刷新

    }

}

#pragma mark 排序

//只要实现这个方法在编辑状态右侧就有排序图标

-(void)tableView:(UITableView *)tableView moveRowAtIndexPath:(NSIndexPath *)sourceIndexPath toIndexPath:(NSIndexPath *)destinationIndexPath{

    KCContactGroup *sourceGroup =_contacts[sourceIndexPath.section];

    KCContact *sourceContact=sourceGroup.contacts[sourceIndexPath.row];

    KCContactGroup *destinationGroup =_contacts[destinationIndexPath.section];

    [sourceGroup.contacts removeObject:sourceContact];

    [destinationGroup.contacts insertObject:sourceContact atIndex:destinationIndexPath.row];

    if(sourceGroup.contacts.count==0){

        [_contacts removeObject:sourceGroup];

        [tableView reloadData];

    }

}

#pragma mark 取得当前操作状态,根据不同的状态左侧出现不同的操作按钮

-(UITableViewCellEditingStyle)tableView:(UITableView *)tableView editingStyleForRowAtIndexPath:(NSIndexPath *)indexPath{

    if (_isInsert) {

        return UITableViewCellEditingStyleInsert;

    }

    return UITableViewCellEditingStyleDelete;

}

#pragma mark 重写状态样式方法

-(UIStatusBarStyle)preferredStatusBarStyle{

    return UIStatusBarStyleLightContent;

}

@end
通过前面的演示这里简单总结一些UITableView的刷新方法:
- (void)reloadData;刷新整个表格。
- (void)reloadRowsAtIndexPaths:(NSArray *)indexPaths withRowAnimation:(UITableViewRowAnimation)animation NS_AVAILABLE_IOS(3_0);刷新指定的分组和行。
- (void)reloadSections:(NSIndexSet *)sections withRowAnimation:(UITableViewRowAnimation)animation NS_AVAILABLE_IOS(3_0);刷新指定的分组。
- (void)deleteRowsAtIndexPaths:(NSArray *)indexPaths withRowAnimation:(UITableViewRowAnimation)animation;删除时刷新指定的行数据。
- (void)insertRowsAtIndexPaths:(NSArray *)indexPaths withRowAnimation:(UITableViewRowAnimation)animation;添加时刷新指定的行数据。
UITableViewController
很多时候一个UIViewController中只有一个UITableView,因此苹果官方为了方便大家开发直接提供了一个UITableViewController,这个控制器 UITableViewController实现了UITableView数据源和代理协议,内部定义了一个tableView属性供外部访问,同时自动铺满整个屏幕、自动伸缩以方便我们的开发。当然UITableViewController也并不是简单的帮我们定义完UITableView并且设置了数据源、代理而已,它还有其他强大的功能,例如刷新控件、滚动过程中固定分组标题等。
有时候一个表格中的数据特别多,检索起来就显得麻烦,这个时候可以实现一个搜索功能帮助用户查找数据,其实搜索的原理很简单:修改模型、刷新表格。下面使用UITableViewController简单演示一下这个功能:
//

//  KCContactTableViewController.m

//  UITableView

//

//  Created by Kenshin Cui on 14-3-1.

//  Copyright (c) 2014年 Kenshin Cui. All rights reserved.

//

#import "KCContactTableViewController.h"

#import "KCContact.h"

#import "KCContactGroup.h"

#define kSearchbarHeight 44

@interface KCContactTableViewController ()<UISearchBarDelegate>{

    UITableView *_tableView;

    UISearchBar *_searchBar;

    //UISearchDisplayController *_searchDisplayController;

    NSMutableArray *_contacts;//联系人模型

    NSMutableArray *_searchContacts;//符合条件的搜索联系人

    BOOL _isSearching;

}

@end

@implementation KCContactTableViewController

- (void)viewDidLoad {

    [super viewDidLoad];

    //初始化数据

    [self initData];

    //添加搜索框

    [self addSearchBar];

}

#pragma mark - 数据源方法

- (NSInteger)numberOfSectionsInTableView:(UITableView *)tableView {

    if (_isSearching) {

        return 1;

    }

    return _contacts.count;;

}

- (NSInteger)tableView:(UITableView *)tableView numberOfRowsInSection:(NSInteger)section {

    if (_isSearching) {

        return _searchContacts.count;

    }

    KCContactGroup *group1=_contacts[section];

    return group1.contacts.count;

}

- (UITableViewCell *)tableView:(UITableView *)tableView cellForRowAtIndexPath:(NSIndexPath *)indexPath {

    KCContact *contact=nil;

    if (_isSearching) {

        contact=_searchContacts[indexPath.row];

    }else{

        KCContactGroup *group=_contacts[indexPath.section];

        contact=group.contacts[indexPath.row];

    }

    static NSString *cellIdentifier=@"UITableViewCellIdentifierKey1";

    //首先根据标识去缓存池取

    UITableViewCell *cell=[tableView dequeueReusableCellWithIdentifier:cellIdentifier];

    //如果缓存池没有取到则重新创建并放到缓存池中

    if(!cell){

        cell=[[UITableViewCell alloc]initWithStyle:UITableViewCellStyleValue1 reuseIdentifier:cellIdentifier];

    }

    cell.textLabel.text=[contact getName];

    cell.detailTextLabel.text=contact.phoneNumber;

    return cell;

}

#pragma mark - 代理方法

#pragma mark 设置分组标题

-(NSString *)tableView:(UITableView *)tableView titleForHeaderInSection:(NSInteger)section{

    KCContactGroup *group=_contacts[section];

    return group.name;

}

#pragma mark - 搜索框代理

#pragma mark  取消搜索

-(void)searchBarCancelButtonClicked:(UISearchBar *)searchBar{

    _isSearching=NO;

    _searchBar.text=@"";

    [self.tableView reloadData];

}

#pragma mark 输入搜索关键字

-(void)searchBar:(UISearchBar *)searchBar textDidChange:(NSString *)searchText{

    if([_searchBar.text isEqual:@""]){

        _isSearching=NO;

        [self.tableView reloadData];

        return;

    }

    [self searchDataWithKeyWord:_searchBar.text];

}

#pragma mark 点击虚拟键盘上的搜索时

-(void)searchBarSearchButtonClicked:(UISearchBar *)searchBar{

    [self searchDataWithKeyWord:_searchBar.text];

    [_searchBar resignFirstResponder];//放弃第一响应者对象,关闭虚拟键盘

}

#pragma mark 重写状态样式方法

-(UIStatusBarStyle)preferredStatusBarStyle{

    return UIStatusBarStyleLightContent;

}

#pragma mark 加载数据

-(void)initData{

    _contacts=[[NSMutableArray alloc]init];

    KCContact *contact1=[KCContact initWithFirstName:@"Cui" andLastName:@"Kenshin" andPhoneNumber:@"18500131234"];

    KCContact *contact2=[KCContact initWithFirstName:@"Cui" andLastName:@"Tom" andPhoneNumber:@"18500131237"];

    KCContactGroup *group1=[KCContactGroup initWithName:@"C" andDetail:@"With names beginning with C" andContacts:[NSMutableArray arrayWithObjects:contact1,contact2, nil]];

    [_contacts addObject:group1];

    KCContact *contact3=[KCContact initWithFirstName:@"Lee" andLastName:@"Terry" andPhoneNumber:@"18500131238"];

    KCContact *contact4=[KCContact initWithFirstName:@"Lee" andLastName:@"Jack" andPhoneNumber:@"18500131239"];

    KCContact *contact5=[KCContact initWithFirstName:@"Lee" andLastName:@"Rose" andPhoneNumber:@"18500131240"];

    KCContactGroup *group2=[KCContactGroup initWithName:@"L" andDetail:@"With names beginning with L" andContacts:[NSMutableArray arrayWithObjects:contact3,contact4,contact5, nil]];

    [_contacts addObject:group2];

    KCContact *contact6=[KCContact initWithFirstName:@"Sun" andLastName:@"Kaoru" andPhoneNumber:@"18500131235"];

    KCContact *contact7=[KCContact initWithFirstName:@"Sun" andLastName:@"Rosa" andPhoneNumber:@"18500131236"];

    KCContactGroup *group3=[KCContactGroup initWithName:@"S" andDetail:@"With names beginning with S" andContacts:[NSMutableArray arrayWithObjects:contact6,contact7, nil]];

    [_contacts addObject:group3];

    KCContact *contact8=[KCContact initWithFirstName:@"Wang" andLastName:@"Stephone" andPhoneNumber:@"18500131241"];

    KCContact *contact9=[KCContact initWithFirstName:@"Wang" andLastName:@"Lucy" andPhoneNumber:@"18500131242"];

    KCContact *contact10=[KCContact initWithFirstName:@"Wang" andLastName:@"Lily" andPhoneNumber:@"18500131243"];

    KCContact *contact11=[KCContact initWithFirstName:@"Wang" andLastName:@"Emily" andPhoneNumber:@"18500131244"];

    KCContact *contact12=[KCContact initWithFirstName:@"Wang" andLastName:@"Andy" andPhoneNumber:@"18500131245"];

    KCContactGroup *group4=[KCContactGroup initWithName:@"W" andDetail:@"With names beginning with W" andContacts:[NSMutableArray arrayWithObjects:contact8,contact9,contact10,contact11,contact12, nil]];

    [_contacts addObject:group4];

    KCContact *contact13=[KCContact initWithFirstName:@"Zhang" andLastName:@"Joy" andPhoneNumber:@"18500131246"];

    KCContact *contact14=[KCContact initWithFirstName:@"Zhang" andLastName:@"Vivan" andPhoneNumber:@"18500131247"];

    KCContact *contact15=[KCContact initWithFirstName:@"Zhang" andLastName:@"Joyse" andPhoneNumber:@"18500131248"];

    KCContactGroup *group5=[KCContactGroup initWithName:@"Z" andDetail:@"With names beginning with Z" andContacts:[NSMutableArray arrayWithObjects:contact13,contact14,contact15, nil]];

    [_contacts addObject:group5];

}

#pragma mark 搜索形成新数据

-(void)searchDataWithKeyWord:(NSString *)keyWord{

    _isSearching=YES;

    _searchContacts=[NSMutableArray array];

    [_contacts enumerateObjectsUsingBlock:^(id obj, NSUInteger idx, BOOL *stop) {

        KCContactGroup *group=obj;

        [group.contacts enumerateObjectsUsingBlock:^(id obj, NSUInteger idx, BOOL *stop) {

            KCContact *contact=obj;

            if ([contact.firstName.uppercaseString containsString:keyWord.uppercaseString]||[contact.lastName.uppercaseString containsString:keyWord.uppercaseString]||[contact.phoneNumber containsString:keyWord]) {

                [_searchContacts addObject:contact];

            }

        }];

    }];

    //刷新表格

    [self.tableView reloadData];

}

#pragma mark 添加搜索栏

-(void)addSearchBar{

    CGRect searchBarRect=CGRectMake(0, 0, self.view.frame.size.width, kSearchbarHeight);

    _searchBar=[[UISearchBar alloc]initWithFrame:searchBarRect];

    _searchBar.placeholder=@"Please input key word...";

    //_searchBar.keyboardType=UIKeyboardTypeAlphabet;//键盘类型

    //_searchBar.autocorrectionType=UITextAutocorrectionTypeNo;//自动纠错类型

    //_searchBar.autocapitalizationType=UITextAutocapitalizationTypeNone;//哪一次shitf被自动按下

    _searchBar.showsCancelButton=YES;//显示取消按钮

    //添加搜索框到页眉位置

    _searchBar.delegate=self;

    self.tableView.tableHeaderView=_searchBar;

}

@end
运行效果:
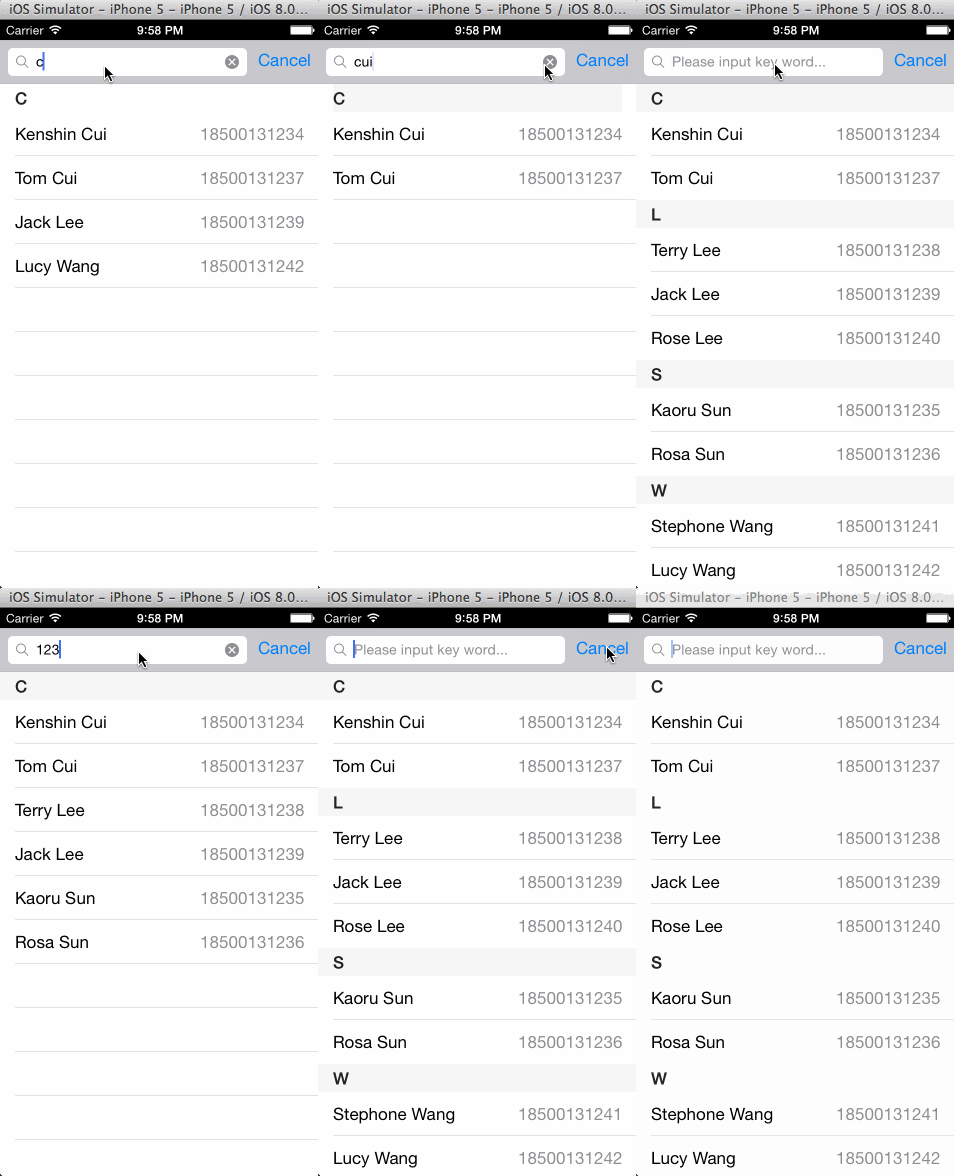
在上面的搜索中除了使用一个_contacts变量去保存联系人数据还专门定义了一个_searchContact变量用于保存搜索的结果。在输入搜索关键字时我们刷新了表格,此时会调用表格的数据源方法,在这个方法中我们根据定义的搜索状态去决定显示原始数据还是搜索结果。
我们发现每次搜索完后都需要手动刷新表格来显示搜索结果,而且当没有搜索关键字的时候还需要将当前的tableView重新设置为初始状态。也就是这个过程中我们要用一个tableView显示两种状态的不同数据,自然会提高程序逻辑复杂度。为了简化这个过程,我们可以使用UISearchDisplayController,UISearchDisplayController内部也有一个UITableView类型的对象searchResultsTableView,如果我们设置它的数据源代理为当前控制器,那么它完全可以像UITableView一样加载数据。同时它本身也有搜索监听的方法,我们不必在监听UISearchBar输入内容,直接使用它的方法即可自动刷新其内部表格。为了和前面的方法对比在下面的代码中没有直接删除原来的方式而是注释了对应代码大家可以对照学习:
//

//  KCContactTableViewController.m

//  UITableView

//

//  Created by Kenshin Cui on 14-3-1.

//  Copyright (c) 2014年 Kenshin Cui. All rights reserved.

//

#import "KCContactTableViewControllerWithUISearchDisplayController.h"

#import "KCContact.h"

#import "KCContactGroup.h"

#define kSearchbarHeight 44

@interface KCContactTableViewControllerWithUISearchDisplayController ()<UISearchBarDelegate,UISearchDisplayDelegate>{

    UITableView *_tableView;

    UISearchBar *_searchBar;

    UISearchDisplayController *_searchDisplayController;

    NSMutableArray *_contacts;//联系人模型

    NSMutableArray *_searchContacts;//符合条件的搜索联系人

    //BOOL _isSearching;

}

@end

@implementation KCContactTableViewControllerWithUISearchDisplayController

- (void)viewDidLoad {

    [super viewDidLoad];

    //初始化数据

    [self initData];

    //添加搜索框

    [self addSearchBar];

}

#pragma mark - 数据源方法

- (NSInteger)numberOfSectionsInTableView:(UITableView *)tableView {

//    if (_isSearching) {

//        return 1;

//    }

    //如果当前是UISearchDisplayController内部的tableView则不分组

    if (tableView==self.searchDisplayController.searchResultsTableView) {

        return 1;

    }

    return _contacts.count;;

}

- (NSInteger)tableView:(UITableView *)tableView numberOfRowsInSection:(NSInteger)section {

//    if (_isSearching) {

//        return _searchContacts.count;

//    }

    //如果当前是UISearchDisplayController内部的tableView则使用搜索数据

    if (tableView==self.searchDisplayController.searchResultsTableView) {

        return _searchContacts.count;

    }

    KCContactGroup *group1=_contacts[section];

    return group1.contacts.count;

}

- (UITableViewCell *)tableView:(UITableView *)tableView cellForRowAtIndexPath:(NSIndexPath *)indexPath {

    KCContact *contact=nil;

//    if (_isSearching) {

//        contact=_searchContacts[indexPath.row];

//    }else{

//        KCContactGroup *group=_contacts[indexPath.section];

//        contact=group.contacts[indexPath.row];

//    }

    //如果当前是UISearchDisplayController内部的tableView则使用搜索数据

    if (tableView==self.searchDisplayController.searchResultsTableView) {

        contact=_searchContacts[indexPath.row];

    }else{

        KCContactGroup *group=_contacts[indexPath.section];

        contact=group.contacts[indexPath.row];

    }

    static NSString *cellIdentifier=@"UITableViewCellIdentifierKey1";

    //首先根据标识去缓存池取

    UITableViewCell *cell=[tableView dequeueReusableCellWithIdentifier:cellIdentifier];

    //如果缓存池没有取到则重新创建并放到缓存池中

    if(!cell){

        cell=[[UITableViewCell alloc]initWithStyle:UITableViewCellStyleValue1 reuseIdentifier:cellIdentifier];

    }

    cell.textLabel.text=[contact getName];

    cell.detailTextLabel.text=contact.phoneNumber;

    return cell;

}

#pragma mark - 代理方法

#pragma mark 设置分组标题

-(NSString *)tableView:(UITableView *)tableView titleForHeaderInSection:(NSInteger)section{

    if (tableView==self.searchDisplayController.searchResultsTableView) {

        return @"搜索结果";

    }

    KCContactGroup *group=_contacts[section];

    return group.name;

}

#pragma mark 选中之前

-(NSIndexPath *)tableView:(UITableView *)tableView willSelectRowAtIndexPath:(NSIndexPath *)indexPath{

    [_searchBar resignFirstResponder];//退出键盘

    return indexPath;

}

#pragma mark - 搜索框代理

//#pragma mark  取消搜索

//-(void)searchBarCancelButtonClicked:(UISearchBar *)searchBar{

//    //_isSearching=NO;

//    _searchBar.text=@"";

//    //[self.tableView reloadData];

//    [_searchBar resignFirstResponder];

//}

//

//#pragma mark 输入搜索关键字

//-(void)searchBar:(UISearchBar *)searchBar textDidChange:(NSString *)searchText{

//    if([_searchBar.text isEqual:@""]){

//        //_isSearching=NO;

//        //[self.tableView reloadData];

//        return;

//    }

//    [self searchDataWithKeyWord:_searchBar.text];

//}

//#pragma mark 点击虚拟键盘上的搜索时

//-(void)searchBarSearchButtonClicked:(UISearchBar *)searchBar{

//

//    [self searchDataWithKeyWord:_searchBar.text];

//

//    [_searchBar resignFirstResponder];//放弃第一响应者对象,关闭虚拟键盘

//}

#pragma mark - UISearchDisplayController代理方法

-(BOOL)searchDisplayController:(UISearchDisplayController *)controller shouldReloadTableForSearchString:(NSString *)searchString{

    [self searchDataWithKeyWord:searchString];

    return YES;

}

#pragma mark 重写状态样式方法

-(UIStatusBarStyle)preferredStatusBarStyle{

    return UIStatusBarStyleLightContent;

}

#pragma mark 加载数据

-(void)initData{

    _contacts=[[NSMutableArray alloc]init];

    KCContact *contact1=[KCContact initWithFirstName:@"Cui" andLastName:@"Kenshin" andPhoneNumber:@"18500131234"];

    KCContact *contact2=[KCContact initWithFirstName:@"Cui" andLastName:@"Tom" andPhoneNumber:@"18500131237"];

    KCContactGroup *group1=[KCContactGroup initWithName:@"C" andDetail:@"With names beginning with C" andContacts:[NSMutableArray arrayWithObjects:contact1,contact2, nil]];

    [_contacts addObject:group1];

    KCContact *contact3=[KCContact initWithFirstName:@"Lee" andLastName:@"Terry" andPhoneNumber:@"18500131238"];

    KCContact *contact4=[KCContact initWithFirstName:@"Lee" andLastName:@"Jack" andPhoneNumber:@"18500131239"];

    KCContact *contact5=[KCContact initWithFirstName:@"Lee" andLastName:@"Rose" andPhoneNumber:@"18500131240"];

    KCContactGroup *group2=[KCContactGroup initWithName:@"L" andDetail:@"With names beginning with L" andContacts:[NSMutableArray arrayWithObjects:contact3,contact4,contact5, nil]];

    [_contacts addObject:group2];

    KCContact *contact6=[KCContact initWithFirstName:@"Sun" andLastName:@"Kaoru" andPhoneNumber:@"18500131235"];

    KCContact *contact7=[KCContact initWithFirstName:@"Sun" andLastName:@"Rosa" andPhoneNumber:@"18500131236"];

    KCContactGroup *group3=[KCContactGroup initWithName:@"S" andDetail:@"With names beginning with S" andContacts:[NSMutableArray arrayWithObjects:contact6,contact7, nil]];

    [_contacts addObject:group3];

    KCContact *contact8=[KCContact initWithFirstName:@"Wang" andLastName:@"Stephone" andPhoneNumber:@"18500131241"];

    KCContact *contact9=[KCContact initWithFirstName:@"Wang" andLastName:@"Lucy" andPhoneNumber:@"18500131242"];

    KCContact *contact10=[KCContact initWithFirstName:@"Wang" andLastName:@"Lily" andPhoneNumber:@"18500131243"];

    KCContact *contact11=[KCContact initWithFirstName:@"Wang" andLastName:@"Emily" andPhoneNumber:@"18500131244"];

    KCContact *contact12=[KCContact initWithFirstName:@"Wang" andLastName:@"Andy" andPhoneNumber:@"18500131245"];

    KCContactGroup *group4=[KCContactGroup initWithName:@"W" andDetail:@"With names beginning with W" andContacts:[NSMutableArray arrayWithObjects:contact8,contact9,contact10,contact11,contact12, nil]];

    [_contacts addObject:group4];

    KCContact *contact13=[KCContact initWithFirstName:@"Zhang" andLastName:@"Joy" andPhoneNumber:@"18500131246"];

    KCContact *contact14=[KCContact initWithFirstName:@"Zhang" andLastName:@"Vivan" andPhoneNumber:@"18500131247"];

    KCContact *contact15=[KCContact initWithFirstName:@"Zhang" andLastName:@"Joyse" andPhoneNumber:@"18500131248"];

    KCContactGroup *group5=[KCContactGroup initWithName:@"Z" andDetail:@"With names beginning with Z" andContacts:[NSMutableArray arrayWithObjects:contact13,contact14,contact15, nil]];

    [_contacts addObject:group5];

}

#pragma mark 搜索形成新数据

-(void)searchDataWithKeyWord:(NSString *)keyWord{

    //_isSearching=YES;

    _searchContacts=[NSMutableArray array];

    [_contacts enumerateObjectsUsingBlock:^(id obj, NSUInteger idx, BOOL *stop) {

        KCContactGroup *group=obj;

        [group.contacts enumerateObjectsUsingBlock:^(id obj, NSUInteger idx, BOOL *stop) {

            KCContact *contact=obj;

            if ([contact.firstName.uppercaseString containsString:keyWord.uppercaseString]||[contact.lastName.uppercaseString containsString:keyWord.uppercaseString]||[contact.phoneNumber containsString:keyWord]) {

                [_searchContacts addObject:contact];

            }

        }];

    }];

    //刷新表格

    //[self.tableView reloadData];

}

#pragma mark 添加搜索栏

-(void)addSearchBar{

    _searchBar=[[UISearchBar alloc]init];

    [_searchBar sizeToFit];//大小自适应容器

    _searchBar.placeholder=@"Please input key word...";

    _searchBar.autocapitalizationType=UITextAutocapitalizationTypeNone;

    _searchBar.showsCancelButton=YES;//显示取消按钮

    //添加搜索框到页眉位置

    _searchBar.delegate=self;

    self.tableView.tableHeaderView=_searchBar;

    _searchDisplayController=[[UISearchDisplayController alloc]initWithSearchBar:_searchBar contentsController:self];

    _searchDisplayController.delegate=self;

    _searchDisplayController.searchResultsDataSource=self;

    _searchDisplayController.searchResultsDelegate=self;

    [_searchDisplayController setActive:NO animated:YES];

}

@end
运行效果:
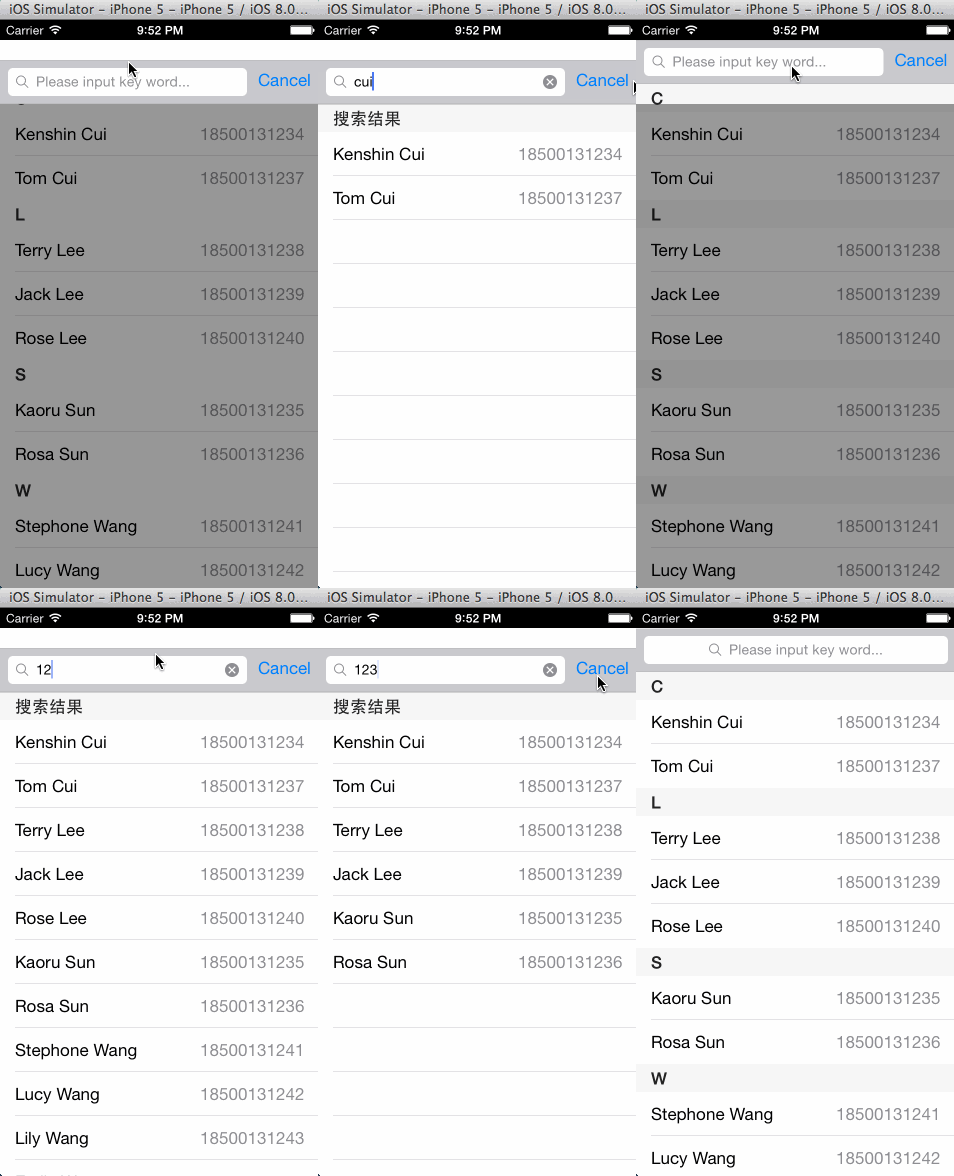
注意如果使用Storyboard或xib方式创建上述代码则无需定义UISearchDisplayController成员变量,因为每个UIViewController中已经有一个searchDisplayController对象。
MVC模式
通过UITableView的学习相信大家对于iOS的MVC已经有一个大致的了解,这里简单的分析一下iOS中MVC模式的设计方式。在iOS中多数数据源视图控件(View)都有一个dataSource属性用于和控制器(Controller)交互,而数据来源我们一般会以数据模型(Model)的形式进行定义,View不直接和模型交互,而是通过Controller间接读取数据。
就拿前面的联系人应用举例,UITableView作为视图(View)并不能直接访问模型Contact,它要显示联系人信息只能通过控制器(Controller)来提供数据源方法。同样的控制器本身就拥有视图控件,可以操作视图,也就是说视图和控制器之间可以互相访问。而模型既不能访问视图也不能访问控制器。具体依赖关系如下图:

深入理解UITableView的更多相关文章
- 点击UITableView的cell展开收缩
在项目中有个需求,点击表视图的单元格展开,再点击另外一个单元格或者本身又收缩,经过一段时间尝试,实现了该功能,现在记录分享总结下. 首先要理解UITableView代理方法调用的先后顺序. 当 ...
- iOS开发200个tips总结(一)
tip 1 : 给UIImage添加毛玻璃效果 func blurImage(value:NSNumber) -> UIImage { let context = CIContext(opti ...
- 苹果Xcode帮助文档阅读指南
文档导读 https://developer.apple.com/legacy/library/navigation/ 前面我们讲Xcode的文档结构是在介绍如何能够快速定位到你要找的内容.但是很多人 ...
- UITableViewController
UITableViewController 目录 概述 UITableView UITableViewCell 与UITableViewController相关的代理 UITableViewDataS ...
- iOS开发tips总结
tip 1 : 给UIImage添加毛玻璃效果 func blurImage(value:NSNumber) -> UIImage { let context = CIContext(opti ...
- 转:苹果Xcode帮助文档阅读指南
一直想写这么一个东西,长期以来我发现很多初学者的问题在于不掌握学习的方法,所以,Xcode那么好的SDK文档摆在那里,对他们也起不到什么太大的作用.从论坛.微博等等地方看到的初学者提出的问题,也暴露出 ...
- 【IOS】从android角度来实现(理解)IOS的UITableView
以下内容为原创,欢迎转载,转载请注明 来自天天博客:http://www.cnblogs.com/tiantianbyconan/p/3403124.html 本人从在学校开始到现在上班(13年毕 ...
- iOS 中UITableView的深理解
例如下图:首先分析一下需求:1.根据模型的不同状态显示不同高度的cell,和cell的UI界面. 2.点击cell的取消按钮时,对应的cell首先要把取消按钮隐藏掉,然后改变cell的高度. 根据需求 ...
- iOS - UITableView中Cell重用机制导致Cell内容出错的解决办法
"UITableView" iOS开发中重量级的控件之一;在日常开发中我们大多数会选择自定Cell来满足自己开发中的需求, 但是有些时候Cell也是可以不自定义的(比如某一个简单的 ...
随机推荐
- Java中final、finally和finalize的区别(转)
http://www.cnblogs.com/bluestorm/archive/2012/04/22/2464746.html final 用于声明属性,方法和类,分别表示属性不可变,方法不可覆盖, ...
- 石英晶振频率后面带的PPM是什么单位
PPM是石英晶振的基本单位之一,表示晶振的精度和相对偏差, PPM代表着百万分之一,它表明晶体的频率可能会偏离标称值多少.晶振频率是以MHZ(10的6次方)和KHZ(10的3次方)为基本单位的,标称频 ...
- bzoj3531
不难想到树链剖分这题的难点是记录的是路径上宗教相同的点裸的想法是对每一种宗教都开一棵线段树,记录每个点的评级但显然这样会爆空间,仔细分析一下,这些线段树内很多点压根就没用到因此我们考虑对线段树动态开点 ...
- HDNOIP201206施工方案
HDNOIP201206施工方案 难度级别:A: 运行时间限制:1000ms: 运行空间限制:51200KB: 代码长度限制:2000000B 试题描述 c国边防军在边境某处的阵地是由n个地堡组成的. ...
- Ubuntu 12.04 下安装 Eclipse
方法一:(缺点是安装时附加openjdk等大量程序并无法去除,优点是安装简单) $ sudo apt-get install eclipse 方法二:(优点是安装内容清爽,缺点是配置麻烦)1.安装JD ...
- (转载)PHP 提示和技巧
(转载)http://www.111cn.net/phper/21/b4aea31507014a778b18682943db402f.htm 1. 当您在寻找关于某个具体的 PHP 函数的信息时,请转 ...
- div+css模式编写html静态网页例子_仿照网页制作
<!DOCTYPE html> <html lang="en"> <head> <meta charset="UTF-8&quo ...
- python最简洁的条件判断语句写法
这篇文章主要介绍了Python返回真假值(True or False)小技巧,本文探讨的是最简洁的条件判断语句写法,本文给出了两种简洁写法,需要的朋友可以参考下 如下一段代码: def isLen(s ...
- winform combobox控件绑定 分类: WinForm 2014-04-17 14:34 118人阅读 评论(0) 收藏
想要达到的效果:把数据库中的一列数据绑定到combobox控件中. 数据库表:T_Task//任务表 列名:Task_Name//名称 主键:Task_ID combobox控件名称:cbName 解 ...
- Android的minSdkVersion,targetSdkVersion,maxSdkVersion
参考http://developer.android.com/guide/topics/manifest/uses-sdk-element.html API Level 是一个整型值,表示Androi ...
