Keras实现autoencoder
Keras使我们搭建神经网络变得异常简单,之前我们使用了Sequential来搭建LSTM:keras实现LSTM。
我们要使用Keras的functional API搭建更加灵活的网络结构,比如说本文的autoencoder,关于autoencoder的介绍可以在这里找到:deep autoencoder。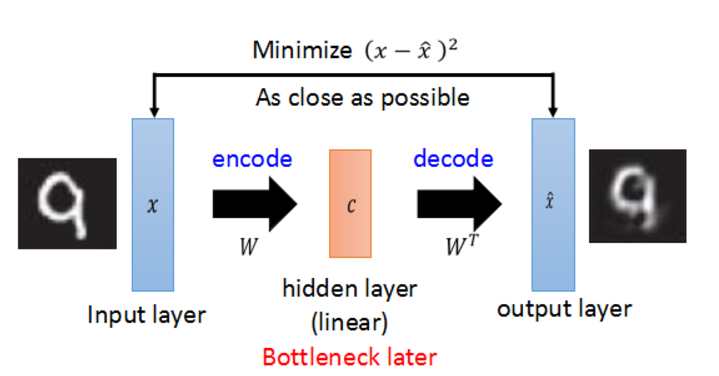
现在我们就开始。
step 0 导入需要的包
 import keras

 from keras.layers import Dense, Input

 from keras.datasets import mnist

 from keras.models import Model

 import numpy as np
step 1 数据预处理
这里需要说明一下,导入的原始数据shape为(60000,28,28),autoencoder使用(60000,28*28),而且autoencoder属于无监督学习,所以只需要导入x_train和x_test.
 (x_train, _), (x_test, _) = mnist.load_data()

 x_train = x_train.astype('float32')/255.0

 x_test = x_test.astype('float32')/255.0

 #print(x_train.shape)

 x_train = x_train.reshape(x_train.shape[0], -1)

 x_test = x_test.reshape(x_test.shape[0], -1)

 #print(x_train.shape)
step 2 向图片添加噪声
添加噪声是为了让autoencoder更robust,不容易出现过拟合。
 #add random noise

 x_train_nosiy = x_train + 0.3 * np.random.normal(loc=0., scale=1., size=x_train.shape)

 x_test_nosiy = x_test + 0.3 * np.random.normal(loc=0, scale=1, size=x_test.shape)

 x_train_nosiy = np.clip(x_train_nosiy, 0., 1.)

 x_test_nosiy = np.clip(x_test_nosiy, 0, 1.)

 print(x_train_nosiy.shape, x_test_nosiy.shape)
step 3 搭建网络结构
分别构建encoded和decoded,然后将它们链接起来构成整个autoencoder。使用Model建模。
#build autoencoder model
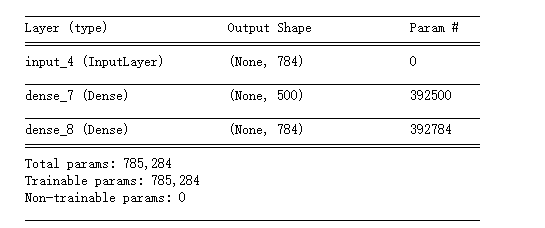
input_img = Input(shape=(28*28,))
encoded = Dense(500, activation='relu')(input_img)
decoded = Dense(784, activation='sigmoid')(encoded) autoencoder = Model(input=input_img, output=decoded)
step 4 compile
因为这里是让解压后的图片和原图片做比较, loss使用的是binary_crossentropy。
 autoencoder.compile(optimizer='adam', loss='binary_crossentropy')

 autoencoder.summary()
step 5 train
指定epochs,batch_size,可以使用validation_data,keras训练的时候不会使用它,而是用来做模型评价。
autoencoder.fit(x_train_nosiy, x_train, epochs=20, batch_size=128, verbose=1, validation_data=(x_test, x_test))
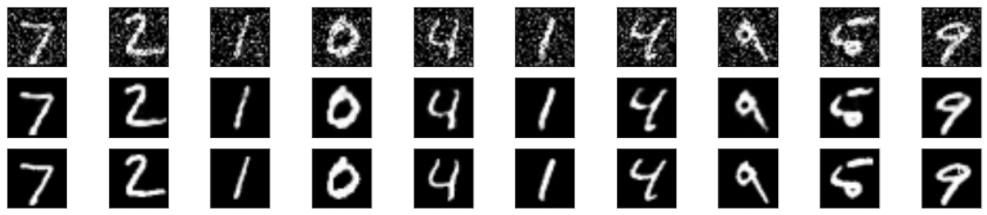
step 6 对比一下解压缩后的图片和原图片
 %matplotlib inline

 import matplotlib.pyplot as plt

 #decoded test images

 decoded_img = autoencoder.predict(x_test_nosiy)

 n = 10

 plt.figure(figsize=(20, 4))

 for i in range(n):

     #noisy data

     ax = plt.subplot(3, n, i+1)

     plt.imshow(x_test_nosiy[i].reshape(28, 28))

     plt.gray()

     ax.get_xaxis().set_visible(False)

     ax.get_yaxis().set_visible(False)

     #predict

     ax = plt.subplot(3, n, i+1+n)

     plt.imshow(decoded_img[i].reshape(28, 28))

     plt.gray()

     ax.get_yaxis().set_visible(False)

     ax.get_xaxis().set_visible(False)

     #original

     ax = plt.subplot(3, n, i+1+2*n)

     plt.imshow(x_test[i].reshape(28, 28))

     plt.gray()

     ax.get_yaxis().set_visible(False)

     ax.get_xaxis().set_visible(False)

 plt.show()
这样的结果,你能分出哪个是压缩解压缩后的图片哪个是原图片吗?
reference:
https://keras.io/getting-started/functional-api-guide/
Keras实现autoencoder的更多相关文章
- keras使用AutoEncoder对mnist数据降维
import keras import matplotlib.pyplot as plt from keras.datasets import mnist (x_train, _), (x_test, ...
- tlflearn 编码解码器 ——数据降维用
# -*- coding: utf-8 -*- """ Auto Encoder Example. Using an auto encoder on MNIST hand ...
- Keras(六)Autoencoder 自编码 原理及实例 Save&reload 模型的保存和提取
Autoencoder 自编码 压缩与解压 原来有时神经网络要接受大量的输入信息, 比如输入信息是高清图片时, 输入信息量可能达到上千万, 让神经网络直接从上千万个信息源中学习是一件很吃力的工作. 所 ...
- 深度学习Keras框架笔记之AutoEncoder类
深度学习Keras框架笔记之AutoEncoder类使用笔记 keras.layers.core.AutoEncoder(encoder, decoder,output_reconstruction= ...
- 用Keras搭建神经网络 简单模版(六)——Autoencoder 自编码
import numpy as np np.random.seed(1337) from keras.datasets import mnist from keras.models import Mo ...
- CNN autoencoder 进行异常检测——TODO,使用keras进行测试
https://sefiks.com/2018/03/23/convolutional-autoencoder-clustering-images-with-neural-networks/ http ...
- 深度学习中的Data Augmentation方法(转)基于keras
在深度学习中,当数据量不够大时候,常常采用下面4中方法: 1. 人工增加训练集的大小. 通过平移, 翻转, 加噪声等方法从已有数据中创造出一批"新"的数据.也就是Data Augm ...
- 深度学习之自编码器AutoEncoder
原文地址:https://blog.csdn.net/marsjhao/article/details/73480859 一.什么是自编码器(Autoencoder) 自动编码器是一种数据的压缩算法, ...
- (zhuan) Variational Autoencoder: Intuition and Implementation
Agustinus Kristiadi's Blog TECH BLOG TRAVEL BLOG PORTFOLIO CONTACT ABOUT Variational Autoencoder: In ...
随机推荐
- Centos 虚拟机网络问题,网卡起不来,重启network服务失败
拷贝了个虚拟机,有两个网卡,1个可以起来,另一个起不来.运行命令:$>systemctl restart network 输出如下:Job for network.service failed ...
- 1、Android自己的下拉刷新SwipeRefreshLayout
<android.support.v4.widget.SwipeRefreshLayout xmlns:android="http://schemas.android.com/apk/ ...
- Fragment切换页面
<?xml version="1.0" encoding="utf-8"?> <LinearLayout xmlns:android=&quo ...
- CentOS 安装 dotnetcore
参考官方教程:https://www.microsoft.com/net/core#linuxcentos 安装.NET CORE SDK sudo yum install libunwind lib ...
- 【BZOJ4596】[Shoi2016]黑暗前的幻想乡 容斥+矩阵树定理
[BZOJ4596][Shoi2016]黑暗前的幻想乡 Description 幽香上台以后,第一项措施就是要修建幻想乡的公路.幻想乡有 N 个城市,之间原来没有任何路.幽香向选民承诺要减税,所以她打 ...
- AEcs6破解版下载
下载地址 http://pan.baidu.com/share/link?shareid=79184520&uk=1795677788 点击下载
- Less-Mixins分离规则集
//Mixins --立即执行函数 .test{/* */} #test{/* */} --指定执行函数 .test(){/* */} #test(){/* */} --调用: .test; or . ...
- idle命令行按ALT+P重复调出上个语句
idle命令行按ALT+P重复调出上个语句
- XXE(xml外部实体注入漏洞)
实验内容 介绍XXE漏洞的触发方式和利用方法,简单介绍XXE漏洞的修复. 影响版本: libxml2.8.0版本 漏洞介绍 XXE Injection即XML External Entity Inje ...
- IE11 Enterprise Mode Template missing from GPMC
IE11 Enterprise Mode Template missing from GPMC Reason:You have not copied the new IE11 Enterpri ...