HarmonyOS三方件开发指南(19)-BGABadgeView徽章组件
目录:
引言
现在很多的APP会有新消息/未接来电/未读消息/新通知圆球红点提示,典型的以微信、QQ新消息提示为例,当微信朋友圈有新的朋友更新/发布朋友圈消息后,在微信的底部切换卡上会有一个红色的小圆球红点,表示有新消息,提示用户查看。在消息通讯类的app中十分实用。
功能介绍
鸿蒙BGABadgeView 徽章组件,主要功能包括:传入图片生成徽章,设置文本生成文本徽章,并且每个徽章都具有拖拽超范围即可消除,范围内即可回到原位置。模拟机效果图如下
1.图片徽章:


2.文字徽章:

3.拖动徽章爆炸:
使用时候,直接将其下载,作为一个har包导入到自己的项目中即可。下面则详细介绍BGABadgeView 的使用以及开发指南。
BGABadgeView 使用指南
Ø 新建工程, 添加组件Har包依赖
在应用模块中添加HAR,只需要将verificationcodeview-debug.har复制到entry\libs目录下即可
Ø 修改配置文件
1. 修改主页面的布局文件:
<?xml version="1.0" encoding="utf-8"?>

<DependentLayout

    xmlns:ohos="http://schemas.huawei.com/res/ohos"

    ohos:height="match_parent"

    ohos:width="match_parent"

    ohos:id="$+id:layout1"

    ohos:orientation="vertical">

    <DependentLayout

        ohos:id="$+id:dependent1"

        ohos:height="200vp"

        ohos:width="match_parent">

        <com.example.bgabadgecomp_library.BAGDragBadgeImage

            ohos:top_margin="15vp"

            ohos:right_margin="10vp"

            ohos:bottom_margin="10vp"

            ohos:height="80vp"

            ohos:width="80vp"

            ohos:scale_mode="zoom_center"

            ohos:image_src="$media:avator"

            ohos:id="$+id:image1"

            ohos:below="$id:title"

            ohos:left_margin="30vp"/>

        <Image

            ohos:top_margin="15vp"

            ohos:right_margin="10vp"

            ohos:bottom_margin="10vp"

            ohos:height="80vp"

            ohos:width="80vp"

            ohos:scale_mode="zoom_center"

            ohos:image_src="$media:avator"

            ohos:id="$+id:image2"

            ohos:end_of="$id:image1"

            ohos:below="$id:title"

            ohos:left_margin="10vp"/>

           </DependentLayout>

        <Text

            ohos:left_margin="30vp"

            ohos:id="$+id:text1"

            ohos:top_margin="10vp"

            ohos:right_margin="15vp"

            ohos:bottom_margin="10vp"

            ohos:height="40vp"

            ohos:width="match_parent"

            ohos:text="测试1"

            ohos:below="$id:dependent1"

            ohos:text_size="20vp"/>

</DependentLayout>
2.修改MainAbilitySlice中的UI加载代码
在MainAbilitySlince类的onStart函数中,增加如下代码:
@Override

public void onStart(Intent intent) {

    super.onStart(intent);

    super.setUIContent(ResourceTable.Layout_ability_main);

    BAGDragBadgeImage bagDragBadgeImage = (BAGDragBadgeImage) findComponentById(ResourceTable.Id_image1);

    bagDragBadgeImage.setCornerRadius(bagDragBadgeImage.getWidth() / 2); // 圆形边框

    DependentLayout stackLayout = (DependentLayout) findComponentById(ResourceTable.Id_layout1);

    Image image2 = (Image) findComponentById(ResourceTable.Id_image2);

    image2.setCornerRadius(20);

    DependentLayout.LayoutConfig config = new DependentLayout.LayoutConfig(DependentLayout.LayoutConfig.MATCH_PARENT, DependentLayout.LayoutConfig.MATCH_PARENT);

    RoundRectImage roundRectImage = RoundRectImage.attach2Window(this, stackLayout, image2, config, BGABadgeViewHelper.getPixelMap(this, ResourceTable.Media_avatar_vip));

    RoundRectText roundRectText = RoundRectText.attach2Window(this, stackLayout, image3, config);

    Text text1  = (Text) findComponentById(ResourceTable.Id_text1);

    RoundRectText roundText1 = RoundRectText.attach2Window(this, stackLayout, text1, config);

    roundText1.setBadgeText("qqqqqqqq");

    List<Component> componentList = new ArrayList<>();

    componentList.add(roundRectText);

    componentList.add(roundText1);

    stackLayout.setTouchEventListener(new Component.TouchEventListener() {

        @Override

        public boolean onTouchEvent(Component component, TouchEvent event) {

            switch (event.getAction()) {

                case TouchEvent.PRIMARY_POINT_DOWN:// 手指第一次触摸到屏幕

                    int startX = (int) event.getPointerPosition(event.getIndex()).getX();

                    int startY = (int) event.getPointerPosition(event.getIndex()).getY();

                   if (startX < roundRectImage.getCircleLeft() + 2 * roundRectImage.getCircleRadius()

                           && startX > roundRectImage.getCircleLeft()

                           && startY < roundRectImage.getCircleTop() + 2 * roundRectImage.getCircleRadius()

                           && startY > roundRectImage.getCircleTop()) {

                       roundRectImage.setDraggedListener(DRAG_HORIZONTAL_VERTICAL, roundRectImage );

                       for (Component component1 : componentList) {

                           component1.setDraggedListener(DRAG_HORIZONTAL_VERTICAL,null);

                       }

                   } else {

                       roundRectImage.setDraggedListener(DRAG_HORIZONTAL_VERTICAL, null );

                       for (Component component1 : componentList) {

                           RoundRectText rectText = (RoundRectText) component1;

                           if (startX < rectText.getCircleLeft() + 2 * rectText.getRadius()

                                   && startX > rectText.getCircleLeft()

                                   && startY < rectText.getCircleTop() + 2 * rectText.getRadius()

                                   && startY > rectText.getCircleTop()) {

                               component1.setDraggedListener(DRAG_HORIZONTAL_VERTICAL, (Component.DraggedListener) component1);

                           } else {

                               component1.setDraggedListener(DRAG_HORIZONTAL_VERTICAL,null);

                           }

                       }

                   }

                    break;

                case TouchEvent.PRIMARY_POINT_UP:

                case TouchEvent.POINT_MOVE:

                default:

                    break;

            }

            return true;

        }

    });

}
通过以上两个步骤,就实现了简单的徽章组件,接下来在一起看下徽章组件是如何实现的。
BGABadgeView 开发指南
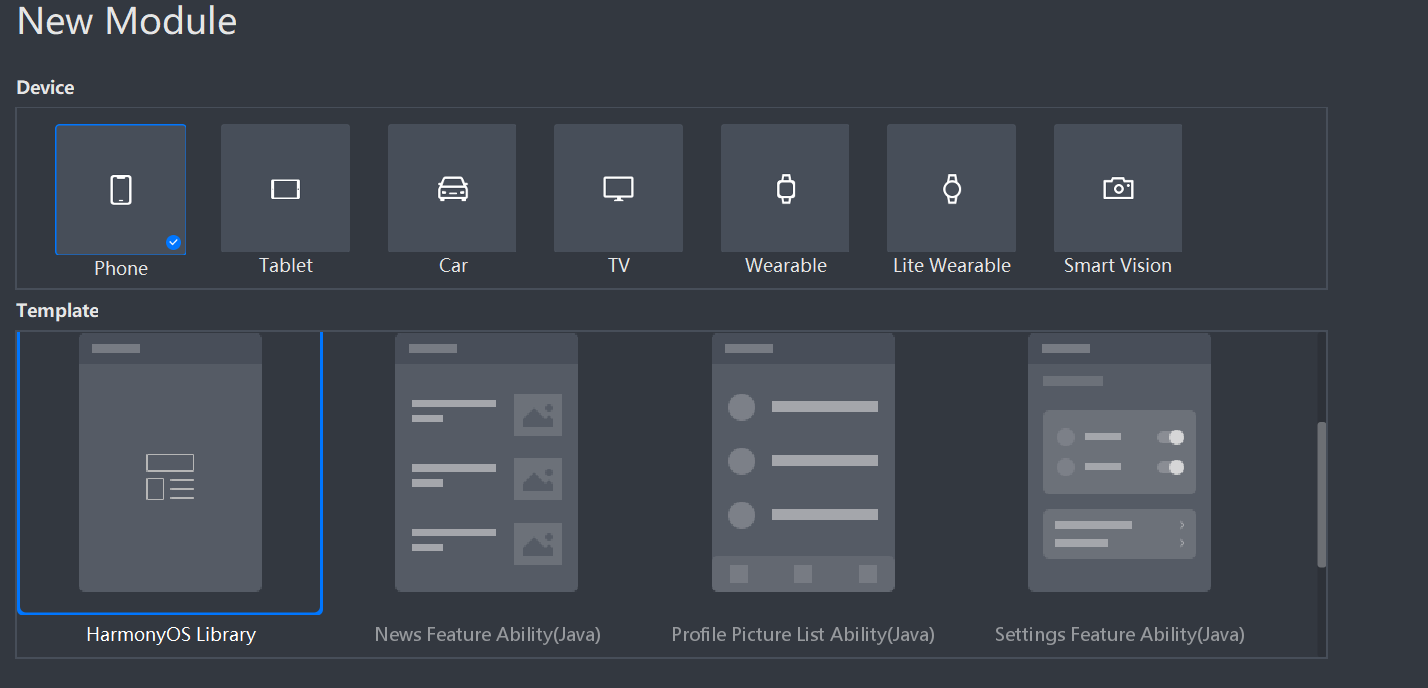
新建一个Module
新建一个Module,类型选择HarmonyOS Library,模块名为VerificationCodeView,如图:
 新建一个RoundRectText类
1.实现自定义RoundRectText绘制
@Override

public void onDraw(Component component, Canvas canvas){

    length = mBadgeText.length();

    Paint mTextPain = new Paint();

    mTextPain.setColor(Color.WHITE);

    mTextPain.setStyle(Paint.Style.FILL_STYLE);

    mTextPain.setTextSize(30);

    mTextPain.setFont(Font.DEFAULT);

    Rect textBounds = mTextPain.getTextBounds(mBadgeText);

    Paint mBadgePaint = new Paint();

    mBadgePaint.setColor(Color.RED);

    mBadgePaint.setStyle(Paint.Style.FILL_STYLE);

    mBadgePaint.setStrokeWidth(5);

    if (mBadgeRectF == null) {

        switch (mBadgeGravity) {

            case RightTop:

                int left = mComponent.getLeft();

                int top = mComponent.getTop();

                circleLeft = mComponent.getWidth() + left - 2 * radius - 15 * (length - 2);

                circleTop = top;

                mBadgeRectF = new RectFloat( circleLeft, circleTop, circleLeft + 2 * radius + 15 * (length - 2)  , circleTop + 2 * radius);

                break;

            case RightCenter:

                left = mComponent.getLeft();

                top = mComponent.getTop();

                circleLeft = mComponent.getWidth() + left - 2 * radius - 15 * (length - 2);

                circleTop = top + (float)mComponent.getHeight() / 2 - radius;

                mBadgeRectF = new RectFloat( circleLeft, circleTop, circleLeft + 2 * radius + 15 * (length - 2) , circleTop + 2 * radius);

                break;

            case RightBottom:

                mBadgeRectF = new RectFloat();

                left = mComponent.getLeft();

                top = mComponent.getTop();

                circleLeft = mComponent.getWidth() + left - 2 * radius - 15 * (length - 2) ;

                circleTop = top + mComponent.getHeight() - 2 * radius;

                mBadgeRectF = new RectFloat( circleLeft, circleTop, circleLeft + 2 * radius + 15 * (length - 2) , circleTop + 2 * radius);

                break;

            default:

                break;

        }

    }

    path = (float) Math.sqrt((mBadgeRectF.left - circleLeft) * (mBadgeRectF.left - circleLeft) + (mBadgeRectF.top - circleTop) * (mBadgeRectF.top - circleTop));

    isOverPath = path > overPath;

    float offSet = (float) (textBounds.top + textBounds.bottom) / 2;

    float boundsX = 0 ;

    if( 15 * length < (mBadgeRectF.right - mBadgeRectF.left)){

       float temp =  mBadgeRectF.right - mBadgeRectF.left - 15 * length;

        boundsX = temp / 2;

    }

   float roundNum = 2 * radius / (mBadgeRectF.right - mBadgeRectF.left) ;

    canvas.drawRoundRect(mBadgeRectF,roundNum * radius ,roundNum * radius, mBadgePaint);

    canvas.drawText(mTextPain, mBadgeText, mBadgeRectF.left + boundsX, mBadgeRectF.top + radius - offSet);

}
2.生成拖拽事件
@Override

public void onDragDown(Component component, DragInfo dragInfo) {

     pointX = dragInfo.downPoint.getPointX();

     pointY = dragInfo.downPoint.getPointY();

    if (pointX <= circleLeft || pointX >= circleLeft + 2 * radius + 15 * (length - 2)

            || pointY <= circleTop || pointY >= circleTop + 2 * radius) {

        onDragCancel(component, dragInfo);

    }

}

@Override

public void onDragStart(Component component, DragInfo dragInfo) {

}

@Override

public void onDragUpdate(Component component, DragInfo dragInfo) {

    float left = mBadgeRectF.left;

    float right = mBadgeRectF.right;

    float top = mBadgeRectF.top;

    float bottom = mBadgeRectF.bottom;

    if (pointX <= circleLeft || pointX >= circleLeft + 2 * radius + 15 * (length - 2)

            || pointY <= circleTop || pointY >= circleTop + 2 * radius) {

        onDragCancel(component, dragInfo);

    } else {

        mBadgeRectF.left = (float) (left + dragInfo.xOffset);

        mBadgeRectF.right = (float) (right + dragInfo.xOffset);

        mBadgeRectF.top = (float) (top + dragInfo.yOffset);

        mBadgeRectF.bottom = (float) (bottom + dragInfo.yOffset);

        invalidate();

    }

}

@Override

public void onDragEnd(Component component, DragInfo dragInfo) {

    if (isOverPath) {

        explosionField.explode(component, mBadgeRectF, explosionFieldColor);

    } else {

        mBadgeRectF = new RectFloat(circleLeft, circleTop , circleLeft + 2 * radius + 15 * (length - 2), circleTop + 2 * radius);

        invalidate();

    }

}

@Override

public void onDragCancel(Component component, DragInfo dragInfo) {

    mBadgeRectF = new RectFloat(circleLeft, circleTop , circleLeft + 2 * radius + 15 * (length - 2), circleTop + 2 * radius);

    invalidate();

}
具体代码请下载项目查看。
编译HAR包
利用Gradle可以将HarmonyOS Library库模块构建为HAR包,构建HAR包的方法如下:
在Gradle构建任务中,双击PackageDebugHar或PackageReleaseHar任务,构建Debug类型或Release类型的HAR。
待构建任务完成后,可以在工程目录中的VerificationCodeView> bulid > outputs > har目录中,获取生成的HAR包。

更多原创,请关注:软通动力HarmonyOS学院https://harmonyos.51cto.com/column/30
作者:软通田可辉
想了解更多内容,请访问51CTO和华为合作共建的鸿蒙社区:https://harmonyos.51cto.com
HarmonyOS三方件开发指南(19)-BGABadgeView徽章组件的更多相关文章
- HarmonyOS三方件开发指南(15)-LoadingView功能介绍
目录: 1. LoadingView组件功能介绍2. Lottie使用方法3. Lottie开发实现4.<HarmonyOS三方件开发指南>系列文章合集 1. LoadingView组件功 ...
- HarmonyOS三方件开发指南(12)——cropper图片裁剪
鸿蒙入门指南,小白速来!0基础学习路线分享,高效学习方法,重点答疑解惑--->[课程入口] 目录:1. cropper组件功能介绍2. cropper使用方法3. cropper组件开发实现4. ...
- HarmonyOS三方件开发指南(13)-SwipeLayout侧滑删除
鸿蒙入门指南,小白速来!0基础学习路线分享,高效学习方法,重点答疑解惑--->[课程入口] 目录:1. SwipeLayout组件功能介绍2. SwipeLayout使用方法3. SwipeLa ...
- HarmonyOS三方件开发指南(14)-Glide组件功能介绍
<HarmonyOS三方件开发指南>系列文章合集 引言 在实际应用开发中,会用到大量图片处理,如:网络图片.本地图片.应用资源.二进制流.Uri对象等,虽然官方提供了PixelMap进行图 ...
- HarmonyOS三方件开发指南(16)-VideoCache 视频缓存
目录: 1.引言 2.功能介绍 3.VideoCache使用指南 4.VideoCache开发指南 5.<HarmonyOS三方件开发指南>系列文章合集 引言 对于视频播放器这个app大家 ...
- HarmonyOS三方件开发指南(17)-BottomNavigationBar
目录: 1.引言 2.功能介绍 3.BottomNavigationBar使用指南 4.BottomNavigationBar开发指南 5.<HarmonyOS三方件开发指南>文章合集 引 ...
- HarmonyOS三方件开发指南(4)——Logger组件
目录: 1. Logger功能介绍 2. Logger使用方法 3. Logger开发实现 4. 源码上传地址 1. Logger功能介绍1.1. ...
- HarmonyOS三方件开发指南(5)——Photoview组件
PhotoView使用说明 1. PhotoView功能介绍1.1 组件介绍: PhotoView是一个继承自Image的组件,不同之处在于:它可以进行图击放大功能,手势缩放功能(暂无 ...
- HarmonyOS三方件开发指南(7)——compress组件
目录:1. 组件compress功能介绍2. 组件compress使用方法3. 组件compress开发实现 1. 组件compress功能介绍1.1. 组件介绍: compress是 ...
随机推荐
- 一款免费的在线 Markdown 笔记,类似 typora 编辑体验
为什么要开发一款新的编辑器 自从我开始使用 Markdown,就爱上了这种标记语法,轻量.纯文本兼容是最大的优点,哪里都可以编辑,一开始是在 IDE 上直接编辑,后来笔记越来越多,需要上传图片,有云同 ...
- 3.DataFrame的增删改查
以此为例 一.DataFrame的初步认知 在pandas中完成数据读取后数据以DataFrame保存.在操作时要以DataFrame函数进行了解 函数 含义 示例 values 元素 index 索 ...
- Springboot2.x集成lettuce连接redis集群报超时异常Command timed out after 6 second(s)
文/朱季谦 背景:最近在对一新开发Springboot系统做压测,发现刚开始压测时,可以正常对redis集群进行数据存取,但是暂停几分钟后,接着继续用jmeter进行压测时,发现redis就开始突然疯 ...
- 使用C# (.NET Core) 实现模板方法模式 (Template Method Pattern)
本文的概念内容来自深入浅出设计模式一书. 项目需求 有一家咖啡店, 供应咖啡和茶, 它们的工序如下: 咖啡: 茶: 可以看到咖啡和茶的制作工序是差不多的, 都是有4步, 其中有两步它们两个是一样的, ...
- mybatis-plus的Could not set property 'updateDate' of 'class com.example.pojo.User' with value 'Fri Jul 24 10:29:39 CST 2020' Cause: java.lang.IllegalArgumentException: argument type mismatch解决方案
按照官网在写mybatis-plus的自动填充功能一直报错,发现官网的解说不全,数据库是datetime类型,java程序又是date,类型不匹配 org.mybatis.spring.MyBatis ...
- 自学PHP笔记(三) 类型转换
本文转发来自:https://blog.csdn.net/KH_FC/article/details/115558701 在真正使用PHP写项目时会经常用到不同数据类型之间进行转换,PHP中类型转换是 ...
- day-08-文件管理
文件的操作的初识 利用python代码写一个很low的软件,去操作文件. 文件路径:path 打开方式:读,写,追加,读写,写读...... 编码方式:utf-8,gbk ,gb2312...... ...
- 【剑指offer】8:跳台阶
题目描述: 一只青蛙一次可以跳上1级台阶,也可以跳上2级.求该青蛙跳上一个n级的台阶总共有多少种跳法(先后次序不同算不同的结果). 解题思路: 这种题目多为找规律求通用公式并最终用代码实现. 首先,考 ...
- [Python]import使用的疑难杂症与包管理
概念:模块与包 模块module:一般是以.py为后缀的文件,也包括.pyo..pyc..pyd..so和.dll后缀的文件,模块内定义了函数.类以及变量 包package:包是含有若干个模块的文件夹 ...
- 安全开发Java:日志注入,并没那么简单
摘要:当web工程比较大,历史代码较多时, 应当使用log4j2框架的能力来修改日志注入问题,而不是按照有些博文里写的逐个进化参数的方式. 案例故事 某个新系统上线了,小A在其中开发了个简单的登录模块 ...