
SIFT Learing records
花了一周的时间去读了一下SIFT的原论文,相关的一些视频还有文章,大体了解了其思想和步骤,在这里记录一下吧。
SIFT是一种提取图像中具有尺度不变性的关键点的算法。举个例子,一个鼠标,对其拍摄远端,近端两张照片,然后用SIFT分别提取这两张图片的关键点,然后计算特征点的描述符,用描述符进行匹配。类似的这些描述符也可以用于图像检索。
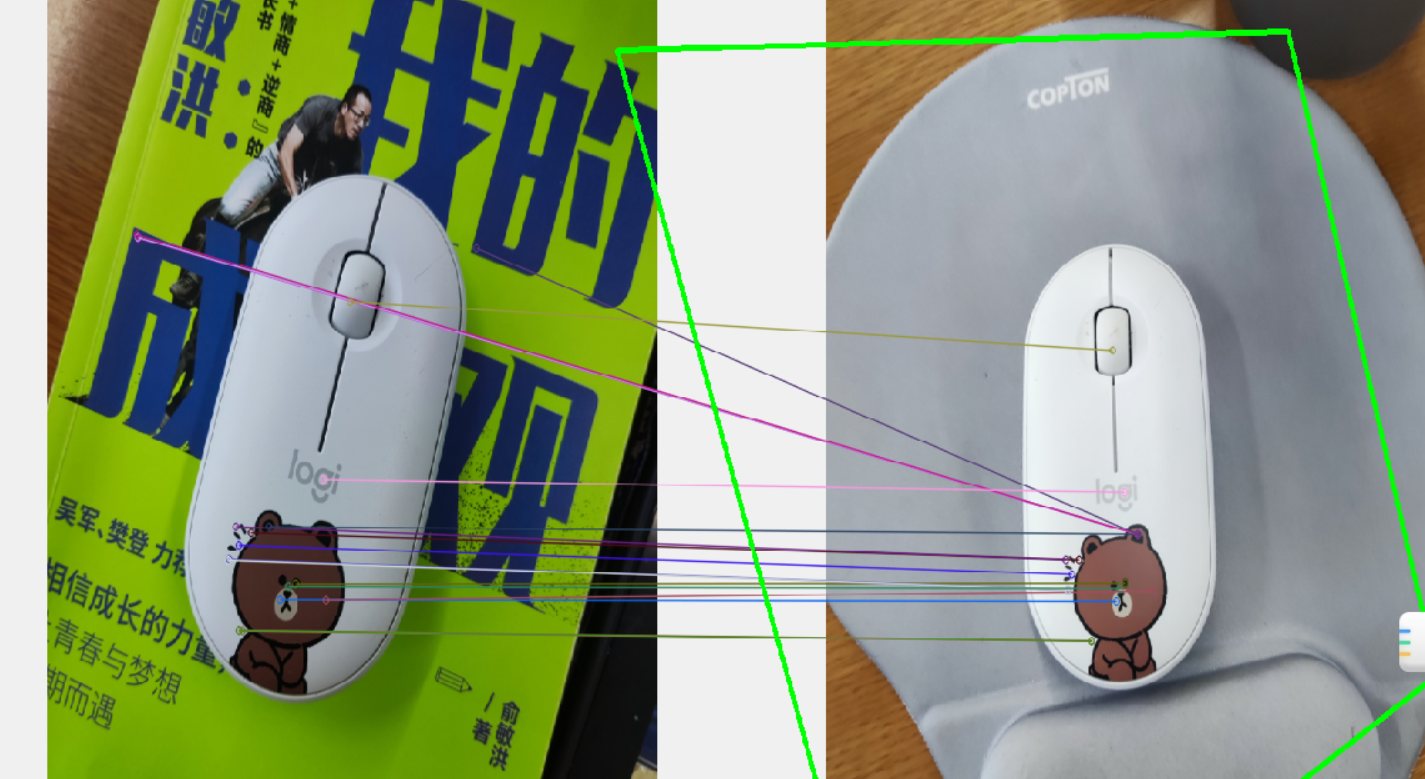
SIFT算法的步骤
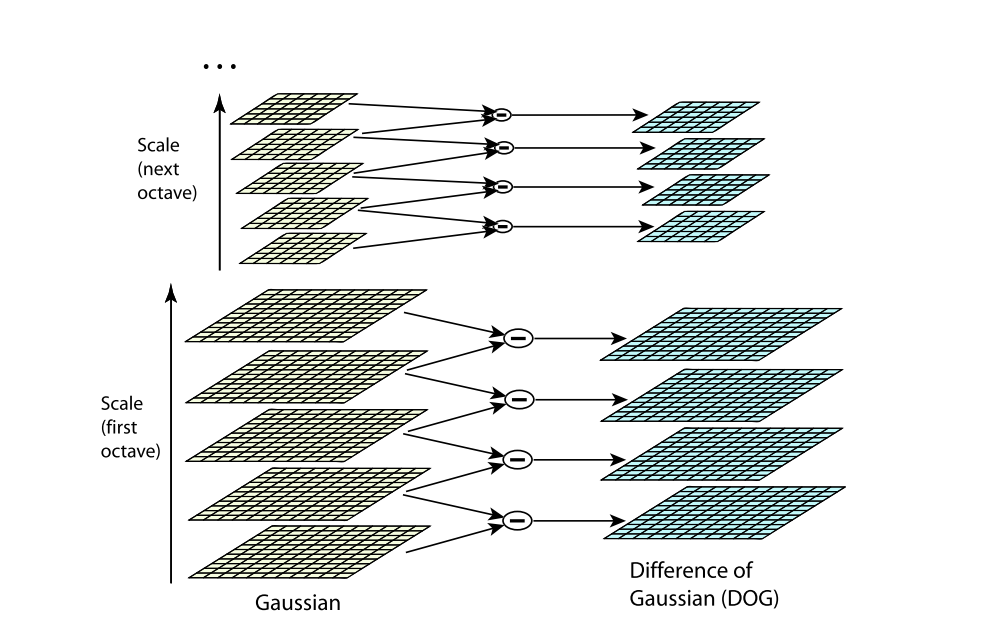
构建高斯差分金字塔,寻找可能的关键点。
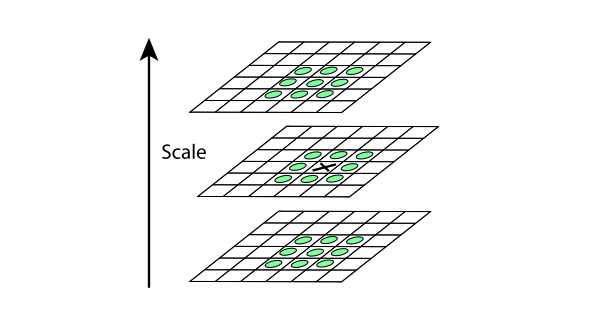
因为上一步找到的极值点都是离散的,不一定是真正的极值点,对此可以在检测到的极值点处做三元二阶泰勒展开,
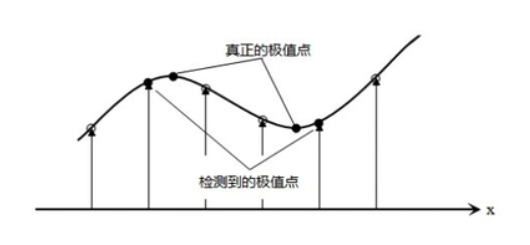
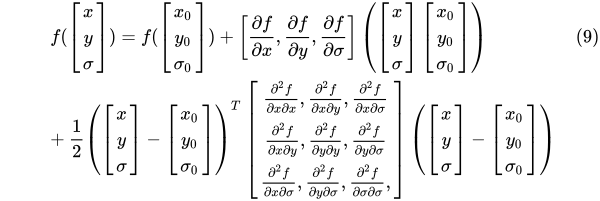
通过有限差分法求偏导,代入原方程,求导,并让方程等于零,我们可以得到极值点的偏移量为:

将(10)代入(9)可以得到对应的极值点:

同时舍去对比度低的点。

同时仅仅舍去对比度低的点,是不够的,又使用了一个Heesian 矩阵 来消除边缘效应。
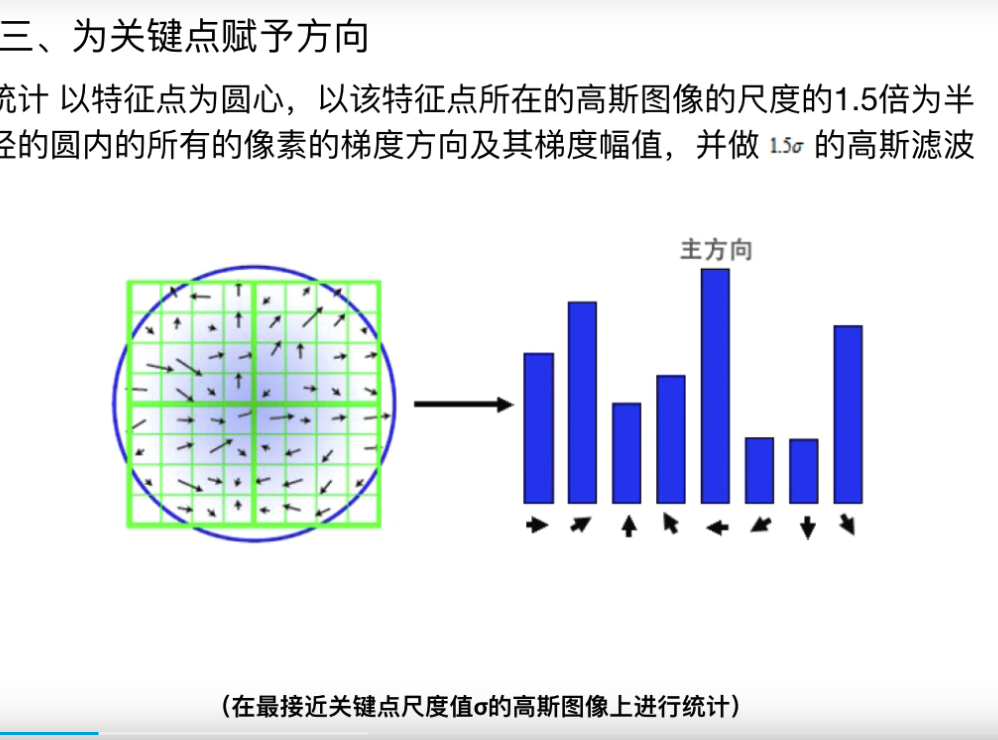
- 为关键点赋方向
构建关键点描述符
通过我们上边步骤,每个特征点被分配了坐标位置、尺度和方向。在图像局部区域内,这些参数可以重复的用来描述局部二维坐标系统,因为这些参数具有不变性。
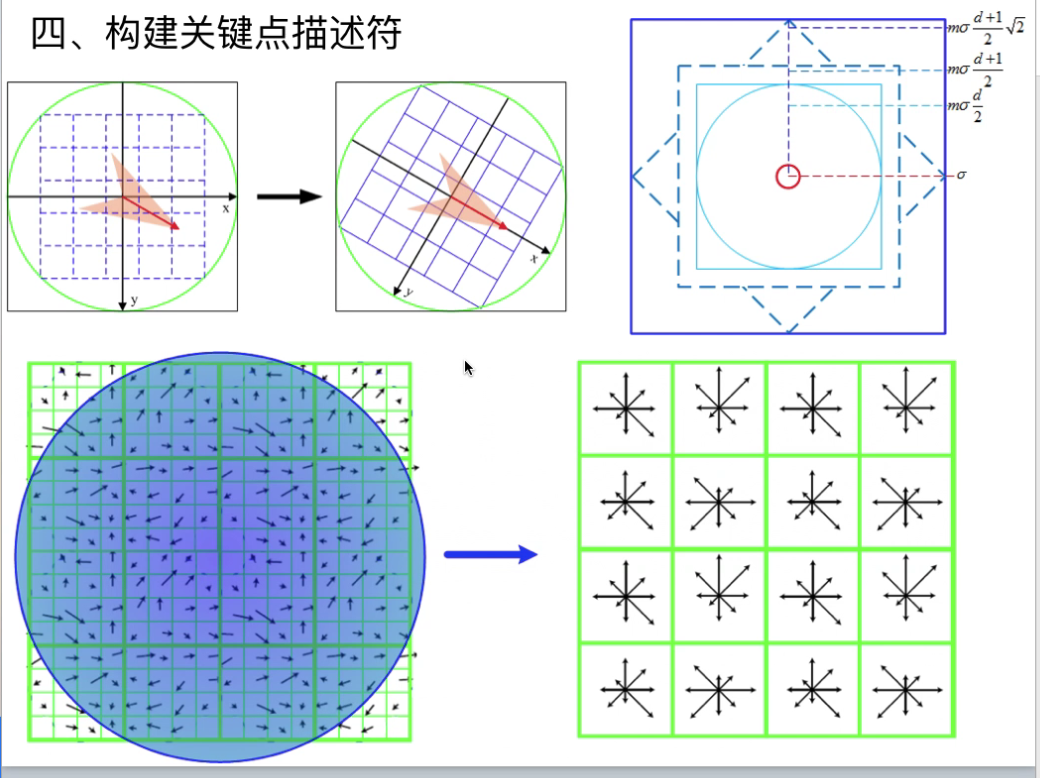
可以使用描述符进行关键点匹配。
小结
SIFI是真的难理解,刚开始去查阅了很多关于图像处理的基本知识,才能勉强理解每一步的作用。这个算法很经典,但是,整个研究过程真的挺难的,很多知识点论文中没有提到,论文本身又是英文写,读起来难免有些困难,限于自己目前的知识以及编程能力,仍有一些问题还没有想通,可能随着时间的推移,会有另一种层面的理解。
附录代码
from __future__ import print_function

import cv2 as cv

import numpy as np

import argparse

parser = argparse.ArgumentParser(description='Code for Feature Matching with FLANN tutorial.')

parser.add_argument('--input1', help='Path to input image 1.', default='mu.jpg')

parser.add_argument('--input2', help='Path to input image 2.', default='mo.jpg')

args = parser.parse_args()

img_object = cv.imread(args.input2)

img_scene = cv.imread(args.input1)

if img_object is None or img_scene is None:

    print('Could not open or find the images!')

    exit(0)

#-- Step 1: Detect the keypoints using SURF Detector, compute the descriptors

minHessian = 400

detector = cv.xfeatures2d_SURF.create(hessianThreshold=minHessian)

keypoints_obj, descriptors_obj = detector.detectAndCompute(img_object, None)

keypoints_scene, descriptors_scene = detector.detectAndCompute(img_scene, None)

#-- Step 2: Matching descriptor vectors with a FLANN based matcher

# Since SURF is a floating-point descriptor NORM_L2 is used

matcher = cv.DescriptorMatcher_create(cv.DescriptorMatcher_FLANNBASED)

knn_matches = matcher.knnMatch(descriptors_obj, descriptors_scene, 2)

#-- Filter matches using the Lowe's ratio test

ratio_thresh = 0.5

good_matches = []

for m,n in knn_matches:

    if m.distance < ratio_thresh * n.distance:

        good_matches.append(m)

#-- Draw matches

img_matches = np.empty((max(img_object.shape[0], img_scene.shape[0]), img_object.shape[1]+img_scene.shape[1], 3), dtype=np.uint8)

cv.drawMatches(img_object, keypoints_obj, img_scene, keypoints_scene, good_matches, img_matches, flags=cv.DrawMatchesFlags_NOT_DRAW_SINGLE_POINTS)

#-- Localize the object

obj = np.empty((len(good_matches),2), dtype=np.float32)

scene = np.empty((len(good_matches),2), dtype=np.float32)

for i in range(len(good_matches)):

    #-- Get the keypoints from the good matches

    obj[i,0] = keypoints_obj[good_matches[i].queryIdx].pt[0]

    obj[i,1] = keypoints_obj[good_matches[i].queryIdx].pt[1]

    scene[i,0] = keypoints_scene[good_matches[i].trainIdx].pt[0]

    scene[i,1] = keypoints_scene[good_matches[i].trainIdx].pt[1]

H, _ =  cv.findHomography(obj, scene, cv.RANSAC)

#-- Get the corners from the image_1 ( the object to be "detected" )

obj_corners = np.empty((4,1,2), dtype=np.float32)

obj_corners[0,0,0] = 0

obj_corners[0,0,1] = 0

obj_corners[1,0,0] = img_object.shape[1]

obj_corners[1,0,1] = 0

obj_corners[2,0,0] = img_object.shape[1]

obj_corners[2,0,1] = img_object.shape[0]

obj_corners[3,0,0] = 0

obj_corners[3,0,1] = img_object.shape[0]

scene_corners = cv.perspectiveTransform(obj_corners, H)

#-- Draw lines between the corners (the mapped object in the scene - image_2 )

cv.line(img_matches, (int(scene_corners[0,0,0] + img_object.shape[1]), int(scene_corners[0,0,1])),\

    (int(scene_corners[1,0,0] + img_object.shape[1]), int(scene_corners[1,0,1])), (0,255,0), 4)

cv.line(img_matches, (int(scene_corners[1,0,0] + img_object.shape[1]), int(scene_corners[1,0,1])),\

    (int(scene_corners[2,0,0] + img_object.shape[1]), int(scene_corners[2,0,1])), (0,255,0), 4)

cv.line(img_matches, (int(scene_corners[2,0,0] + img_object.shape[1]), int(scene_corners[2,0,1])),\

    (int(scene_corners[3,0,0] + img_object.shape[1]), int(scene_corners[3,0,1])), (0,255,0), 4)

cv.line(img_matches, (int(scene_corners[3,0,0] + img_object.shape[1]), int(scene_corners[3,0,1])),\

    (int(scene_corners[0,0,0] + img_object.shape[1]), int(scene_corners[0,0,1])), (0,255,0), 4)

#-- Show detected matches

cv.namedWindow("Good Matches & Object detection", 0)

cv.resizeWindow("Good Matches & Object detection", 1024, 1024)

cv.imshow('Good Matches & Object detection', img_matches)

cv.waitKey()
SIFT Learing records的更多相关文章
- 【特征匹配】SIFT原理之KD树+BBF算法解析
转载请注明出处:http://blog.csdn.net/luoshixian099/article/details/47606159 继上一篇中已经介绍了SIFT原理与C源代码剖析,最后得到了一系列 ...
- RobHess的SIFT代码解析之kd树
平台:win10 x64 +VS 2015专业版 +opencv-2.4.11 + gtk_-bundle_2.24.10_win32 主要参考:1.代码:RobHess的SIFT源码:SIFT+KD ...
- sift特征
已经有很多博客已经将sift特征提取算法解释的很清楚了,我只是记录一些我不明白的地方,并且记录几个理解sift特征比较好的博客. 1. http://aishack.in/tutorials/sift ...
- sift特征源码
先贴上我对Opencv3.1中sift源码的注释吧,虽然还有很多没看懂.先从detectAndCompute看起 void SIFT_Impl::detectAndCompute(InputArray ...
- opencv中的SIFT,SURF,ORB,FAST 特征描叙算子比较
opencv中的SIFT,SURF,ORB,FAST 特征描叙算子比较 参考: http://wenku.baidu.com/link?url=1aDYAJBCrrK-uk2w3sSNai7h52x_ ...
- 特征描述算子-sift
特征描述算子-sift http://boche.github.io/download/sift/Introduction%20to%20SIFT.pdf
- SIFT特征详解
1.SIFT概述 SIFT的全称是Scale Invariant Feature Transform,尺度不变特征变换,由加拿大教授David G.Lowe提出的.SIFT特征对旋转.尺度缩放.亮度变 ...
- mysql slow query---pt-query-digest----db structure consistency,monitor table records before and after transaction.
将数据库脚本纳入版本管理是很必要的,尤其对于需要在客户那里部署升级的系统. 对于Python Django等框架,由于数据库是通过Model生成的,因此框架本身包括数据库升级工具,并通过代码版本间接管 ...
- SIFT中的尺度空间和传统图像金字塔
SIFT中的尺度空间和传统图像金字塔 http://www.zhizhihu.com/html/y2010/2146.html 最近自己混淆了好多概念,一边弄明白的同时,也做了一些记录,分享一下.最近 ...
随机推荐
- 【LeetCode】188. Best Time to Buy and Sell Stock IV 解题报告(Python)
作者: 负雪明烛 id: fuxuemingzhu 个人博客: http://fuxuemingzhu.cn/ 目录 题目描述 题目大意 解题方法 日期 题目地址:https://leetcode.c ...
- P1753HackSon的趣味题
1 #include<stdio.h> 2 #include<algorithm> 3 #include<iostream> 4 #include<stdli ...
- HPU积分赛 2019.8.18
A题 给出n个数,问这n个数能不能分成奇数个连续的长度为奇数并且首尾均为奇数的序列 Codeforces849A 题解传送门 代码 1 #include <bits/stdc++.h> 2 ...
- Boost的反射库PFR
目录 目录 简介 使用方法 限制 总结 简介 Boost.PFR是一个Boost 1.75版本出的C++14的基础反射库,其使用非常简单,非常便捷,但是适用性也比较差,有很多的地方无法使用,适合比较简 ...
- Web 网站进化
01-初始阶段 应用程序.数据库.文件等所有资源都在一台服务器上 02-应用服务与数据服务分离 应用服务器 要处理大量的业务逻辑,所以需要更好更快更强大的 CPU 数据库服务器 需要快速的进行磁盘 ...
- A Tutorial on Energy-Based Learning
目录 概 主要内容 损失函数 Energy Loss Generalized Perceptron Loss Generalized Margin Loss Hinge Loss Log Loss L ...
- DP转LVDS方案 瑞奇达CS5211替代PS8625方案 CS5211芯片
PS8625将作为DP或eDP接收器设备出现在视频源中,并将作为LVDS显示面板的LVDS源设备.该设备是一个完全集成的解决方案,不需要外部CPU.内存.时钟基准或电压调节器.PS8625可配置为从显 ...
- Spring企业级程序设计 • 【第3章 面向切面编程】
全部章节 >>>> 本章目录 3.1 AOP基本概念和术语 3.1.1 AOP概念 3.1.2 AOP的术语解释 3.1.3 通知类型介绍 3.1.4 通过AOP模拟事务操 ...
- Hexo博客部署到腾讯云服务器全过程(Nginx,证书,HTTPS),你要的这里都有
背景 说来也惭愧,博客已经搭建很久了,一直免费的部署在 Coding 和 Github Pages 上,前者迁移到腾讯云 Serverless,导致原有的配置始终有问题,没时间仔细研究,刚好腾讯服务器 ...
- 抛砖系列之-MySQL中的数据类型JSON
今天介绍一个MySQL中的数据类型-JSON,相信大家对JSON都不陌生,在日常工作中使用到的频率也很高,话不多说,直接开始. 何谓JSON 看下RFC文档对于JSON的描述 1.基于 JavaScr ...