Dubbo直连方式改造
一、dubbo 服务化最佳实践
1. 分包
建议将服务接口、服务模型、服务异常等均放在公共包中
2. 粒度
服务接口尽可能大粒度,每个服务方法应代表一个功能,而不是某功能的一个步骤,否则将面临分布式事务问题,Dubbo 暂未提供分布式事务支持
服务接口建议以业务场景为单位划分,并对相近业务做抽象,防止接口数量爆炸
不建议使用过于抽象的通用接口,如:Map query(Map),这样的接口没有明确语义,会给后期维护带来不便
3. 版本
每个接口都应定义版本号,为后续不兼容升级提供可能,如: <dubbo:service interface="com.xxx.XxxService" version="1.0" />。
建议使用两位版本号,要变更服务版本。先升级一半提供者为新版本,再将消费者全部升为新版本,然后将剩下的一半提供者升为新版本
二、改造 dubbo 项目
抽象分散在多个项目中的公共接口,实体类,异常,工具类到一个项目中(比如:link-interface)
在其他项目如服务提供者,消费者共用公共的资源
三、link-interface
link-interface是一个maven Java工程
dubbo官方推荐使用的一个模式,将实体bean和业务接口存放到接口工程中
1. pom.xml
这只是一个java工程,这里不用改变
<?xml version="1.0" encoding="UTF-8"?>

<project xmlns="http://maven.apache.org/POM/4.0.0"

         xmlns:xsi="http://www.w3.org/2001/XMLSchema-instance"

         xsi:schemaLocation="http://maven.apache.org/POM/4.0.0 http://maven.apache.org/xsd/maven-4.0.0.xsd">

    <modelVersion>4.0.0</modelVersion>

    <groupId>com.md.dubbo</groupId>

    <artifactId>03-link-interface</artifactId>

    <version>1.0.0</version>

</project>
2. 实体类
package com.md.dubbo.model;

import java.io.Serializable;

/**

 * @author MD

 * @create 2020-08-19 10:40

 */

// 对于分布式开发,对象要进行序列化操作

public class User implements Serializable {

    private Integer id;

    private String username;

    public Integer getId() {

        return id;

    }

    public void setId(Integer id) {

        this.id = id;

    }

    public String getUsername() {

        return username;

    }

    public void setUsername(String username) {

        this.username = username;

    }

}
3. 公共接口
package com.md.dubbo.service;

import com.md.dubbo.model.User;

/**

 * @author MD

 * @create 2020-08-19 10:41

 */

public interface UserService {

    /**

     * 通过用户id获取用户信息

     * @param id

     * @return

     */

    User queryUserById(Integer id);

    /**

     * 获取用户总人数

     * @return

     */

    Integer queryAllUserCount();

}
四、提供者
建立maven web工程
1. pom.xml
注意引入接口工程的依赖
<?xml version="1.0" encoding="UTF-8"?>

<project xmlns="http://maven.apache.org/POM/4.0.0" xmlns:xsi="http://www.w3.org/2001/XMLSchema-instance"

  xsi:schemaLocation="http://maven.apache.org/POM/4.0.0 http://maven.apache.org/xsd/maven-4.0.0.xsd">

  <modelVersion>4.0.0</modelVersion>

  <groupId>com.md.dubbo</groupId>

  <artifactId>04-link-userservice-provider</artifactId>

  <version>1.0.0</version>

  <packaging>war</packaging>

  <properties>

    <project.build.sourceEncoding>UTF-8</project.build.sourceEncoding>

    <maven.compiler.source>1.8</maven.compiler.source>

    <maven.compiler.target>1.8</maven.compiler.target>

  </properties>

  <dependencies>

    <dependency>

      <groupId>junit</groupId>

      <artifactId>junit</artifactId>

      <version>4.11</version>

      <scope>test</scope>

    </dependency>

    <!--spring依赖-->

    <dependency>

      <groupId>org.springframework</groupId>

      <artifactId>spring-context</artifactId>

      <version>4.3.16.RELEASE</version>

    </dependency>

    <dependency>

      <groupId>org.springframework</groupId>

      <artifactId>spring-webmvc</artifactId>

      <version>4.3.16.RELEASE</version>

    </dependency>

    <!--dubbo依赖-->

    <dependency>

      <groupId>com.alibaba</groupId>

      <artifactId>dubbo</artifactId>

      <version>2.6.2</version>

    </dependency>

    <!--引入接口工程-->

    <dependency>

      <groupId>com.md.dubbo</groupId>

      <artifactId>03-link-interface</artifactId>

      <version>1.0.0</version>

    </dependency>

  </dependencies>

  <build>

  </build>

</project>
2. 接口实现
这里只是一个简单的模拟
package com.md.dubbo.service.impl;

import com.md.dubbo.model.User;

import com.md.dubbo.service.UserService;

/**

 * @author MD

 * @create 2020-08-19 10:48

 */

public class UserServiceImpl implements UserService {

    @Override

    public User queryUserById(Integer id) {

        User user = new User();

        user.setId(id);

        user.setUsername("山丘!");

        return user;

    }

    @Override

    public Integer queryAllUserCount() {

        return 9;

    }

}
3. 服务提供者的核心配置文件
在resources目录下建立dubbo-userservice-provider.xml文件
<?xml version="1.0" encoding="UTF-8"?>

<beans xmlns="http://www.springframework.org/schema/beans"

       xmlns:xsi="http://www.w3.org/2001/XMLSchema-instance" xmlns:dubbo="http://dubbo.apache.org/schema/dubbo"

       xsi:schemaLocation="http://www.springframework.org/schema/beans http://www.springframework.org/schema/beans/spring-beans.xsd http://dubbo.apache.org/schema/dubbo http://dubbo.apache.org/schema/dubbo/dubbo.xsd">

    <!--声明dubbo服务提供者名称:保证唯一性,通常用model名就可以-->

    <dubbo:application name="04-link-userservice-provider"/>

    <!--设置dubbo使用的协议和端口号-->

    <dubbo:protocol name="dubbo" port="20880"/>

    <!--暴露服务接口-->

    <dubbo:service interface="com.md.dubbo.service.UserService" ref="userService" registry="N/A"/>

    <!--加载业务接口的实现类到spring容器中-->

    <bean id="userService" class="com.md.dubbo.service.impl.UserServiceImpl"/>

</beans>
4. 添加监听器
在web.xml中
<?xml version="1.0" encoding="UTF-8"?>

<web-app xmlns="http://xmlns.jcp.org/xml/ns/javaee"

         xmlns:xsi="http://www.w3.org/2001/XMLSchema-instance"

         xsi:schemaLocation="http://xmlns.jcp.org/xml/ns/javaee http://xmlns.jcp.org/xml/ns/javaee/web-app_4_0.xsd"

         version="4.0">

<!--默认的版本低的话换成这个版本的,直接复制即可-->

  <context-param>

    <param-name>contextConfigLocation</param-name>

    <param-value>classpath:dubbo-userservice-provider.xml</param-value>

  </context-param>

  <listener>

    <listener-class>org.springframework.web.context.ContextLoaderListener</listener-class>

  </listener>

</web-app>
5. 配置Tomcat
端口号注意修改一下:避免冲突
HTTP port :8081
JMX port:1098
五、消费者
1. pom.xml
还是maven web项目
注意:添加了接口的依赖
<?xml version="1.0" encoding="UTF-8"?>

<project xmlns="http://maven.apache.org/POM/4.0.0" xmlns:xsi="http://www.w3.org/2001/XMLSchema-instance"

  xsi:schemaLocation="http://maven.apache.org/POM/4.0.0 http://maven.apache.org/xsd/maven-4.0.0.xsd">

  <modelVersion>4.0.0</modelVersion>

  <groupId>com.md.dubbo</groupId>

  <artifactId>05-link-consumer</artifactId>

  <version>1.0.0</version>

  <packaging>war</packaging>

  <properties>

    <project.build.sourceEncoding>UTF-8</project.build.sourceEncoding>

    <maven.compiler.source>1.8</maven.compiler.source>

    <maven.compiler.target>1.8</maven.compiler.target>

  </properties>

  <dependencies>

    <dependency>

      <groupId>junit</groupId>

      <artifactId>junit</artifactId>

      <version>4.11</version>

      <scope>test</scope>

    </dependency>

    <!--spring依赖-->

    <dependency>

      <groupId>org.springframework</groupId>

      <artifactId>spring-context</artifactId>

      <version>4.3.16.RELEASE</version>

    </dependency>

    <dependency>

      <groupId>org.springframework</groupId>

      <artifactId>spring-webmvc</artifactId>

      <version>4.3.16.RELEASE</version>

    </dependency>

    <!--dubbo依赖-->

    <dependency>

      <groupId>com.alibaba</groupId>

      <artifactId>dubbo</artifactId>

      <version>2.6.2</version>

    </dependency>

    <!--接口工程-->

    <!--此时不像之前的还得打jar包,这里不用,03是普通的java工程,只提供接口-->

    <dependency>

      <groupId>com.md.dubbo</groupId>

      <artifactId>03-link-interface</artifactId>

      <version>1.0.0</version>

    </dependency>

  </dependencies>

  <build>

  </build>

</project>
2. 服务消费者的核心配置文件
在resources目录下建立dubbo-consumer.xml文件
<?xml version="1.0" encoding="UTF-8"?>

<beans xmlns="http://www.springframework.org/schema/beans"

       xmlns:xsi="http://www.w3.org/2001/XMLSchema-instance" xmlns:dubbo="http://dubbo.apache.org/schema/dubbo"

       xsi:schemaLocation="http://www.springframework.org/schema/beans http://www.springframework.org/schema/beans/spring-beans.xsd http://dubbo.apache.org/schema/dubbo http://dubbo.apache.org/schema/dubbo/dubbo.xsd">

    <!--声明服务消费着名称:唯一-->

    <dubbo:application name="05-link-consumer"/>

    <!--引用远程接口服务-->

    <dubbo:reference id="userService" interface="com.md.dubbo.service.UserService"

                     url="dubbo://localhost:20880"

                     registry="N/A"/>

</beans>
3. controller
package com.md.dubbo.web;

import com.md.dubbo.model.User;

import com.md.dubbo.service.UserService;

import org.springframework.beans.factory.annotation.Autowired;

import org.springframework.stereotype.Controller;

import org.springframework.ui.Model;

import org.springframework.web.bind.annotation.RequestMapping;

/**

 * @author MD

 * @create 2020-08-19 11:11

 */

@Controller

public class UserController {

    @Autowired

    private UserService userService;

    @RequestMapping(value = "/userDetail")

    public String userDetail(Model model , Integer id){

        // 根据id获取用户信息

        User user = userService.queryUserById(id);

        // 获取用户总人数

        Integer allUserCount = userService.queryAllUserCount();

        model.addAttribute("user",user);

        model.addAttribute("allUserCount",allUserCount);

        return "userDetail";

    }

}
4. applicationContext.xml
在resources目录下创建spring配置文件
<?xml version="1.0" encoding="UTF-8"?>

<beans xmlns="http://www.springframework.org/schema/beans"

       xmlns:xsi="http://www.w3.org/2001/XMLSchema-instance"

       xmlns:context="http://www.springframework.org/schema/context"

       xmlns:mvc="http://www.springframework.org/schema/mvc"

       xsi:schemaLocation="http://www.springframework.org/schema/beans http://www.springframework.org/schema/beans/spring-beans.xsd http://www.springframework.org/schema/context http://www.springframework.org/schema/context/spring-context.xsd http://www.springframework.org/schema/mvc http://www.springframework.org/schema/mvc/spring-mvc.xsd">

    <!--扫描组件-->

    <context:component-scan base-package="com.md.dubbo.web"/>

    <!--配置注解驱动-->

    <mvc:annotation-driven/>

    <bean class="org.springframework.web.servlet.view.InternalResourceViewResolver">

        <property name="prefix" value="/"/>

        <property name="suffix" value=".jsp"/>

    </bean>

</beans>
5. 配置中央调度器
在web.xml中
<?xml version="1.0" encoding="UTF-8"?>

<web-app xmlns="http://xmlns.jcp.org/xml/ns/javaee"

         xmlns:xsi="http://www.w3.org/2001/XMLSchema-instance"

         xsi:schemaLocation="http://xmlns.jcp.org/xml/ns/javaee http://xmlns.jcp.org/xml/ns/javaee/web-app_4_0.xsd"

         version="4.0">

  <!--中央调度器-->

  <servlet>

    <servlet-name>dispatcherServlet</servlet-name>

    <servlet-class>org.springframework.web.servlet.DispatcherServlet</servlet-class>

    <init-param>

      <param-name>contextConfigLocation</param-name>

      <param-value>classpath:applicationContext.xml,classpath:dubbo-consumer.xml</param-value>

    </init-param>

  </servlet>

  <servlet-mapping>

    <servlet-name>dispatcherServlet</servlet-name>

    <url-pattern>/</url-pattern>

  </servlet-mapping>

</web-app>
6. 配置Tomcat
此时使用默认的就可以了
7. 配置测试页面
在webapp下 建立userDetail.jsp
<%--
Created by IntelliJ IDEA.
User: MD
Date: 2020/8/19
Time: 11:16
To change this template use File | Settings | File Templates.
--%>
<%@ page contentType="text/html;charset=UTF-8" language="java" %>
<html>
<head>
<title>Title</title>
</head>
<body>
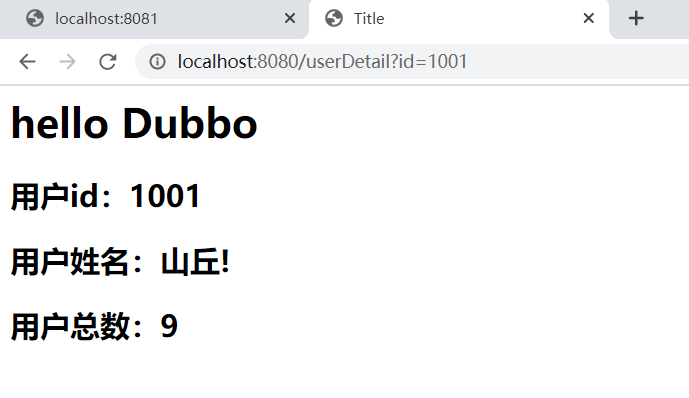
<h1>hello Dubbo</h1>
<h2>用户id:${user.id}</h2>
<h2>用户姓名:${user.username}</h2>
<h2>用户总数:${allUserCount}</h2>
</body>
</html>
8. 测试
- 首先开服务提供者的Tomcat
- 然后开服务消费者的Tomcat
- 然后在地址栏输入,就可以看到了
Dubbo直连方式改造的更多相关文章
- Dubbo直连方式
目录 一.dubbo概述 1. 基本架构 2. dubbo 支持的协议 二.直连方法 三.创建服务提供者 1. 思路 1. 创建maven web 2. pom.xml 3. 创建实体 4. 创建服务 ...
- dubbo直连提供者 & 只订阅 & 只注册
1. dubbo直连提供者 在开发及测试环境下,经常需要绕过注册中心,只测试指定服务提供者,这时候可能需要点对点直连,点对点直连方式,将以服务接口为单位,忽略注册中心的提供者列表,A 接口配置点 ...
- 企业级SpringBoot与Dubbo的使用方式
企业级SpringBoot与Dubbo的使用方式 SpringBoot越来越热门以至于达到满大街可见的程度,而Dubbo这个基于二进制的微服务框架又捐献给Apache孵化,如果不会如何使用那么是不是很 ...
- 以芯片直读方式得到的全盘镜像解析及ext4日志区域解析
之前在centos中分析了/dev/sda1下的结构,但当对象是一块以芯片直读方式作出来的全盘镜像呢? 这次以安卓手机的全盘镜像为对象,尝试按照ext4文件系统结构手动解析,加强对ext4文件系统.E ...
- kafka直连方式消费多个topic
一个消费者组可以消费多个topic,以前写过一篇一个消费者消费一个topic的,这次的是一个消费者组通过直连方式消费多个topic,做了小测试,结果是正确的,通过查看zookeeper的客户端,zoo ...
- SparkStreaming直连方式读取kafka数据,使用MySQL保存偏移量
SparkStreaming直连方式读取kafka数据,使用MySQL保存偏移量 1. ScalikeJDBC 2.配置文件 3.导入依赖的jar包 4.源码测试 通过MySQL保存kafka的偏移量 ...
- 遇到的问题之“Dubbo 直连 Invoke remote method timeout 问题!”
Dubbo 直连 Invoke remote method timeout 问题! 在测试环境消费者直连服务端进行测试时, 其中一个RPC接口抛出一个错误, 如下: Caused by: com. ...
- dubbo直连代码示例
我们都知道dubbo是个分布式的RPC工具,等以后有时间能力允许的话,会好好写下dubbo,当在测试环境我们联调或想指定机器执行之时,是不需要ZK这类调度工具的,当然dubbo也提供了配置的解决方案, ...
- 基于dubbo的SOA项目改造
工程改造: 1.原来工程删除掉表现层的模块,将表现层独立出来. 2.将原来的工程改造.将service的打包方式改为改为war. 3.在service模块中添加web.xml文件 4.在web.xml ...
随机推荐
- ImportError: /lib64/libm.so.6: version `CXXAB_1.3.8.' not found (required by /usr/local/python37/lib/python3.7/site-packages/tensorflow/python/_pywrap_tensorflow_internal.so)
问题背景 使用在AI项目中,由于需要用到tensorflow,scipy,sklearn等这些库,所以需要libstdc++库. 问题原因 这个问题的出现与写的代码无关,只与操作系统的libstdc+ ...
- Fortify Audit Workbench 笔记索引
Password Management: Password in Configuration File(明文存储密码) https://www.cnblogs.com/mahongbiao/p/124 ...
- activiti7 获取流程定义的xml
RepositoryService repositoryService = ProcessEngines.getDefaultProcessEngine().getRepositoryService( ...
- ElasticJob和SpringBoot
本文以在SpringBoot下集成ElasticJob的方式对其进行浅析,仅仅是简单使用,不涉及源码级别研究. 事先必备: 注册中心——zookeeper 简略结构: 代码目录结构: ├─.idea ...
- 3-Pandas之Series和DataFrame区别
一.Pandas pandas的数据元素包括以下几种类型: 类型 说明 object 字符串或混合类型 int 整型 float 浮点型 datetime 时间类型 bool 布尔型 二.Series ...
- PHP date_isodate_set() 函数
------------恢复内容开始------------ 实例 设置 2013 年第 5 周的 ISO 日期: <?php$date=date_create();date_isodate_s ...
- 区块链钱包开发 - USDT - 三、实战(nodejs版本)
一.安装钱包 请参考另一篇随笔: 入口 二.获取测试usdt(TestOmni)步骤: 1.导入地址到钱包,往该地址充值测试比特币, 2.然后往 moneyqMan7uh8FqdCA2BV5yZ8qV ...
- Spring异常总结
1. Caused by: org.springframework.beans.factory.NoSuchBeanDefinitionException: No qualifying bean o ...
- HiddenHttpMethodFilter进行请求过滤
基于 HiddentHttpMethodFilter 的示例 作用: 由于浏览器 form 表单只支持 GET 与 POST 请求,而 DELETE.PUT 等 method 并不支持,Spring3 ...
- sql developer连接mysql数据库
1 首先打开sql developer ,选择上方菜单,工具(tools)--->首选项,如下图 2 数据库(database)--->第三方 JDBC驱动程序 ; “添加条目”,选择m ...