shiro认证流程源码分析--练气初期
写在前面
在上一篇文章当中,我们通过一个简单的例子,简单地认识了一下shiro。在这篇文章当中,我们将通过阅读源码的方式了解shiro的认证流程。
建议大家边读文章边动手调试代码,这样效果会更好。
认证异常分析
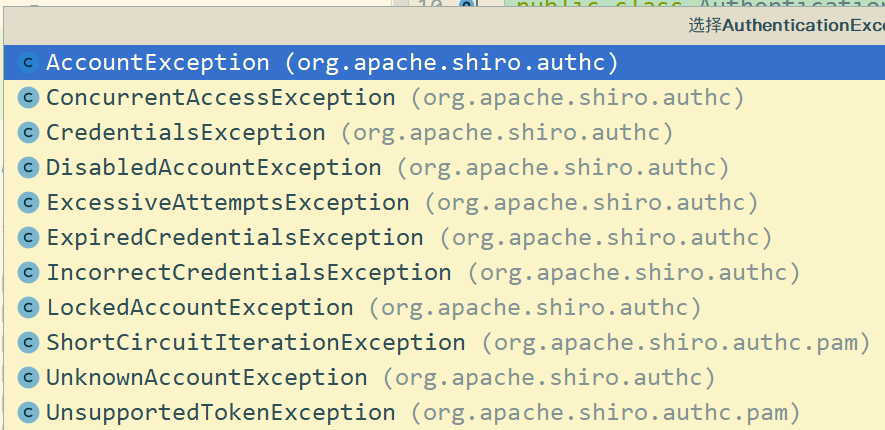
shiro中的异常主要分为两类,一类是AuthenticationException认证异常,一类是AuthorizationException权限异常。分别对应http响应状态码中的401和403
认证异常AuthenticationException子类
权限异常AuthorizationException子类

当认证不通过时将根据具体情况抛出AuthenticationException的子类,当鉴权不通过时将会抛出AuthorizationException的子类。
我们通过检验shiro是否抛出异常,从而判断登录对象是否通过认证、是否具备相关保护资源的访问权限。
这也是我们在上一节的例子中,需要捕获相关异常的原因。
接下来,我们通过阅读源码的方式来分析一下shiro框架的认证流程。
认证流程分析
/**认证器
* @author 赖柄沣 bingfengdev@aliyun.com
* @version 1.0
* @date 2020/9/21 0:50
*/
public class Authenticator {
private DefaultSecurityManager securityManager;
public Authenticator(){
//1. 创建安全管理器
this.securityManager = new DefaultSecurityManager();
//2. 给安全管理器设置问题域
//因为权限信息从ini文件中读取,所以是IniRealm
this.securityManager.setRealm(new IniRealm("classpath:shiro.ini"));
//3. 注入安全管理器,并使用SecurityUtils全局安全工具类完成认证
SecurityUtils.setSecurityManager(securityManager);
}
/**认证
* @author 赖柄沣 bingfengdev@aliyun.com
* @date 2020-09-23 16:22:11
* @param username 用户名
* @param password 密码
* @return void
* @version 1.0
*/
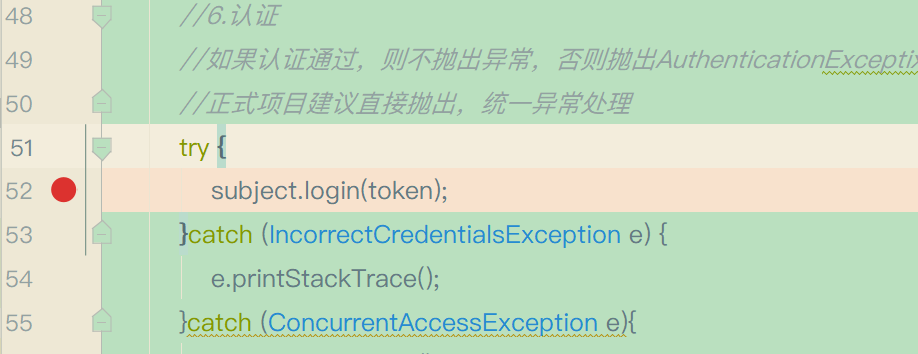
public void authenticate(String username,String password){
//4. 获取当前主题
Subject subject = SecurityUtils.getSubject();
//5.根据登录对象身份凭证信息创建登录令牌
UsernamePasswordToken token = new UsernamePasswordToken(username,password);
//6.认证
//如果认证通过,则不抛出异常,否则抛出AuthenticationExceptixon异常子类
//正式项目建议直接抛出,统一异常处理
try {
subject.login(token);
}catch (IncorrectCredentialsException e) {
e.printStackTrace();
}catch (ConcurrentAccessException e){
e.printStackTrace();
}catch (UnknownAccountException e){
e.printStackTrace();
}catch (ExcessiveAttemptsException e){
e.printStackTrace();
}catch (ExpiredCredentialsException e){
e.printStackTrace();
}catch (LockedAccountException e){
e.printStackTrace();
}
}
}
这是上一个例子当中的认证器的代码。 我们在上述代码的44行,shiro认证的入口处打个断点,以便跟踪其认证流程。
然后在idea中以debug的形式启动程序。
DelegatingSubject
login()方法
我们发现我们进入了DelegatingSubject.login方法当中;
public class DelegatingSubject implements Subject {

    //省略了其他不影响理解的代码

      public void login(AuthenticationToken token) throws AuthenticationException {

        this.clearRunAsIdentitiesInternal();

          // 1. 真正做认证的还是securityManager对象

        Subject subject = this.securityManager.login(this, token);

        String host = null;

        PrincipalCollection principals;

        if (subject instanceof DelegatingSubject) {

            DelegatingSubject delegating = (DelegatingSubject)subject;

            principals = delegating.principals;

            host = delegating.host;

        } else {

            principals = subject.getPrincipals();

        }

        if (principals != null && !principals.isEmpty()) {

            this.principals = principals;

            this.authenticated = true;

            if (token instanceof HostAuthenticationToken) {

                host = ((HostAuthenticationToken)token).getHost();

            }

            if (host != null) {

                this.host = host;

            }

            Session session = subject.getSession(false);

            if (session != null) {

                this.session = this.decorate(session);

            } else {

                this.session = null;

            }

        } else {

            String msg = "Principals returned from securityManager.login( token ) returned a null or empty value.  This value must be non null and populated with one or more elements.";

            throw new IllegalStateException(msg);

        }

    }

}
从上面的源码中我们发现,虽然我们调用了Subject对象的认证方法,但是,真正的认证操作还是由安全管理器对象securityManager执行。
DefaultSecurityManager
login() 方法
接着,我们进入到securityManager的login方法当中去。
public class DefaultSecurityManager extends SessionsSecurityManager {

    //省略了其他无关代码

    public Subject login(Subject subject, AuthenticationToken token) throws AuthenticationException {

        AuthenticationInfo info;

        try {

            //调用认证方法

            info = this.authenticate(token);

        } catch (AuthenticationException var7) {

            AuthenticationException ae = var7;

            try {

                this.onFailedLogin(token, ae, subject);

            } catch (Exception var6) {

                if (log.isInfoEnabled()) {

                    log.info("onFailedLogin method threw an exception.  Logging and propagating original AuthenticationException.", var6);

                }

            }

            throw var7;

        }

        Subject loggedIn = this.createSubject(token, info, subject);

        this.onSuccessfulLogin(token, info, loggedIn);

        return loggedIn;

    }

}
AuthenticatingSecurityManager
authenticate()方法
当我们进入到authenticate方法中时,发现他是AuthenticatingSecurityManager的方法
public abstract class AuthenticatingSecurityManager extends RealmSecurityManager {

//省略了其他无关代码

public AuthenticationInfo authenticate(AuthenticationToken token) throws AuthenticationException {

    return this.authenticator.authenticate(token);

    }

}
AbstractAuthenticator
authenticate()方法
接着,他又调用了authenticator对象的authenticate方法
public abstract class AbstractAuthenticator implements Authenticator, LogoutAware {

    //省略了其他无关方法

     public final AuthenticationInfo authenticate(AuthenticationToken token) throws AuthenticationException {

        if (token == null) {

            throw new IllegalArgumentException("Method argument (authentication token) cannot be null.");

        } else {

            log.trace("Authentication attempt received for token [{}]", token);

            AuthenticationInfo info;

            try {

                info = this.doAuthenticate(token);

                if (info == null) {

                    String msg = "No account information found for authentication token [" + token + "] by this Authenticator instance.  Please check that it is configured correctly.";

                    throw new AuthenticationException(msg);

                }

            } catch (Throwable var8) {

                AuthenticationException ae = null;

                if (var8 instanceof AuthenticationException) {

                    ae = (AuthenticationException)var8;

                }

                if (ae == null) {

                    String msg = "Authentication failed for token submission [" + token + "].  Possible unexpected error? (Typical or expected login exceptions should extend from AuthenticationException).";

                    ae = new AuthenticationException(msg, var8);

                    if (log.isWarnEnabled()) {

                        log.warn(msg, var8);

                    }

                }

                try {

                    this.notifyFailure(token, ae);

                } catch (Throwable var7) {

                    if (log.isWarnEnabled()) {

                        String msg = "Unable to send notification for failed authentication attempt - listener error?.  Please check your AuthenticationListener implementation(s).  Logging sending exception and propagating original AuthenticationException instead...";

                        log.warn(msg, var7);

                    }

                }

                throw ae;

            }

            log.debug("Authentication successful for token [{}].  Returned account [{}]", token, info);

            this.notifySuccess(token, info);

            return info;

        }

    }

}
ModularRealmAuthenticator
doAuthenticate()方法
紧接着进入到了ModularRealmAuthenticator认证器对象的doAuthenticate方法
public class ModularRealmAuthenticator extends AbstractAuthenticator {

    protected AuthenticationInfo doAuthenticate(AuthenticationToken authenticationToken) throws AuthenticationException {

        this.assertRealmsConfigured();

        Collection<Realm> realms = this.getRealms();

        return realms.size() == 1 ?

 /**终于到了真正的认证逻辑*/            	this.doSingleRealmAuthentication((Realm)realms.iterator().next(), authenticationToken) : this.doMultiRealmAuthentication(realms, authenticationToken);

    }

}
在这一步当中,在检验我们的Realms对象创建后,开始进入到doSingleRealmAuthentication方法当中进行认证操作
doSingleRealmAuthentication()方法
protected AuthenticationInfo doSingleRealmAuthentication(Realm realm, AuthenticationToken token) {

        if (!realm.supports(token)) {

            String msg = "Realm [" + realm + "] does not support authentication token [" + token + "].  Please ensure that the appropriate Realm implementation is configured correctly or that the realm accepts AuthenticationTokens of this type.";

            throw new UnsupportedTokenException(msg);

        } else {

            //获取认证信息

            AuthenticationInfo info = realm.getAuthenticationInfo(token);

            if (info == null) {

                String msg = "Realm [" + realm + "] was unable to find account data for the submitted AuthenticationToken [" + token + "].";

                throw new UnknownAccountException(msg);

            } else {

                return info;

            }

        }

    }
AuthenticatingRealm
getAuthenticationInfo()方法
在这一步当中开始根据我们传入的令牌获取认证信息
public abstract class AuthenticatingRealm extends CachingRealm implements Initializable {

    public final AuthenticationInfo getAuthenticationInfo(AuthenticationToken token) throws AuthenticationException {

        // 首先从缓存中获取

        AuthenticationInfo info = this.getCachedAuthenticationInfo(token);

        if (info == null) {

            //缓存中没有,则从持久化数据中获取

            info = this.doGetAuthenticationInfo(token);

            log.debug("Looked up AuthenticationInfo [{}] from doGetAuthenticationInfo", info);

            if (token != null && info != null) {

                this.cacheAuthenticationInfoIfPossible(token, info);

            }

        } else {

            log.debug("Using cached authentication info [{}] to perform credentials matching.", info);

        }

        if (info != null) {

            this.assertCredentialsMatch(token, info);

        } else {

            log.debug("No AuthenticationInfo found for submitted AuthenticationToken [{}].  Returning null.", token);

        }

        return info;

    }

}
SimpleAccountRealm
doGetAuthenticationInfo()方法
从持久化数据源中获取登录对象信息
public class SimpleAccountRealm extends AuthorizingRealm {

protected AuthenticationInfo doGetAuthenticationInfo(AuthenticationToken token) throws AuthenticationException {

    UsernamePasswordToken upToken = (UsernamePasswordToken)token;

    //根据用户名查询账户信息

    SimpleAccount account = this.getUser(upToken.getUsername());

    //如果查询到了账户信息

    if (account != null) {

        //开始判断账户状态

        if (account.isLocked()) {

            throw new LockedAccountException("Account [" + account + "] is locked.");

        }

        if (account.isCredentialsExpired()) {

            String msg = "The credentials for account [" + account + "] are expired";

            throw new ExpiredCredentialsException(msg);

        }

    }

    return account;

}

}
在这里,便完成了对用户名的校验。
AuthenticatingRealm
接下来,我们获取到了账户信息并返回到了AuthenticatingRealm的getAuthenticationInfo方法。
在这个方法中有如下几行代码,在第二行中,调用assertCredentialsMatch方法开始校验用户凭证
if (info != null) {

    this.assertCredentialsMatch(token, info);

} else {

    log.debug("No AuthenticationInfo found for submitted AuthenticationToken [{}].  Returning null.", token);

}
assertCredentialsMatch()方法
protected void assertCredentialsMatch(AuthenticationToken token, AuthenticationInfo info) throws AuthenticationException {

    //获取凭证匹配器对象

    CredentialsMatcher cm = this.getCredentialsMatcher();

    if (cm != null) {

        if (!cm.doCredentialsMatch(token, info)) {

            String msg = "Submitted credentials for token [" + token + "] did not match the expected credentials.";

            throw new IncorrectCredentialsException(msg);

        }

    } else {

        throw new AuthenticationException("A CredentialsMatcher must be configured in order to verify credentials during authentication.  If you do not wish for credentials to be examined, you can configure an " + AllowAllCredentialsMatcher.class.getName() + " instance.");

    }

}
在这里完成对用户凭证的校验。真正的比较逻辑则在SimpleCredentialsMatcher的equals方法中完成。里面还会区分加密和不加密的情况,具体请查看源码。
分析到这一步我们可以发现,SimpleAccountRealm继承了AuthorizingRealm类实现doGetAuthenticationInfo方法完成账户信息查询并校验,并将结果返回给AuthorizingRealm。AuthorizingRealm帮SimpleAccountRealm完成对用户凭证的校验。
那么,如果我们需要从数据库当中获取账户信息,应该怎么将账户信息传给shiro进行验证呢?这个问题留给大家思考一下,我将在下一篇文章当中为大家解答。
写在最后
在这篇文章当中,我们通过断点调试,阅读源码的方式弄清楚了shiro的认证流程。我们拆开他的层层封装,发现在SimpleAccountRealm对象中的doGetAuthenticationInfo方法中完成账户验证,在AuthenticatingRealm的assertCredentialsMatch完成对用户凭证的校验。
在下一篇文章当中,我们将学习如何使用数据库信息完成认证和授权。
shiro认证流程源码分析--练气初期的更多相关文章
- [Android]Android系统启动流程源码分析
以下内容为原创,欢迎转载,转载请注明 来自天天博客:http://www.cnblogs.com/tiantianbyconan/p/5013863.html Android系统启动流程源码分析 首先 ...
- [Android]从Launcher开始启动App流程源码分析
以下内容为原创,欢迎转载,转载请注明 来自天天博客:http://www.cnblogs.com/tiantianbyconan/p/5017056.html 从Launcher开始启动App流程源码 ...
- Spring加载流程源码分析03【refresh】
前面两篇文章分析了super(this)和setConfigLocations(configLocations)的源代码,本文来分析下refresh的源码, Spring加载流程源码分析01[su ...
- Android笔记--View绘制流程源码分析(二)
Android笔记--View绘制流程源码分析二 通过上一篇View绘制流程源码分析一可以知晓整个绘制流程之前,在activity启动过程中: Window的建立(activit.attach生成), ...
- Android笔记--View绘制流程源码分析(一)
Android笔记--View绘制流程源码分析 View绘制之前框架流程分析 View绘制的分析始终是离不开Activity及其内部的Window的.在Activity的源码启动流程中,一并包含 着A ...
- Spark(五十一):Spark On YARN(Yarn-Cluster模式)启动流程源码分析(二)
上篇<Spark(四十九):Spark On YARN启动流程源码分析(一)>我们讲到启动SparkContext初始化,ApplicationMaster启动资源中,讲解的内容明显不完整 ...
- Spark(四十九):Spark On YARN启动流程源码分析(一)
引导: 该篇章主要讲解执行spark-submit.sh提交到将任务提交给Yarn阶段代码分析. spark-submit的入口函数 一般提交一个spark作业的方式采用spark-submit来提交 ...
- spring boot 加载web容器tomcat流程源码分析
spring boot 加载web容器tomcat流程源码分析 我本地的springboot版本是2.5.1,后面的分析都是基于这个版本 <parent> <groupId>o ...
- springboot 事务创建流程源码分析
springboot 事务创建流程源码分析 目录 springboot 事务创建流程源码分析 1. 自动加载配置 2. InfrastructureAdvisorAutoProxyCreator类 3 ...
随机推荐
- mysql 安装卸载自动化脚本
#!/bin/sh #mkdir /root/mysql #tar -xvf mysql-5.7.-.el7.x86_64.rpm-bundle.tar -C /root/mysql #cd /roo ...
- Spring Security如何优雅的增加OAuth2协议授权模式
一.什么是OAuth2协议? OAuth 2.0 是一个关于授权的开放的网络协议,是目前最流行的授权机制. 数据的所有者告诉系统,同意授权第三方应用进入系统,获取这些数据.系统从而产生一个短期的进入令 ...
- Currency Exchange(SPFA判负环)
Several currency exchange points are working in our city. Let us suppose that each point specializes ...
- Codeforces Round #560 (Div. 3)A-E
A. Remainder output standard output You are given a huge decimal number consisting of nn digits. It ...
- 启动oracle11监听器错误
启动oracle11监听器错误:本地计算机上的OracleOraDb11g_home1TNSListener服务启动后又停止了解决方案 . 关键字:启动oracle10监听器错误:本地计算机上的Ora ...
- vue-cli3项目配置eslint代码规范
前言 最近接手了一个项目,由于之前为了快速开发,没有做代码检查.为了使得代码更加规范以及更易读,所以就要eslint上场了. 安装依赖 安装依赖有两种方法: 1. 在cmd中打上把相应的依赖加到dev ...
- idea报错cannot resolve symbol servlet
解决方法:在project structure中导入包.该包在tomcat安装目录的lib文件夹.导入之后点击Apply.
- nodeJS 下载与安装,环境配置
1.什么是nodeJs: 简单的说 Node.js 就是运行在服务端的 JavaScript. Node.js 是一个基于Chrome JavaScript 运行时建立的一个平台. Node.js是一 ...
- opentracting+jager分布式链路追踪探索实践
一.Opentracing opentracing通过提供平台无关.厂商无关的API,使得开发人员可以方便地实现追踪系统.opentracing提供了用于运营支撑系统和针对特定平台的辅助程序库,被跟踪 ...
- JS中条件判断语句
用pycharm敲代码时,在.js文件中敲,敲完之后复制代码到浏览器的console中去回车执行 1.if( ){} 2.switch(a){} 3.for循环 循环列表 循环字典 循环字符串 另外 ...