Android Studio局部管理器
1、LinearLayout(线性布局)
该布局将其中的View子控件按照水平或者垂直方向排列。但是需要注意不管是水平还是竖直,对应的每一行或列都只能放一个控件。
线性布局两种排法:
从左到右:android:orientation="horizontal"
从上到下:android:orientation="vertical"
效果如下:
<?xml version="1.0" encoding="utf-8"?>

<LinearLayout

    xmlns:android="http://schemas.android.com/apk/res/android"

    android:layout_width="match_parent"

    android:layout_height="match_parent"

    android:orientation="vertical">

<LinearLayout

    android:layout_width="match_parent"

    android:layout_height="250dp"

    android:orientation="horizontal">

    <TextView

        android:layout_width="96dp"

        android:layout_height="match_parent"

        android:background="#b2dfdb" />

    <TextView

        android:layout_width="96dp"

        android:layout_height="match_parent"

        android:background="#80cbc4" />

     <TextView

        android:layout_width="96dp"

        android:layout_height="match_parent"

        android:background="#4db6ac" />

    <TextView

        android:layout_width="96dp"

        android:layout_height="match_parent"

        android:background="#26a69a" />

</LinearLayout>

<LinearLayout

    android:layout_width="match_parent"

    android:layout_height="match_parent"

    android:orientation="vertical">

    <TextView

        android:layout_width="match_parent"

        android:layout_height="68dp"

        android:background="#b2dfdb" />

    <TextView

        android:layout_width="match_parent"

        android:layout_height="68dp"

        android:background="#80cbc4" />

    <TextView

        android:layout_width="match_parent"

        android:layout_height="68dp"

        android:background="#4db6ac" />

    <TextView

        android:layout_width="match_parent"

        android:layout_height="68dp"

        android:background="#26a69a" />

</LinearLayout>

</LinearLayout>
一个竖向的大LinearLayout嵌套着两个小LinearLayout,第一个小LinearLayout为横向,第二个小LinearLayout为竖向。
2、RelativeLayout布局
参考其他控件进行布局,默认为父控件。
有三种类型的属性:
属性值是true或false
android:layout_centerHrizontal 水平居中
android:layout_centerVertical 垂直居中
android:layout_centerInparent 相对于父元素完全居中。
android:layout_alignParentBottom 位于父元素的下边缘
android:layout_alignParentTop 位于父元素的上边缘
android:layout_alignParentLeft 位于父元素的左边缘
android:layout_alignParentRight 位于父元素的右边缘
属性值是“@id/*”
android:layout_below 在某元素的下方
android:layout_above 在某元素的上方
andorid:layout_toRightOf 在某元素的右方
android:layout_toLeftOf 在某元素的左方
android:layout_alignBottom 和某元素下方对齐
android:layout_alignTop 和某元素上方对齐
android:layout_alignRight 和某元素右方对齐
android:layout_alignLeft 和某元素左方对齐
属性值是数值
android:layout_marginLeft 离某元素左边缘的距离
android:layout_marginRight 离某元素右边缘的距离
android:layout_marginTop 离某元素上边缘的距离
android:layout_marginBottom 离某元素下边缘的距离
注意:
如果没有定义左右,那么默认在左边,如果没有定义上下,默认在上边。
相同位置,新定义的元素会覆盖旧的元素。
只定义在父元素的下部,左右没有定义,默认在左边。
android:layout_below,在某元素的下部并不意味着就一定是紧随某元素,只是在下部的默认位置。
3、MyLayout布局(自定义ViewGroup)
自定义布局主要是重写两个方法:
onMeasure()写自定义容器的大小。
onLayout()写子元素的布局。
3.1、onMeasure()
 @Override

    protected void onMeasure(int widthMeasureSpec, int heightMeasureSpec) {

        /**

         * 获得此ViewGroup上级容器为其推荐的宽和高,以及计算模式

         */

        int widthMode = MeasureSpec.getMode(widthMeasureSpec);

        int heightMode = MeasureSpec.getMode(heightMeasureSpec);

        int sizeWidth = MeasureSpec.getSize(widthMeasureSpec);

        int sizeHeight = MeasureSpec.getSize(heightMeasureSpec);

        // 计算出所有的childView的宽和高

        measureChildren(widthMeasureSpec, heightMeasureSpec);

        /**

         * width和height是当wrap_content时使用的属性。

         */

        int width = 0;

        int height = 0;

        int cCount = getChildCount();

        int cWidth = 0;

        int cHeight = 0;

        /**

         * 在这里计算当wrap_content时,布局的大小。

         */

        for (int i = 0; i < cCount; i++) {

            View childView = getChildAt(i);

            cWidth = childView.getMeasuredWidth();

            cHeight = childView.getMeasuredHeight();

            width += cWidth;

            height += cHeight;

        }

        /**

         * 如果是wrap_content设置为我们计算的值

         * 否则:直接设置为父容器计算的值

         */

        setMeasuredDimension((widthMode == MeasureSpec.EXACTLY) ? sizeWidth

                : width, (heightMode == MeasureSpec.EXACTLY) ? sizeHeight

                : height);

    }
布局计算模式,即最后的EXACTLY。共有三种计算模式:
MeasureSpec.EXACTLY:精确尺寸,相当于具体数值和match_parent.
MeasureSpec.AT_MOST:最大尺寸,相当于warp_content.
MeasureSpec.UNSPECIFIED:未指定尺寸,这种情况不多,一般用于AdapterView.
3.2、onLayout()
@Override

    protected void onLayout(boolean changed, int l, int t, int r, int b) {

        int cCount = getChildCount();

        /**

         * 遍历所有childView根据其宽和高,以及margin进行布局

         */

        for (int i = 0; i < cCount; i++) {

            View childView = getChildAt(i);

            r = l + childView.getMeasuredWidth();

            b = t + childView.getMeasuredHeight();

            childView.layout(l, t, r, b);

            l += childView.getMeasuredWidth();

            t += childView.getMeasuredHeight();

        }

    }
这个方法的作用是设置摆放子元素的位置。其中onLayout()传入的l、t、分别是对应子元素左上角的left,top坐标。r、b分别是对应子元素右下角的right,bottom坐标。
可以使用childview.getMeasureWidth()和childView.getMeasureHeight()得到子元素的宽和高。
xml代码如下:
<?xml version="1.0" encoding="utf-8"?>

<com.example.layoutdemo.MyLayout.MyLayout

    xmlns:android="http://schemas.android.com/apk/res/android"

    android:layout_width="wrap_content"

    android:layout_height="wrap_content"

    >

        <TextView

            android:layout_width="50dp"

            android:layout_height="50dp"

            android:background="#b2dfdb" />

        <TextView

            android:layout_width="50dp"

            android:layout_height="50dp"

            android:background="#80cbc4" />

        <TextView

            android:layout_width="50dp"

            android:layout_height="50dp"

            android:background="#4db6ac" />

        <TextView

            android:layout_width="50dp"

            android:layout_height="50dp"

            android:background="#26a69a" />

</com.example.layoutdemo.MyLayout.MyLayout>
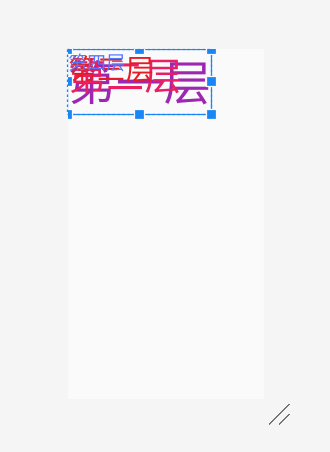
4、FrameLayout布局
帧布局,这个布局的特点是从左上角开始,后面的会覆盖前面的控件。
<?xml version="1.0" encoding="utf-8"?>

<FrameLayout xmlns:android="http://schemas.android.com/apk/res/android"

    android:layout_width="match_parent"

    android:layout_height="match_parent"

    android:orientation="vertical">

    <TextView

        android:layout_width="wrap_content"

        android:layout_height="wrap_content"

        android:textSize="100dp"

        android:textColor="#9c27b0"

        android:text="第一层"/>

    <TextView

        android:layout_width="wrap_content"

        android:layout_height="wrap_content"

        android:textSize="80dp"

        android:textColor="#e91e63"

        android:text="第二层"/>

    <TextView

        android:layout_width="wrap_content"

        android:layout_height="wrap_content"

        android:textSize="60dp"

        android:textColor="#e51c23"

        android:text="第三层"/>

    <TextView

        android:layout_width="wrap_content"

        android:layout_height="wrap_content"

        android:textSize="40dp"

        android:textColor="#5677fc"

        android:text="第四层"/>

</FrameLayout>
效果图如下:
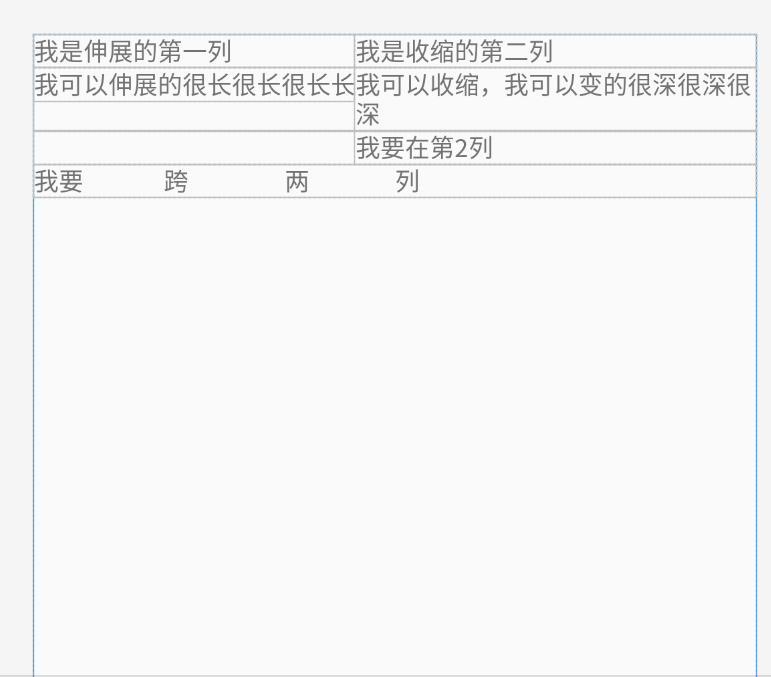
5、TableLayout布局
表格布局,应遵循以下布局结构。
<TableLayout>

    <TableRow>

    <!-在这里填充第一行的元素->

    </TableRow>

    <TableRow>

    <!-在这里填充第二行的元素->

    </TableRow>

</TableLayout>
几个重要属性:
写在TableLayout中的属性
android:stretchColumns 设置第几列为伸展(0表示第一列)
android:shrinkColumns 设置第几列为收缩
android:collapseColumns 设置第几列为隐藏
写在TableRow里的控件里的属性
android:layout_column 设置控件在第几列
android:layout_span 设置控件能跨多少列
代码如下:
<?xml version="1.0" encoding="utf-8"?>

<TableLayout xmlns:android="http://schemas.android.com/apk/res/android"

    android:layout_width="match_parent"

    android:layout_height="match_parent"

    android:collapseColumns="2"

    android:shrinkColumns="1"

    android:stretchColumns="0">

    <TableRow

       >

        <TextView android:text="我是伸展的第一列" />

        <TextView android:text="我是收缩的第二列" />

        <TextView android:text="我被隐藏了" />

    </TableRow>

    <TableRow>

        <TextView android:text="我可以伸展的很长很长很长长" />

        <TextView android:text="我可以收缩,我可以变的很深很深很深" />

        <TextView android:text="我被隐藏了T_T" />

    </TableRow>

    <TableRow>

        <TextView

            android:layout_column="1"

            android:text="我要在第2列" />

    </TableRow>

    <TableRow>

        <TextView

            android:layout_width="wrap_content"

            android:layout_height="wrap_content"

            android:layout_column="0"

            android:layout_span="2"

            android:text="我要               跨                  两                列" />

    </TableRow>

</TableLayout>
效果图如下:
参考文章:https://blog.csdn.net/u013254061/article/details/52512146
Android Studio局部管理器的更多相关文章
- Android TelephonyManager电话管理器
今天介绍一下Android的电话管理器--TelephonyManager,TelephonyManager管理手机通话状态.电话网络信息的服务类,获取TelephonyManager: Teleph ...
- android的布局管理器
理论上通过setContentView(view)能够把一个view设置到activity中,但当你有很多个view控件的时候,就需要用android的布局管理器来管理view控件了. android ...
- Android之声音管理器《AudioManager》的使用以及音量控制
以下为网上下载然后拼接-- Android声音管理AudioManager使用 手机都有声音模式,声音.静音还有震动,甚至震动加声音兼备,这些都是手机的基本功能.在Android手机中,我们同样可以通 ...
- 一步一步学android之布局管理器——LinearLayout
线性布局是最基本的一种布局,在基本控件篇幅中用到的都是LinearLayout,线性布局有两种方式,前面也有用到,一种是垂直的(vertical),一种是水平的(horizontal).我们同样来看下 ...
- Visual Studio 代码管理器svn插件下载
环境:Visual Studio 2010 Visual Studio的svn插件叫做VisualSVN,可自行到VisualSVN官网上下载相应版本,也可以通过vs中找到相关插件. ps:vs其他的 ...
- Android课程---布局管理器中的线性布局
线性布局实例: <?xml version="1.0" encoding="utf-8"?><LinearLayout xmlns:andro ...
- 一步一步学android之布局管理器——RelativeLayout
今天开始学习RelativeLayout(相对布局),相对布局在平时布局的时候用的较多,因为Android适配方面的原因.相对布局可以控制组件摆放的位置(放在任一组件的上下左右等位置),下面来看看类的 ...
- android studio 统一管理版本号配置
1.在android 的根目录新建一个versions.gradle 2.在这里面声明 各个第三方库的版本,写法有两种,第一种,写ext 扩展, 引用的时候, 第二种: 然后在project级的bui ...
- Android课程---布局管理器
随机推荐
- 数据可视化基础专题(十四):pyecharts 基础(一)简单上手
1.引言 文档位于 https://pyecharts.org/#/zh-cn/intro 示例位于 https://gallery.pyecharts.org/#/README echarts 官网 ...
- Azure Web App (三)切换你的Net Core Web 项目的数据库连接字符串
一,引言 上一篇文章讲到今天我们演示了一下,如何在Web App中创建 “Deployment Slot”进行快速无停机部署新功能代码,也使用VS进行发布到创建的Web App中创建的新的部署槽位中, ...
- ASP.NET CORE之中间件-自定义异常中间件
参考资料:https://docs.microsoft.com/zh-cn/aspnet/core/fundamentals/middleware/?view=aspnetcore-3.1 1.一般A ...
- 【C#】NET截屏网页,生成网页快照开发——IECapt、CutyCapt
软件介绍 IECapt.CutyCapt 生成网页快照 http://iecapt.sourceforge.net/ http://cutycapt.sourceforge.net/ ### 操作代码 ...
- 谷歌浏览器又隐藏的HTTPS和WWW前缀
谷歌工程师 Emily Schechter 曾在 Chromium 反馈页面中提到:Chrome 团队一直将简易性.可用性.安全性作为衡量 UI 的标准.为了让 URL 能更好地被用户理解.移除那些容 ...
- java 获取传入值的区间
/** * 获取值的区间 * * @param num 值 */ public static Map<String, Integer> getNumSection(Integer num) ...
- C++语法小记---string类
string类 #include <iostream> #include <string> using namespace std; // 实现字符串右移, 例子hello & ...
- PHP中使用 TUS 协议来实现可恢复文件上传
曾经尝试过用PHP上传大文件吗?想知道您是否可以从上次中断的地方继续上传,而不会在遇到任何中断的情况下再次重新上传整个数据?如果您觉得这个场景很熟悉,请接着往下阅读. 文件上传是我们几乎所有现代Web ...
- 写给程序员的机器学习入门 (八) - 卷积神经网络 (CNN) - 图片分类和验证码识别
这一篇将会介绍卷积神经网络 (CNN),CNN 模型非常适合用来进行图片相关的学习,例如图片分类和验证码识别,也可以配合其他模型实现 OCR. 使用 Python 处理图片 在具体介绍 CNN 之前, ...
- win10里面怎么获取最高管理员权限
Windows10专业版 1,按下win+R键唤出“运行”窗口,输入gpedit.msc. 2,这时打开了组策略编辑器,在左边找到“计算机配置-Windows 设置”,再进入右边“安全设置”,如图. ...