Qt 绘制平滑曲线
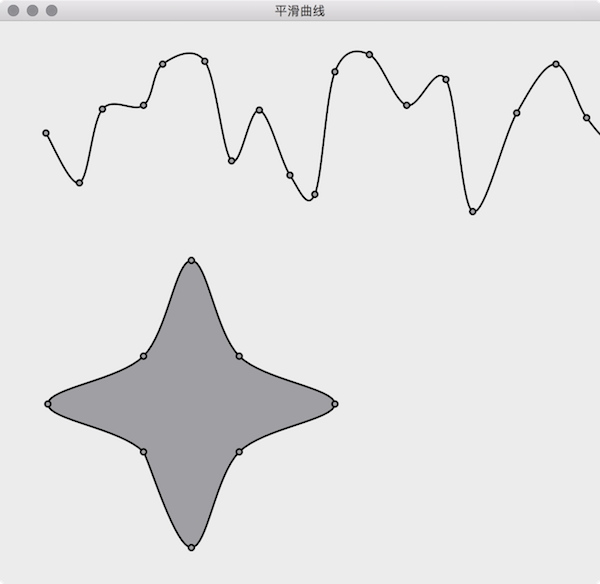
本文介绍在 Qt 中绘制平滑曲线的实现,调用下面的函数 SmoothCurveGenerator::generateSmoothCurve(points) 即可。默认曲线的 2 个顶点之间被分割为 16 个小线段来拟合曲线,下图展示了 tension 为 0.5(默认值) 的曲线效果,tension 并不是越大越好,默认的 0.5 大多数时候就不错。
算法来自于 How to draw smooth curve through N points using javascript HTML5 canvas?
SmoothCurveGenerator
|
1
2
3
4
5
6
7
8
9
10
11
12
13
14
15
16
17
18
19
20
21
22
23
24
25
26
27
28
29
|
// 文件名: SmoothCurveGenerator.h
#ifndef SMOOTHCURVEGENERATOR_H
#define SMOOTHCURVEGENERATOR_H
#include <QList>
#include <QPainterPath>
class SmoothCurveGenerator {
public:
/**
* @brief generateSmoothCurve 的重载函数
*/
static QPainterPath generateSmoothCurve(QList<QPointF> points, bool closed = false, double tension = 0.5, int numberOfSegments = 16);
/**
* @brief 使用传入的曲线顶点坐标创建平滑曲线。
*
* @param points 曲线顶点坐标数组,
* points[i+0] 是第 i 个点的 x 坐标,
* points[i+1] 是第 i 个点的 y 坐标
* @param closed 曲线是否封闭,默认不封闭
* @param tension 密集程度,默认为 0.5
* @param numberOfSegments 平滑曲线 2 个顶点间的线段数,默认为 16
* @return 平滑曲线的 QPainterPath
*/
static QPainterPath generateSmoothCurve(QList<double>points, bool closed = false, double tension = 0.5, int numberOfSegments = 16);
};
#endif // SMOOTHCURVEGENERATOR_H
|
|
1
2
3
4
5
6
7
8
9
10
11
12
13
14
15
16
17
18
19
20
21
22
23
24
25
26
27
28
29
30
31
32
33
34
35
36
37
38
39
40
41
42
43
44
45
46
47
48
49
50
51
52
53
54
55
56
57
58
59
60
61
62
63
64
65
66
67
68
69
70
71
72
73
74
75
76
77
78
79
80
81
|
// 文件名: SmoothCurveGenerator.cpp
#include "SmoothCurveGenerator.h"
#include <QtMath>
QPainterPath SmoothCurveGenerator::generateSmoothCurve(QList<QPointF> points, bool closed, double tension, int numberOfSegments) {
QList<double> ps;
foreach (QPointF p, points) {
ps << p.x() << p.y();
}
return SmoothCurveGenerator::generateSmoothCurve(ps, closed, tension, numberOfSegments);
}
QPainterPath SmoothCurveGenerator::generateSmoothCurve(QList<double> points, bool closed, double tension, int numberOfSegments) {
QList<double> ps(points); // clone array so we don't change the original points
QList<double> result; // generated smooth curve coordinates
double x, y;
double t1x, t2x, t1y, t2y;
double c1, c2, c3, c4;
double st;
// The algorithm require a previous and next point to the actual point array.
// Check if we will draw closed or open curve.
// If closed, copy end points to beginning and first points to end
// If open, duplicate first points to befinning, end points to end
if (closed) {
ps.prepend(points[points.length() - 1]);
ps.prepend(points[points.length() - 2]);
ps.prepend(points[points.length() - 1]);
ps.prepend(points[points.length() - 2]);
ps.append(points[0]);
ps.append(points[1]);
} else {
ps.prepend(points[1]); // copy 1st point and insert at beginning
ps.prepend(points[0]);
ps.append(points[points.length() - 2]); // copy last point and append
ps.append(points[points.length() - 1]);
}
// 1. loop goes through point array
// 2. loop goes through each segment between the 2 points + 1e point before and after
for (int i = 2; i < (ps.length() - 4); i += 2) {
// calculate tension vectors
t1x = (ps[i + 2] - ps[i - 2]) * tension;
t2x = (ps[i + 4] - ps[i - 0]) * tension;
t1y = (ps[i + 3] - ps[i - 1]) * tension;
t2y = (ps[i + 5] - ps[i + 1]) * tension;
for (int t = 0; t <= numberOfSegments; t++) {
// calculate step
st = (double)t / (double)numberOfSegments;
// calculate cardinals
c1 = 2 * qPow(st, 3) - 3 * qPow(st, 2) + 1;
c2 = -2 * qPow(st, 3) + 3 * qPow(st, 2);
c3 = qPow(st, 3) - 2 * qPow(st, 2) + st;
c4 = qPow(st, 3) - qPow(st, 2);
// calculate x and y cords with common control vectors
x = c1 * ps[i] + c2 * ps[i + 2] + c3 * t1x + c4 * t2x;
y = c1 * ps[i + 1] + c2 * ps[i + 3] + c3 * t1y + c4 * t2y;
//store points in array
result << x << y;
}
}
// 使用的平滑曲线的坐标创建 QPainterPath
QPainterPath path;
path.moveTo(result[0], result[1]);
for (int i = 2; i < result.length() - 2; i += 2) {
path.lineTo(result[i+0], result[i+1]);
}
if (closed) {
path.closeSubpath();
}
return path;
}
|
Form
|
1
2
3
4
5
6
7
8
9
10
11
12
13
14
15
16
17
18
19
20
21
22
23
24
25
26
|
// 文件名: Form.h
#ifndef FORM_H
#define FORM_H
#include <QWidget>
#include <QList>
#include <QPainterPath>
class Form : public QWidget {
Q_OBJECT
public:
explicit Form(QWidget *parent = 0);
~Form();
protected:
void paintEvent(QPaintEvent *event) Q_DECL_OVERRIDE;
private:
QList<QPointF> points1; // 曲线一的顶点数组
QList<QPointF> points2; // 曲线二的顶点数组
QPainterPath smoothCurvePath1; // 平滑曲线一
QPainterPath smoothCurvePath2; // 平滑曲线二
};
#endif // FORM_H
|
|
1
2
3
4
5
6
7
8
9
10
11
12
13
14
15
16
17
18
19
20
21
22
23
24
25
26
27
28
29
30
31
32
33
34
35
36
37
38
39
40
41
42
43
44
45
46
47
48
49
50
51
52
|
// 文件名: Form.cpp
#include "Form.h"
#include "SmoothCurveGenerator.h"
#include <QDebug>
#include <QPainter>
#include <QDateTime>
Form::Form(QWidget *parent) : QWidget(parent) {
qsrand(QDateTime::currentDateTime().toTime_t());
// 随机生成曲线第一条曲线的坐标
int x = 0, y = 0;
for (int i = 0; i < 100; ++i) {
x += qrand() % 30 + 20;
y = qrand() % 180 + 30;
points1 << QPointF(x, y);
}
// 第二条星行曲线的坐标
points2 << QPointF(0, 150) << QPointF(50, 50) << QPointF(150, 0) << QPointF(50, -50)
<< QPointF(0, -150) << QPointF(-50, -50) << QPointF(-150, 0) << QPointF(-50, 50);
// 使用曲线的坐标生成平滑曲线
smoothCurvePath1 = SmoothCurveGenerator::generateSmoothCurve(points1); // 第一条曲线不封闭
smoothCurvePath2 = SmoothCurveGenerator::generateSmoothCurve(points2, true); // 第二条曲线是封闭的
}
Form::~Form() {
}
void Form::paintEvent(QPaintEvent *) {
QPainter painter(this);
painter.setRenderHint(QPainter::Antialiasing);
painter.setPen(QPen(Qt::black, 2));
// 绘制第一条平滑曲线和曲线上的顶点
painter.drawPath(smoothCurvePath1);
painter.setBrush(Qt::gray);
for (int i = 0; i < points1.length() ; i += 1) {
painter.drawEllipse(points1[i].x()-3, points1[i].y()-3, 6, 6);
}
// 绘制第二条平滑曲线和曲线上的顶点
painter.translate(200, 400);
painter.drawPath(smoothCurvePath2);
for (int i = 0; i < points2.length() ; i += 1) {
painter.drawEllipse(points2[i].x()-3, points2[i].y()-3, 6, 6);
}
}
|
Qt 绘制平滑曲线的更多相关文章
- QT绘制饼图
QT版本:QT5.6.1 QT绘制饼图,出问题的代码如下 void DrawPieDialog::paintEvent(QPaintEvent *event) { float startAngle=0 ...
- Qt 学习之路 2(24):Qt 绘制系统简介
Qt 学习之路 2(24):Qt 绘制系统简介 豆子 2012年10月30日 Qt 学习之路 2 77条评论 Qt 的绘图系统允许使用相同的 API 在屏幕和其它打印设备上进行绘制.整个绘图系统基于Q ...
- 【js类库Raphaël】使用raphael.js根据点坐标绘制平滑曲线
一.可供参考的文档资料. raphaeljs官网:http://raphaeljs.com/ w3c关于path的介绍:http://www.w3.org/TR/2003/REC-SVG11-200 ...
- Qt绘制异形窗体
异形窗体即不规则窗体,一般采用png图片,一般绘制异形窗体分两步: 1.设置遮罩区 2.绘制图片 使用png图片的透明部分作为遮罩区,然后绘制图片,这样我们就看到一个只绘制了非透明部分的图形,废话 ...
- Qt 学习之路 :Qt 绘制系统简介
Qt 的绘图系统允许使用相同的 API 在屏幕和其它打印设备上进行绘制.整个绘图系统基于QPainter,QPainterDevice和QPaintEngine三个类. QPainter用来执行绘制的 ...
- qt绘制设备
# -*- coding: utf-8 -*- # python:2.x __author__ = 'Administrator' from PyQt4.QtGui import * from Py ...
- QT绘制系统简介
#3个类:QPainter,QPainterDevice 和 QPaintEngine 三个类 #qpainter用于执行绘制操作 #QPainterDevice是一个二维空间抽象,允许qpainte ...
- QT 绘制按钮 paintEvent enterEvent leaseEvent mouseEvent
案例2:绘制按钮 main.cpp #include<QApplication> #include “demoWidget.h” int main(int args , int arg ...
- Qt绘制文本一
QPainterPath,使用 drawText且设置字体,再使用painter.drawText方式 效果图: void WgtText::paintEvent(QPaintEvent *event ...
随机推荐
- 网站访问优化(二):开启apache服务器gzip压缩
昨天,把带宽从1M升级到2M,使用cdn版本的jquery之后,网站访问速度由平均5s(在禁止缓存的情况下,使用缓存大概在2.8s)下降到2.8s的样子. 今天,继续优化. 第1步: 把图片进行了 ...
- 【26.34%】【codeforces 722A】Broken Clock
time limit per test1 second memory limit per test256 megabytes inputstandard input outputstandard ou ...
- [CSS] Draw Simple Icons with CSS
Using pseudo-elements like ::before and ::after we can draw some simple icons without having using i ...
- [转载]剥析surging的架构思想
1.前言 2.通信机制 2.1 简介 在单体应用中,模块之间的调用通信通过引用加载方法或者函数来实现,但是单体应用最终都会因为团队壮大,项目模块的扩展和部署等出现难以维护的问题.随着业务需求 ...
- 【26.8%】【CF 46D】Parking Lot
time limit per test 2 seconds memory limit per test 256 megabytes input standard input output standa ...
- 序列 mysql
CREATE TABLE emp_seq (seq INT); INSERT INTO emp_seq VALUES(0); UPDATE emp_seq SET seq = LAST_INSERT_ ...
- 【u019】排序(sort)
[问题描述] 一个不同的值的升序排序数列指的是一个从左到右元素依次增大的序列,例如,一个有序的数列A,B,C,D 表示A<B,B<C,C<D.在这道题中,我们将给你一系列形如A< ...
- 数据局部性(data locality)
信息处理的典型模式是,将所有数据项视为一个集合,并将其组织为适宜的数据结构(或者说使用适宜的数据结构对之进行存储以及组织),进而借助操作接口高效访问. 为了考查和评价各操作接口的效率,除了从最坏情况的 ...
- js进阶 10-5 jquery中的层级选择器有哪些
js进阶 10-5 jquery中的层级选择器有哪些 一.总结 一句话总结: 1.jquery中的层级选择器有哪些? 四种,后代,子代,兄弟,相邻兄弟 2.如何区别jquery中的层级选择器? 记住这 ...
- 【u119】中位数
Time Limit: 1 second Memory Limit: 128 MB [问题描述] 给出一个长度为N的非负整数序列A[i],对于所有1 ≤ k ≤ (N + 1) / 2,输出A[1], ...