Jetson TX1使用usb camera采集图像 (1)
使用python实现
https://jkjung-avt.github.io/tx2-camera-with-python/
How to Capture and Display Camera Video with Python on Jetson TX2
Oct 19, 2017
Quick link: tegra-cam.py
In this post I share how to use python code (with OpenCV) to capture and display camera video on Jetson TX2, including IP CAM, USB webcam and the Jetson onboard camera. This sample code should work on Jetson TX1 as well.
Prerequisite:
- OpenCV with GStreamer and python support needs to be built and installed on the Jetson TX2. I use opencv-3.4.0 and python3. You can refer to my earlier post for how to build and install OpenCV with python support: How to Install OpenCV (3.4.0) on Jetson TX2.
- If you’d like to test with an IP CAM, you need to have it set up and know its RTSP URI, e.g. rtsp://admin:XXXXX@192.168.1.64:554.
- Hook up a USB webcam (I was using Logitech C920) if you’d like to test with it. The USB webcam would usually be instantiated as /dev/video1, since the Jetson onboard camera has occupied /dev/video0.
- Install gstreamer1.0-plugins-bad-xxx which include the
h264parseelement. This is required for decoding H.264 RTSP stream from IP CAM.
$ sudo apt-get install gstreamer1.0-plugins-bad-faad \

                       gstreamer1.0-plugins-bad-videoparsers
Reference:
- I developed my code based on this canny edge detector sample code.
- ACCELERATED GSTREAMER FOR TEGRA X2 USER GUIDE: Descriptions of nvcamerasrc, nvvidconv and omxh264dec could be found in this document.
How to run the Tegra camera sample code:
- Download the
tegra-cam.pysource code from my GitHubGist: https://gist.github.com/jkjung-avt/86b60a7723b97da19f7bfa3cb7d2690e - To capture and display video using the Jetson onboard camera, try the following. By default the camera resolution is set to 1920x1080 @ 30fps.
$ python3 tegra-cam.py
- To use a USB webcam and set video resolution to 1280x720, try the following. The ‘–vid 1’ means using /dev/video1.
$ python3 tegra-cam.py --usb --vid 1 --width 1280 --height 720
- To use an IP CAM, try the following command, while replacing the last argument with RTSP URI for you own IP CAM.
$ python3 tegra-cam.py --rtsp --uri rtsp://admin:XXXXXX@192.168.1.64:554
Discussions:
The crux of this tegra-cam.py script lies in the GStreamer pipelines I use to call cv.VideoCapture(). In my experience, using nvvidconv to do image scaling and to convert color format to BGRx (note that OpenCV requires BGR as the final output) produces better results in terms of frame rate.
def open_cam_rtsp(uri, width, height, latency):

    gst_str = ("rtspsrc location={} latency={} ! rtph264depay ! h264parse ! omxh264dec ! "

               "nvvidconv ! video/x-raw, width=(int){}, height=(int){}, format=(string)BGRx ! "

               "videoconvert ! appsink").format(uri, latency, width, height)

    return cv2.VideoCapture(gst_str, cv2.CAP_GSTREAMER)

def open_cam_usb(dev, width, height):

    # We want to set width and height here, otherwise we could just do:

    #     return cv2.VideoCapture(dev)

    gst_str = ("v4l2src device=/dev/video{} ! "

               "video/x-raw, width=(int){}, height=(int){}, format=(string)RGB ! "

               "videoconvert ! appsink").format(dev, width, height)

    return cv2.VideoCapture(gst_str, cv2.CAP_GSTREAMER) #该命令在测试时无法启动摄像头,但采用"return cv2.VideoCapture(0)"可以正常显示,I don`t know ???
def open_cam_onboard(width, height): # On versions of L4T previous to L4T 28.1, flip-method=2 # Use Jetson onboard camera gst_str = ("nvcamerasrc ! " "video/x-raw(memory:NVMM), width=(int)2592, height=(int)1458, format=(string)I420, framerate=(fraction)30/1 ! " "nvvidconv ! video/x-raw, width=(int){}, height=(int){}, format=(string)BGRx ! " "videoconvert ! appsink").format(width, height) return cv2.VideoCapture(gst_str, cv2.CAP_GSTREAMER)
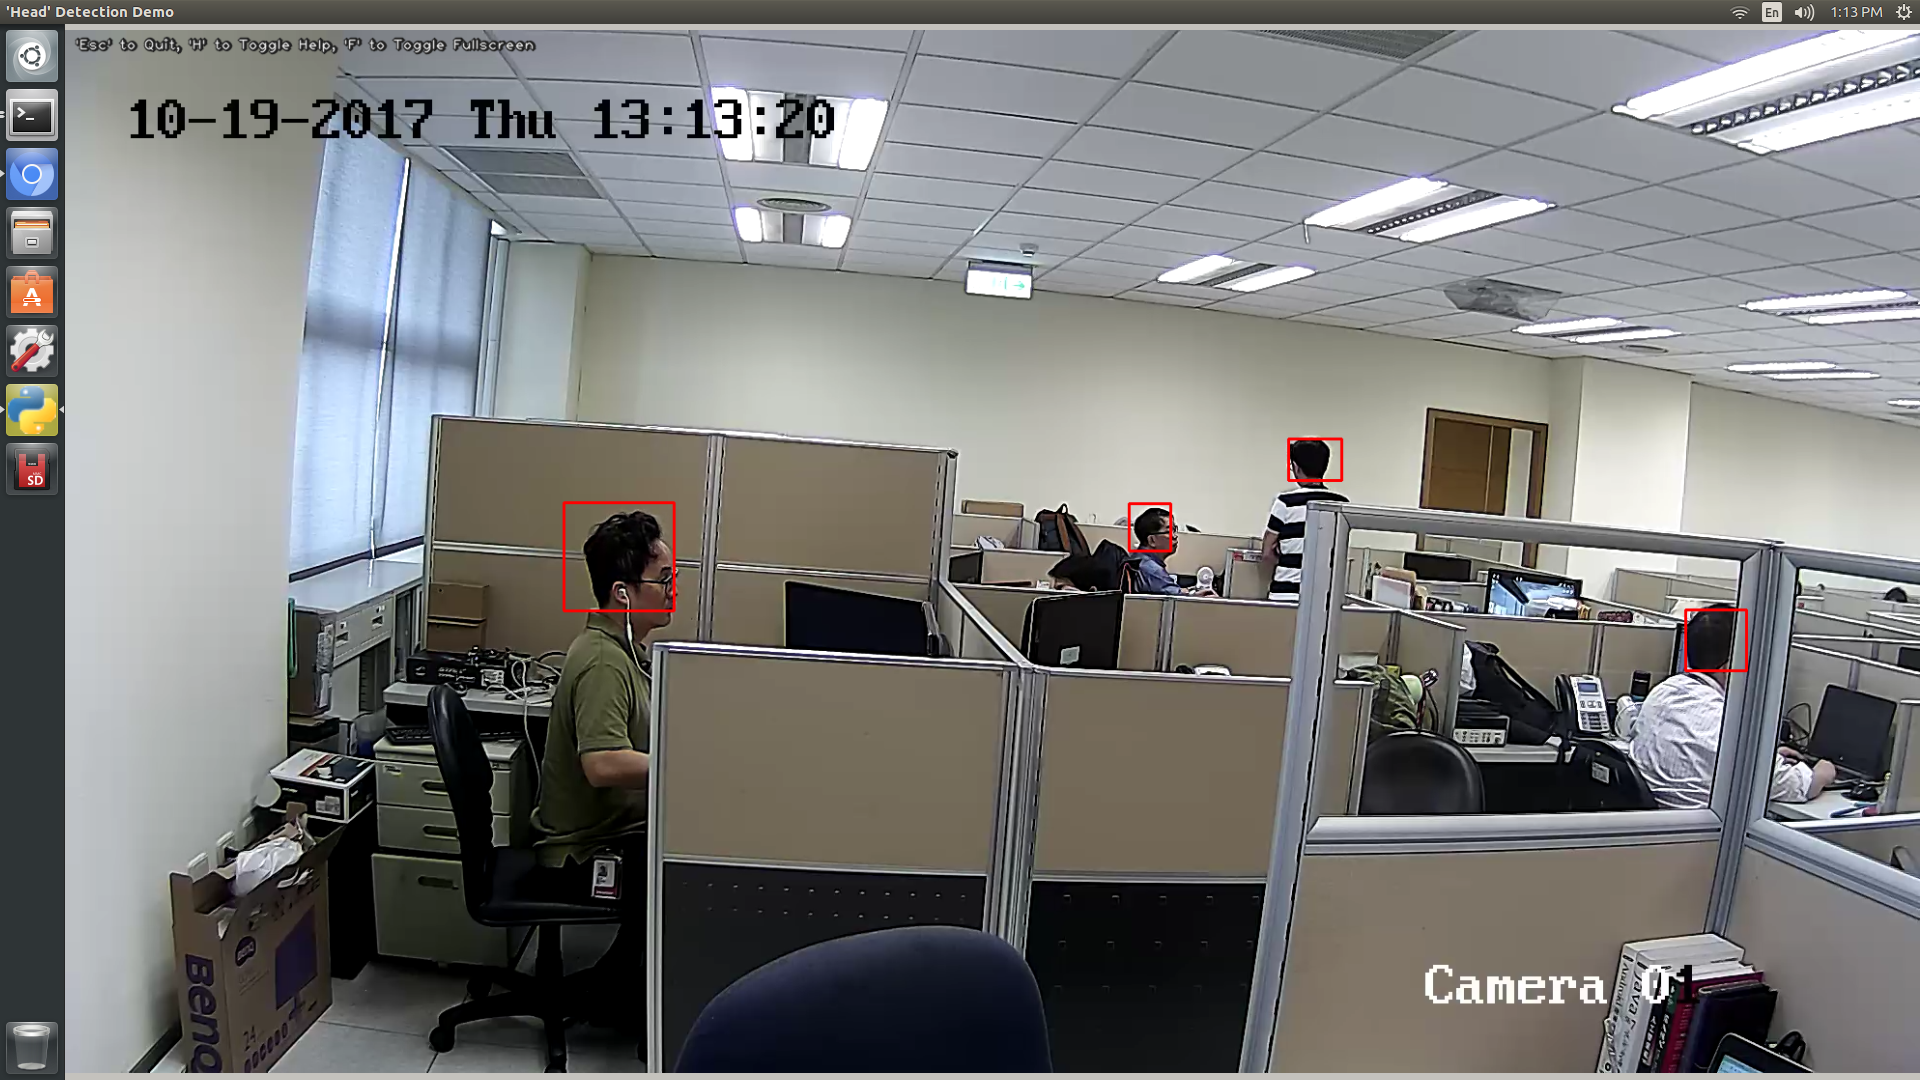
Here’s a screenshot of my Jetson TX2 running tegra-cam.py with a live IP CAM video feed. (I also hooked up a Faster R-CNN model to do human head detection and draw bounding boxes on the captured images here, but the main video capture/display code was the same.)
If you like this post or have any questions, feel free to leave a comment below. Otherwise be sure to also check out my next post How to Capture Camera Video and Do Caffe Inferencing with Python on Jetson TX2, in which I demonstrate how to feed live camera images into a Caffe pipeline for real-time inferencing.
Jetson TX1使用usb camera采集图像 (1)的更多相关文章
- Jetson TX1使用usb camera采集图像 (2)
该方法只启动usb摄像头 import cv2 import numpy import matplotlib.pyplot as plot class Camera: cap = cv2.VideoC ...
- Camera 采集图像的方法
使用 Camera 采集图像, 实现步骤如下: 需要权限: android.permission.CAMERA android.permission.WRITE_EXTERNAL_STORAGE // ...
- 【Xilinx-Petalinux学习】-06-OpenCV通过USB摄像头采集图像。
占位, 实现USB摄像头的图像采集与保存
- 基于英伟达Jetson TX1的GPU处理平台
基于英伟达Jetson TX1 GPU的HDMI图像输入的深度学习套件 [309] 本平台基于英伟达的Jetson TX1视觉计算的全功能开发板,配合本公司研发的HDMI输入图像采集板:Jetson ...
- camera按键采集图像及waitKey的用法(转)
源: camera按键采集图像及waitKey的用法
- camera按键采集图像及waitKey的用法
前言 项目需要通过摄像头采集图像并保存,主要是用于后续的摄像头标定.实现过程其实很简单,需要注意一些细节. 系统环境 系统版本:ubuntu16.04:opencv版本:opencv2.4.13:编程 ...
- [转]Jetson TX1 开发教程(1)配置与刷机
开箱 Jetson TX1是英伟达公司新出的GPU开发板,拥有世界上先进的嵌入式视觉计算系统,提供高性能.新技术和极佳的开发平台.在进行配置和刷机工作之前,先来一张全家福: 可以看到,Jetson T ...
- 【并行计算-CUDA开发】 NVIDIA Jetson TX1
概述 NVIDIA Jetson TX1是计算机视觉系统的SoM(system-on-module)解决方案.它组合了最新的NVIDIAMaxwell GPU架构,其具有ARM Cortex-A57 ...
- ffmpeg从USB摄像头采集一张原始图片(转)
本文讲解使用ffmpeg从USB摄像头中采集一帧数据并写入文件保存,测试平台使用全志A20平台,其他平台修改交叉工具链即可移植.开发环境使用eclipse+CDT.交叉工具链使用arm-Linux-g ...
随机推荐
- 高可用实现KeepAlived原理简介
一.简介 目前主流实现web网站及数据库服务高可用软件包括:keepalived.heartbeat.corosync,cman;高可用简称HA: 官方站点:https://www.keepalive ...
- Autofac 和 Quartz.Net 自动注入的整合
一:问题场景 在一次项目开发中,项目中已使用了Autofac.在新需求中要用到Quatrz.Net.在任务中使用注入方法,确始终无法使用注入的方法,经过千百次的度娘,终于找到了解决办法!吐槽下度娘真心 ...
- c#下载文件选择路径控件
<input id="file1" style="width: 240px; height: 20px; display:none;" type=&quo ...
- 数据库管理工具DataGrip使用总结(一)
DataGrip是JetBrains公司推出的管理数据库的产品,对于JetBrains公司,开发者肯定都不陌生,IDEA和ReSharper都是这个公司的产品,用户体验非常不错. 下载地址:https ...
- WOW.js 使用教程
官网加动画特效,哇哦,下面我介绍一下WOW.js 官网地址:https://www.delac.io/wow/ 点击github可以找到wow.js和wow.min.js 以及animate.css者 ...
- Python笔记-面向对象编程
1.类和实例 面向-对象的三大特点:数据封装.继承和多态 在Python中,所有数据类型都可以视为对象,当然也可以自定义对象.自定义的对象数据类型就是面向对象中的类(Class)的概念. 假设我们要处 ...
- javaFX笔记----ComboBox模仿qq账号下拉框删除账号
myComboBox.setCellFactory( new Callback<ListView<String>, ListCell<String>>() { @O ...
- 基于FPM制作nginx RPM包
目录 环境 配置 FPM安装 环境 系统 其它 CentOS 7.5 需提前配置好epel 配置 [root@localhost ~]# yum clean all && yum ma ...
- .Net Core 在Linux服务器下部署程序--(3). 部署.net Core程序
确认第二步中的软件已安装完成 lrzsz文件上传下载软件 zip与unzip压缩包软件 net core 相关软件 确认上述软件安装完成之后,开始部署程序 创建部署文件夹 我的习惯是在usr文件夹下新 ...
- JS倒计时两种种实现方式
最近做浏览器界面倒计时,用js就实现,两种方式: 一:设置时长,进行倒计时.比如考试时间等等 代码如下: <html> <head> <meta charset=&quo ...