在虚拟机中使用NetToPLCSim和PLC相连.
1,虚拟机...系统Win10...里面安装了VS.
2,本机...系统Win10...里面安装了博图15.
3,转换软件:NetToPLCSIM.
4,本机和虚拟机连接同一个路由器.注意:

5,设置虚拟机为桥接模式,并且选择连接了路由器的网卡.
6,网卡设置自动获取IP地址,并且禁止,启用,让网卡获取IP地址.
本机IP:
虚拟机IP:
正常情况,两台机器能够互相ping 成功!,则基本准备,网络配置完毕.否则,检查防火墙.我没遇到,就没弄.
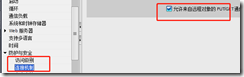
然后打开博图,必须要进行get/put打勾!
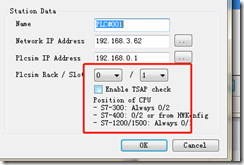
1,设置PLC ip 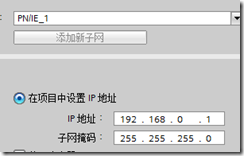
2,GET/PUT 打勾
3,模拟的时候,先点击模拟,但是不要下载PLC.
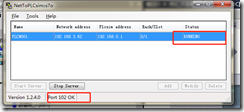
4,打开Nettoplcsim软件:(其中有 stop server start server 默认即可),注意,一定要先打开这个软件.

5,打开添加对接画面:点击PLCSIM IP.注意,如果先模拟再添加就不会显示.
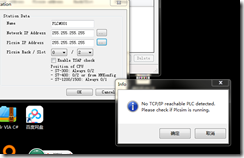 没有PLC
没有PLC
6,打开PLC模拟器,并下载PLC 点击 PLCSIM IP:这个很关键,必须它自己跳出来的.选择PLC.

7,选择 NET IP ADDR:
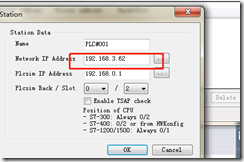
8,ok注意 rack和slot选择
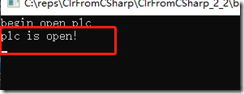
9,在虚拟机的VS里面测试通讯
 internal static void TestS7()

        {

            Plc plc = new Plc(CpuType.S71200, "192.168.3.62", 0, 1);

            try

            {

                log("begin open plc");

                plc.Open();//一个PLC异步函数,注意,异步函数的异常只能通过

                log("plc is open!");

            }

            catch(Exception e)

            {

                log(e.Message);

            }

        }
结果:
10,尝试读取写入byte[]数组:
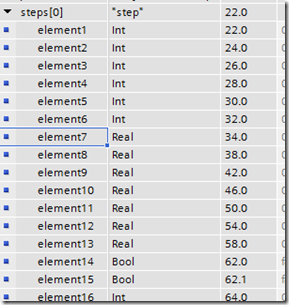
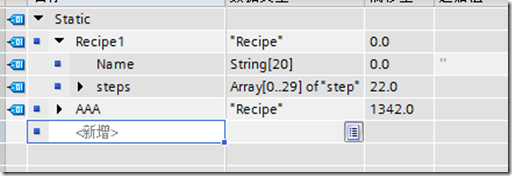
RecipePLC 数据类型具有:(配方)
一个字符串: string[20] 占用了22个字节.Index0是其大小,应该是22,index1 是实际字符长度.应该是0.现在
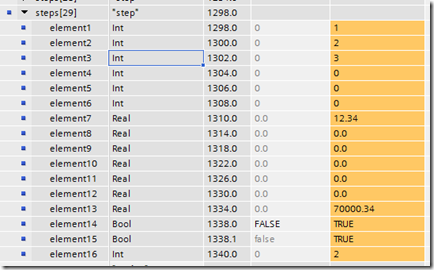
一个step数组:step是一个plc数据类型. 其为30个step元素.
每个step含有:

OK,我们先来完成如何读取写入这个结构:
10.1首先在vs中架构一个PLCSTRING类,因为 string这个类不好投射.
 public class PlcString:IPlcParse

    {

        private readonly byte[] bytes;

        public PlcString() : this(256) { }

        public PlcString(int len )

        {

            bytes = new byte[len];

            bytes[0] = len <= 0xfe ? (byte)len : (byte)0xfe;

        }

        public void SetString(string str)

        {

            int len = bytes.Length;

            if (str != string.Empty)

            {

                byte[] str_bytes = ASCIIEncoding.ASCII.GetBytes(str);

                bytes[1] = (byte)str_bytes.Length;

                str_bytes.CopyTo(bytes, 2);

            }

            else

            {

                bytes[1] = 0;

            }

        }

        public string GetString()

        {

            if (bytes[1] != 0)

            {

                byte[] strs = new byte[(int)bytes[1]];

                Buffer.BlockCopy(bytes, 2, strs, 0, (int)bytes[1]);

                return ASCIIEncoding.ASCII.GetString(strs);

            }

            else

            {

                return string.Empty;

            }

        }

        public static explicit operator String(PlcString obj)

        {

            return obj.GetString();

        }

        public  object FromBytes(byte[] bytes, ref double numBytes)

        {

            numBytes = Math.Ceiling(numBytes);

            if ((numBytes / 2 - Math.Floor(numBytes / 2.0)) > 0)

                numBytes++;

            Buffer.BlockCopy(bytes, (int)numBytes, this.bytes, 0, this.bytes.Length);

            numBytes += this.bytes.Length;

            return this;

        }

        public int GetSize()

        {

            return bytes.Length;

        }

        public void ToBytes(byte[] bytes, ref double numBytes)

        {

            numBytes = Math.Ceiling(numBytes);

            if ((numBytes / 2 - Math.Floor(numBytes / 2.0)) > 0)

                numBytes++;

            Buffer.BlockCopy(this.bytes, 0,bytes, (int)numBytes, this.bytes.Length);

            numBytes += this.bytes.Length;

        }

        public void Display()

        {

            foreach (var x in bytes)

                Console.Write(" {0:X2}", x);

            Console.WriteLine();

        }

    }
这个类实现了如下的接口:
 public interface IPlcParse

    {

        void ToBytes(byte[] bytes, ref double numBytes);

        object FromBytes(byte[] bytes, ref double numBytes);

        int GetSize();

    }
https://gitee.com/mao_qin_bin/s7netplus
算了,太多了,大家到这个地方下载吧. 注意版权.是我的!!!!!!!!!!!!!!!!!!!!!!!!!!!!!!!!!!!!!!!!!!!!!!!!!
在原有的S7的基础上更改的实现.(git下来之后,我们再开始下一步)
下面我们来实现VS中的step步:
public class Recipe_Step

    {

        public short element1;

        public short element2;

        public short element3;

        public short element4;

        public short element5;

        public short element6;

        public double element7;

        public double element8;

        public double element9;

        public double element10;

        public double element11;

        public double element12;

        public double element13;

        public bool element14;

        public bool element15;

        public short element16;

    }
1,int--投射成short
2,real-投射成double
3,注意大小是64个字节.我们来计算下我们的类的大小.
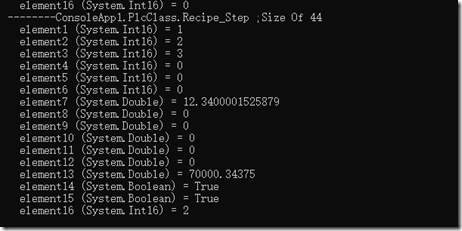
 public static void demo5()

        {

            PlcClassHelper.DisplayObject(new Recipe_Step());

        }
结果:
 Recipe_Step : ConsoleApp1.PlcClass.Recipe_Step   Size:44

Class of Recipe_Step

   Int16 : 0   Size:2

   Int16 : 0   Size:2

   Int16 : 0   Size:2

   Int16 : 0   Size:2

   Int16 : 0   Size:2

   Int16 : 0   Size:2

   Double : 0   Size:4

   Double : 0   Size:4

   Double : 0   Size:4

   Double : 0   Size:4

   Double : 0   Size:4

   Double : 0   Size:4

   Double : 0   Size:4

   Boolean : False   Size:2

   Boolean : False   Size:2

   Int16 : 0   Size:2
OK.
然后再测试下Recipe1:
 public class Recipe

    {

        public static Recipe StaticInstance=new Recipe();

        public PlcString Recipe_Name = new PlcString(20, "");

        public Recipe_Step[] Recipe_Steps = new Recipe_Step[30];

        private Recipe()

        {

            for(var i = 0; i < Recipe_Steps.Length; i++)

            {

                Recipe_Steps[i] = new Recipe_Step();

            }

        }

    }
这是PLC数据块(非优化)编译好的
这是我测试的:
Recipe : ConsoleApp1.PlcClass.Recipe   Size:1342

Class of Recipe

   PlcString :  String =   Bytes = : 14  0  0  0  0  0  0  0  0  0  0  0  0  0  0  0  0  0  0  0  0  0    Size:22

Array of ConsoleApp1.PlcClass.Recipe_Step[] :

     Recipe_Step : ConsoleApp1.PlcClass.Recipe_Step   Size:44

Class of Recipe_Step

       Int16 : 0   Size:2

       Int16 : 0   Size:2

       Int16 : 0   Size:2

       Int16 : 0   Size:2

       Int16 : 0   Size:2

       Int16 : 0   Size:2

       Double : 0   Size:4

       Double : 0   Size:4

       Double : 0   Size:4

       Double : 0   Size:4

       Double : 0   Size:4

       Double : 0   Size:4

       Double : 0   Size:4

       Boolean : False   Size:2

       Boolean : False   Size:2

       Int16 : 0   Size:2

     Recipe_Step : ConsoleApp1.PlcClass.Recipe_Step   Size:44
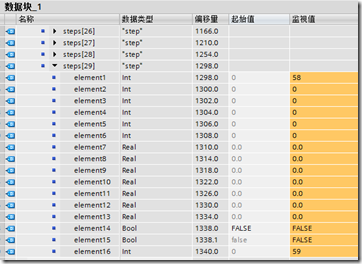
完全正确.下面设定下一些数据并且从PLC的读取:
10.5 设置PLC数据

10.6 从PLC读取数据:
完全一致:
10.7 将数据写入PLC:
 public static void demo6()

        {

            Recipe curRecipe = Recipe.StaticInstance;//引用配方

            Recipe.Initial();

            short t = 0;

            foreach(var step in curRecipe.Recipe_Steps)

            {

                step.element1 = t++;

                step.element16 = t++;

            }

            Plc plc = new Plc(CpuType.S71200, "192.168.3.62", 0, 1);

            try

            {

                plc.Open();

                plc.WriteBytes(DataType.DataBlock, 1, 0, PlcClass.ToBytes(curRecipe));

                PlcClassHelper.DisplayObject(curRecipe);

            }

            catch (PlcException e)

            {

                Console.WriteLine("Exception'Message is {0},Exception's Errcode is {1}", e.Message, e.ErrorCode.ToString());

            }

            finally

            {

                plc.Close();

            }

        }
上面的Initial是将staticInstance实列给初始化了.
查看结果: PLC
查看结果:VS

在虚拟机中使用NetToPLCSim和PLC相连.的更多相关文章
- Java对象在虚拟机中的创建、内存分布、访问定位以及死亡判定
转载请注明原文地址:http://www.cnblogs.com/ygj0930/p/6535156.html 一:虚拟机中对象的创建 1:虚拟机遇到new指令时,在常量池检索是否有对应的符号引用, ...
- Linux环境搭建-在虚拟机中安装Centos7.0
最近在空闲时间学习Linux环境中各种服务的安装与配置,都属于入门级别的,这里把所有的学习过程记录下来,和大家一起分享. 我的电脑系统是win7,所以我需要在win7上安装一个虚拟机-VMware,然 ...
- python虚拟机中的异常流控制
异常:对程序运行中的非正常情况进行抽象.并且提供相应的语法结构和语义元素,使得程序员能够通过这些语法结构和语义元素来方便地描述异常发生时的行为. 1.Python中的异常机制: 1.1Python虚拟 ...
- 虚拟机中Linux系统盘空间不足
虚拟机中Linux系统盘在使用过程中, 出现空间不足的提示. 使用命令du --max-depth=1 -h 查看Home目录下各个文件占用空间, 发现是./cache(隐藏文件)占用很大空间.进入c ...
- 虚拟机中CentOS 7下PHP环境配置
为了简单起见,虚拟机网卡设置为桥接模式 1.yum install httpd php 2.yum install mariadb 3.启动mariadb systemctl start maria ...
- VMware Workstation虚拟机中的Linux通过NAT模式共享上网配置教程
VMware Workstation虚拟机中的Linux通过NAT模式共享上网配置教程 在VMware Workstation虚拟机下面,Linux虚机要上网,一般是桥接模式,但我自己的电脑上网的环境 ...
- Azure Backup (1) 将SQL Server 2012虚拟机中数据库备份到Azure Storage
<Windows Azure Platform 系列文章目录> 本文介绍的是由国内世纪互联运维的China Azure,相比国外的Global Azure.主要区别是存储账号的DNS地址不 ...
- 虚拟机中MySQL连接问题:Lost connection to MySQL server at 'reading initial communication packet, system error: 0 以及 host is not allowed to connect mysql
环境:在VirtualBox中安装了Ubuntu虚拟机,网络使用了NAT模式,开启了端口转发. 局域网内其他计算机访问虚拟机中的MySQL Server出现两个问题: Lost connection ...
- 在虚拟机中安装CentOS7
在虚拟机中安装CentOS7 听语音 | 浏览:17352 | 更新:2014-10-31 12:14 1 2 3 4 5 6 7 分步阅读 一键约师傅 百度师傅最快的到家服务,最优质的电脑清灰! 百 ...
随机推荐
- set集合迭代
1.迭代遍历 Set<String> set = new HashSet<String>(); Iterator<String> it = set.iterator ...
- 学习 lind UML 资源 十月 第二弹
step one 来分析一下 UML 资源 管理
- 简单看看LockSupport和AQS
这次我们可以看看并发中锁的原理,大概会说到AQS,ReentrantLock,ReentrantReadWriteLock以及JDK8中新增的StampedLock,这些都是在java并发中很重要的东 ...
- python的数据类型之列表list
列表是最常用的Python数据类型,它可以作为一个方括号内的逗号分隔值出现.例如: stus = ["zhangsan","lisi","wangwu ...
- Quartz.Net和队列应用demo
using System; using System.Collections.Generic; using System.Threading; namespace ConsoleApplication ...
- 【Nginx入门系列】第二章 外部无法访问Nginx服务器
问题 Nginx服务器已经搭建成功,并且已经启动(如下图所示),并且可以ping通nginx服务器的ip地址,但是外部机子无法访问 Nginx服务器(没法显示欢迎页面) 解决方案 一般这种情况是出现在 ...
- OpenCV中Mat与二维数组之间的转换
---恢复内容开始--- 在OpenCV中将Mat(二维)与二维数组相对应,即将Mat中的每个像素值赋给一个二维数组. 全部代码如下: #include <iostream> #inclu ...
- 计算机原理基础:DNS
DNS服务的作用 将域名解析成IP地址 端口号:53 域名服务器 根域名服务器 所有的根域名服务器都知道所有的顶级域名服务器的域名和IP地址. 不管是哪一个本地域名服务器,若要对因特网上任何一个域名进 ...
- 安卓开发实战-记账本APP(六)
记账本APP开发---终结篇 昨天的动态数字录屏奉上:在抖音上拍了一个(ps:欢迎点赞) https://v.douyin.com/poEjmG/ 今天将图表的内容进行了制作,我用的是MPChart的 ...
- 文件传输基础----Java IO流
编码问题 一个很著名的奇怪现象:当你在 windows 的记事本里新建一个文件,输入"联通"两个字之后,保存,关闭,然后再次打开,你会发现这两个字已经消失了,代之的是几个乱码!呵呵 ...