WPF成长之路------帧动画(1)
最近公司的一个项目因为是WPF的,而自己已经很长一段时间没有接触过WPF了,再加上之前没有做过wpf的动画效果,因此在学习的过程中也顺便记录一下,说不定以后还会用上,同时也算是总结一下吧!刚开始写博客,写得不好的地方大家多多见谅!不喜勿喷!
这个效果主要是通过各种图形的组合进行绘图,然后通过贝塞尔曲线绘制主要的动画图形,从而实现帧动画!
先上效果图:
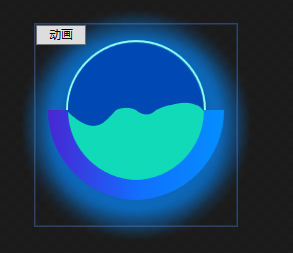

动态图效果不好,所以也放了一张静态图片。
首先是绘制图形部分,图形主要是五部分组成:背景的虚化效果、圆弧(由两部分组成,分别设置渐变色)、圆形边框、圆形内部颜色以及动画部分,代码如下:
<Viewbox>

        <DockPanel>

            <Grid>

                <ed:Arc x:Name="shadowArc" StartAngle="" EndAngle="" Height="" Width="" ArcThickness="" Opacity="0.7">

                    <ed:Arc.Fill>

                        <SolidColorBrush x:Name="shadowColor" Color="#0689FF"></SolidColorBrush>

                    </ed:Arc.Fill>

                    <ed:Arc.Effect>

                        <BlurEffect Radius="" KernelType="Box"  RenderingBias="Quality"/>

                    </ed:Arc.Effect>

                </ed:Arc>

                <ed:Arc StartAngle="" EndAngle="" ArcThickness="" Height="" Width="" Fill="#8BFCF4" Margin="0 0 0 30"></ed:Arc>

                <ed:Arc StartAngle="" EndAngle="" ArcThickness="" Height="" Width="" Fill="#0048B4" Margin="0 0 0 30"></ed:Arc>

                <ed:Arc Height="" Width="" Margin="0 0 0 30" StartAngle="" EndAngle=""></ed:Arc>

                <Path Height="" Width="" Margin="0 0 0 30" Fill="#11DAB9">

                    <Path.Data>

                        <PathGeometry>

                            <PathFigure x:Name="pf_main" StartPoint="0,70">

                                <BezierSegment x:Name="bs_main0" Point1="30,100" Point2="40,80" Point3="50,70"></BezierSegment>

                                <BezierSegment x:Name="bs_main1" Point1="50,70" Point2="60,65" Point3="70,70"></BezierSegment>

                                <BezierSegment x:Name="bs_main2" Point1="70,70" Point2="80,80" Point3="90,70"></BezierSegment>

                                <BezierSegment x:Name="bs_main3" Point1="90,70" Point2="100,65" Point3="105,65"></BezierSegment>

                                <BezierSegment x:Name="bs_main4" Point1="105,65" Point2="120,60" Point3="130,65"></BezierSegment>

                                <BezierSegment x:Name="bs_main5" Point1="130,65" Point2="135,65" Point3="140,75"></BezierSegment>

                                <PolyLineSegment Points="140,120 70,150 0,120"></PolyLineSegment>

                            </PathFigure>

                        </PathGeometry>

                    </Path.Data>

                </Path>

                <ed:Arc StartAngle="" EndAngle="" Height="" Width="" ArcThickness="" Margin="85 60 0 0">

                    <ed:Arc.Fill>

                        <LinearGradientBrush StartPoint="1,0" EndPoint="0,0">

                            <GradientStop Color="#038EFF" Offset=""></GradientStop>

                            <GradientStop Color="#126DFF" Offset=""></GradientStop>

                        </LinearGradientBrush>

                    </ed:Arc.Fill>

                </ed:Arc>

                <ed:Arc StartAngle="" EndAngle="" Height="" Width="" ArcThickness="" Margin="-85 60 0 0">

                    <ed:Arc.Fill>

                        <LinearGradientBrush StartPoint="1,0" EndPoint="0,0">

                            <GradientStop Color="#126DFF" Offset=""></GradientStop>

                            <GradientStop Color="#4826D2" Offset=""></GradientStop>

                        </LinearGradientBrush>

                    </ed:Arc.Fill>

                </ed:Arc>

                <Button x:Name="button" Width="" Height="" VerticalAlignment="Top" HorizontalAlignment="Left">动画</Button>

            </Grid>

        </DockPanel>

    </Viewbox>
随后设置内部动画效果,设置的点位越多,动画效果也好,这里就由大家自己的琢磨了(帧动画):
<UserControl.Resources>

        <ResourceDictionary>

            <Storyboard x:Key="stb">

                <PointAnimationUsingKeyFrames Storyboard.TargetName="bs_main0" Storyboard.TargetProperty="Point2" BeginTime="0:0:0.7" AutoReverse="True" RepeatBehavior="4x" FillBehavior="Stop">

                    <EasingPointKeyFrame Value="45,70" KeyTime="0:0:0.8"></EasingPointKeyFrame>

                </PointAnimationUsingKeyFrames>

                <PointAnimationUsingKeyFrames Storyboard.TargetName="bs_main2" Storyboard.TargetProperty="Point3" BeginTime="0:0:0.7" AutoReverse="True" RepeatBehavior="4x" FillBehavior="Stop">

                    <EasingPointKeyFrame Value="90,75" KeyTime="0:0:1.2"></EasingPointKeyFrame>

                </PointAnimationUsingKeyFrames>

                <PointAnimationUsingKeyFrames Storyboard.TargetName="bs_main3" Storyboard.TargetProperty="Point1" BeginTime="0:0:0.7" AutoReverse="True" RepeatBehavior="4x" FillBehavior="Stop">

                    <EasingPointKeyFrame Value="90,75" KeyTime="0:0:1.2"></EasingPointKeyFrame>

                </PointAnimationUsingKeyFrames>

                <PointAnimationUsingKeyFrames Storyboard.TargetName="bs_main3" Storyboard.TargetProperty="Point2" BeginTime="0:0:0.7" AutoReverse="True" RepeatBehavior="4x" FillBehavior="Stop">

                    <EasingPointKeyFrame Value="100,70" KeyTime="0:0:1.2"></EasingPointKeyFrame>

                </PointAnimationUsingKeyFrames>

                <PointAnimationUsingKeyFrames Storyboard.TargetName="bs_main3" Storyboard.TargetProperty="Point3" BeginTime="0:0:0.7" AutoReverse="True" RepeatBehavior="5x" FillBehavior="Stop">

                    <EasingPointKeyFrame Value="105,68" KeyTime="0:0:1.2"></EasingPointKeyFrame>

                </PointAnimationUsingKeyFrames>

                <PointAnimationUsingKeyFrames Storyboard.TargetName="bs_main4" Storyboard.TargetProperty="Point1" BeginTime="0:0:0.7" AutoReverse="True" RepeatBehavior="5x" FillBehavior="Stop">

                    <EasingPointKeyFrame Value="105,68" KeyTime="0:0:0.8"></EasingPointKeyFrame>

                </PointAnimationUsingKeyFrames>

                <PointAnimationUsingKeyFrames Storyboard.TargetName="bs_main4" Storyboard.TargetProperty="Point2" BeginTime="0:0:0.7" AutoReverse="True" RepeatBehavior="5x" FillBehavior="Stop">

                    <EasingPointKeyFrame Value="120,65" KeyTime="0:0:0.8"></EasingPointKeyFrame>

                </PointAnimationUsingKeyFrames>

            </Storyboard>

        </ResourceDictionary>

    </UserControl.Resources>

    <UserControl.Triggers>

        <EventTrigger RoutedEvent="FrameworkElement.Loaded">

            <BeginStoryboard Storyboard="{StaticResource stb}"></BeginStoryboard>

        </EventTrigger>

        <EventTrigger SourceName="button" RoutedEvent="Button.Click">

            <BeginStoryboard Storyboard="{StaticResource stb}"></BeginStoryboard>

        </EventTrigger>

    </UserControl.Triggers>
参考链接:https://www.cnblogs.com/tsliwei/p/5770546.html
WPF成长之路------帧动画(1)的更多相关文章
- WPF成长之路------翻转动画
先介绍一下RenderTransform类,该类成员如下: TranslateTransform:能够让某对象的位置发生平移变化. RotateTransform:能够让某对象产生旋转变化,根据中心点 ...
- WPF成长之路------视频
今天偶然看到一篇博文,发现WPF原来还可以直接播放视频!于是在这里记录一下,以后方便使用: <MediaElement Source="C:\WINDOWS\system32\oobe ...
- wpf 帧动画
帧动画实现很简单 <ImageBrush x:Key="speed_s" Stretch="Fill" ImageSource="/images ...
- android 帧动画的实现及图片过多时OOM解决方案(一)
一,animation_list.xml中静态配置帧动画的顺序,如下: <?xml version="1.0" encoding="utf-8"?> ...
- WPF学习之绘图和动画
如今的软件市场,竞争已经进入白热化阶段,功能强.运算快.界面友好.Bug少.价格低都已经成为了必备条件.这还不算完,随着计算机的多媒体功能越来越强,软件的界面是否色彩亮丽.是否能通过动画.3D等效果是 ...
- Android动画总结#补间动画(Tween Animation/View Animation) #帧动画(Frame Animation/Drawable Animation)#属性动画(PropertyAnimation)
1.共有三种动画,英文名字多种叫法如下 第一种动画:补间动画(Tween Animation/View Animation) 四个:RotateAnimation旋转. AlphaAnimation透 ...
- WPF学习之路初识
WPF学习之路初识 WPF 介绍 .NET Framework 4 .NET Framework 3.5 .NET Framework 3.0 Windows Presentation Found ...
- 利用css3-animation来制作逐帧动画
前言 趁着还没有元旦之前先码一篇文章,不然到时候估计又被各种虐了,所以趁现在还有力气先来一篇.今天来聊聊css3中的动画属性animation,对这个属性懵懂是在很早的时候有前辈用这个 animati ...
- WPF学习之绘图和动画--DarrenF
Blend作为专门的设计工具让WPF如虎添翼,即能够帮助不了解编程的设计师快速上手,又能够帮助资深开发者快速建立图形或者动画的原型. 1.1 WPF绘图 与传统的.net开发使用GDI+进行绘图不 ...
随机推荐
- 我的Linux之路——实现虚拟机VMware上linux与windows互相复制与粘贴
出自:http://blog.csdn.net/u012243115/article/details/40454063 解决方法:只需要在CentOS安装一个vmware-tools的工具. 1.打开 ...
- Java安全框架 Apache Shiro学习-1-ini 配置
简单登录流程: 1. SecurityManager 2. SecurityUtils.setSecurityManager 3. SecurityUtils.getSubject ...
- git远程代码库回滚(webstorm下)
git远程代码库回滚(webstorm下) 1. 场景 添加了一个文件[file-for-test.js]到git的控制下 进行了三次修改,并分别进行了三次commit,最后进行了一次push git ...
- Spring学习笔记(三)--Convert System设计
一.概述 转换系统是不同范式系统间交互常常会需要碰到的,如WEB 中HTTP KV文本流到对象的转换和对象到http KV文本流的转换:还有对象到关系型DB和关系型DB到对象之间的转换(ORM). 一 ...
- 怎样取得selected的option选项的value值
现在有一id=test的下拉框,怎么拿到选中的那个值呢? 分别使用javascript原生的方法和jquery方法 <select id="test" name=& ...
- HAproxy-1.6.3 安装部署
反向代理优缺点: haproxy反向代理高性能的HTTP,TCP反向代理 nginx:优点:1.web服务器,比较广泛2.工作7层location设置比较复杂基于HTTP(url,cookies,ag ...
- code3728 联合权值
一开始暴搜,超时3个点... 后来看了题解: 首先,两个点的距离为2当且仅当它们都与一个点直接相连 反过来说,一个点所有的出边的终点都是互相距离2的(最大值可以依靠这个方法,前向星处理的时候将每个点的 ...
- Python自然语言处理工具NLTK的安装FAQ
1 下载Python 首先去python的主页下载一个python版本http://www.python.org/,一路next下去,安装完毕即可 2 下载nltk包 下载地址:http://www. ...
- MVC各个层的作用
(1)控制器的作用是调用模型,并调用视图,将模型产生的数据传递给视图.并让相关视图去显示.(2)模型的作用是获取数据并处理数据.(3)视图的作用是将取得的数据进行组织.美化等,并最终向用户终端输出.
- Sublime Text 2 安装配置插件
最近学习python,看网上推荐用sublime text2挺方便,就学习了一下对sublime text2 安装插件,先放在这里,以备以后查找 根据晚上资料修改,原文请看这里 Python的自动补全 ...