appium+python自动化29-toast
注意
toast要appium1.6.3以上版本才支持,appium1.4的版本就别浪费时间了
Supported Platforms
1.查看appium v1.7版本官方文档
Supported Platforms
Appium supports app automation across a variety of platforms, like iOS, Android, and Windows. Each platform is supported by one or more "drivers", which know how to automate that particular platform. Choose a driver below for specific information about how that driver works and how to set it up:
- iOS
- The XCUITest Driver
- (DEPRECATED) The UIAutomation Driver
- Android
- (BETA) The Espresso Driver
- The UiAutomator2 Driver
- (DEPRECATED) The UiAutomator Driver
- (DEPRECATED) The Selendroid Driver
- The Windows Driver (for Windows Desktop apps)
- The Mac Driver (for Mac Desktop apps)
2.从上面的信息可以看出目前1.7的android版可以支持:Espresso、UiAutomator2、UiAutomator、Selendroid四种驱动模式,后面两个不推荐用了,太老了,Espresso这个是最新支持的处于beta阶段,UiAutomator2是目前最稳的。
3.appium最新版本还能支持windows和mac的桌面app程序了,这个是否稳定,拭目以待!
toast定位
1.先看下toast长什么样,如下图,像这种弹出来的消息"再按一次退出",这种就是toast了。

2.想定位toast元素,这里一定要注意automationName的参数必须是Uiautomator2才能定位到。
'automationName': 'Uiautomator2'
# coding:utf-8

from appium import webdriver

from selenium.webdriver.support.ui import WebDriverWait

from selenium.webdriver.support import expected_conditions as EC

from time import sleep

desired_caps = {

                'platformName': 'Android',

                'deviceName': '127.0.0.1:62001',

                'platformVersion': '4.4.2',

                'appPackage': 'com.baidu.yuedu',

                'appActivity': 'com.baidu.yuedu.splash.SplashActivity',

                'noReset': 'true',

                'automationName': 'Uiautomator2'

                }

driver = webdriver.Remote('http://127.0.0.1:4723/wd/hub', desired_caps)

# 等主页面activity出现

driver.wait_activity(".base.ui.MainActivity", 10)

driver.back()   # 点返回

# 定位toast元素

toast_loc = ("xpath", ".//*[contains(@text,'再按一次退出')]")

t = WebDriverWait(driver, 10, 0.1).until(EC.presence_of_element_located(toast_loc))

print t
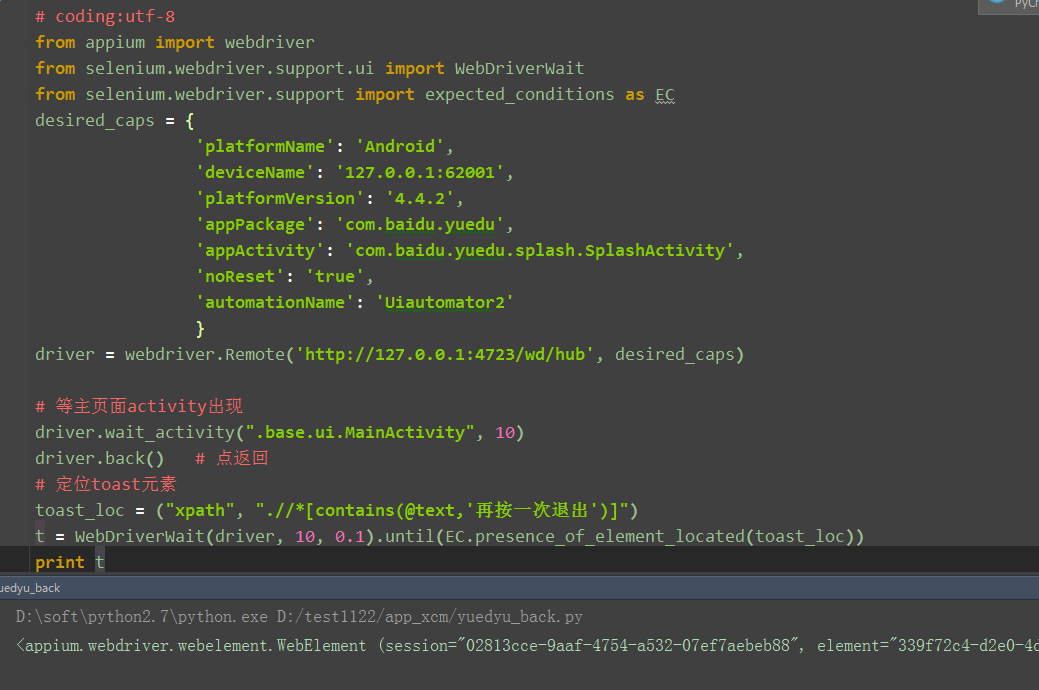
3.打印出来的结果,出现如下信息,说明定位到toast了
<appium.webdriver.webelement.WebElement (session="02813cce-9aaf-4754-a532-07ef7aebeb88", element="339f72c4-d2e0-4d98-8db0-69be741a3d1b")>
封装toast判断
1.单独写一个函数来封装判断是否存在toast消息,存在返回True,不存在返回False
def is_toast_exist(driver,text,timeout=30,poll_frequency=0.5):

    '''is toast exist, return True or False

    :Agrs:

     - driver - 传driver

     - text   - 页面上看到的文本内容

     - timeout - 最大超时时间,默认30s

     - poll_frequency  - 间隔查询时间,默认0.5s查询一次

    :Usage:

     is_toast_exist(driver, "看到的内容")

    '''

    try:

        toast_loc = ("xpath", ".//*[contains(@text,'%s')]"%text)

        WebDriverWait(driver, timeout, poll_frequency).until(EC.presence_of_element_located(toast_loc))

        return True

    except:

        return False
参考代码
# coding:utf-8

from appium import webdriver

from selenium.webdriver.support.ui import WebDriverWait

from selenium.webdriver.support import expected_conditions as EC

desired_caps = {

                'platformName': 'Android',

                'deviceName': '127.0.0.1:62001',

                'platformVersion': '4.4.2',

                'appPackage': 'com.baidu.yuedu',

                'appActivity': 'com.baidu.yuedu.splash.SplashActivity',

                'noReset': 'true',

                'automationName': 'Uiautomator2'

                }

def is_toast_exist(driver,text,timeout=30,poll_frequency=0.5):

    '''is toast exist, return True or False

    :Agrs:

     - driver - 传driver

     - text   - 页面上看到的文本内容

     - timeout - 最大超时时间,默认30s

     - poll_frequency  - 间隔查询时间,默认0.5s查询一次

    :Usage:

     is_toast_exist(driver, "看到的内容")

    '''

    try:

        toast_loc = ("xpath", ".//*[contains(@text,'%s')]"%text)

        WebDriverWait(driver, timeout, poll_frequency).until(EC.presence_of_element_located(toast_loc))

        return True

    except:

        return False

if __name__ == "__main__":

    driver = webdriver.Remote('http://127.0.0.1:4723/wd/hub', desired_caps)

    # 等主页面activity出现

    driver.wait_activity(".base.ui.MainActivity", 10)

    driver.back()   # 点返回

    # 判断是否存在toast-'再按一次退出'

    print is_toast_exist(driver, "再按一次退出")
在学习过程中有遇到疑问的,可以appium+python QQ群交流:330467341
appium+python自动化29-toast的更多相关文章
- Appium+python自动化获取toast消息的方法
转载地址:https://www.cnblogs.com/shangren/p/8191879.html 1. 首先执行这个命令:npm install -g cnpm --registry=http ...
- Appium+python自动化获取toast消息(windows版)的方法
原来用的Appium1.5.3GUI版本,那为什么升级呢? 为了兼容最新版本的iOS10和Android7 Xcode8升级后,将不支持使用UIAutomation,而是改为使用XCUITest了,并 ...
- Appium+python自动化8-Appium Python API
Appium+python自动化8-AppiumPython API 前言: Appium Python API全集,不知道哪个大神整理的,这里贴出来分享给大家. 1.contexts conte ...
- appium+python自动化61-中文输入乱码问题解决
前言 在夜神模拟器上输入中文,发现是乱码,将unicodeKeyboard和resetKeyboard参数设置为True了,发现还是没法解决. 打开手机设置语言和输入法,发现找不到Appium And ...
- appium+python自动化52-多点触控MultiAction
前言 MultiAction是针对多点触控操作的,是TouchAction的一个补充模块 TouchAction用法参考前面的一篇:appium+python自动化33-TouchAction 多点触 ...
- Appium+python自动化20-查看iOS上app元素属性
前言 学UI自动化首先就是定位页面元素,玩过android版的appium小伙伴应该都知道,appium的windows版自带的Inspector可以定位app上的元素 Mac版的appium1.6的 ...
- Appium+python自动化19-iOS模拟器(iOS Simulator)安装自家APP
前言 做过iOS上app测试的小伙伴应该都知道,普通用户安装app都是从appstore下载安装,安装测试版本的app,一般就是开发给的二维码扫码安装, 或者开发给个.ipa的安装包文件,通过itoo ...
- appium+python自动化50-生成定位对象模板templet(jinja2)
前言 每次自己写pageobject定位元素对象太繁琐,格式都差不多,只是换个定位方法,这种就可以才有模板的方式,批量生成pageobject定位元素对象的模板 python里面生成模板有两个模块可以 ...
- Appium+python自动化20-查看iOS上app元素属性【转载】
前言 学UI自动化首先就是定位页面元素,玩过android版的appium小伙伴应该都知道,appium的windows版自带的Inspector可以定位app上的元素Mac版的appium1.6的版 ...
- Appium+python自动化19-iOS模拟器(iOS Simulator)安装自家APP【转载】
前言 做过iOS上app测试的小伙伴应该都知道,普通用户安装app都是从appstore下载安装,安装测试版本的app,一般就是开发给的二维码扫码安装, 或者开发给个.ipa的安装包文件,通过itoo ...
随机推荐
- java的简单入门,tomcat服务器
Tomcat是一款开源的处理动态非常牛逼的web服务器.是sun公司开发的,在丧尸危机之后被收购了. 安装Tomcat需要的支持安装包 JDK下载:http://www.oracle.com/tech ...
- 【ecmascript】Javascript 严格模式详解【转】
一.概述 除了正常运行模式,ECMAscript 5添加了第二种运行模式:"严格模式"(strict mode).顾名思义,这种模式使得Javascript在更严格的条件下运行. ...
- CentOS7 开通特定防火墙端口
>>> 开启端口 firewall-cmd --zone=public --add-port=/tcp --permanent 命令含义: --zone #作用域 --add-po ...
- C++复制控制:拷贝构造函数
一.拷贝构造函数是一种特殊构造函数,具有单个形参,该形参(常用const修饰)是对该类类型的引用.与默认构造函数一样 ,拷贝构造函数可由编译器隐式调用.拷贝构造函数应用的场合为: (1)根据另一个同类 ...
- Python中的数据结构 --- 元组(tuple)、字典(tuple)
元组(tuple)本身是不可变数据类型,没有增删改查:元组内可以存储任意数据类型一.元组的创建 例:t = (1,2.3,'star',[1,2,3]) ## 元组里面包含可变类型,故 ...
- 学习三部曲:WHAT、HOW、WHY
一个人学习的过程要经历以下三步,才可以说得上"学会"两字: 第一步:WHAT 所谓的"WHAT",就是搞清楚某个东东是什么?有什么用?有什么语法?有什么功能特性 ...
- Objective C----手动管理内存和自动管理内存
对象的引用计数(Reference Counting) 正常情况下,当一段代码需要访问某个对象时,该对象的引用的计数加1:当这段代码不再访问该对象时,该对象的引用计数减1,表示这段代码不再访问该对象: ...
- 07----popo up 弹窗
弹窗: 绑定点击弹窗事件,js代码 弹出框的url设置 from django.forms.models import ModelChoiceField 进入ModelChoiceField 可看到 ...
- http_server实例代码
from socket import * def handleClient(connfd): print("-----") request = connfd.recv(4096) ...
- countDown
<!DOCTYPE html> <html> <head> <meta charset="utf-8"> <meta http ...