SpringCloud教程 | 第六篇: 分布式配置中心(Spring Cloud Config)
一、简介
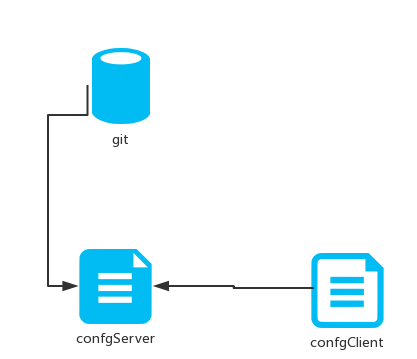
在分布式系统中,由于服务数量巨多,为了方便服务配置文件统一管理,实时更新,所以需要分布式配置中心组件。在Spring Cloud中,有分布式配置中心组件spring cloud config ,它支持配置服务放在配置服务的内存中(即本地),也支持放在远程Git仓库中。在spring cloud config 组件中,分两个角色,一是config server,二是config client。
二、构建Config Server
父maven工程省略,父pom文件:
<?xml version="1.0" encoding="UTF-8"?>
<project xmlns="http://maven.apache.org/POM/4.0.0" xmlns:xsi="http://www.w3.org/2001/XMLSchema-instance" xsi:schemaLocation="http://maven.apache.org/POM/4.0.0 http://maven.apache.org/xsd/maven-4.0.0.xsd">
  <modelVersion>4.0.0</modelVersion>

  <groupId>com.javen</groupId>
  <artifactId>springcloud-config</artifactId>
  <version>0.0.1-SNAPSHOT</version>
  <packaging>pom</packaging>

  <name>springcloud-config</name>
  <url>http://maven.apache.org</url>
  <description>springcloud config demo</description>

 <modules>
    <module>springcloud-config-eureka</module>
    <module>springcloud-config-server</module>
    <module>springcloud-config-client</module>
  </modules>

    <parent>
        <groupId>org.springframework.boot</groupId>
        <artifactId>spring-boot-starter-parent</artifactId>
        <version>2.1.4.RELEASE</version>
        <relativePath/>
    </parent>

      <properties>
        <project.build.sourceEncoding>UTF-8</project.build.sourceEncoding>
        <project.reporting.outputEncoding>UTF-8</project.reporting.outputEncoding>
        <java.version>1.8</java.version>
       <spring-cloud.version>Finchley.RELEASE</spring-cloud.version>
    </properties>

      <dependencies>
        <dependency>
            <groupId>org.springframework.boot</groupId>
            <artifactId>spring-boot-starter-test</artifactId>
            <scope>test</scope>
        </dependency>
    </dependencies>

    <dependencyManagement>
        <dependencies>
            <dependency>
                <groupId>org.springframework.cloud</groupId>
                <artifactId>spring-cloud-dependencies</artifactId>
                <version>${spring-cloud.version}</version>
                <type>pom</type>
                <scope>import</scope>
            </dependency>
        </dependencies>
    </dependencyManagement>

    <build>
        <plugins>
            <plugin>
                <groupId>org.springframework.boot</groupId>
                <artifactId>spring-boot-maven-plugin</artifactId>
            </plugin>
        </plugins>
    </build>

</project>
创建一个spring-boot项目,取名为springcloud-config-eureka,其pom.xml如下:
<?xml version="1.0"?>
<project xsi:schemaLocation="http://maven.apache.org/POM/4.0.0 http://maven.apache.org/xsd/maven-4.0.0.xsd" xmlns="http://maven.apache.org/POM/4.0.0"
    xmlns:xsi="http://www.w3.org/2001/XMLSchema-instance">
  <modelVersion>4.0.0</modelVersion>
  <parent>
    <groupId>com.javen</groupId>
    <artifactId>springcloud-config</artifactId>
    <version>0.0.1-SNAPSHOT</version>
  </parent>
  <artifactId>springcloud-config-eureka</artifactId>
  <name>springcloud-config-eureka</name>
  <url>http://maven.apache.org</url>
  <properties>
    <project.build.sourceEncoding>UTF-8</project.build.sourceEncoding>
  </properties>
   <dependencies>
          <dependency>
            <groupId>org.springframework.cloud</groupId>
            <artifactId>spring-cloud-starter-netflix-eureka-server</artifactId>
        </dependency>
  </dependencies>
</project>
在程序的入口Application类加上注解开启配置服务器的功能,代码如下:
import org.springframework.boot.SpringApplication;
import org.springframework.boot.autoconfigure.SpringBootApplication;
import org.springframework.cloud.netflix.eureka.server.EnableEurekaServer;

@SpringBootApplication
@EnableEurekaServer
public class ConfigEurekaApplication {

    public static void main(String[] args) {
        SpringApplication.run(ConfigEurekaApplication.class, args);
         System.out.println("config 注册中心服务启动...");
    }
}
需要在程序的配置文件application.properties文件配置以下:
spring.application.name=springcloud-config-eureka

server.port=8005
## 表示是否将自己注册到Eureka Server,默认为true。
eureka.client.register-with-eureka=false
## 表示是否从Eureka Server获取注册信息,默认为true。
eureka.client.fetch-registry=false

## 设置与Eureka Server交互的地址,查询服务和注册服务都需要依赖这个地址。
eureka.client.serviceUrl.defaultZone=http://localhost:${server.port}/eureka/
创建一个spring-boot项目,取名为springcloud-config-server,其pom.xml如下:
<?xml version="1.0"?>
<project xsi:schemaLocation="http://maven.apache.org/POM/4.0.0 http://maven.apache.org/xsd/maven-4.0.0.xsd" xmlns="http://maven.apache.org/POM/4.0.0"
    xmlns:xsi="http://www.w3.org/2001/XMLSchema-instance">
  <modelVersion>4.0.0</modelVersion>
  <parent>
    <groupId>com.javen</groupId>
    <artifactId>springcloud-config</artifactId>
    <version>0.0.1-SNAPSHOT</version>
  </parent>
  <artifactId>springcloud-config-server</artifactId>
  <name>springcloud-config-server</name>
  <url>http://maven.apache.org</url>

  <dependencies>
       <dependency>
            <groupId>org.springframework.cloud</groupId>
            <artifactId>spring-cloud-config-server</artifactId>
        </dependency>
        <dependency>
            <groupId>org.springframework.cloud</groupId>
            <artifactId>spring-cloud-starter-netflix-eureka-server</artifactId>
        </dependency>
  </dependencies>

  <build>
        <plugins>
            <plugin>
                <groupId>org.springframework.boot</groupId>
                <artifactId>spring-boot-maven-plugin</artifactId>
            </plugin>
        </plugins>
    </build>
</project>
在程序的入口Application类加上注解开启配置服务器的功能,代码如下:
import org.springframework.boot.SpringApplication;
import org.springframework.boot.autoconfigure.SpringBootApplication;
import org.springframework.cloud.client.discovery.EnableDiscoveryClient;
import org.springframework.cloud.config.server.EnableConfigServer;

@EnableDiscoveryClient
@EnableConfigServer
@SpringBootApplication
public class ConfigServerApplication {

    public static void main(String[] args) {
        SpringApplication.run(ConfigServerApplication.class, args);
        System.out.println("配置中心服务端启动成功!");
    }
}
需要在程序的配置文件application.properties文件配置以下:
spring.application.name=springcloud-config-server

server.port=9005

## 设置与Eureka Server交互的地址,查询服务和注册服务都需要依赖这个地址。
eureka.client.serviceUrl.defaultZone=http://localhost:8005/eureka/

## 读取本地文件,取消本属性注释,注释下面的git属性后从本地读取属性配置
#spring.profiles.active=native

## 读取git的路径
# git仓库的地址
spring.cloud.config.server.git.uri = https://github.com/xuwujing/springcloud-study/
# git仓库地址下的相对地址 多个用逗号","分割
spring.cloud.config.server.git.search-paths = /springcloud-config/config-repo
# git仓库的账号
spring.cloud.config.server.git.username =
# git仓库的密码
spring.cloud.config.server.git.password =
spring.cloud.config.server.git.uri:配置git仓库地址
spring.cloud.config.server.git.searchPaths:配置仓库路径
spring.cloud.config.label:配置仓库的分支
spring.cloud.config.server.git.username:访问git仓库的用户名
spring.cloud.config.server.git.password:访问git仓库的用户密码
如果Git仓库为公开仓库,可以不填写用户名和密码,如果是私有仓库需要填写,本例子是公开仓库,放心使用。
远程仓库https://github.com/xuwujing/springcloud-study/中有个文件/springcloud-config/config-repo文件夹中有对应的属性文件属性如下:
word=hello world
configtest.properties文件配置以下(本地属性文件):
word=hello world
证明配置服务中心可以从远程程序获取配置信息。
http请求地址和资源文件映射如下:
/{application}/{profile}[/{label}]
/{application}-{profile}.yml
/{label}/{application}-{profile}.yml
/{application}-{profile}.properties
/{label}/{application}-{profile}.properties
三、构建一个config client
重新创建一个springboot项目,取名为config-client,其pom文件:
<?xml version="1.0"?>
<project xsi:schemaLocation="http://maven.apache.org/POM/4.0.0 http://maven.apache.org/xsd/maven-4.0.0.xsd" xmlns="http://maven.apache.org/POM/4.0.0"
    xmlns:xsi="http://www.w3.org/2001/XMLSchema-instance">
  <modelVersion>4.0.0</modelVersion>
 <parent>
    <groupId>com.javen</groupId>
    <artifactId>springcloud-config</artifactId>
    <version>0.0.1-SNAPSHOT</version>
  </parent>
  <artifactId>springcloud-config-client</artifactId>
  <name>springcloud-config-client</name>
  <url>http://maven.apache.org</url>

    <dependencies>
        <dependency>
            <groupId>org.springframework.boot</groupId>
            <artifactId>spring-boot-starter-web</artifactId>
        </dependency>
          <dependency>
            <groupId>org.springframework.cloud</groupId>
            <artifactId>spring-cloud-starter-netflix-eureka-client</artifactId>
        </dependency>
        <dependency>
            <groupId>org.springframework.cloud</groupId>
            <artifactId>spring-cloud-starter-config</artifactId>
        </dependency>
    </dependencies>

    <build>
        <plugins>
            <plugin>
                <groupId>org.springframework.boot</groupId>
                <artifactId>spring-boot-maven-plugin</artifactId>
            </plugin>
        </plugins>
    </build>
</project>
其配置文件bootstrap.properties:
spring.cloud.config.name=configtest
spring.cloud.config.profile=pro
spring.cloud.config.label=master
spring.cloud.config.discovery.enabled=true
spring.cloud.config.discovery.serviceId=springcloud-config-server

eureka.client.serviceUrl.defaultZone=http://localhost:8005/eureka/
其配置文件application.properties:
spring.application.name=springcloud-config-client
server.port=9006
在程序的入口Application类加上注解开启配置服务器的功能,代码如下:
import org.springframework.beans.factory.annotation.Value;
import org.springframework.boot.SpringApplication;
import org.springframework.boot.autoconfigure.SpringBootApplication;
import org.springframework.cloud.client.discovery.EnableDiscoveryClient;
import org.springframework.web.bind.annotation.RequestMapping;
import org.springframework.web.bind.annotation.RequestParam;
import org.springframework.web.bind.annotation.RestController;

@EnableDiscoveryClient
@SpringBootApplication
@RestController
public class ConfigClientApplication {

    public static void main(String[] args) {
        SpringApplication.run(ConfigClientApplication.class, args);
        System.out.println("配置中心客户端启动成功!");
    }

    @Value("${word}")
    private String word;

    @RequestMapping("/hello")
    public String index(@RequestParam String name) {
        return name+","+this.word;
    }
}
打开网址访问:http://localhost:9006/hello?name=xx,网页显示:
xx,hello world!!
这就说明,config-client从config-server获取了foo的属性,而config-server是从git仓库读取的,如图:
SpringCloud教程 | 第六篇: 分布式配置中心(Spring Cloud Config)的更多相关文章
- 史上最简单的SpringCloud教程 | 第六篇: 分布式配置中心(Spring Cloud Config)
一.简介 在分布式系统中,由于服务数量巨多,为了方便服务配置文件统一管理,实时更新,所以需要分布式配置中心组件. 在Spring Cloud中,有分布式配置中心组件spring cloud confi ...
- SpringCloud教程 | 第六篇: 分布式配置中心(Spring Cloud Config)(Finchley版本)
在上一篇文章讲述zuul的时候,已经提到过,使用配置服务来保存各个服务的配置文件.它就是Spring Cloud Config. 一.简介 在分布式系统中,由于服务数量巨多,为了方便服务配置文件统一管 ...
- 【SpringCloud】第六篇: 分布式配置中心(Spring Cloud Config)
前言: 必需学会SpringBoot基础知识 简介: spring cloud 为开发人员提供了快速构建分布式系统的一些工具,包括配置管理.服务发现.断路器.路由.微代理.事件总线.全局锁.决策竞选. ...
- 第六篇: 分布式配置中心(Spring Cloud Config)
一.简介 在分布式系统中,由于服务数量巨多,为了方便服务配置文件统一管理,实时更新,所以需要分布式配置中心组件. 在Spring Cloud中,有分布式配置中心组件spring cloud confi ...
- SpringCloud学习(六)分布式配置中心(Spring Cloud Config)(Finchley版本)
在上一篇文章讲述zuul的时候,已经提到过,使用配置服务来保存各个服务的配置文件.它就是Spring Cloud Config. 简介 在分布式系统中,由于服务数量巨多,为了方便服务配置文件统一管理, ...
- springCloud学习-高可用的分布式配置中心(Spring Cloud Config)
1.简介 高可用的分布式配置中心,即将配置中心做成一个微服务,将其集群化,从而达到高可用.config-server和config-client向eureka-server注册,且将config-se ...
- 一起来学Spring Cloud | 第七章:分布式配置中心(Spring Cloud Config)
上一章节,我们讲解了服务网关zuul,本章节我们从git和本地两种存储配置信息的方式来讲解springcloud的分布式配置中心-Spring Cloud Config. 一.Spring Cloud ...
- Spring Cloud Config(一):聊聊分布式配置中心 Spring Cloud Config
目录 Spring Cloud Config(一):聊聊分布式配置中心 Spring Cloud Config Spring Cloud Config(二):基于Git搭建配置中心 Spring Cl ...
- SpringCloud(6)分布式配置中心Spring Cloud Config
1.Spring Cloud Config 简介 在分布式系统中,由于服务数量巨多,为了方便服务配置文件统一管理,实时更新,所以需要分布式配置中心组件.在Spring Cloud中,有分布式配置中心组 ...
随机推荐
- [SDOI2006] 保安站岗
题目链接 第一遍不知道为什么就爆零了…… 第二遍改了一下策略,思路没变,结果不知道为什么就 A 了??? 树形 DP 经典问题:选择最少点以覆盖树上所有点(边). 对于本题,设 dp[i][0/1][ ...
- ZOJ Monthly, January 2018
A 易知最优的方法是一次只拿一颗,石头数谁多谁赢,一样多后手赢 #include <map> #include <set> #include <ctime> #in ...
- 降维【PCA & SVD】
PCA(principle component analysis)主成分分析 理论依据 最大方差理论 最小平方误差理论 一.最大方差理论(白面机器学习) 对一个矩阵进行降维,我们希望降维之后的每一维数 ...
- PHP-max_execution_time与fpm.request_terminate_timeout介绍
前段时间一位同事跟我说php脚本超时时间以fpm配置优先.经过自己测试后,其实不然,前面的观点只是在某些情况下成立. php脚本超时时间可以在php.ini的max_execution_time和fp ...
- NOI-OJ 1.12 ID:10 素数对
整体思路 本题涉及大量素数的使用,故使用埃拉拖色尼算法提前计算出素数表可以避免大量.重复的计算. 判断素数对很简单,使用两个变量p1和p2代表素数表中的第一个和第二个素数,依次在表中向后移动,判断p2 ...
- Docker下安装Jenkins
Docker安装参见:https://www.cnblogs.com/hackyo/p/9280042.html 安装Jenkins: docker run \ -u root \ --rm \ -d ...
- 第一节:WebApi的纯原生态的RestFul风格接口和路由规则介绍
一. 原生态接口 1. 从默认路由开始分析 在WebApiConfig.cs类中的Register方法中,我们可以看到默认路由如下: 分析:请求地址在 controller 前面需要加上 api/,c ...
- django - 总结
0.html-socket import socket def handle_request(client): request_data = client.recv(1024) print(" ...
- word中中文保持正体,英文用斜体的方法.
有时候,大段的文字中夹杂着英文字母,英文需要斜体,如果一个接一个选中再斜体,费时费力,那么怎样快速实现文斜体中文不斜体呢? 工具/原料 word软件 方法/步骤 选中要修改的段落,替换-查找内容-特殊 ...
- shell使用lftp连接ftp和sftp,并可以指定私钥
lftp连接ftp在脚本中可以 lftp -c "open username:password@host:port; ls /Friso/20180822/click/mobile/SUCC ...