【译】第23节---Fluent API - 实体映射
原文:http://www.entityframeworktutorial.net/code-first/configure-entity-mappings-using-fluent-api.aspx
本节,我们将学习如何使用Fluent API配置实体。
我们将使用以下学校app的Student和Standard类:
public class Student

{

    public Student()

    {

    }

    public int StudentID { get; set; }

    public string StudentName { get; set; }

    public DateTime? DateOfBirth { get; set; }

    public byte[]  Photo { get; set; }

    public decimal Height { get; set; }

    public float Weight { get; set; }

    public Standard Standard { get; set; }

}

public class Standard

{

    public Standard()

    {

    }

    public int StandardId { get; set; }

    public string StandardName { get; set; }

    public ICollection<Student> Students { get; set; }

}
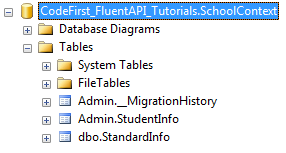
配置默认模式
首先,我们为数据库中的表配置默认模式。 当然,你可以在创建单个表时更改模式。 以下示例设置默认管理模式:
public class SchoolContext: DbContext

{

    public SchoolDBContext(): base()

    {

    }

    public DbSet<Student> Students { get; set; }

    public DbSet<Standard> Standards { get; set; }

    protected override void OnModelCreating(DbModelBuilder modelBuilder)

    {

        //Configure default schema

        modelBuilder.HasDefaultSchema("Admin");

    }

}
映射实体到表
Code-First将在上下文类中创建名称为DbSet属性的数据库表---本例中为Students和Standards。 你可以覆盖此约定,可以给出与DbSet属性不同的表名称,如下所示:
namespace CodeFirst_FluentAPI_Tutorials

{

    public class SchoolContext: DbContext

    {

        public SchoolDBContext(): base()

        {

        }

        public DbSet<Student> Students { get; set; }

        public DbSet<Standard> Standards { get; set; }

        protected override void OnModelCreating(DbModelBuilder modelBuilder)

        {

                //Configure default schema

            modelBuilder.HasDefaultSchema("Admin");

            //Map entity to table

            modelBuilder.Entity<Student>().ToTable("StudentInfo");

            modelBuilder.Entity<Standard>().ToTable("StandardInfo","dbo");

        }

    }

}
如上例所示,我们从Entity <TEntity>()方法开始。
大多数情况下,你必须从实体<TEntity>()方法开始,使用Fluent API进行配置。
我们使用ToTable()方法将Student实体映射到StudentInfo表,Standard实体到StandardInfo表。注意,StudentInfo位于Admin模式中,并且StandardInfo表位于dbo模式中,因为我们为StandardInfo表指定了dbo模式。
映射实体到多个表
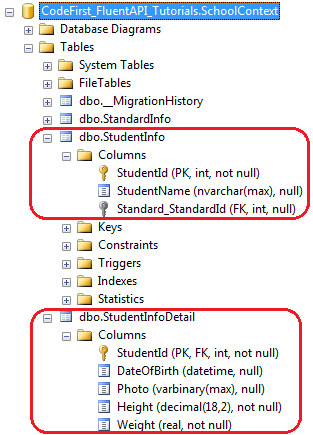
以下示例显示如何将Student实体映射到数据库中的多个表:
namespace CodeFirst_FluentAPI_Tutorials

{

    public class SchoolContext: DbContext

    {

        public SchoolDBContext(): base()

        {

        }

        public DbSet<Student> Students { get; set; }

        public DbSet<Standard> Standards { get; set; }

        protected override void OnModelCreating(DbModelBuilder modelBuilder)

        {

            modelBuilder.Entity<Student>().Map(m =>

            {

                m.Properties(p => new { p.StudentId, p.StudentName});

                m.ToTable("StudentInfo");

            }).Map(m => {

                m.Properties(p => new { p.StudentId, p.Height, p.Weight, p.Photo, p.DateOfBirth});

                m.ToTable("StudentInfoDetail");

            });

            modelBuilder.Entity<Standard>().ToTable("StandardInfo");

        }

    }

}
如上例所示,我们使用Map()方法将Student实体的某些属性映射到StudentInfo表,其他属性映射到StudentInfoDetail表。
因此,Student实体将分成两个表,如下所示:
Map方法需要将delegate方法作为参数。 您可以在Map方法中传递Action delegate或lambda表达式,如下所示:
using System.Data.Entity.ModelConfiguration.Configuration;

namespace CodeFirst_FluentAPI_Tutorials

{

    public class SchoolContext: DbContext

    {

        public SchoolDBContext(): base()

        {

        }

        public DbSet<Student> Students { get; set; }

        public DbSet<Standard> Standards { get; set; }

        protected override void OnModelCreating(DbModelBuilder modelBuilder)

        {

            modelBuilder.Entity<Student>().Map(delegate(EntityMappingConfiguration<Student> studentConfig)

            {

                studentConfig.Properties(p => new { p.StudentId, p.StudentName });

                studentConfig.ToTable("StudentInfo");

            });

            Action<EntityMappingConfiguration<Student>> studentMapping = m =>

            {

                m.Properties(p => new { p.StudentId, p.Height, p.Weight, p.Photo, p.DateOfBirth });

                m.ToTable("StudentInfoDetail");

            };

            modelBuilder.Entity<Student>().Map(studentMapping);

            modelBuilder.Entity<Standard>().ToTable("StandardInfo");

        }

    }

}
【译】第23节---Fluent API - 实体映射的更多相关文章
- 【译】第24节---Fluent API - 属性映射
原文:http://www.entityframeworktutorial.net/code-first/configure-property-mappings-using-fluent-api.as ...
- 使用 Fluent API 配置/映射属性和类型(摘自微软Data Access and Storage)
使用 Fluent API 配置/映射属性和类型 使用实体框架 Code First 时,默认行为是使用一组 EF 中内嵌的约定将 POCO 类映射到表.但是,有时您无法或不想遵守这些约定,需要将实体 ...
- 使用Fluent API 配置/映射属性和类型
Code First约定-Fluent API配置 使用Fluent API 配置/映射属性和类型 简介 通常通过重写派生DbContext 上的OnModelCreating 方法来访问Code F ...
- 使用 Fluent API 配置/映射属性和类型
使用 Fluent API 配置/映射属性和类型 使用实体框架 Code First 时,默认行为是使用一组 EF 中内嵌的约定将 POCO 类映射到表.但是,有时您无法或不想遵守这些约定,需要将实体 ...
- 【译】第22节---Fluent API - EntityTypeConfiguration类
原文:http://www.entityframeworktutorial.net/code-first/entitytypeconfiguration-class.aspx 在我们开始使用Fluen ...
- 【译】第21节---Fluent API
原文:http://www.entityframeworktutorial.net/code-first/fluent-api-in-code-first.aspx 在前面的学习中.我们已经看到不同的 ...
- 使用 Fluent API 配置/映射属性和类型2
1.将多个实体类映射到数据库中的一个表 要将多个实体映射到一个数据库表需要满足: a. 两个实体必须是一对一关系 b.两个实体共享一个主键 public class MyContext:DbConte ...
- EF使用Fluent API配置映射关系
定义一个继承自EntityTypeConfiguration<>泛型类的类来定义domain中每个类的数据库配置,在这个自定义类的构造函数中使用我们上次提到的那些方法配置数据库的映射. 映 ...
- 1.【使用EF Code-First方式和Fluent API来探讨EF中的关系】
原文链接:http://www.c-sharpcorner.com/UploadFile/3d39b4/relationship-in-entity-framework-using-code-firs ...
随机推荐
- 使用AJAX技术发送异步请求,HTTP服务端推送
使用AJAX技术发送异步请求 什么是AJAX AJAX指一步Javascript和XML(Asynchronous JavaScript And XML),它是一些列技术的组合,简单来说AJAX基于X ...
- 转:【专题五】TCP编程
前言 前面专题的例子都是基于应用层上的HTTP协议的介绍, 现在本专题来介绍下传输层协议——TCP协议,主要介绍下TCP协议的工作过程和基于TCP协议的一个简单的通信程序,下面就开始本专题的正文了. ...
- oracle 如何将一个字段内容拆分多行显示
例子: select regexp_substr('1,2,3,4,5', '[^,]+', 1, level)from dualconnect by level <= regexp_count ...
- 在Linux 中如何从进程相关的文件描述中恢复数据
在Linux中误删除了某个文件,但是 ps-ef|grep 文件名 发现某个进程还在使用该文件,那么可以通 过以下方式恢复文件. 例如:创建一个简单文件/tmp/test.txt, 随便向里面写点内容 ...
- redis安装--转
第一部分:安装redis 希望将redis安装到此目录 1 /usr/local/redis 希望将安装包下载到此目录 1 /usr/local/src 那么安装过程指令如下: 1 2 3 4 5 6 ...
- gets函数
gets函数 gets函数从标准输入读取一行文本并把它存储在作为参数传递给它的数组中 一行输入由一串字符组成,以一个换行符(newline)结尾 gets函数丢弃换行符,并在该行的末 ...
- 计算概论(A)/基础编程练习2(8题)/5:点和正方形的关系
#include<stdio.h> #include<math.h> int main() { // 输入坐标 float x, y; while(scanf("%f ...
- django模型中的关系对应
显然,关系数据库的力量在于将表相互关联.Django提供了定义三种最常见的数据库关系类型的方法:多对一,多对多和一对一. 在说明之前,首先来理解一下这三个概念: 多对一: 两个集合a,b;集合a中的多 ...
- pyglet self.
import pyglet class T(pyglet.window.Window): def __init__(self): super(T, self).__init__() self.play ...
- Git命令cherry-pick,选择把一部分代码提交到另一个分支
由于对git的使用还不是很熟悉,只是会基本的添加.提交.分支相关简单操作,在开发新需求的时候,需要涉及两个项目,一部分在新项目的新分支上开发的,另一部分是在老项目的老分支上开发的(这里忘了创建新分支) ...