iOS开发UI篇——简单的浏览器查看程序
一、程序实现要求
1、要求
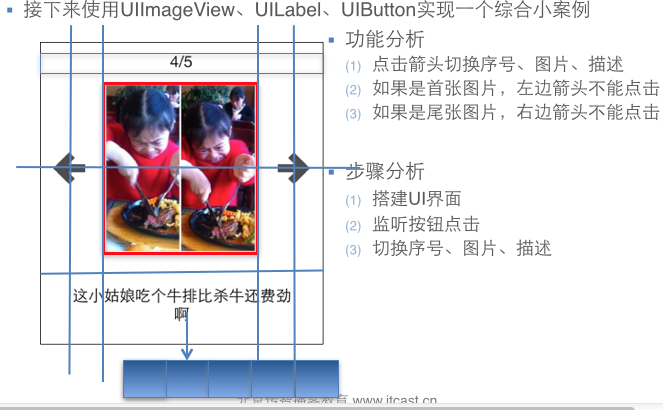
2. 界面分析
(1) 需要读取或修改属性的控件需要设置属性
序号标签
图片
图片描述
左边按钮
右边按钮
(2) 需要监听响应事件的对象,需要添加监听方法
左边按钮
右边按钮
二、实现基本功能的程序
//
// YYViewController.m
// 03-图片浏览器初步
//
// Created by apple on 14-5-21.
// Copyright (c) 2014年 itcase. All rights reserved.
// #import "YYViewController.h" #define POTOIMGW 200
#define POTOIMGH 300
#define POTOIMGX 60
#define POTOIMGY 50 @interface YYViewController () //变量声明!
@property(nonatomic,strong)UILabel *firstlab;
@property(nonatomic,strong)UILabel *lastlab;
@property(nonatomic,strong)UIImageView *icon;
@property(nonatomic,strong)UIButton *leftbtn;
@property(nonatomic,strong)UIButton *rightbtn; -(void)change;
@property(nonatomic ,assign)int i;
@end @implementation YYViewController - (void)viewDidLoad
{
[super viewDidLoad];
self.i=;
//创建一个用来显示序号的lable控件
UILabel *headlab=[[UILabel alloc]initWithFrame:CGRectMake(, , , )]; // [headlab setText:@"1/5"];
[headlab setTextAlignment:NSTextAlignmentCenter];
[headlab setTextColor:[UIColor blackColor]]; [self.view addSubview:headlab];
self.firstlab=headlab; //创建一个装载图片的控件
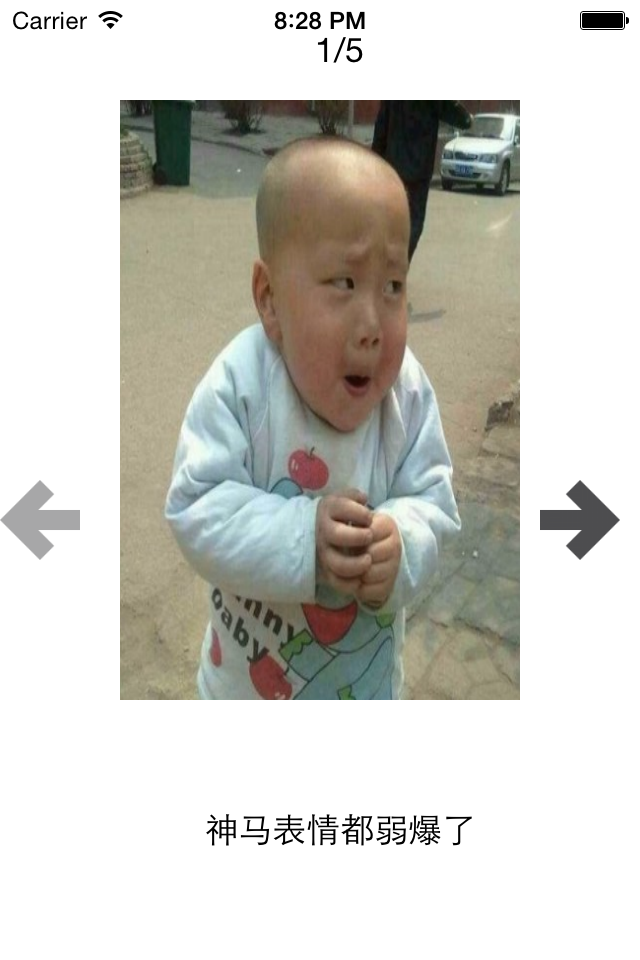
UIImageView *potoimg=[[UIImageView alloc]initWithFrame:CGRectMake(POTOIMGX, POTOIMGY, POTOIMGW, POTOIMGH)]; UIImage *image=[UIImage imageNamed:@"biaoqingdi"];
potoimg.image=image; [self.view addSubview:potoimg];
self.icon=potoimg; //创建最下边的描述图片的lable控件
UILabel *desclab=[[UILabel alloc]initWithFrame:CGRectMake(, , , )];
// [desclab setText:@"表情弱爆了!"];
[desclab setTextAlignment:NSTextAlignmentCenter];
[self.view addSubview:desclab];
self.lastlab=desclab; //创建两个方向键按钮
//设置为自定义类型
//1.使用类创建对象
UIButton *leftbtn=[UIButton buttonWithType:UIButtonTypeCustom]; //2.设置对象的属性(不要忘记设置坐标)
leftbtn.frame=CGRectMake(, self.view.center.y, , );
[leftbtn setBackgroundImage:[UIImage imageNamed:@"left_normal"] forState:UIControlStateNormal];
[leftbtn setBackgroundImage:[UIImage imageNamed:@"left_highlighted"] forState:UIControlStateHighlighted]; //3.提交对象到视图
[self.view addSubview:leftbtn]; self.leftbtn=leftbtn;
[leftbtn addTarget:self action:@selector(leftclick:) forControlEvents:UIControlEventTouchUpInside]; UIButton *rightbtn=[UIButton buttonWithType:UIButtonTypeCustom]; rightbtn.frame=CGRectMake(POTOIMGX+POTOIMGW+, self.view.center.y, , );
[rightbtn setBackgroundImage:[UIImage imageNamed:@"right_normal"] forState:UIControlStateNormal];
[rightbtn setBackgroundImage:[UIImage imageNamed:@"right_highlighted"] forState:UIControlStateHighlighted]; [self.view addSubview:rightbtn]; self.rightbtn=rightbtn;
[rightbtn addTarget:self action:@selector(rightclick:) forControlEvents:UIControlEventTouchUpInside]; //这是一个初始化方法,调用change可以完成初始化的工作
[self change];
} -(void)change
{
[self.firstlab setText:[NSString stringWithFormat:@"%d/5",self.i+]];
switch (self.i) {
case :
self.lastlab.text=@"什么表情都弱爆了!";
self.icon.image=[UIImage imageNamed:@"biaoqingdi"];
break;
case :
self.lastlab.text=@"病例";
self.icon.image=[UIImage imageNamed:@"bingli"];
break;
case :
self.lastlab.text=@"王八";
self.icon.image=[UIImage imageNamed:@"wangba"];
break;
case :
self.lastlab.text=@"吃牛扒";
self.icon.image=[UIImage imageNamed:@"chiniupa"];
break;
case :
self.lastlab.text=@"蛋疼!";
self.icon.image=[UIImage imageNamed:@"danteng"];
break;
}
//控制按钮的点击,如果为5则右键失效,如果为1,则左键失效
self.leftbtn.enabled=(self.i!=);
self.rightbtn.enabled=(self.i!=); } //向右按键
-(void)rightclick:(UIButton *)btn
{
self.i++;
[self change];
//NSLog(@"点我了");
}
-(void)leftclick:(UIButton *)btn
{
self.i--;
[self change];
}
- (void)didReceiveMemoryWarning
{
[super didReceiveMemoryWarning];
// Dispose of any resources that can be recreated.
} @end
三、程序优化
//

//  YYViewController.m

//  03-图片浏览器初步

//

//  Created by apple on 14-5-21.

//  Copyright (c) 2014年 itcase. All rights reserved.

//

#import "YYViewController.h"

#define POTOIMGW    200

#define POTOIMGH    300

#define POTOIMGX    60

#define  POTOIMGY    50

@interface YYViewController ()

//变量声明!

@property(nonatomic,strong)UILabel *firstlab;

@property(nonatomic,strong)UILabel *lastlab;

@property(nonatomic,strong)UIImageView *icon;

@property(nonatomic,strong)UIButton *leftbtn;

@property(nonatomic,strong)UIButton *rightbtn;

@property(nonatomic,strong)NSArray *array;

-(void)change;

@property(nonatomic ,assign)int i;

@end

@implementation YYViewController

- (void)viewDidLoad

{

    [super viewDidLoad];

    self.i=;

    //创建一个用来显示序号的lable控件

    UILabel *headlab=[[UILabel alloc]initWithFrame:CGRectMake(, , , )];

  // [headlab setText:@"1/5"];

    [headlab setTextAlignment:NSTextAlignmentCenter];

    [headlab setTextColor:[UIColor blackColor]];

    [self.view addSubview:headlab];

    self.firstlab=headlab;

    //创建一个装载图片的控件

    UIImageView *potoimg=[[UIImageView alloc]initWithFrame:CGRectMake(POTOIMGX, POTOIMGY, POTOIMGW, POTOIMGH)];

    UIImage *image=[UIImage imageNamed:@"biaoqingdi"];

    potoimg.image=image;

    [self.view addSubview:potoimg];

    self.icon=potoimg;

    //创建最下边的描述图片的lable控件

    UILabel *desclab=[[UILabel alloc]initWithFrame:CGRectMake(, , , )];

   // [desclab setText:@"表情弱爆了!"];

    [desclab setTextAlignment:NSTextAlignmentCenter];

    [self.view addSubview:desclab];

    self.lastlab=desclab;

    //创建两个方向键按钮

    //设置为自定义类型

    //1.使用类创建对象

    UIButton *leftbtn=[UIButton buttonWithType:UIButtonTypeCustom];

    //2.设置对象的属性(不要忘记设置坐标)

    leftbtn.frame=CGRectMake(, self.view.center.y, , );

    [leftbtn setBackgroundImage:[UIImage imageNamed:@"left_normal"] forState:UIControlStateNormal];

    [leftbtn setBackgroundImage:[UIImage imageNamed:@"left_highlighted"] forState:UIControlStateHighlighted];

    //3.提交对象到视图

    [self.view addSubview:leftbtn];

    self.leftbtn=leftbtn;

    [leftbtn addTarget:self action:@selector(leftclick:) forControlEvents:UIControlEventTouchUpInside];

    UIButton *rightbtn=[UIButton buttonWithType:UIButtonTypeCustom];

    rightbtn.frame=CGRectMake(POTOIMGX+POTOIMGW+, self.view.center.y, , );

    [rightbtn setBackgroundImage:[UIImage imageNamed:@"right_normal"] forState:UIControlStateNormal];

    [rightbtn setBackgroundImage:[UIImage imageNamed:@"right_highlighted"] forState:UIControlStateHighlighted];

    [self.view addSubview:rightbtn];

    self.rightbtn=rightbtn;

    [rightbtn addTarget:self action:@selector(rightclick:) forControlEvents:UIControlEventTouchUpInside];

    //放在这里的话,只会创建一次,但是这个部分和[self change];部分有很严格的顺序要求,并不人性化,可以考虑使用懒加载特性

//    NSDictionary *dict1=@{@"name": @"biaoqingdi",@"desc":@"什么表情都弱爆了!"};

//    NSDictionary *dict2=@{@"name": @"bingli",@"desc":@"病例"};

//    NSDictionary *dict3=@{@"name": @"wangba",@"desc":@"乌龟"};

//    NSDictionary *dict4=@{@"name": @"chiniupa",@"desc":@"吃牛扒"};

//    NSDictionary *dict5=@{@"name": @"danteng",@"desc":@"蛋疼"};

//

//    self.array=@[dict1,dict2,dict3,dict4,dict5];

    //这是一个初始化方法,调用change可以完成初始化的工作

    [self change];

}

-(void)change

{

    //每次调用都需要创建?有没有什么解决办法?

//    NSDictionary *dict1=@{@"name": @"biaoqingdi",@"desc":@"什么表情都弱爆了!"};

//    NSDictionary *dict2=@{@"name": @"bingli",@"desc":@"病例"};

//    NSDictionary *dict3=@{@"name": @"wangba",@"desc":@"乌龟"};

//    NSDictionary *dict4=@{@"name": @"chiniupa",@"desc":@"吃牛扒"};

//    NSDictionary *dict5=@{@"name": @"danteng",@"desc":@"蛋疼"};

//

//    NSArray *array=@[dict1,dict2,dict3,dict4,dict5];

    //设置照片

    //先根据self.i取出数组中的元素,再取出元素(字典)中键值对应的值

//    self.icon.image=[UIImage imageNamed:array[self.i][@"name"]];

//    self.lastlab.text=array[self.i][@"desc"];

   // NSLog(@"%@",array[self.i][@"desc"]);

    self.icon.image=[UIImage imageNamed:self.array[self.i][@"name"]];

    self.lastlab.text=self.array[self.i][@"desc"];

    [self.firstlab setText:[NSString stringWithFormat:@"%d/5",self.i+]];

//    switch (self.i) {

//        case 0:

//            self.lastlab.text=@"什么表情都弱爆了!";

//            self.icon.image=[UIImage imageNamed:@"biaoqingdi"];

//            break;

//        case 1:

//            self.lastlab.text=@"病例";

//            self.icon.image=[UIImage imageNamed:@"bingli"];

//            break;

//        case 2:

//           self.lastlab.text=@"王八";

//            self.icon.image=[UIImage imageNamed:@"wangba"];

//            break;

//        case 3:

//           self.lastlab.text=@"吃牛扒";

//            self.icon.image=[UIImage imageNamed:@"chiniupa"];

//            break;

//        case 4:

//             self.lastlab.text=@"蛋疼!";

//            self.icon.image=[UIImage imageNamed:@"danteng"];

//            break;

//    }

    //控制按钮的点击,如果为5则右键失效,如果为1,则左键失效

    self.leftbtn.enabled=(self.i!=);

    self.rightbtn.enabled=(self.i!=);

}

//array的get方法

-(NSArray *)array

{

    NSLog(@"需要获取数组");

    //只实例化一次

    if (_array==nil) {

        NSLog(@"实例化数组");

        NSDictionary *dict1=@{@"name": @"biaoqingdi",@"desc":@"什么表情都弱爆了!"};

        NSDictionary *dict2=@{@"name": @"bingli",@"desc":@"病例"};

        NSDictionary *dict3=@{@"name": @"wangba",@"desc":@"乌龟"};

        NSDictionary *dict4=@{@"name": @"chiniupa",@"desc":@"吃牛扒"};

        NSDictionary *dict5=@{@"name": @"danteng",@"desc":@"蛋疼"};

        _array=@[dict1,dict2,dict3,dict4,dict5];

    }

//    NSDictionary *dict1=@{@"name": @"biaoqingdi",@"desc":@"什么表情都弱爆了!"};

//    NSDictionary *dict2=@{@"name": @"bingli",@"desc":@"病例"};

//    NSDictionary *dict3=@{@"name": @"wangba",@"desc":@"乌龟"};

//    NSDictionary *dict4=@{@"name": @"chiniupa",@"desc":@"吃牛扒"};

//    NSDictionary *dict5=@{@"name": @"danteng",@"desc":@"蛋疼"};

   // _array=@[dict1,dict2,dict3,dict4,dict5];

    return _array;

}

//向右按键

-(void)rightclick:(UIButton *)btn

{

    self.i++;

    [self change];

}

//向左按键

-(void)leftclick:(UIButton *)btn

{

    self.i--;

    [self change];

}

- (void)didReceiveMemoryWarning

{

    [super didReceiveMemoryWarning];

}

@end
说明:
1> 定义控件属性,注意:属性必须是strong的,示例代码如下:
@property (nonatomic, strong) UIImageView *icon;
2> 在属性的getter方法中实现懒加载,示例代码如下:
- (UIImageView *)icon

{

    if (!_icon) {

        // 计算位置参数

        CGFloat imageW = ;

        CGFloat imageX = ( - imageW) / ;

        CGFloat imageH = ;

        CGFloat imageY = ;

        // 实例化图像视图

        _icon = [[UIImageView alloc] initWithFrame:CGRectMake(imageX, imageY, imageW, imageH)];

        // 将图像视图添加到主视图

        [self.view addSubview:_icon];

    }

    return _icon;

}
四、使用plist文件
(1)使用Plist文件的目的:将数据与代码分离
(2)加载方法:
NSString *path = [[NSBundle mainBundle] pathForResource:@"ImageData" ofType:@"plist"];
_imageList = [NSArray arrayWithContentsOfFile:path];
提示:通常在方法中出现File字眼,通常需要传递文件的全路径作为参数
(3)代码示例
//

//  YYViewController.m

//  03-图片浏览器初步

//

//  Created by apple on 14-5-21.

//  Copyright (c) 2014年 itcase. All rights reserved.

//

#import "YYViewController.h"

#define POTOIMGW    200

#define POTOIMGH    300

#define POTOIMGX    60

#define  POTOIMGY    50

@interface YYViewController ()

//变量声明!

@property(nonatomic,strong)UILabel *firstlab;

@property(nonatomic,strong)UILabel *lastlab;

@property(nonatomic,strong)UIImageView *icon;

@property(nonatomic,strong)UIButton *leftbtn;

@property(nonatomic,strong)UIButton *rightbtn;

@property(nonatomic,strong)NSArray *array;

-(void)change;

@property(nonatomic ,assign)int i;

@end

@implementation YYViewController

- (void)viewDidLoad

{

    [super viewDidLoad];

    self.i=;

    //创建一个用来显示序号的lable控件

    UILabel *headlab=[[UILabel alloc]initWithFrame:CGRectMake(, , , )];

  // [headlab setText:@"1/5"];

    [headlab setTextAlignment:NSTextAlignmentCenter];

    [headlab setTextColor:[UIColor blackColor]];

    [self.view addSubview:headlab];

    self.firstlab=headlab;

    //创建一个装载图片的控件

    UIImageView *potoimg=[[UIImageView alloc]initWithFrame:CGRectMake(POTOIMGX, POTOIMGY, POTOIMGW, POTOIMGH)];

    UIImage *image=[UIImage imageNamed:@"biaoqingdi"];

    potoimg.image=image;

    [self.view addSubview:potoimg];

    self.icon=potoimg;

    //创建最下边的描述图片的lable控件

    UILabel *desclab=[[UILabel alloc]initWithFrame:CGRectMake(, , , )];

   // [desclab setText:@"表情弱爆了!"];

    [desclab setTextAlignment:NSTextAlignmentCenter];

    [self.view addSubview:desclab];

    self.lastlab=desclab;

    //创建两个方向键按钮

    //设置为自定义类型

    //1.使用类创建对象

    UIButton *leftbtn=[UIButton buttonWithType:UIButtonTypeCustom];

    //2.设置对象的属性(不要忘记设置坐标)

    leftbtn.frame=CGRectMake(, self.view.center.y, , );

    [leftbtn setBackgroundImage:[UIImage imageNamed:@"left_normal"] forState:UIControlStateNormal];

    [leftbtn setBackgroundImage:[UIImage imageNamed:@"left_highlighted"] forState:UIControlStateHighlighted];

    //3.提交对象到视图

    [self.view addSubview:leftbtn];

    self.leftbtn=leftbtn;

    [leftbtn addTarget:self action:@selector(leftclick:) forControlEvents:UIControlEventTouchUpInside];

    UIButton *rightbtn=[UIButton buttonWithType:UIButtonTypeCustom];

    rightbtn.frame=CGRectMake(POTOIMGX+POTOIMGW+, self.view.center.y, , );

    [rightbtn setBackgroundImage:[UIImage imageNamed:@"right_normal"] forState:UIControlStateNormal];

    [rightbtn setBackgroundImage:[UIImage imageNamed:@"right_highlighted"] forState:UIControlStateHighlighted];

    [self.view addSubview:rightbtn];

    self.rightbtn=rightbtn;

    [rightbtn addTarget:self action:@selector(rightclick:) forControlEvents:UIControlEventTouchUpInside];

    [self change];

}

-(void)change

{

    self.icon.image=[UIImage imageNamed:self.array[self.i][@"name"]];

    self.lastlab.text=self.array[self.i][@"desc"];

    [self.firstlab setText:[NSString stringWithFormat:@"%d/5",self.i+]];

    self.leftbtn.enabled=(self.i!=);

    self.rightbtn.enabled=(self.i!=);

}

//array的get方法

-(NSArray *)array

{

    NSLog(@"需要获取数组");

    //只实例化一次

    if (_array==nil) {

        NSString *path=[[NSBundle mainBundle] pathForResource:@"data" ofType:@"plist"];

        //数组的数据从文件获取

       // _array=[NSArray arrayWithContentsOfFile:path];

        _array=[[NSArray alloc]initWithContentsOfFile:path];

        //打印查看包的位置

        NSLog(@"%@",path);

       NSLog(@"实例化数组");

    }

    return _array;

}

//向右按键

-(void)rightclick:(UIButton *)btn

{

    self.i++;

    [self change];

}

//向左按键

-(void)leftclick:(UIButton *)btn

{

    self.i--;

    [self change];

}

- (void)didReceiveMemoryWarning

{

    [super didReceiveMemoryWarning];

}

@end
(4)plist文件

(5)实现效果
五、补充
开发思路:
1.完成基本功能
2.考虑性能
(1)(初始化操作,可以直接调用change进行)
(2)因为要控制序号和图片两个变量,所以考虑使用字典代替掉switch
(3)每次点击,字典都需要创建一次,效率地下,可以考虑创建的这部分拿到初始化方法中去,这样就只需要创建一次就ok了。
(4)考虑缺点(对代码的顺序要求极其严格)
(5)懒加载(需要的时候才加载,那么什么时候是需要的时候,及调用get方法的时候)
(6)每次都来一下?效率低下—》只有第一次调用get方法时为空,此时实例化并建立数组,其他时候直接返回成员变量(仅仅执行一次)
注意点:
1.方法的调用堆栈(顺序)。
2.使用plist:让数据的操作更加灵活,把数据弄到外面去,解除耦合性,让耦合性不要太强。实际上是一个xml,是苹果定义的一种特殊格式的xml。
3.bundle-包(只读)
iOS开发UI篇——简单的浏览器查看程序的更多相关文章
- iOS开发UI篇—简单的浏览器查看程序
iOS开发UI篇—简单的浏览器查看程序 一.程序实现要求 1.要求 2. 界面分析 (1) 需要读取或修改属性的控件需要设置属性 序号标签 图片 图片描述 左边按钮 右边按钮 (2) 需要监听响应事件 ...
- iOS开发UI篇—简单介绍静态单元格的使用
iOS开发UI篇—简单介绍静态单元格的使用 一.实现效果与说明 说明:观察上面的展示效果,可以发现整个界面是由一个tableview来展示的,上面的数据都是固定的,且几乎不会改变. 要完成上面的效果, ...
- iOS-UI篇—简单的浏览器查看程序和Tomcat简单实现
#import "ViewController.h" @interface ViewController () @property (retain, nonatomic) NSAr ...
- iOS开发UI篇—Date Picker和UITool Bar控件简单介绍
iOS开发UI篇—Date Picker和UITool Bar控件简单介绍 一.Date Picker控件 1.简单介绍: Date Picker显示时间的控件 有默认宽高,不用设置数据源和代理 如何 ...
- iOS开发UI篇—UIWindow简单介绍
iOS开发UI篇—UIWindow简单介绍 一.简单介绍 UIWindow是一种特殊的UIView,通常在一个app中只会有一个UIWindow iOS程序启动完毕后,创建的第一个视图控件就是UIWi ...
- iOS开发UI篇—使用picker View控件完成一个简单的选餐应用
iOS开发UI篇—使用picker View控件完成一个简单的选餐应用 一.实现效果 说明:点击随机按钮,能够自动选取,下方数据自动刷新. 二.实现思路 1.picker view的有默认高度为162 ...
- iOS开发UI篇—Quartz2D简单使用(三)
iOS开发UI篇—Quartz2D简单使用(三) 一.通过slider控制圆的缩放 1.实现过程 新建一个项目,新建一个继承自UIview的类,并和storyboard中自定义的view进行关联. 界 ...
- iOS开发UI篇—UITabBarController简单介绍
iOS开发UI篇—UITabBarController简单介绍 一.简单介绍 UITabBarController和UINavigationController类似,UITabBarControlle ...
- ios开发UI篇—使用纯代码自定义UItableviewcell实现一个简单的微博界面布局
本文转自 :http://www.cnblogs.com/wendingding/p/3761730.html ios开发UI篇—使用纯代码自定义UItableviewcell实现一个简单的微博界面布 ...
随机推荐
- 创建mysql数据库
mysql> create database wzhpush3 default charset utf8 collate utf8_general_ci;
- Unity3d Web3d资源的动态加载
Unity3d Web3d资源的动态加载 @灰太龙 参考了宣雨松的博客,原文出处http://www.xuanyusong.com/archives/2405,如果涉及到侵权,请通知我! Unity3 ...
- 用expect实现自动输入SSH的SCP信息,且不需要另外的文件
#!/bin/sh ] ; then echo "USAGE: $0 remote_ip serverXXXXX" echo " e.g.: $0 1.2.3.4 ser ...
- c语言小练习(蛮好玩的)
1.求三个数的平均数,要求保留三位小数位 #include <conio.h> #include<stdio.h> int main(){ int a,b,c; float a ...
- POJ-Common Substrings(后缀数组-长度不小于 k 的公共子串的个数)
题意: 长度不小于 k 的公共子串的个数 分析: 基本思路是计算 A 的所有后缀和 B 的所有后缀之间的最长公共前缀的长度,把最长公共前缀长度不小于 k 的部分全部加起来. 先将两个字符串连起来,中间 ...
- Android数据加密解密
最近项目在维护过程中,估计这一周都会没有什么事情做了.于是开始打量自己做完的这个项目,项目在展示方面乏善可陈,然后仔细的想了想,这个项目的亮点无非就在数据加密和解密这一块了.因为是银行的项目,所以对数 ...
- ubuntu server配置xmanager
ubuntu server配置xmanager ubuntu是典型的多用户多任务操作系统,通过XDMCP方式可以轻松的实现远程的多用户同时登录ubuntu任务. www.2cto.com ...
- Access denied for user 'root'@'localhost' (using password:YES) 解决方案
1.打开MySQL目录下的my.ini文件,在文件的最后添加一行“skip-grant-tables”,保存并关闭文件. 2.重启MySQL服务. 3.在命令行中输入“mysql -uroot -p” ...
- [Locked] Read N Characters Given Read4 & Read N Characters Given Read4 II - Call multiple times
Read N Characters Given Read4 The API: int read4(char *buf) reads 4 characters at a time from a file ...
- [Sequence Alignment Methods] Dynamic time warping (DTW)
本系列介绍几种序列对齐方法,包括Dynamic time warping (DTW),Smith–Waterman algorithm,Cross-recurrence plot Dynamic ti ...