led的进化
- 1.一个led亮100ns,灭400ns,循环
- 2.一个led亮2500ns,灭5000ns,亮7500ns,灭10000ns循环
- 3.以2500ns为变化周期,20000ns为一个循环,每个周期的亮灭模式由用户设置。
- 4.以tim*20/8 ns为变化周期,tim*20 ns为一个循环,每个周期的亮灭模式,tim由用户设置。
- 5.1最小周期相同(由用户指定),由多个ctrl控制多个led在其周期内循环亮灭
- 5.2最小周期相同(由用户指定),由多个ctrl控制多个led在其周期内循环亮灭,用例化模块的方法
- 6.每隔Tim秒,led的一个8状态周期tim循环一次,Tim>tim,两个参数都由用户设置。
module led_change1(      //1.一个led亮100ns,灭400ns,循环

    clk,

    reset,

    led

    );

    input clk;

    input reset;

    output reg led = 1'd1;

    reg [4:0]counter0;

    always@( posedge clk or negedge reset )

    begin

    if ( reset == 0 )

    counter0 <= 5'b0 ;

    else if (counter0 == 24 )

    counter0 <= 0 ;

    else

    counter0 <= counter0 + 1'd1;

    end

    always@( posedge clk or negedge reset )

    begin

    if ( reset == 0 )

    led <= 0 ;

    else if (counter0 == 4 )

    led <= ! led ;

    else if (counter0 == 24 )

    led <= ! led ;

    else

    led <= led;//记得

    end

endmodule
module led_change2(      //2.一个led亮2500ns,灭5000ns,亮7500ns,灭10000ns循环

    clk,

    reset,

    led

    );

    input clk;

    input reset;

    output reg led = 1'd1;

    reg [11:0]counter0;

    parameter  mcnt = 1250 ;

    always@( posedge clk or negedge reset )

    begin

    if ( reset == 0 )

    counter0 <= 5'b0 ;

    else if (counter0 == mcnt - 1 )

    counter0 <= 0 ;

    else

    counter0 <= counter0 + 1'd1;

    end

//    always@( posedge clk or negedge reset )

//    begin

//    if ( reset == 0 )

//    led <= 0 ;

//    else if (counter0 == mcnt * 1 / 10 - 1 )

//    led <= ! led ;

//    else if (counter0 == mcnt * 3 / 10 - 1 )

//    led <= ! led ;

//    else if (counter0 == mcnt * 6 / 10 - 1 )

//    led <= ! led ;

//    else if (counter0 == mcnt * 10 / 10 - 1 )

//    led <= ! led ;

//    else

//    led <= led;//记得

//    end

 always@( posedge clk or negedge reset )

    begin

        if ( reset == 0 )

        led <= 0 ;

        else case( counter0 )

        mcnt * 1 / 10 - 1 : led <= ! led ;

        mcnt * 3 / 10 - 1 : led <= ! led ;

        mcnt * 6 / 10 - 1 : led <= ! led ;

        mcnt * 10 / 10 - 1 : led <= ! led ;

        endcase

    end

endmodule
module led_change3(      //3.以2500ns为变化周期,20000ns为一个循环,每个周期的亮灭模式由用户设置。

    clk,

    reset,

    ctrl,

    led

    );

    input clk;

    input reset;

    input [7:0]ctrl;

    output reg led ;

    reg [9:0]counter0;

    parameter  mcnt = 1000 ;

    always@( posedge clk or negedge reset )

    begin

        if ( reset == 0 )

        counter0 <= 11'b0 ;

        else if (counter0 == mcnt - 1 )

        counter0 <= 0 ;

        else

        counter0 <= counter0 + 1'd1;

    end

    always@( posedge clk or negedge reset )

    begin

        if ( reset == 0 )

        led <= 0 ;

        else case( counter0 )

        mcnt * 1 / 8 - 1 : led <= ctrl[0] ;

        mcnt * 2 / 8 - 1 : led <= ctrl[1] ;

        mcnt * 3 / 8 - 1 : led <= ctrl[2] ;

        mcnt * 4 / 8 - 1 : led <= ctrl[3] ;

        mcnt * 5 / 8 - 1 : led <= ctrl[4] ;

        mcnt * 6 / 8 - 1 : led <= ctrl[5] ;

        mcnt * 7 / 8 - 1 : led <= ctrl[6] ;

        mcnt * 8 / 8 - 1 : led <= ctrl[7] ;

        default led <= led ;

        endcase

    end

endmodule
module led_change4(      //4.以tim*20/8 ns为变化周期,tim*20 ns为一个循环,每个周期的亮灭模式,tim由用户设置。.

    clk,

    reset,

    ctrl,

    tim,

    led

    );

    input clk;

    input reset;

    input [7:0]ctrl;

    input [9:0]tim;

    output reg led ;

    reg [9:0]counter0;

    always@( posedge clk or negedge reset )

    begin

        if ( reset == 0 )

        counter0 <= 11'b0 ;

        else if (counter0 == tim - 1 )

        counter0 <= 0 ;

        else

        counter0 <= counter0 + 1'd1;

    end

    always@( posedge clk or negedge reset )

    begin

        if ( reset == 0 )

        led <= 0 ;

        else case( counter0 )                   //可以用第二个计数器的方法来设置判断条件

        tim * 1 / 8 - 1 : led <= ctrl[0] ;

        tim * 2 / 8 - 1 : led <= ctrl[1] ;

        tim * 3 / 8 - 1 : led <= ctrl[2] ;

        tim * 4 / 8 - 1 : led <= ctrl[3] ;

        tim * 5 / 8 - 1 : led <= ctrl[4] ;

        tim * 6 / 8 - 1 : led <= ctrl[5] ;

        tim * 7 / 8 - 1 : led <= ctrl[6] ;

        tim * 8 / 8 - 1 : led <= ctrl[7] ;

        default led <= led ;

        endcase

    end

endmodule
module led_change4(      //5.1以tim*20/8 ns为变化周期,tim*20 ns为一个循环,每个周期的亮灭模式,tim由用户设置。.

    clk,

    reset,

    ctrl,

    tim,

    led

    );

    input clk;

    input reset;

    input [7:0]ctrl;

    input [9:0]tim;

    output reg led ;

    reg [9:0]counter0;

    always@( posedge clk or negedge reset )

    begin

        if ( reset == 0 )

        counter0 <= 11'b0 ;

        else if (counter0 == tim - 1 )

        counter0 <= 0 ;

        else

        counter0 <= counter0 + 1'd1;

    end

    always@( posedge clk or negedge reset )

    begin

        if ( reset == 0 )

        led <= 0 ;

        else case( counter0 )                   //可以用第二个计数器的方法来设置判断条件

        tim * 1 / 8 - 1 : led <= ctrl[0] ;

        tim * 2 / 8 - 1 : led <= ctrl[1] ;

        tim * 3 / 8 - 1 : led <= ctrl[2] ;

        tim * 4 / 8 - 1 : led <= ctrl[3] ;

        tim * 5 / 8 - 1 : led <= ctrl[4] ;

        tim * 6 / 8 - 1 : led <= ctrl[5] ;

        tim * 7 / 8 - 1 : led <= ctrl[6] ;

        tim * 8 / 8 - 1 : led <= ctrl[7] ;

        default led <= led ;

        endcase

    end

endmodule
module led_change5_M(      //5.2最小周期相同(由用户指定),由多个ctrl控制多个led在其周期内循环亮灭,用例化模块的方法

    clk,

    reset,

    ctrlA,

    ctrlB,

    tim,

    led

    );

    input clk;

    input reset;

    input [7:0]ctrlA,ctrlB;

    input [9:0]tim;

    output wire [1:0]led ;

    led_change4 led_change4_sim0(      //以tim*20/8 ns为变化周期,tim*20 ns为一个循环,每个周期的亮灭模式,tim由用户设置。

    .clk(clk),

    .reset(reset),

    .ctrl(ctrlA),

    .tim(tim),

    .led(led[0])

    );

    led_change4 led_change4_sim1(      //以tim*20/8 ns为变化周期,tim*20 ns为一个循环,每个周期的亮灭模式,tim由用户设置。

    .clk(clk),

    .reset(reset),

    .ctrl(ctrlB),

    .tim(tim),

    .led(led[1])

    );

endmodule
module led_change6(      //6.每隔Tim秒,led的一个8状态周期tim循环一次,Tim>tim,两个参数都由用户设置。

    clk,

    reset,

    ctrl,

    tim,

    Tim,

    led

    );

    input clk;

    input reset;

    input [7:0]ctrl;

    input [9:0]tim;

    input [10:0]Tim;

    output reg led ;

    reg [10:0] counter0;

    always@( posedge clk or negedge reset )

    begin

        if ( reset == 0 )

        counter0 <= 9'b0 ;

        else if (counter0 == Tim -1  )

        counter0 <= 0 ;

        else

        counter0 <= counter0 + 1'd1;

    end

    always@( posedge clk or negedge reset )

    begin

        if ( reset == 0 )

        led <= 0 ;

        else case( counter0 )                   //可以用第二个计数器的方法来设置判断条件

        tim * 1 / 8 - 1 : led <= ctrl[0] ;

        tim * 2 / 8 - 1 : led <= ctrl[1] ;

        tim * 3 / 8 - 1 : led <= ctrl[2] ;

        tim * 4 / 8 - 1 : led <= ctrl[3] ;

        tim * 5 / 8 - 1 : led <= ctrl[4] ;

        tim * 6 / 8 - 1 : led <= ctrl[5] ;

        tim * 7 / 8 - 1 : led <= ctrl[6] ;

        tim * 8 / 8 - 1 : led <= ctrl[7] ;

        tim * 9 / 8 - 1 : led <= 0 ;

        default led <= led ;

        endcase

    end

endmodule
注意:
1.需要用户指定的便需要设置输入端口,这是一个变量。
2.用if语句时可以用else 罗列其他没有写出的情况。而用case语句时应该用default xxxxx。语句实现,见上面3和4。同时,可以用if先列出复位信号的情况,再用else case罗列时钟信号的情况。
3.工程包含多个文件时,用set as top来激活指定要操作的文件。
4.乘除可以使用左右移位来实现,节省乘法器。
5.用顶层中例化模块的方法十分便捷有效,只需要把顶层的引脚分别分配给多个例化模块就可以了。要学会这么用,很快很好用。
6.多位宽既可以用来表示多个输出端口,也可以用来表示一个端口的不同时期的多个状态。
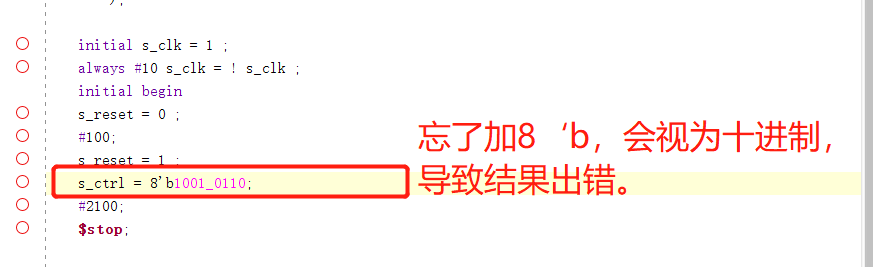
7.参数赋值时,要明确指定进制,不然会默认是十进制,有时候不注意就会出错。养成良好习惯。
8.错误:counter设定位宽太小,导致计数不到第二个else if就已经溢出,成为0,波形一直在重复前面的结果,后面的结果没有出现,难以看出错误。所以遇到我们设置的有些预期结果没有出现的情况,要检查一下计时器的位宽设置有没有出错。因为溢出不报错,但影响结果。
9.记住:仿真设置的例化module参数的位宽必须与原来module的参数位宽保持一致,不然虽然没有报错,但是输出会出错。
10.再次记忆:顶层设计时的输出端写为wire,底层是reg。顶层写reg会报错。
led的进化的更多相关文章
- Atitit 软件架构方法的进化与演进cs bs soa roa msa attilax总结
Atitit 软件架构方法的进化与演进cs bs soa roa msa attilax总结 1.1. 软件体系架构是沿着单机到 CS 架构,再到 BS 的三层架构甚至多层架构逐步发展过来的,关于 ...
- Atitit 编程语言编程方法的进化演进 sp COP ,AOP ,SOP
Atitit 编程语言编程方法的进化演进 sp COP ,AOP ,SOP 1.1. Sp oop>>COP ,AOP ,SOP1 1.2. Sp oop 结构化方法SP(Stru ...
- js生成一个不重复的ID的函数的进化之路
在MongoDB中的ObjectID,可以理解为是一个不会重复的ID,这里有个链接http://blog.csdn.net/xiamizy/article/details/41521025感兴趣可以去 ...
- linux输入子系统(input subsystem)之按键输入和LED控制
实验现象:在控制台打印按键值,并且通过按键控制相应的LED亮灭. 1.代码 input_subsys_drv.c #include <linux/module.h> #include &l ...
- FPGA与simulink联合实时环路系列——实验二LED
实验二LED 实验内容 在实验一的基础上,将simulink产生的测试信号输出到FPGA开发板上的LED灯进行显示,这里要在生成的硬件模型上进行修改,将传送到FPGA的信号输出到8个LED灯上,并且对 ...
- 差分进化算法 DE-Differential Evolution
差分进化算法 (Differential Evolution) Differential Evolution(DE)是由Storn等人于1995年提出的,和其它演化算法一样,DE是一种模拟生物进化 ...
- [Evolutionary Algorithm] 进化算法简介
进化算法,也被成为是演化算法(evolutionary algorithms,简称EAs),它不是一个具体的算法,而是一个“算法簇”.进化算法的产生的灵感借鉴了大自然中生物的进化操作,它一般包括基因编 ...
- 嵌入式Linux学习入门:控制LED灯
记录自己linux学习过程,让自己能够一直坚持下去 1.原理图分析: nLED_1, nLED_2, nLED_4, 给低电平则对应LED灯亮,高电平则对应LED灯灭, S3C2440芯片GPF4-G ...
- 单片机与控制实验(2)——LED点阵显示屏
一.实验目的和要求 了解LED点阵显示的基本原理和实现方法.掌握点阵汉字库的编码和从标准字库中提取汉字编码的方法. 二.实验设备 单片机测控实验系统 LED点阵显示器实验模块 Keil开发环境 STC ...
随机推荐
- 数据结构_C语言_二叉树先序、中序、后序遍历
# include <stdio.h> # include <stdlib.h> typedef struct BiTreeNode { char data; struct B ...
- [题解] trip
题目大意 给定一颗大小为 \(N\) 的树, \(1\)的度数不小于 \(2\) .每个点有一个颜色,要么为黑色要么为白色. 从 \(1\) 号点开始游走,计数器初始为 \(0\). 如果当前为黑点计 ...
- 如何查看和修改Windows远程桌面端口
Windows远程桌面的默认端口为3389.基于安全性考虑,部分用户有修改默认端口的需要,以减少通过远程桌面恶意攻击和扫描主机的次数. 因此今天带大家一起学习下,如何查看和修改Windows远程桌面的 ...
- iptables系列教程(三)| iptables 实战篇
一个执着于技术的公众号 实战1 服务器禁止ping iptables -A INPUT -p icmp --icmp-type 8 -s 0/0 -j DROP // 禁止任何人ping通本机 &qu ...
- 哈工大软件构造Lab1(2022)
目录 一.实验目标概述 二.实验环境配置 1.安装编写java程序的IDE--IntelliJ IDEA 2.安装Git 3.安装Junit 4.GitHub Lab1仓库的URL地址 三.实验过程 ...
- Glide源码解析二---into方法
转载请标明出处,维权必究: https://www.cnblogs.com/tangZH/p/12543154.html Glide作为一个强大的图片加载框架,已经被android官方使用,所以,明白 ...
- ElasticSearch7.3学习(二十五)----Doc value、query phase、fetch phase解析
1.Doc value 搜索的时候,要依靠倒排索引: 排序的时候,需要依靠正排索引,看到每个document的每个field,然后进行排序. 所谓的正排索引,其实就是doc values. 在建立索引 ...
- mysql5.7介绍和安装
环境准备: 1.关闭防火墙和selinux systemctl stop firewalldsystemctl stop SElinux 2. 如果安装过mariadb需要停止且卸载服务 system ...
- 为什么说 Gradle 是 Android 进阶绕不去的坎 —— Gradle 系列(1)
请点赞,你的点赞对我意义重大,满足下我的虚荣心. Hi,我是小彭.本文已收录到 GitHub · Android-NoteBook 中.这里有 Android 进阶成长知识体系,有志同道合的朋友,欢迎 ...
- 129_Power Pivot&Power BI DAX不同维度动态展示&动态坐标轴
博客:www.jiaopengzi.com 焦棚子的文章目录 请点击下载附件 一.背景 某天在和那还是叫我大铁吧 交流关于季度&月度同时展示的问题,感概中国式报表真的需求很微妙. 下面来看看到 ...